background image

10

Hunter Fan Company 

42624-01 • 12/01/06 

7 • Completing Your Installation With or Without a Light Fixture

Steps 7-1 – 7-3

Housing 
Assembly 
Screw

Upper 
Switch 
Housing

Your Hunter fan comes with an integrated light fi xture assembly and an 
optional switch housing cap and plug button. Th

  is feature gives you the 

option of installing the fan with OR without the included light fi xture. 
Th

  e steps below direct you whether or not you are installing a light 

fi xture. 


WARNING:

  Use only the light fi xture supplied with this fan model.

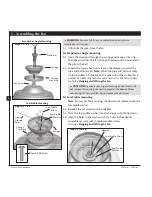
7-1.  To attach the upper switch housing, partially install two #6-32 x 

3/8” housing assembly screws into the switch housing mounting 
plate.

7-2.  Feed the upper plug connector through the center opening of the 

housing. 

7-3.  Align the keyhole slots in the housing with the housing assembly 

screws. 

7-4.  Turn the housing counterclockwise until the housing assembly 

screws are fi rmly situated in the narrow end of the keyhole slots. 
Install the remaining #6-32 x 3/8” screw into the housing. Tighten 
all three screws fi rmly.


CAUTION:

  Make sure the upper switch housing is securely 

attached to the switch housing mounting plate. Failure to properly 
attach and tighten all three assembly screws could result in the 
switch housing and light fi xture falling.

7-5. 

If you want to install the light fi xture

, proceed with step 7-6 on 

page 12 now.


If you do not want to install the light fi xture

, you need to 

uninstall it now. See “Uninstalling the Light Fixture” on page 11. 
Once you have uninstalled the light fi xture, continue with step 
7-6.


Step 7-4

Содержание 23262

Страница 1: ...odel Name _____________________ Catalog Model No ________________ Serial No ________________________ Date Purchased ___________________ Where Purchased _________________ For reference also attach your receipt or a copy of your receipt to the manual TYPE 2 Models ...

Страница 2: ...fan motor housing CautionsandWarnings READ THIS ENTIRE MANUAL CAREFULLY BEFORE BEGINNING INSTALLATION SAVE THESE INSTRUCTIONS Use only Hunter replacement parts To reduce the risk of personal injury attach the fan directly to the support structure of the building according to these instructions and use only the hardware supplied To avoid possible electrical shock before installing your fan disconne...

Страница 3: ...Profile Standard or Angle mounting The steps in this manual include instructions for all three Installer s Choice mounting methods ConsideringOptionalAccessories Consider using Hunter s optional accessories including a wall mounted or remote speed control To install and use the accessories follow the instructions included with each product For quiet and optimum performance of your Hunter fan use on...

Страница 4: ...rench or pliers Ladder height dependent upon installation site CheckingYourFanParts Carefully unpack your fan to avoid damage to the fan parts Refer to the included Parts Guide Check for any shipping damage to the motor or fan blades If any parts are missing or damaged contact your Hunter dealer or call Hunter Technical Support Department at 888 830 1326 PreparingtheFanSite Before you begin instal...

Страница 5: ...e isolators Check to make sure all four isolators are in place and were not removed during shipment 2 3 Place a flat washer on each of the two 3 wood screws 2 4 Thread the supply wires from the outlet box in the ceiling through the hole in the center of the ceiling plate 2 5 Align the slotted holes in the ceiling plate with the pilot holes you drilled in the wood support structure For proper alignm...

Страница 6: ...is normal Securely retighten the set screw with a wrench or pliers Go to 4 Hanging and Wiring the Fan CAUTION The adapter has a special coating on the threads Do not remove this coating the coating prevents the downrod from unscrewing Once assembled do not remove the downrod For Low Profile mounting Note For low profile mounting the downrod is replaced with the low profile washer 3 4 Remove the set s...

Страница 7: ...her and place a wire nut over them then twist the wire nut clockwise until tight 4 4 Connect the bare or green ground wired grounded from the ceiling to the green ground wire grounded from the ceiling plate and the green ground wire from the fan 4 5 Connect the white wire ungrounded from the ceiling to the white wired ungrounded from the fan 4 6 Connect the remaining wires as follows Single Switch...

Страница 8: ...y up with the screw holes aligned partially install two canopy screws into the holes opposite the ceiling plate tabs 5 4 Partially install a canopy screw between the slots in the canopy When all the holes are properly aligned securely tighten all three canopy screws 5 5 Verify that the tabs in the canopy are still in the grooves of the hanger ball 5 6 Align the tabs on the trim ring opposite the g...

Страница 9: ...ades may appear slightly loose after screws are tightened This is normal 6 3 Some blade mounting screws are installed in the motor to secure shipping blocks Remove the blade mounting screws and rubber bumpers from the motor Save the screws and discard the bumpers 6 4 For each blade insert one blade mounting screw through the blade iron and attach lightly to the fan Insert the second blade mounting...

Страница 10: ... upper plug connector through the center opening of the housing 7 3 Align the keyhole slots in the housing with the housing assembly screws 7 4 Turn the housing counterclockwise until the housing assembly screws are firmly situated in the narrow end of the keyhole slots Install the remaining 6 32 x 3 8 screw into the housing Tighten all three screws firmly CAUTION Make sure the upper switch housing ...

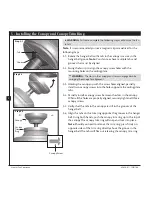
Страница 11: ...ng 5 Remove the light fixture from the lower switch housing pulling disconnected wires through the hole in the center of the lower switch housing Note When removing the wires pull the thin plug connector male through first and then pull the other plug connector female through the hole 6 Install the dummy terminals included in the sack parts on the two disconnected wires in the lower switch housing 7...

Страница 12: ...housing assembly over the upper switch housing Align the side screw holes in the upper and lower switch housings Attach the lower switch housing to the upper switch housing with three 6 32 x 3 8 housing assembly screws If you are not installing the light fixture your installation is complete Otherwise proceed with step 7 8 7 8 The last installation step when installing the light fixture is to instal...

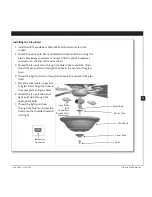
Страница 13: ...disk Then thread the fan pull chain through the hole in the center of the glass bowl 4 Thread the light pull chain through the hole in the center of the glass bowl 5 Place the cover plate up against the glass bowl Align the holes in the cover plate and glass bowl 6 Thread the fan pull chain and light pull chain through the appropriate holes 7 Thread the light pull chain through the finial and screw...

Страница 14: ...The light pull chain controls power to the light The pull chain has two settings On and Off 8 4 Ceiling fans work best by blowing air downward counterclockwise blade rotation in warm weather to cool the room with a direct breeze In cold weather having the fan draw air upward clockwise blade rotation will distribute the warmer air trapped at the ceiling around the room without causing a draft 8 5 Fo...

Страница 15: ...de screws until snug 3 Check to see if the blade is cracked If so replace all the blades 4 Change to an approved speed control 5 Be sure that the glass is secure 6 Check and tighten the screws in the switch housing mounting plate and in the upper and lower switch housing Problem Excessive wobbling 1 If your fan wobbles when operating use the enclosed balancing kit and instructions to balance the f...

Отзывы: