


For indoor-only device, place it in a dry and well-ventilated
environment.
Do not aim the lens at the sun or any other bright light.
Make sure the running environment meets the requirement of
the device. The operating humidity shall be 95% or less (non-
condensing), and the operating temperature is below:
Indoor device: -10°C to 40 °C (14 °F to 104 °F ),
Outdoor device: -30 °C to 60 °C (-22 °F to 140 °F), or -H model: -40
°C to 60 °C (-40 °F to 140 °F).
Do not place the camera in extremely hot, cold, dusty or damp
locations, and do not expose it to high electromagnetic radiation.
IR Reflection Prevention
Dust or grease on the dome cover will cause IR reflection. Please
do not remove the dome cover film until the installation is finished.
If there is dust or grease on the dome cover, clean the dome cover
with clean soft cloth and isopropyl alcohol.
Make sure that there is no reflective surface too close to the camera
lens. The IR light from the camera may reflect back into the lens
causing reflection.
The foam ring around the lens must be seated flush against the
inner surface of the bubble to isolate the lens from the IR LEDS.
Fasten the dome cover to camera body so that the foam ring and
the dome cover are attached seamlessly.
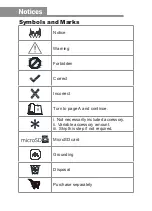
Emergency
If smoke, odor, or noise arises from the device, immediately turn off
the power, unplug the power cable, and contact the service center.
Time Synchronization
Set up camera time manually for the first time access if the local
time is not synchronized with that of the network. Visit the camera
via Web browse/client software and go to time settings interface.
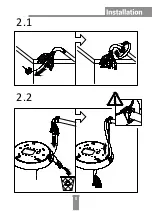
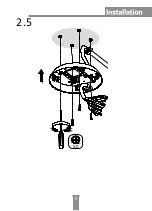
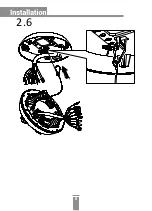
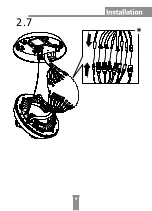
Installation
Make sure the device is firmly secured to any wall or ceiling
mountings.
Be sure that there is enough space to install the camera and
accessories.
Make sure that the device in the package is in good condition and
all the assembly parts are included.
Make sure that the wall is strong enough to withstand at least 4
times the weight of the camera and the mount.
Make sure that the power has been disconnected before you wire,
install, or disassemble the device.
Содержание HNC6D24-IZS
Страница 8: ...INDOOR 1...
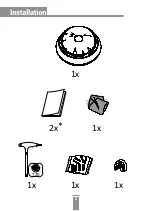
Страница 9: ...1x 1x 2x 1x 1x T20 1x 2...
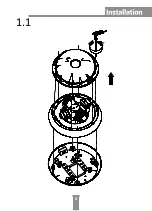
Страница 10: ...1 1 3...
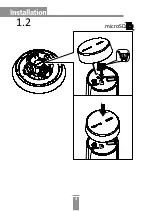
Страница 11: ...1 2 microSD 4...
Страница 12: ...2 1 2 2 5...
Страница 13: ...6mm 2 3 2 4 6...
Страница 14: ...5 0 2 5 7...
Страница 15: ...2 6 8...
Страница 16: ...2 7 9...
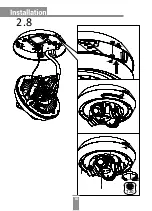
Страница 17: ...2 8 T20 10...
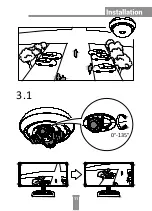
Страница 18: ...3 1 0 135 11...
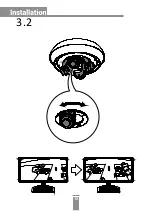
Страница 19: ...3 2 12...
Страница 20: ...3 3 0 355 13...
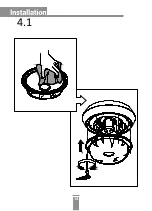
Страница 21: ...4 1 14...
Страница 22: ...4 2 15...
Страница 23: ...OUTDOOR 16...
Страница 24: ...1x 1x 2x 1x 5 0 1x 1x T20 7x 1x 17...
Страница 25: ...1 1 18...
Страница 26: ...1 2 microSD 19...
Страница 27: ...2 1 20...
Страница 28: ...2 2 21...
Страница 29: ...2 3 22...
Страница 30: ...2 4 2 4 2 2 4 1 2 4 3 23...
Страница 31: ...2 5 24...
Страница 32: ...L 3L 2 6 25...
Страница 33: ...2 7 26...
Страница 34: ...3 1 0 135 27...
Страница 35: ...3 2 28...
Страница 36: ...3 3 0 355 29...
Страница 37: ...4 1 30...
Страница 38: ...4 2 31...
Страница 41: ...UD08581N...