Hunt Electronic HVR-04 Скачать руководство пользователя страница 28


10. Connecting & configuring relay out   


10.1. Connecting relay out   

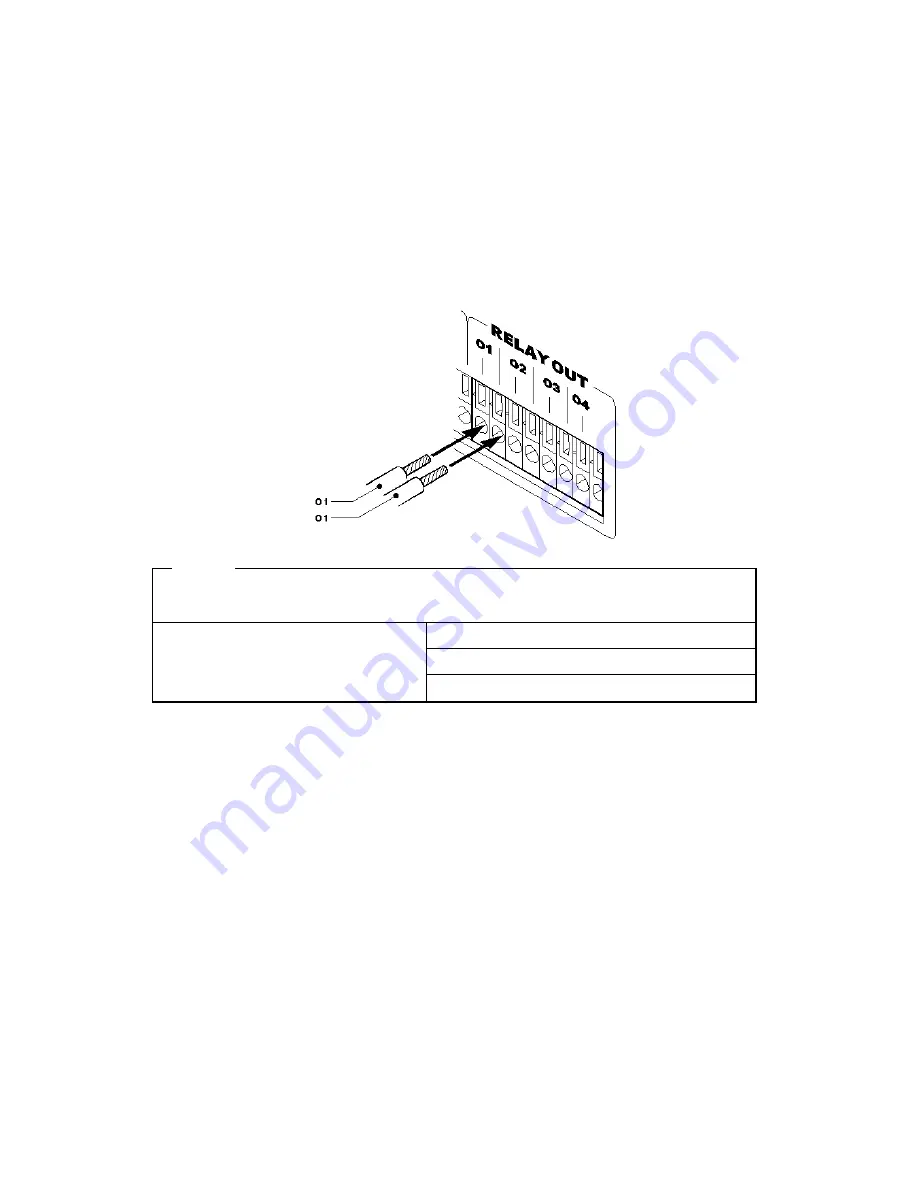
HVR-04 has total four ports of Relay Out. 

To connect a device to “O1,” connect the wires to two “O1”s. If user want to connect or disconnect with 

wire, please refer to ‘34’page (Wire Handling).   


<Note> 


The rated voltage and current of Relay Out are as follows. Do not exceed the rated values. 

24V    DC, 1.25A, 30W 

125V DC, 0.24A, 30W 

Maximum Switching Capacity 

125V AC, 0.5A, 62.5VA 


28 

Содержание HVR-04

Страница 1: ...HVR 04 Installation Guide v 3 1...

Страница 2: ...occur in a particular installation If this equipment does cause harmful interference to radio or television reception which can be determined by turning the equipment off and on the user is encourage...

Страница 3: ...to drop the HVR 04 Physical shocks may harm the product In addition be sure the HVR 04 is secured after installation 5 HVR 04 is made of metal Therefore you can hurt human beings if you throw it to th...

Страница 4: ...ing menu 14 5 2 Dialogue box to edit a word 15 6 Setting remote controller 16 6 1 Setting remote control DIP switch 16 6 2 Set ID of HVR 04 16 6 3 Selecting HVR 04 17 6 4 Operable range of remote cont...

Страница 5: ...ensor 26 9 1 Connecting Sensor Input 26 9 2 Setting sensor at OSD menu 27 10 Connecting configuring relay out 28 10 1 Connecting relay out 28 10 2 Configuring relay out 29 11 Connecting external devic...

Страница 6: ...k information 39 16 Using DVR manager 40 16 1 PC system requirements for running DVR manager 40 16 2 Installing DVR manager 40 16 3 Uninstalling DVR manager 42 16 4 Configstation 43 16 5 Monitor 43 16...

Страница 7: ...eal time monitoring 30ips IP video 5ips Built in software multiplexer for all 16 live monitoring channels 1 4 9 13 16Ch Mode Maximum 4TB storage capacity IEEE 1394 for external HDD ATM POS transaction...

Страница 8: ...cessories Unpack and check all the items as below 1 HVR 04 1 2 DC Power Supply 1 110V 220V 3 AC Power Cord 1 4 CD ROM Including DVR manager 1 5 Remote Controller 1 6 Guide 2 7 Plug Bracket 1 8 HDD Fix...

Страница 9: ...3 Description Function HVR 04 front 1 LED 2 IEEE1394 connecter 3 Remote controller receiver 4 USB connecter 5 Function buttons 6 Bracket fixing hole for rack mount 9...

Страница 10: ...or 11 RS232 connecter 9Pin D Sub 12 Terminal block for RS232 422 485 13 Terminal block for Sensor input 14 Terminal block for Relay output 15 Video output for MONITOR or VCR 16 Video input type impeda...

Страница 11: ...ear panel s switch Note The video type for all channels should be either NTSC or PAL The only one type must be selected 3 Set the impedance control switch for each channel as needed Note It may be nec...

Страница 12: ...monitor to HVR 04 with BNC cable as shown below Note HVR 04 has two video output ports for Monitor and VCR The output signals from the two ports are same and either port may be used 4 3 Connecting aud...

Страница 13: ...ower 1 Connect power cable to HVR 04 2 Turn on the power switch located on the HVR 04 rear panel Note Use the plug bracket to secure the power cable if needed Note To connect EARTH refer to the follow...

Страница 14: ...right of the sub menu Use the arrow buttons to move within the sub menu list To move to the setting page press the ENTER button To exit the setting page press the EXIT button 3 Setting Page The selec...

Страница 15: ...elect C press 3 and 2 buttons 2 Using arrow button Select a value using the or buttons The intersection of the horizontal and vertical bar is selected value Press the button to confirm the selected va...

Страница 16: ...ar part to ON 6 2 Set ID of HVR 04 When controlling several HVR 04s with one remote controller set Remote Control ID as follows 1 Press MENU button 2 Select System with using button and press the ENET...

Страница 17: ...rolled with a single remote controller 6 3 Selecting HVR 04 If several HVR 04s are set with unique ID numbers they can be controlled with one remote controller To select a specific HVR 04 press the ID...

Страница 18: ...mote controller Remote controller requires two AAA type batteries 1 Remove the battery cover 2 Taking care that the poles are correctly positioned 3 Replace the battery cover Note Batteries are not in...

Страница 19: ...7 HVR 04 configuration 7 1 Basic configuration 7 2 Advanced configuration 19...

Страница 20: ...7 3 External storage Backup configuration 7 4 Internet Intranet configuration 20...

Страница 21: ...ng image After initial start up images from Ch 1 4 are displayed in a quad split screen Note If user password is set a prompt for entering the password will appear and key pad of front will not operat...

Страница 22: ...8 2 2 Daylight saving 1 Daylight Saving Time is only activated for time zones that use Daylight Savings 2 Select Daylight Saving by using or buttons and press the EXIT button when finished 3 Select On...

Страница 23: ...s the EXIT button when finished 8 2 6 Apply Date Time Most setting values are applied automatically when exiting from the related menu page But Date Time settings are not applied automatically because...

Страница 24: ...etup 2 Move to sub menu by pressing ENTER or the button 3 Select Recording using the buttons and press the ENTER button 8 3 1 Configuration status Displays the recording configuration status When sett...

Страница 25: ...d ips When Recording Speed Quality is set as Custom values can be set manually 1 Select Speed using buttons and press the ENTER button 2 Select a value using the button Press the EXIT button when fini...

Страница 26: ...a sensor to S1 fix the wire to S1 and G If user want to connect or disconnect with wire please refer to 34 page Wire Handling Note Devices connected to the sensor input should have Dry contact The fo...

Страница 27: ...the OSD Configuration menu 2 Select the sensor number S1 S2 etc using button and press the Enter button to configure Use the buttons to select On or Off 3 The Pre Post Alarm function will cause the HV...

Страница 28: ...t a device to O1 connect the wires to two O1 s If user want to connect or disconnect with wire please refer to 34 page Wire Handling Note The rated voltage and current of Relay Out are as follows Do n...

Страница 29: ...can be synchronized with a sensor input or with motion detection for each schedule Relays can be controlled locally by pressing the RELAY Number button in its front Relays can also be controlled remot...

Страница 30: ...addition to images the HVR 04 can record text data received from POS ATM through the RS232 serial port Connect RS232 to 9pin D sub of HVR 04 and configure the Text sub menu under the System tab Set Se...

Страница 31: ...y pre programmed Makes and models not supported can still be controlled using the Transparent Protocol For a list of supported protocols refer to the list on the OSD Configuration menu 12 1 1 Connecti...

Страница 32: ...12 1 3 Connecting RS422 Fix the wire to 4 8 pins R R T T GND If user want to connect or disconnect with wire please refer to 34 page Wire Handling 32...

Страница 33: ...model for PTZ at System Serial Setup After completing serial setup configure base address and port for each channel under the Camera menu tab When connecting PTZ devices to several cameras be sure the...

Страница 34: ...fferent types of wire that can be used Stranded Wire Peel off the wiring cover 8 10mm and solder it Wire gage should be AWG 22 26 Solid Wire Peel off the wiring cover 8 10mm and solder it Wire gage sh...

Страница 35: ...e USB Memory Stick Output Voltage Current Max 200mA per DC 5V Port Note The disk should be formatted with FAT32 type If properly connected the disk is recognized automatically as in the following pict...

Страница 36: ...t in the front panel or 2 ports in the rear panel The HVR 04 does not supply power to the hard drive bay therefore only bays that use external power can be used 14 3 Available HDD It is recommended to...

Страница 37: ...F using button and press EXIT button 3 Select Action using button and press EXIT button 4 Select Add using button and press EXIT button 5 Select Apply using button and press ENTER button The HDD statu...

Страница 38: ...ecting Ethernet 1 Turn off HVR 04 s power switch 2 Connect HVR 04 to hub with Ethernet cable 3 Turn on HVR 04 s power switch Note 1 Supply power to HVR 04 after connecting Ethernet cable to protect ag...

Страница 39: ...and press ENTER 4 Select IP Addr using the buttons and press ENTER 5 Press EXIT button after entering IP address in the dialogue box 6 Select Net Mask using the buttons and press ENTER 7 Press EXIT bu...

Страница 40: ...OS Windows 2000 SP4 XP SP2 or above Windows 2000 SP4 XP SP2 or above Resolution 1024 X 768 pixels or above 1024 X 768 pixels or above Network 100 Base TX Fast Ethernet 100 Base TX Fast Ethernet 16 2 I...

Страница 41: ...5 Check the all boxes to use all its function and press the Next button 6 Browse and choose a directory and click the Install button if using Browse button you can change installed directory 41...

Страница 42: ...after DVR manager program is installed successfully 16 3 Uninstalling DVR manager 1 Click Windows Start Button 2 Select and Click Uninstall icon to run Uninstall Shield 3 DVR manager program will be...

Страница 43: ...16 4 Configstation Click icon on desktop to run DVR manager Configstation program 16 5 Monitor Click the related icon and run the DVR manager Monitor program 43...

Страница 44: ...16 6 Playback Click the related icon and run the DVR manager Playback program 44...

Страница 45: ...APPENDIX APPENDIX 45...

Страница 46: ...lows 1 Connection of HDD can be made up to 2 internal Internal ATA Interface 63 external External 2 IEEE1394 2 All connected HDD are recognized as Virtual disk and max 4TB can be supported 3 Connected...

Страница 47: ...xiliary disk can work normally Note Log Partition Partition to have recorded image information Normal Partition Partition to have recorded image according to normal schedule Alarm Partition Partition...

Страница 48: ...he order in the list can be changed according to order for recognition 3 HDD Managing Command Add Add HDD for recording Alarm Partition menu will be activated when adding it Alarm Partition works on d...

Страница 49: ...ies Model No Size 6Y060L0 60GB 4R060L0 60GB 6Y080L P 0 80GB 4R080L0 80GB 6Y120L P 0 120GB 4R120L0 120GB 6Y160L P 0 160GB 4R160L0 160GB 6Y200P0 200GB DiamondMax Plus 9 7200rpm DiamondMax 16 5400rpm 6Y2...

Страница 50: ...HDD should be set as SLAVE Identical dip switch setting may cause system conflict or mal function 3 Remove the 6 screws as illustrated below and pull up the cover from the rear part to open 4 Take ou...

Страница 51: ...nternal 2 HDDs causes permanent data loss in the SLAVE HDD 2 MASTER HDD has all the index of stored data including SLAVE HDD Corruption on MASTER HDD may cause total data loss Be careful when handling...

Страница 52: ...lly run on start up after installing a HDD If Disk Manager does not automatically run on start up make sure the HDD is properly installed 1 Press ENTER button at Select Disk 2 Select new added HDD ind...

Страница 53: ...ile system After using Add need to format for making as R Connected and added using the ADD command If formatting it will be R X HDD cable is not connected properly or HDD has problem in this case you...

Страница 54: ...impedance setup switch It s possible to set up Impedance of Video input line When one Video output is connected to several Input Monitor Multiplexer Analogue VCR HVR 04 and so on as below the impedanc...

Страница 55: ...gram Acrobat Reader Version 5 1 Preparation To read manual of CD ROM disc Adobe Acrobat 5 0 or above should be installed in client s PC Note If Adobe Acrobat Reader is not installed within client s PC...

Страница 56: ...wer failure Image Compression Technology Differential Wavelet Average file size 1 5KB Standard quality Image quality level 5 Level 20 1 500 1 Image compression rate Recording speed Max 120ips in total...

Страница 57: ...n Data Backup Expansion Copy HDD expandable data backup IEEE1394 Analogue VCR VHS video output for VCR Daily Weekly Monthly Backup reminder Data copy USB flash memory disk Input Output Video 1 Monitor...

Страница 58: ...on detection or Sensor input Alarm data preservation Alarm triggered video data preservation Alarm log Log search Log monitoring via OSD Network Pre Post alarm Pre 1 10 seconds Post 1 60 seconds Daily...

Страница 59: ...Mechanical Dimension W x D x H 306 x 280 x 67 mm 3 5Kg With one HDD Weight 59...

Страница 60: ...Hunt Electronic USA 978 W 10th Street Azusa CA 91702 Tel 626 812 8868 Fax 626 812 8828 info huntcctv com www huntcctv com...

Отзывы: