


18
1. Enable: Choose “Normal Mode”
2. IP Address
:
Insert the IP address of the connecting device.
3. Port
:
Insert the port number of the connecting device. Default port: 80
4. User
:
Insert the user name of the connecting device.
5. Password
:
Insert the password of the connecting device.
6. State
:
After click the “connect IPCAM” button to test the IPCAM device,
the connection state will reveal among this column.
Note: To the camera connected via ONVIF protocol, the PTZ control function
is not supported.
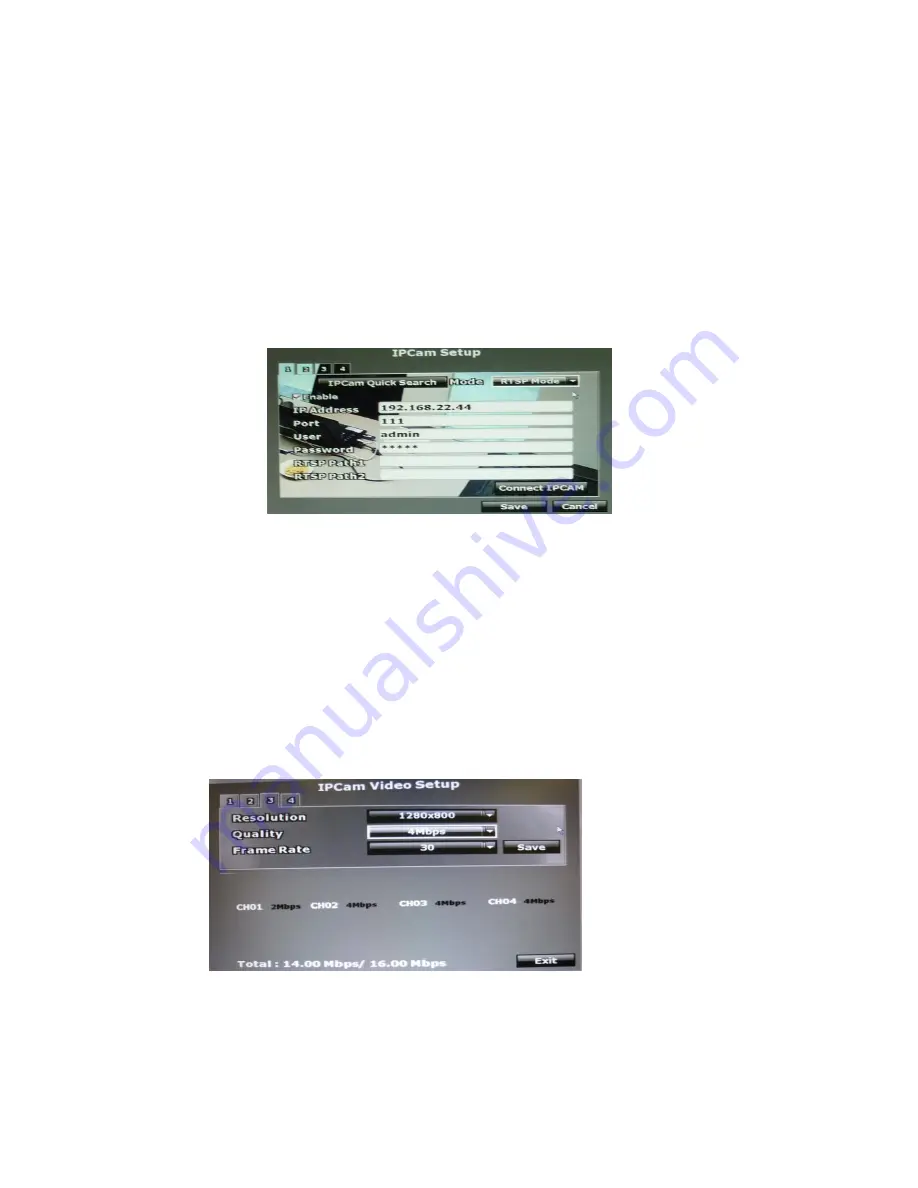
b. RSTP Mode
Under RTSP Mode, the NVR only support the IP address indication, the live
video, and video recording. Other functions like motion detection are not
supported.
1. Enable: Choose “RTSP Mode”
2. IP Address
:
Insert the IP address of the connecting device.
3. Port
:
Insert the port number of the connecting device. Please key in “554”
here.
4. User
:
Insert the user name of the connecting device.
5. Password
:
Insert the password of the connecting device.
6. RTSP Path
:
To link to the IP camera, check the RTSP Path settings of your
IP camera, and key in the corresponding value here.
A-2. Connect IPCAM
:
After insert the IPCAM related information, click this button
to test the connection circumstances.
B. IPCam Video Setup
B-1. Resolution
Click drop down list to change the resolution of connecting device.
B-2. Quality
Click drop down list to change the image quality.
For H.264 IPCam above 1 Megapixel, the resolution options support “4Mbps,
Содержание HNR-04AF
Страница 1: ...USER MANUAL 04 CHANNELS NETWORK VIDEO RECORDER...
Страница 11: ...12 3 SYSTEM SETUP 3 1 MENU SETUP INTERFACE GUI A CAMERA SETUP B RECORD SETUP C ALARM SETUP D NETWORK SETUP...
Страница 12: ...13 E AUTHORITY SETUP F DISK MANAGEMENT G SYSTEM SETUP H EXIT...
Страница 20: ...21...
Страница 33: ...34...
Страница 49: ...50 OPTION 2 ADD TO TRUSTED SITES IE Tools Internet Options Security Trusted sites Sites...
Страница 66: ...67 J 5 SYSTEM SETTING Please refer to Chapter3 9 System Setup...


