background image

User Manual of HBK-1100KI Network Keyboard

55

4.7 Advanced Settings

Click Advanced on the main interface to enter the Advanced Settings interface where you can configure the

password, AUX key, live view performance and PTZ speed control settings.

4.7.1 Password Settings

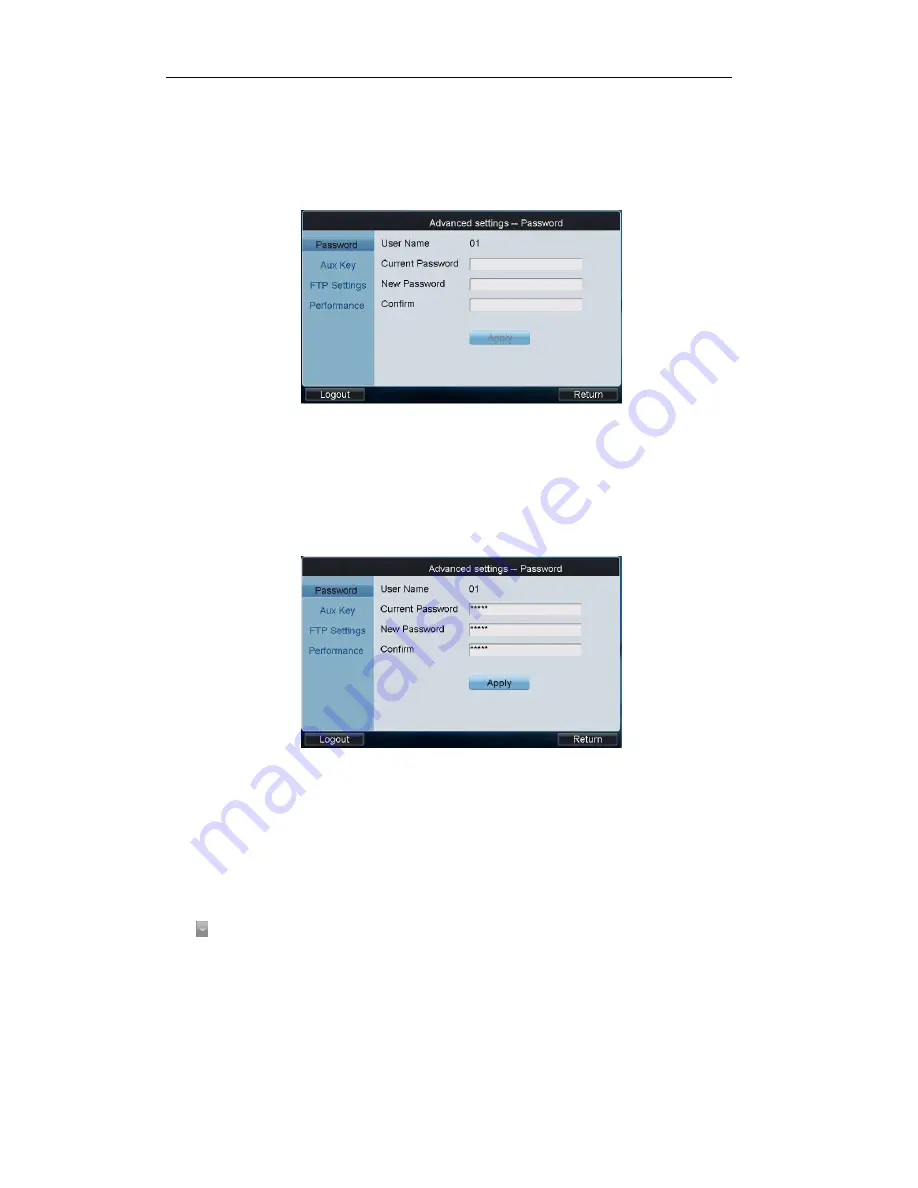
Click Password on the Advanced Settings interface to enter the Password Settings interface.

It is allowed to edit the password for the current login user.

Enter the current password and new password, and then click Apply to finish the password modification.

4.7.2 AUX Key Settings

Click Aux Key on the Advanced Settings interface to enter the Aux Key Settings interface.

On the Advanced Settings-Aux Key interface, the Aux Key 1 and Aux Key 2 correspond to the AUX1 and AUX2 keys

on the keyboard respectively.

The function of AUX1/AUX2 can be set to Two-way Audio, Picture Capture or Video Wall/Scene Switch control.

Click

to select the Aux function for each Aux Key, and then click Apply to save the settings.

Содержание HKB-1100KI

Страница 1: ...Network Keyboard User Manual ...

Страница 2: ...Keep all liquids away from the keyboard Please check the power supply to avoid the damage caused by voltage mismatch Please make sure the keyboard work in the allowed range of temperature and humidity Please keep the device horizontal and avoid the installation under severe vibration environment The dust board will cause a short circuit after damping please use brush to dedust regularly for the bo...

Страница 3: ...agement 19 3 2 1 Viewing Version Information 20 3 2 2 Configuring Network Settings 20 3 2 3 Configuring Hardware Settings 20 3 2 4 Configuring Time Settings 21 3 2 5 Selecting Language 21 3 2 6 Calibrating Screen 22 3 2 7 Upgrading Device 22 3 3 Device Management 23 3 3 1 Adding a Device 23 3 3 2 Editing Deleting Device 24 3 4 User Management 25 3 4 1 Adding an User 25 3 4 2 Setting the Related De...

Страница 4: ...put Channel 50 4 4 3 Setting Output Group 50 4 4 4 Setting Video Wall Scene 51 4 5 Macro Settings 52 4 6 Playback 53 4 6 1 Playback by USB File 54 4 6 2 Playback by File 54 4 6 3 Playback by Time 55 4 7 Advanced Settings 55 4 7 1 Password Settings 56 4 7 2 AUX Key Settings 56 4 7 3 Live View PTZ Speed Settings 56 4 7 4 FTP Settings 57 4 8 Logout 57 4 9 Reboot 58 4 10 Shutdown 58 Chapter 5 Keyboard...

Страница 5: ... Other Functions 75 Chapter 6 Server Operation 76 6 1 Control of MVC 76 6 1 1 Login 76 6 1 2 Device List 76 6 1 3 Camera List 78 6 1 4 Monitor List 79 6 1 5 Scene Settings 82 6 1 6 Screen Settings 83 6 2 Control of Analog Matrix 86 6 2 1 Login 86 6 2 2 Configuring RS 232 Parameters 87 6 2 3 Operating Analog Matrix 87 6 2 4 Configuring RS 485 Parameters 88 6 2 5 Operating PTZ Control 88 6 3 Access ...

Страница 6: ...gs 105 Chapter 8 Keyboard Configuration Tool 107 8 1 System Requirements 107 8 2 Features 107 8 3 Selecting Login Mode to Configuration Tool 107 8 3 1 Login by Local Configuration File 108 8 3 2 Export Login by Remote Configuration File 108 8 3 3 Remote Upgrade 109 8 4 Configuring Keyboard by Configuration Tool 110 8 4 1 Managing Device List 110 8 4 2 Managing User List 112 8 4 3 Managing Channel ...

Страница 7: ...nnected devices in the same network area Support 3 operators and each user is allowed to operate 1280 devices Import and export of keyboard configuration parameters Macro command operation Storage of record files and captured pictures to U flash disk or FTP server Play back record files from the U flash disk Play back the remote record files by time or by file Two way audio Support configuration b...

Страница 8: ...00KI Network Keyboard 7 Display of decoded camera group on selected window Sequence display of decoded camera group on monitor Sequence display of decoded camera group on monitor group Display of video via MVC on video wall ...

Страница 9: ... Serial No Description 1 Record playback 2 Functional buttons 3 Numeric buttons 4 PTZ control area Interface Description Serial No Description Serial No Description 1 Touch pen 2 GND 3 Line In 4 Audio Out 5 Reserved 6 RS 485 Interface 7 LAN 8 RS 232 Interface 9 USB Interface 10 12 VDC Power Supply 11 Power On Off ...

Страница 10: ...ameters 3 Add edit and delete device 4 Add edit and delete user as well as assign device for the user The operator user is allowed to operate the assigned device only Up to 1280 devices can be assigned for each operator 2 2 Indicators Buttons LED Indicators on Panel LED Indicator Description POWER Normally lights when the keyboard is powered on LINK Lights when the keyboard is connected with the n...

Страница 11: ...a Next camera AUX2 LOCK Button The LOCK button on the keyboard is used to lock the keyboard and mouse operation After being locked it is unallowable to operate all keys except LOCK and SHIFT joystick mouse and the touch screen In the any interface or operation status you can press and hold the LOCK key or press the SHIFT LOCK keys to lock the keyboard operation In the lock status you can press and...

Страница 12: ...aptured pictures can be saved in U flash disk or uploaded to the FTP server Playback Control Rotate the outer ring of shutter in clockwise direction to increase speed and up to 16X playing speed can be achieved Rotate the outer ring of shutter in anti clockwise direction to decrease speed and 1 16X playing speed can be achieved In playback by file rotate the inner ring of shutter to play the previ...

Страница 13: ...ra group Press the 1 MON 1 CAM G buttons to select the camera group 1 to be displayed on the monitor 1 SET SET Num TOUR GROUP PATROL PATTERN set the tour group patrol and pattern Press the SET 1 PATTERN buttons to set the pattern 1 TOUR SET Num TOUR set the tour Num TOUR call the defined tour Press the SET 1 TOUR buttons to set the tour 1 Press the 1 TOUR buttons to call the pre defined tour 1 GRO...

Страница 14: ...ck unlock the system Press and hold the LOCK button or press the SHIFT LOCK buttons to lock unlock the system PREV Select the previous camera for live view on keyboard or on TV wall NEXT Select the next camera for live view on keyboard or on TV wall AUX1 Press the AUX1 button to realize its defined function two way audio picture capture or vide wall scene switch AUX2 Press the AUX2 button to reali...

Страница 15: ... 2 5 Basic Operation Procedure Admin For the first time to operate the keyboard you should configure the keyboard parameters in Keyboard Configuration menu add device and operator and then link the added device to assigned operator Operator The operator is allowed to operate local live view remote configuration of encoder decoder parameters display of decoded video on monitor local playback PTZ co...

Страница 16: ...o enter the Network Settings interface Configure the network settings of the keyboard including the Port IP address Subnet Mask Default Gateway Preferred DNS and Alternate DNS Click Apply to save the settings 5 Click Return to back to the main interface 6 Click Device on the admin main interface to enter the device management menu 7 Click Add Device to enter the Device Add Device interface Input t...

Страница 17: ...er to enter the Add User interface Input the user name password and verify the password Finally click Add to finish the adding of user 11 Return to the User List interface and click of the selected user to enter the User Device interface 12 Click Add Device to enter the User Add Device interface Select the device by clicking the checkbox and click Add to add the device for the current user ...

Страница 18: ...p Click Yes to confirm the logout or No to cancel the operation 2 7 Quick Operation Multi division Display The Operator user is allowed to select different multi division display modes for the selected output channel Currently 1 4 9 16 division display modes are configurable Steps 1 Press the Num MON keys to select the monitor 2 Press the Num MULT keys to select the multi division display mode for...

Страница 19: ...the display window on the monitor You can also directly touch the screen to select the display window 3 Press the Num CAM keys to select the input camera Example You can press the 1 MON 2 WIN 3 CAM keys to decode the video signal from camera 3 and display it on window 2 of monitor 1 ...

Страница 20: ...kbox of Remember Password to save the login password for future use 4 Click Login to enter the main interface of admin 3 2 Keyboard Management On the main interface of admin click the Keyboard on the left navigation bar to enter the Keyboard Management interface In the Keyboard Management interface you can view the device version information configure network parameters configure hardware settings...

Страница 21: ... or remain it as to disable the function Keyboard Lock Delay Screen Off Delay Use the or to decrease or increase the key lock timeout and the screen close timeout with the range of 0 10 minute s configurable When the value is set to 0 the key and screen will be unlocked Background Contrast Click to select the value from the drop down menu with the 3 1 1 1 1 3 and non transparent optional Note The ...

Страница 22: ...ng Time Settings Date Click to select the date from the calendar Time Click or to decrease or increase the time value Click Apply to save the settings 3 2 5 Selecting Language Language Click to select English as the system language Click Apply to save the setting ...

Страница 23: ...n 3 Use the touch pen to click the three spots marked as by following the hints 4 The system will pop up the hint Screen Calibration completed click OK to finish the operation 3 2 7 Upgrading Device Upgrade by FTP 1 Input the address of the FTP server and then click FTP Upgrade to operate the upgrade Note You must create the FTP server connection first by TFTP or WFTP in PC before operating the FT...

Страница 24: ...nterface 2 Select the upgrade file from the disk and finally click Upgrade to start upgrading Note The upgrade file must be digicap dav 3 If the upgrading is failed the corresponding error message box will pop up Note When the upgrading is successful the keyboard will restart automatically to complete the upgrade 3 3 Device Management Click Device on the admin main interface to enter the Device De...

Страница 25: ...ndicates the device is failed to be added and the indicates the device is successfully added 4 After having added the devices click Exit to return to the Device Device List interface where you can view the information of added devices Task2 Add Device by Manually Add Device Click Add Device to enter the Add Device interface Input the device name device IP port user name and password and then click...

Страница 26: ...to be deleted and click to delete it In the pop up message box click Yes to finish the deletion 3 4 User Management Click User on the admin main interface to enter the User User List interface 3 4 1 Adding an User Steps 1 Click Add User to enter the User User List interface 2 Input the user name password and verify the password ...

Страница 27: ...User List interface click to enter the User Device interface 2 Click Add Device to enter the User Add Device interface Select the device by clicking the checkbox and click Add to add the device for the current user 3 The successfully added device is listed on the User Device interface 4 After having configured the above settings click Logout on the admin main interface the message box Logout Now w...

Страница 28: ...ce 3 4 3 Editing User Password Deleting User Edit User Password On the User User List interface you can click to change of password of the selected user Delete User Click to delete the selected user 3 4 4 Importing Exporting Configuration File Purpose The configuration files of the device can be exported to local device for backup and the configuration files of one device can be imported to multip...

Страница 29: ...the USB interface on the keyboard 2 Click Export to export the configuration file named in kbCfg bin If the imported configuration file is not correct the message box Importing file failed file type mismatched will pop up 3 5 Default Purpose There are two types of restoring default supported Simple and Complete Simple Remain the password of admin and network parameters and restore other parameters...

Страница 30: ...ge box Logout now pops up Click Yes to confirm the logout or No to cancel the operation After logout the system will return to the User Login interface 3 7 Reboot Click Reboot on the admin main interface the message box Reboot now will pop up Click Yes to confirm the reboot or No to cancel the operation 3 8 Shutdown Click Shutdown on the admin main interface the message box Shut down now will pop ...

Страница 31: ...ture use 3 Click Login to enter the operator main interface 4 Enter the main interface Click the Device List on the main interface to enter the Device List interface The list will display all devices which can be controlled by the current login user 4 1 Encoder Settings Click of an encoder on the Device List interface and enter its remote settings interface You can configure the settings for netwo...

Страница 32: ...ss DNS server address and HTTP port of the current encoder device PPPoE Configure the user name and password of PPPoE settings DDNS Enable DDNS select the protocol type to IPServer DynDns PeanutHull or NO IP and configure the corresponding settings NTP Configure NTP settings to synchronize the time of device to the selected time zone Network Disk Set the IP address file path and type of the networ...

Страница 33: ...ent for hybrid DVR and NVR only Configuring Video Display On the Video Display interface you can select the camera name for configuration edit the camera name select display or not display of the name date week set the date time format and OSD display You can also copy the current settings to other camera s Configuring Video Parameters On the Video Parameters interface you can select the camera na...

Страница 34: ... record after the event or the scheduled time For example when an alarm triggered the recording ends at 11 00 if you set the post record time as 5 seconds it records till 11 00 05 Expired Time The expired time is the longest time for a record file to be kept in the HDD if the deadline is reached the file will be deleted You can set the expired time to 0 and then the file will not be deleted The ac...

Страница 35: ...click Copy You can also select All to copy the current settings to all cameras 9 Click Apply to save the current settings and Cancel to return to the previous interface Configuring Motion Detection Follow the steps to set the motion detection parameters for the Encoder device In the live view mode once a motion detection event takes place the device can analyze it and do many actions to handle it ...

Страница 36: ...on to configure the linkage method If the Trigger Alarm Output is selected you should click the Set button to configure the triggered alarm output s 10 After having configured the above setting and if you want to configure the other cameras with the same settings choose the camera and click Copy You can also select All to copy the current settings to all cameras 11 Click Apply to save the current ...

Страница 37: ...should click the Set button to configure the triggered alarm output s 6 After having configured the above setting and if you want to configure the other cameras with the same settings choose the camera and click Copy You can also select All to copy the current settings to all cameras 7 Click Apply to save the current settings and Cancel to return to the previous interface Configuring Video Tamperi...

Страница 38: ...9 After having configured the above setting and if you want to configure the other cameras with the same settings choose the camera and click Copy You can also select All to copy the current settings to all cameras 10 Click Apply to save the current settings and Cancel to return to the previous interface Configuring Privacy Mask You are allowed to configure the four sided privacy mask zones that c...

Страница 39: ...s Domain name Port User Name Password Channel No and Factory protocol type to add the IP camera 4 Click OK to save the settings 5 On the Channel List interface click Apply to finish the adding of the IP camera Editing Status of Analog Camera For Hybrid DVR you can view the status of the connected analog camera as well as increase the number of IP camera to add by changing the disabling the analog ...

Страница 40: ...ng action for the selected alarm input by clicking the checkbox of Handling Alarm Configure the Arming Schedule and Linkage Action to set up its alarm response actions as well as triggered camera and PTZ linkage calling defined preset patrol pattern 6 After having configured the above setting and if you want to configure the other cameras with the same settings choose the camera and click Copy You...

Страница 41: ... save the current settings and Cancel to return to the previous interface 3 Configuring Manual Alarm 1 Click Set beside Manual Alarm to enter the Manual Alarm Settings interface 2 Select the alarm output s for manual triggering 3 Click OK to return to the Alarm Settings interface 4 1 5 Exceptions Configure the exception handling method s for each exception type Steps 1 Click Exceptions on the remo...

Страница 42: ...e current settings 4 1 6 Maintenance Click Maintenance on the remote settings interface to enter the Device Management interface HDD Management Set and initialize HDD and set HDD in group management User Management Add edit delete user account and assign operating permissions for each user Device Information View the version and basic information of the encoder device Device Upgrade Remotely upgra...

Страница 43: ...tings to all encoding devices under the current login user If you uncheck it the stream media settings are applicable to the current encoding device only 5 Click Apply to save the settings 4 2 Decoder Settings Click the of a decoder on the Device List interface and enter its remote settings On this interface you can configure the settings for network RS 232 RS 485 serial port output decoding statu...

Страница 44: ...gs Click Serial on the remote settings interface to enter the Serial Port Settings interface You can set the RS232 port and RS485 parameters 4 2 3 Output Settings You can configure parameters for the display of decoded output video on monitor Steps 1 Click Output on the remote settings interface to enter the Output Settings interface ...

Страница 45: ...l the settings 4 2 4 Video Wall If the connected decoder is DS 6400HDI T or DS 6400HDI S the video wall display is supported You can decode the video signal and display it on the video wall Steps 1 Click Video Wall on the remote settings interface to enter the Video Wall interface 2 Select the video wall No to configure and enable the video wall display by checking the Enable checkbox 3 Select the...

Страница 46: ...version and basic information of the decoder device Device Upgrade Remotely upgrade the device by USB file Import Export Import export configuration files Restore Default Restore factory default settings 4 3 Input Settings Click Input on the main interface to enter the Input Settings Input List interface The list has displayed all device cameras which can be controlled by the current login user Se...

Страница 47: ...button to view the video of the next or previous camera 4 3 2 Live View by Channel zero Steps 1 Click the button on the Input Settings Input List interface to enter the Channel zero settings interface 2 Select an encoding device from the list and click the icon to enter the local live view by the channel zero Note The channel zero must be supported by the connected encoding device and has been ena...

Страница 48: ... Click Input Group to enter the Input Settings Input Group interface 2 Click to select the group No from the drop down menu set the cycle time for the group and click the Save button Note Up to 16 camera groups can be added 3 Click the Add Camera key to enter the Add Camera interface 4 Select the cameras from the list to be added to the group and then click Add to finish the setting 5 Click Finish...

Страница 49: ...current login user 4 4 1 Playback on Monitor Select an output channel from the output list and click the icon to enter the Playback interface Note Before operating the playback you must configure the output settings first Please refer to 4 2 3 Output Settings Playback by File Steps 1 Click the By File tab to enter the playback by file interface 2 Input the display window Note Please refer to the w...

Страница 50: ...back by Time Steps 1 Click the By Time tab to enter the playback by time settings interface 2 Input the display window Note Please refer to the window division mode in the 4 2 3 Output Settings before inputting the display window here 3 Input the Camera No for playback 4 Set the start time and end time of the video files for playback 5 Click Playback to start playback Note The Playback Control but...

Страница 51: ... Output key to enter the Add Output interface 4 Select the outputs from the list to be added to the group and then click Add to finish the setting 5 Click Finish to return to the Output Group interface where you can view the successfully added output channels for the current group You can click to delete the added output 4 4 4 Setting Video Wall Scene Steps 1 Click the Wall Scene button to enter t...

Страница 52: ... Num MAC keys to call the programmed macro command Click Macro on the main interface to enter the Macro Settings interface Adding Macro Click Add Macro to enter the Macro Setting Add Macro interface Edit the macro name and press the command keys on the keyboard to enter the text box below Finally click Add to add the current macro command Notes Up to 128 macro commands can be added Max 6 numerals ...

Страница 53: ...ck to run the command or directly click Num MAC keys on the interface to call the macro command Deleting Macro You can click to delete the added macro command 4 6 Playback The video files stored in the encoding device can be played back through the related decoder Three playback modes are available playback by USB file playback by time and playback by file Click Playback on the main interface to e...

Страница 54: ...ck the USB File tab on the Local Playback interface to enter the Playback by Local File interface 3 Select the video file from the USB disk for playback 4 Click Playback to play the selected video file 4 6 2 Playback by File Steps 1 Click the By File tab on the Local Playback interface to enter the Playback by File interface ...

Страница 55: ... search the matched video files 1 The searching results can be viewed on the Playback File List interface 2 Select the file for playback from the list and click Playback to play back the video file 4 6 3 Playback by Time 1 Click the By Time tab on the Local Playback interface to enter the Playback by Time interface 2 Input the Camera No for playback 3 Set the start time and end time of the video f...

Страница 56: ...e password for the current login user Enter the current password and new password and then click Apply to finish the password modification 4 7 2 AUX Key Settings Click Aux Key on the Advanced Settings interface to enter the Aux Key Settings interface On the Advanced Settings Aux Key interface the Aux Key 1 and Aux Key 2 correspond to the AUX1 and AUX2 keys on the keyboard respectively The function...

Страница 57: ...rd Five levels are selectable You can also set the PTZ movement speed of the connected PTZ camera by using the joystick Four levels are selectable 4 7 4 FTP Settings The video files or captured pictures can be uploaded to FTP server Steps 1 Click FTP Settings on the Advanced Settings interface to enter the FTP Settings interface 2 Check the checkbox of Enable FTP Note If the Enable FTP is unchecke...

Страница 58: ...interface and the message box Logout now will pop up Click Yes to confirm the logout or No to cancel the operation After logout of current login user the system will return to the User Login interface 4 9 Reboot Click Reboot on the main interface the message box Reboot now will pop up Click Yes to confirm the reboot or No to cancel the operation 4 10 Shutdown Click Shutdown on the main interface t...

Страница 59: ...ft part has displayed the current output channel and user can select different window division display modes set input channel for each window or configure other shortcut operations And the right part of the interface is used for displaying the current key input and some shortcut operations 5 2 Local Live View The local live view refers to display the video signal from the input channel through th...

Страница 60: ...y of Decoded Video on Monitor 5 3 1 Setting Multi division Display You can select different multi division display modes for the selected output channel Currently 1 4 9 16 division display modes are configurable Steps 1 Press the Num MON keys to select the monitor 2 Press the Num MULT keys to select the multi division display mode for the output channel Note In the local live view mode when you in...

Страница 61: ...M keys to decode the video signal from camera 3 and display it on window 2 of monitor 1 When you press the 0 CAM keys it will stop the dynamic decoding of the current window If no display window is selected the decoding of the 1st window will be stopped by default Description of icons Switch to full screen of sub screen Restore Audio off Audio on Notes In the local live view mode when you input 0 ...

Страница 62: ...ng error message will appear on the screen when you perform wrong operation 5 3 4 Setting Camera Group to Window The video signal from the camera group can be outputted to and displayed on the selected window of monitor in cycle Note The dwell time for the cycle view is set in the input group setting interface refer to 4 3 4 Setting Input Group Steps 1 Press the Num MON keys to select the monitor ...

Страница 63: ...era 33 34 on monitor 1 2 in cycle view mode Note The default dwell time of cycle view is 30 sec Steps 1 Press the Num MON G keys to select the monitor group 2 Press the Num CAM G keys to select the camera group to be viewed in cycle on the specified monitor group Note In this operation mode each output channel in the selected monitor group will be displayed on the screen in 1 division mode by defa...

Страница 64: ... 7 Calling a Tour Steps 1 Press the Num MON keys to select the monitor for display 2 Press the Num TOUR keys to call the programmed tour to be displayed on the selected monitor 5 3 8 Setting a Group Tour Multiple camera groups can be displayed on the specified monitors in tour respectively Each user account is allowed to set up to 8 group tours and each group can include 8 camera groups to specifi...

Страница 65: ...le camera groups can be automatically displayed on related monitors respectively in tour by calling the programmed group tour e g camera group 1 on monitor 1 camera group 2 on monitor 2 etc If multiple camera groups are configured for the same monitor then it is available for the display of the last programmed camera group only The dwell time of group tour can be configured Steps Press the Num GRO...

Страница 66: ...lockwise direction you can speed down the playback with the min speed capable of reaching 1 16X 5 3 11 Operating Image Switch Steps 1 Set the usage of the Aux Key as the Video Wall Scene Switch Please refer to the 4 7 2 AUX Key Settings for detailed instructions 2 Check the No of Wall Scene you want to set Please refer to the 4 4 4 Setting Video Wall Scene for detailed instructions 3 Press Num AUX...

Страница 67: ... operate the joystick and LIGHT WIPER FOCUS IRIS ZOOM buttons to realize PTZ control 5 4 2 Setting a Preset Select the output monitor or window and the keyboard is capable of automatically connecting with its corresponding camera Operate the joystick to move PTZ to the desired position and then press the PRESET key to complete the preset settings You are also allowed to directly select the camera ...

Страница 68: ...keyboard to call the preset You are also allowed to directly select the camera by pressing Num CAM keys and then press the CALL key to realize preset callup Calling a Preset by Output Channel Steps 1 Press the Num MON keys to select the output channel 2 Press the Num WIN keys to select the display window 3 Press the Num CALL keys to call the programmed preset Note This operation is valid only when...

Страница 69: ...tput channel 2 Press the Num WIN keys to select the display window 3 Press the SET key to enter the settings interface 4 Press the Num PATROL keys to enter the patrol settings interface 5 Input Num and press the ENTER key to set the preset number stop time and speed respectively 6 Repeat Step5 to set other presets 7 Press the SET key again to finish the patrol settings Notes Corresponding error me...

Страница 70: ...e programmed patrol You are also allowed to directly select the camera and then press the PATROL key to realize patrol callup Calling a Patrol by Output Channel Steps 1 Press the Num MON keys to select the output channel 2 Press the Num WIN keys to select the display window 3 Press the Num PATROL keys to call the programmed pattern Note This operation is valid only when the patrol function is supp...

Страница 71: ...put Channel Steps 1 Press the Num MON keys to select the output channel 2 Press the Num WIN keys to select the display window 3 Press the SET key to enter the settings interface 4 Press the Num PATTERN keys to set the pattern number 5 Operate the joystick to control PTZ movement 6 Press the SET key again to finish the pattern settings Note It is invalid to input the 0 CAM keys in the current opera...

Страница 72: ...ting Num CAM keys and then press the PATTERN key to realize pattern callup Calling a Pattern by Output Channel Steps 1 Press the Num MON keys to select the output channel 2 Press the Num WIN keys to select the display window 3 Press the Num PATTERN keys to call the programmed pattern Note This operation is valid only when the pattern function is supported by the connected camera dome Calling a Pat...

Страница 73: ... scan by Output Channel Steps 1 Press the Num MON keys to select the output channel 2 Press the Num WIN keys to select the display window 3 Press the PATTERN key to call the pan scan 4 Press the PATTERN key again to stop the pan scan Note This operation is valid only when the pattern function is supported by the connected camera dome Calling Pan scan by Input Channel Steps 1 Press the Num CAM keys...

Страница 74: ... with the camera it needs to press the ESC key input the Num CAM keys and then press the AUX1 AUX2 key to start the two way audio When the network is disconnected in the process of two way audio you should press the 0 AUX1 AUX2 keys to stop the two way audio first and then start it again When you intend to start the two way audio between the keyboard and the remote device which is taking two way a...

Страница 75: ...owed to stop it When the window is configured with multiple channels for display in cycle view mode the error message will appear on the screen And if the current window or output channel is performing playback by time then the recording operation is not allowed 5 5 4 Other Functions The PREV and NEXT keys on the keyboard are used to select the previous or next camera during the shortcut operation...

Страница 76: ...face 2 Select the Login Mode to MVC Subdomain Matrix Access Gate 3 On the Login interface input the IP address port user name and password of the MVC 4 Check the checkbox of Remember Password if you want to save the password for future login 5 Click Login to enter the main interface of admin 6 1 2 Device List After you have logged in the Matrix system you can view the information of its functional...

Страница 77: ...ing Device Parameters in Batch By clicking the Batch Edit IP button you can enter the Batch Edit interface to edit the parameters of the encoding decoding modules including the start IP end IP port subnet mask and gateway Notes The range from the start IP to end IP must be larger than the number of the functional modules When the NAT function of the system is enabled it is not allowed to operate t...

Страница 78: ...n the Shortcut Operation Setting Input Group Steps 1 Click Input Group to enter the MVC Input Group interface 2 Click to select the group No from the drop down menu 3 Set the Cycle Time 1 65535s for the current group Note The Cycle Time refers to the dwell time defined for each camera in this group 4 Click the Add Camera key to enter the Add Camera interface 5 Select the cameras from the list to b...

Страница 79: ...ab to view the information of all monitors connected to the current MVC system including the monitor ID output type IP address and port 2 Click the button of a monitor from the list to enter the Monitor Settings interface 3 Configuring monitor settings Decoding Ability Set the parameters according to the resolution of the front end device If the maximum resolution of the front end devices connecte...

Страница 80: ...ettings click Save Quick Operation of Monitor Settings 1 Press the Num MON keys to select the monitor 2 Press the Num MULT keys to select the window division on the monitor Example You can input the 2 MON 16 MULT keys to realize 16 divison display on monitor 2 Setting Output Group Steps 1 Click Output Group to enter the MVC Output Group interface 2 Click to select the group No from the drop down m...

Страница 81: ...o enter the local live view mode 2 Press the Num CAM keys to enter the local live view of the selected camera Task2 Display of Video on Monitor Steps 1 Press the Num MON keys to select the monitor 2 Press the Num WIN keys to select the display window on the monitor 3 Press the Num CAM keys to select the input camera Example You can press the 1 MON 2 WIN 3 CAM keys to decode the video signal from c...

Страница 82: ...e scene of MVC can be configured on the iVMS 4100 client software 4 Click a grid to enter the following interface 5 Press the Num WIN keys or click on the window to select the window No 6 Press the Num CAM keys to select the camera No of which the video is displayed on the selected window 7 Repeat Step4 6 to configure the screen settings for the other windows of the scene ...

Страница 83: ...ed as 1 2 3 and 4 3 Select the sub screen No which refers to the output connected to the selected sub window in Step 5 1 Note The Main Screen No and the Sub screen No cannot be the same with each other 4 Repeat the Step 5 1 2 to set other sub windows and their related sub screen No 5 Click Save to save the sub window settings 6 Click Apply to finish the screen settings Configuring Video Output to ...

Страница 84: ...2 WIN 3 CAM keys to display the video signal from camera 3 on the roaming window 2 of multi screen 1 You can press the 0 CAM keys and it will stop the dynamic decoding of the current camera Setting Base Picture Note When the MVC is configured with the enhanced decoder module you can set the base picture for the screen display Steps 1 Put the base picture in the USB flash disk and insert it into th...

Страница 85: ...he directory and click the Upload button to select the layer for the picture 5 Select the layer from the drop down list Two base pictures can be uploaded 6 Select OK to confirm the base picture settings 7 On the screen settings interface click the Open Picture button to select the layer and enable the configured base picture to be shown on the screen display ...

Страница 86: ... 6 2 2 Configuring RS 232 Parameters Purpose The RS 232 parameters must be configured the same with that of the connected analog matrix so as to realize the RS 232 communication Before you start Make sure the RS 232 port of analog matrix and the RS 232 port of keyboard have been connected with the control line Steps 1 Click RS232 on the Analog Matrix to enter the RS232 settings interface 2 Input t...

Страница 87: ...input channel of the analog matrix 6 2 4 Configuring RS 485 Parameters Purpose The RS 485 parameters must be configured the same with that of the connected PTZ camera so as to realize the PTZ control Before you start Make sure the R and R terminals of the PTZ camera has been correctly connected to the T and T terminals of the keyboard Steps 1 Click RS485 on the Analog Matrix to enter the RS485 set...

Страница 88: ...ystick to realize the pan tilt and lens movement Setting Calling a Preset Setting a Preset Steps 1 Input the Num CAM keys to select the connected analog dome or pan tilt unit 2 Operate the joystick or focus iris zoom buttons to move PTZ to the desired position 3 Input the Num PRESET keys to set the current position as a preset 4 Repeat step2 and step3 to continue to set the other presets Calling a...

Страница 89: ...to the current patrol 6 Press the SET key again to finish the patrol settings Calling a Patrol Steps 1 Input the Num CAM keys to select the connected analog dome or pan tilt unit 2 Input the Num PATROL keys to call the defined patrol Setting Calling a Pattern Setting a Pattern Steps 1 Input the Num CAM keys to select the connected analog dome or pan tilt unit 2 Press the SET key to enter the setti...

Страница 90: ...m The accessible iVMS platforms include iVMS 5000 iVMS 7000 and iVMS 8200 Note Please make proper configuration on the iVMS platform before connecting the keyboard to the iVMS server Please refer to the user manual of corresponding iVMS platform for instructions 6 3 1 Logging in to the iVMS Platform Steps 1 On the Server Login interface select the Login Mode to iVMS Platform 2 Enter the Server IP ...

Страница 91: ...stem enters the Control Center Unit List as shown below 6 3 2 Managing Output Channel 1 Click on the list to edit the selected screen group 2 Log in to the iVMS platform and click Organization Monitor Screen Group to enter the following page 3 Click Layout to enter the Screen Layout interface ...

Страница 92: ...put Channel 1 The corresponding input channel is corresponding to the Index No on the Control Center Unit List interface of the keyboard e g the index 12060404594398402 corresponds to the Channel 1 of the device 109 2 You can modify the index No of the input channel via the iVMS platform Click Organization Camera to enter the following page to view the list of connected input channels Select an in...

Страница 93: ...ter its local live view 6 3 5 Displaying Video on Monitor You can follow the steps below to view the video from a camera on the selected screen Steps 1 Press the Num MON keys on the keyboard to select the screen 2 Press the Num WIN keys on the keyboard to select the display window on the selected screen Note For the single division display mode this step is not needed the window division display m...

Страница 94: ...d click the icon to enter the playback interface 3 Select the camera No for playback 4 Select the location of record files to Device Record NVR Record or CVR Record 5 Select the record type 6 Set the date of the record files 7 Click Search to enter the playback by time interface 8 Select the output channel and set the time 9 Click Playback to enter the playback interface 10 Select the sub window a...

Страница 95: ... 1 Login Open WEB browser input the IP address of the keyboard e g http 172 6 24 64 and click Enter The system pops up a login interface Input the user name admin and password default 12345 and then click OK to log into the keyboard After successful login you enter the main interface 7 1 2 Keyboard Management Click Keyboard on the left navigation bar to enter the Keyboard management interface ...

Страница 96: ...the left navigation bar to enter the User management interface On this interface you can add edit or delete the user account Adding a User Click the Add button to enter the Add Users interface Input the user name and password to create a new user account Editing a User Select a user from the list and click the icon to enter the following interface to change its password ...

Страница 97: ... User Device Select a user from the list and click the button to enter the User Device interface On this interface you can add device for the current user Click Add to enter the User Add Device interface on which it displays all devices already added to the keyboard by admin Select the device s from the list and then click Add button to finish the adding of device s for the current user ...

Страница 98: ...ar to enter the Device management interface On this interface you can add edit or delete the device Adding a Device Click Add to enter the Add User interface Input the name IP port and login user name password of the device to add Click OK to finish the adding of the device The successfully added devices will be displayed on the list of Device Interface Editing a Device Select a device from the li...

Страница 99: ...your demand Complete and Simple are selectable Please refer to 3 5 Default for the details of two default types Import Export Configuration File Click the Import Export Config File on the left navigation bar to enter the configuration file management interface Note For the first time use of the import export configuration file function a plug in needs to be installed A hint will appear on the lowe...

Страница 100: ...le click the Export button and specify the saving directory of the exported file Upgrade Click the Upgrade on the left navigation bar to enter the upgrade interface Click the Browse to select the upgrade file directory in the pop up box Click the Upgrade button 7 2 Configuring by Operator 7 2 1 Device List On the login interface input the user name and password of operator and then click OK to log...

Страница 101: ...vice and click the icon to enter the Network Stream media interface to configure stream media for the device 7 2 2 Input Settings Click Input Settings on the left navigation bar to enter the Input List interface Editing a Camera By selecting a camera from the list and clicking the icon you are allowed to edit its name No protocol and stream type ...

Страница 102: ...filed and click Set button 3 Click the Add Camera key to enter the Add Camera interface 4 Select the cameras from the list to be added to the group and then click Add to finish the setting 5 Return to the Input Group interface and you can view the successfully added cameras for the current group Viewing Channel zero Click the Channel zero button to show the list of device which support the Channel...

Страница 103: ...l from the list and clicking the icon you are allowed to edit its output No Setting an Output Group Click the Output Group key on the Output List to enter the Output Group interface to add an output group Please refer to the same operating steps in Setting an Input Group section Setting Video Wall Scene Click the Video Wall Scene button on the Output List to enter the video wall scene setting inte...

Страница 104: ...e View PTZ Speed Settings Click Performance on the left navigation bar to enter the network performance and PTZ speed settings interface It allows you set the network performance of local live view on keyboard Five levels are selectable You can also set the PTZ movement speed of the connected PTZ camera by using the joystick Four levels are selectable 7 2 6 FTP Server Settings The video files or c...

Страница 105: ...Check the checkbox of Enable FTP 3 Enter the IP address of the FTP server 4 Enter the user name and password of login to the FTP server 5 Enter the file path to which the video files and captured pictures are uploaded 6 Click Save to save the settings ...

Страница 106: ...he keyboard configuration tool Add Edit Delete the user account Add Edit Delete the device under the Administrator Add Delete the device under the Operator Link the device to stream media server in single batch mode Delete the channel under the Operator Save channel information of the user to local directory in text document Import Export the configuration file Export the input output list as the ...

Страница 107: ...e for exporting the config file Steps 1 Click Local Config File icon to enter the following Login interface 2 Click to select the destination directory of the Config File from your PC or local storage device Note The Config File must be in kbCfg format 3 Input the admin and password for login 4 Click Login The configuration file will be backed up in the backup folder by default If the file has alr...

Страница 108: ...ry or click Export login to export log in the software 6 On the Login interface select the configure file directory and input the user name and password for login Refer to Step2 4 in 6 3 1 Logging in to the iVMS Platform 7 After successful login you will enter the main interface 8 3 3 Remote Upgrade Steps 1 Click Upgrade Keyboard icon on the Mode Choose interface to enter the Remote Upgrade interf...

Страница 109: ...Status bar Note Please do not shut down the keyboard when the upgrading is not finished 8 4 Configuring Keyboard by Configuration Tool 8 4 1 Managing Device List After successful login by Local File or Remote File mode you can enter the following interface Click the Device on the menu bar to enter the Device Management interface Adding a Device You can add a device by manually or by SADP software ...

Страница 110: ...segment 4 Enter the Username and Password for login 5 Click Add to add the device s SADP Mode You can use the SADP software to automatically search and add the online devices in the same network 1 Click to enter the Search online devices interface 2 The automatically searched devices will be displayed on the list Select a device from the list and click Add to enter the Add Devices interface 3 Ente...

Страница 111: ...terface You are allowed to modify the port login user name and password Click Modify to finish the modification Deleting a Device Select the device s from the list and click The following message box pops up Click OK to confirm the deletion 8 4 2 Managing User List Click the User on the menu bar to enter the Device Management interface ...

Страница 112: ...KI Network Keyboard 111 Adding a User Account 1 Click to enter the Add User interface 2 Enter the username and password 3 Click Add to add the new user account The successfully added user accounts are listed on the interface ...

Страница 113: ...eleting a User Account 1 Select the user account s from the list and click The following message box pops up 2 Click OK to confirm the deletion Modifying Password 1 Select a user account from the list and click to enter the Modify Password interface ...

Страница 114: ... a user account from the list and double click it to enter the User Devices interface 2 Select a device or multiple devices from the device list on the left and then click 3 The device s successfully added for the current user will be displayed in the list on right When you select multiple devices the corresponding message box of the result will pop up ...

Страница 115: ...t and click to enter the stream media server settings interface 2 Check the checkbox of Stream Media Start to enable the stream 3 Enter the Stream Media IP Stream Media Port and the Stream Media Protocol TCP UDP 4 Click OK to add the stream media server to the selected decoder s Note You can uncheck the checkbox of Stream Media Start and click OK to disable the stream media server for the device 8...

Страница 116: ...get the channel list 3 Select an item from the list and enter the new index in the Channel Modify field Note The new index No you enter must not exist in the channel list 4 Click to finish the channel index modification Modifying Channel Index in Batch 1 Enter the username of operator in the Channel Type field Only the operator user account has the permission to operate channel management 2 Click ...

Страница 117: ...e channel list 4 Click to finish the channel index modification Deleting Channel s 1 Select the channel s from the list to be deleted 2 Click to delete the selected channel s Saving Channel s 1 On the Channel List interface enter the username in the Channel Type field 2 Click the to save the channel information file txt of the current login user to the directory where the configuration file is loc...

Страница 118: ...enu bar to enter the Keyboard Maintenance interface 2 Select the directory of the keyboard configuration file 3 Enter the IP address of the keyboard 4 Enter the username and password 5 Click to import the configuration file to the keyboard The keyboard will restart after the configuration file has been imported ...

Страница 119: ... 1 ch 3 5 mm connector 2 0 Vp p 1 kΩ Audio Out 1 ch 3 5 mm connector Linear 560 Ω External Interface Network Interface 1 10M 100M 1000M Ethernet interface RS 232 Interface 1 RS 232 interface RS 485 Interface 1 RS 485 interface USB Interface 1 USB2 0 for data storage and device upgrade General Power Supply 12V DC Power Consumption 15W Working Temperature 10 C 55 C Working Humidity 10 90 Dimensions ...

Страница 120: ...steps Steps 1 Open the wftp software and then select Security Users rights option 2 Create new user 3 Input the user name target password target and then click OK to continue 4 Select the user name to target 5 Input the directory of the upgrade file in the text box of Home Directory and then click Done to start system upgrading ...

Отзывы: