background image

26

Recording View only, playback speed can also be changed using the Left and
Right 4-Way Cursor keys. Playback is paused when the sonar cursor is active
and resumes playing when the cursor is removed. Playback is automatically
paused when the end of the recording is reached.

NOTE:

Sonar chart speed is increased during Fast Forward and reversed during Rewind. This

may reduce the quality of the sonar image, since at higher speeds, not every sonar return can
be processed and displayed.

NOTE:

Navigation is not affected by the Sonar Recording feature, but any active navigation is

cancelled when playback begins or ends.

You can delete the highlighted recording, or all recordings, using Delete Recording
or Delete All Recordings from the Snapshot and Recording X-Press™ menu.
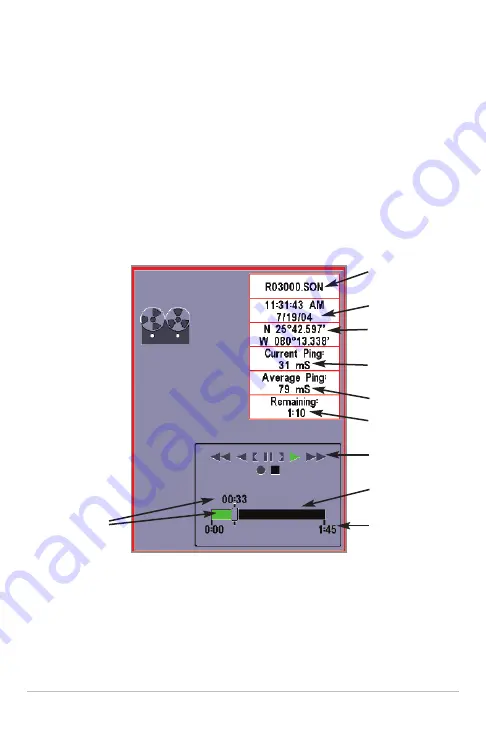
Recording Playback

Amount of time

already played

Name of recording

Time and Date
recording started

Position when
recording started

Current playback
ping rate

Average ping rate

Amount of time
remaining to play

Playback speed
icons

Amount of time
remaining to play

Overall length of
recording

Содержание 757c

Страница 1: ...r Operations Manual 757c 787c2 and 787c2 i GPS Chartplotter Operations Manual 531528 1_C Guide d utilisation du traceur graphique GPS 757c 787c 2 et 787c 2 i Guide d utilisation du traceur graphique G...

Страница 2: ...carefully in order to understand the full capabilities of your model i Merci Merci d avoir choisi Humminbird le chef de file dans le secteur des sondeurs de poissons aux tats Unis Humminbird a b ti s...

Страница 3: ...y 9 Views 11 Sonar View 12 Understanding Sonar History 13 Real Time Sonar RTS Window 14 Freeze Frame and Cursor 14 Bottom Presentation 15 Sonar Zoom View 18 200 83 kHz Split Sonar View 19 Big Digits V...

Страница 4: ...e or Hide Saved Tracks 43 Man Overboard MOB Navigation 44 Key Functions 46 POWER LIGHT Key 46 VIEW Key 46 INFO Key 47 MENU Key 47 4 WAY Cursor Control Key 48 MARK Key 48 GOTO Key 49 ZOOM Key 49 EXIT K...

Страница 5: ...71 Cursor To Waypoint Chart or Combo view only 72 Save Current Track 72 Clear Current Track 73 Save Current Route only when navigating 73 Skip Next Waypoint only when navigating 74 Cancel Navigation...

Страница 6: ...SD Card 83 Sonar Menu Tab 84 Beam Select 85 Fish ID 86 Fish ID Sensitivity 87 Real Time Sonar RTS Window 87 Bottom View 88 Zoom Width 88 83 kHz Sensitivity Advanced 89 455 kHz Sensitivity Advanced wit...

Страница 7: ...art Detail Level 107 Map Borders 108 Lat Lon Grid 109 Spot Soundings 109 Navaids on Bird s Eye View 109 Shaded Depth 110 Set Simulation Position Advanced 110 Set Map Offset Advanced 111 Clear Map Offs...

Страница 8: ...ration Advanced with Temp Speed only 126 Local Time Zone Advanced 127 Daylight Saving Time Advanced 127 Position Format Advanced 128 Time Format Advanced International only 128 Date Format Advanced In...

Страница 9: ...national market To obtain a list of authorized International Distributors please visit our web site at www humminbird com or contact our Customer Resource Center at 1 800 633 1468 to locate the distri...

Страница 10: ...ret location size and composition of an object Sonar is very fast A sound wave can travel from the surface to a depth of 240 ft 70 m and back again in less than 1 4 of a second It is unlikely that you...

Страница 11: ...a good balance between depth performance and resolution Low frequencies 83 kHz are typically used to achieve greater depth capability The power output is the amount of energy generated by the sonar tr...

Страница 12: ...rage to an area equal to your depth In 20 feet of water the wider beam covers an area 20 feet wide DualBeam PLUS sonar returns can be blended together viewed separately or compared side by side DualBe...

Страница 13: ...ide Structure locating sonar beams to spot fish bait and structure to the left and right of the boat over an area of the bottom that s always equal to twice your depth For a detailed view below the bo...

Страница 14: ...kHz with a 16 area of coverage The side looking elements can be used independently or together to locate targets near the surface of the water on either side of your boat Universal Sonar 2 Your 700 Se...

Страница 15: ...lay Service and MSAS the MTSAT Satellite Augmentation System satellites if they are available in your area GPS uses a constellation of 24 satellites that continually send radio signals to the earth Yo...

Страница 16: ...and HotMaps Premium on MMC or SD card media NOTE Your 700 Series does not support Navionics Classic Charts only Navionics Gold HotMaps and HotMaps Premium Your unit also comes with a built in Uni Map...

Страница 17: ...until it clicks into place then replace the slot cover making certain that the gasket is present and positioned correctly before re installing the cover then replace and tighten snugly do NOT overtig...

Страница 18: ...w a very weak one or none at all Speed ifaTemp SpeedaccessoryorGPSReceiver is attached the Fishing System can display the speedoftheboat andcankeepaTriplogofnautical or statute miles traveled NOTE Ent...

Страница 19: ...Fish the Fishing System displays fish as arches and or fish icons and can be set to alarm when a fish of a certain size is detected When a target is detected a Fish ID symbol appears on the displaywi...

Страница 20: ...nge to the screen NOTE Side Beam View and WideSide View require the purchase of the QuadraBeam PLUS transducer for the Side Beam View and the WideSide transducer for the WideSide View You can visit ou...

Страница 21: ...ange sufficient to show the bottom Depth Range is automatically selected to keep the bottom visible on the display although you can adjust it manually as well see Sonar X Press Menu Five additional Di...

Страница 22: ...Each vertical band of data received by the control head and plotted on the display represents something that was detected by a sonar return at a particular time As both the boat and the targets fish...

Страница 23: ...RTS Window continues to update in Freeze Frame In addition see the effects of menu setting changes with Instant Image Update Pressing EXIT will exit Freeze Frame and the display will start to scroll F...

Страница 24: ...iment or flat rock appears as a thinner line across the display A Soft Bottom such as mud or sand appears as a thicker line across the display Rocky Bottoms have a broken random appearance The sonar r...

Страница 25: ...16 Structure ID represents weak returns in blue and strong returns in red...

Страница 26: ...17 WhiteLine highlights the strongest sonar returns in white resulting in a distinctive outline This has the benefit of clearly defining the bottom on the display...

Страница 27: ...ly to display a magnified image of the bottom The Zoom Preview Box shows where the zoomed view is in relation to the full range view The Zoom Level or magnification is displayed in the lower left corn...

Страница 28: ...left hand corner You can use the Split Sonar View to make side by side comparisons between the sonar returns from the 83 kHz wide beam and the 200 kHz narrow beam The digital readouts in the Split Son...

Страница 29: ...the system The Triplog shows distance traveled average speed and time elapsed since the Triplog was last reset The digital readouts in the Big Digits View cannot be customized Big Digits View Depth Te...

Страница 30: ...asher View Circular Flasher View displays Real Time Sonar RTS data in the traditional flasher format Depth and temperature are always displayed The digital readouts in the Circular Flasher View cannot...

Страница 31: ...Recording View displays up to three screen snapshot thumbnails or recording icons on the screen at a time you may have to scroll using the 4 WAY Cursor keys to see the whole list of thumbnails and or...

Страница 32: ...pshot not a live view You can delete the selected image or all images by selecting a thumbnail and using Delete Image or using Delete All Images from the Snapshot and Recording X Press menu Working wi...

Страница 33: ...mum ping rate for the recording using the Snapshot and Recording X Press menu optional 4 Stopping a recording using the Snapshot and Recording X Press menu 5 Playing back a recording using the Snapsho...

Страница 34: ...w is automatically switched to the primary Sonar View for your model and no live sonar data will be displayed only recorded sonar and GPS data will be shown and the Snapshot and Recording View will di...

Страница 35: ...ot every sonar return can be processed and displayed NOTE Navigation is not affected by the Sonar Recording feature but any active navigation is cancelled when playback begins or ends You can delete t...

Страница 36: ...yout Sonar X Press menu only available on the Sonar X Press menu when in Side Beam View the display will represent the same sonar data in one of the following three layouts Default Classic and Slanted...

Страница 37: ...he bottom portion of the display presents a historical log of sonar returns from the 455 kHz right and left looking sonar beams New information appears at the top and scrolls down the display Side Bea...

Страница 38: ...m the side looking beams reveals bottom contour structure and fish similar to the down looking beam but the area covered is to the left and right of the area shown in the down looking portion so you a...

Страница 39: ...ree views are available Left Right and Both The default view is Both Information from both the left and right beams are displayed simultaneously The depth of the water beneath the boat is always displ...

Страница 40: ...ove and turn the eye point so that you can look off to the sides or even behind the boat Pressing the RIGHT or LEFT arrow keys on the 4 WAY Cursor key turns the eye point right or left while pressing...

Страница 41: ...waypoints and the current route when navigating are overlaid on the chart You can use the 4 WAY Cursor Control key to shift pan the chart to another area You can use the ZOOM keys to zoom in and out...

Страница 42: ...rsor shown with Optional Purchase Navionics Cartography Depth Cartography Latitude and Longitude Position of Cursor Bearing of Boat with Respect to True North Distance to the Cursor and Bearing to Cur...

Страница 43: ...creen with Chart View on the left and Sonar View on the right side of the screen The width of the sonar window can be changed Combo View Depth Cartography Sonar Window Bearing of Boat with Respect to...

Страница 44: ...r Combo Views there are several cartography related functions that you can access using various keys Panning Use the 4 WAY Cursor keys to move the chart around on the display in the direction of the k...

Страница 45: ...of the station and the times of the high and low tides for today s date A tide graph is also displayed showing the rise and fall of the tides for the 24 hour time period encompassing the date You can...

Страница 46: ...or navigation and are used in trip planning You can link individual waypoints together by using the GOTO key A route represents your intended navigation and shows the shortest path from each waypoint...

Страница 47: ...view use the Cursor key to point to a feature in the sonar history also called the Sonar Saver feature Press the MARK key to create a waypoint at the location where that sonar reading was taken The n...

Страница 48: ...to select a sort order Name shows the waypoints alphabetically Time shows the most recently created waypoint first Distance shows the closest waypoint first Delete a waypoint From the Waypoints submen...

Страница 49: ...n Add a Waypoint Target or Trolling Grid Add or Remove a Waypoint Target From the Waypoints submenu select Target and press the RIGHT Cursor key to display a list of waypoints Select the waypoint you...

Страница 50: ...rom the Navigation Main menu To remove the trolling grid choose Remove Grid from the Navigation X Press menu NOTE Only one waypoint can have either a target or a grid at one time If you apply a target...

Страница 51: ...dit and press the RIGHT Cursor key Re name the route or change delete or re order the waypoints used in the route Delete a saved route From the Routes submenu select Delete and press the RIGHT Cursor...

Страница 52: ...ubmenu select Edit and press the RIGHT Cursor key to display the list of saved tracks Select the track you want to edit and press the RIGHT Cursor key When the Edit Track dialog box appears use the Cu...

Страница 53: ...argeted The view is switched to the Chart View automatically when MOB is activated and an additional info box that shows the lat lon position of the MOB waypoint and the elapsed time since MOB was act...

Страница 54: ...45 MOB Navigation Elapsed time since MOB was activated Boat s current position Target surrounding MOB waypoint MOB waypoint Position where man fell overboard...

Страница 55: ...s the Light and Background menu Use the 4 WAY Cursor key to select Light or Background and then use the LEFT or RIGHT Cursor key to change the settings Press EXIT to exit the Light and Background menu...

Страница 56: ...allows you to access frequently used settings without having to navigate through the whole menu system When the X Press menu is displayed you can use the UP or DOWN Cursor keys to move to a particular...

Страница 57: ...ntrol the speed of playback MARK Key Press the MARK key while in any view to mark the position of a waypoint either at the current boat location or if the Cursor is active at the current Cursor locati...

Страница 58: ...nctive icon is created at the boat s current position regardless of whether the chart cursor is active or not Any current navigation will be cancelled and the current route discarded without user noti...

Страница 59: ...ing EXIT will exit the menu mode and return to the view If a menu is active pressing EXIT will return to the previous level in the menu system Pressing EXIT will cycle through the available views in r...

Страница 60: ...ically when an accessory is plugged into the unit In addition multiple accessories can be attached simultaneously See Accessories Menu Tab and 700 Series Fishing System Accessories in this manual as w...

Страница 61: ...stem by pressing the POWER LIGHT key The Title screen is displayed until the Fishing System begins operation Your Fishing System will begin Normal or Simulator operation depending on the presence or a...

Страница 62: ...ot X Press Menu will appear depending on the view you are in Main Menu Tabs Less frequently adjusted menus are grouped into the Main Menu System The Main Menu system is organized under the following t...

Страница 63: ...system when you navigate to specific menus while in Advanced Mode Any changes made while in Advanced Mode will remain in effect after you switch back to Normal Mode See Setup Menu Tab User Mode for s...

Страница 64: ...r System Status PC Connect use with PC Connect Cable See the following paragraphs for more information about each of these choices Normal Operation Use Normal Operation for on the water operation with...

Страница 65: ...ator it is important to select Simulator manually from the Start Up Options menu as opposed to letting the Fishing System enter Simulator automatically as it will if a transducer is not connected and...

Страница 66: ...W button when using System Status Self Test Accessory Test GPS Diagnostic View Exit System Status by powering your Fishing System off Self Test Self Test displays results from the internal diagnostic...

Страница 67: ...t Accessory Test lists the accessories connected to the system NOTE The speed accessory will be detected only if the paddlewheel has moved since your Fishing System was powered up System Status Access...

Страница 68: ...et being used This view also reports the current position local time and date and other numeric information The current GPS Fix Type is reported as No Fix 2D Fix 3D Fix or Enhanced An Enhanced fix has...

Страница 69: ...s the use of the PC Connect Cable Complete instructions are included with the PC Connect Cable accessory NOTE The PC Connect Cable requires a separate purchase For more information visit our website a...

Страница 70: ...e while in any of the Sonar Views to access the Sonar X Press menu NOTE Menu choices will vary depending on system settings such as whether the unit is set for Advanced User mode or what transducer is...

Страница 71: ...accessed from the Sonar X Press menu when you are in WideSide view NOTE Side requires the purchase of the WideSide transducer You can visit our website at www humminbird com to order this accessory on...

Страница 72: ...esent in murky or muddy water If Sensitivity is adjusted too low the display may not show many sonar returns that could be fish NOTE The Sensitivity setting is a global setting and will adjust the sen...

Страница 73: ...pper and Lower Range regardless of the manual settings entered To adjust the Upper Range 1 Make sure you are in Advanced Mode then highlight Upper Range on the Sonar X Press Menu 2 Use the LEFT or RIG...

Страница 74: ...in Manual mode NOTE A minimum distance of 10 feet will be maintained between the Upper and Lower Range regardless of the manual settings entered To adjust the Lower Range 1 Highlight Lower Range on t...

Страница 75: ...t is set to WideSide see Sonar Menu Tab Transducer Select and can only be accessed from the WideSide view NOTE The Side Beam Range requires the purchase of the WideSide transducer You can visit our we...

Страница 76: ...ss Menu 2 Use the LEFT or RIGHT 4 Way Cursor Control keys to increase or decrease the Chart Speed setting 1 9 Ultra where 1 Slow 9 Fast Ultra Fastest Default 5 Quad Layout with Optional Purchase Quadr...

Страница 77: ...ange allows you to control how much of the water column measured up from the bottom is shown in the Sonar Zoom View Choose a small value to see low lying bottom structure or details of the bottom retu...

Страница 78: ...y navigating a route This will not delete a previously saved route To Cancel Navigation 1 Highlight Cancel Navigation on the Sonar X Press menu 2 Use the RIGHT 4 WAY Cursor Control key to initiate can...

Страница 79: ...ccess to the settings most frequently used Press the MENU key once while in the Bird s Eye View the Chart or the Combo View to access the Navigation X Press menu NOTE Menu choices will vary depending...

Страница 80: ...Use the RIGHT 4 Way Cursor Control key to view the Waypoints submenu which contains the following menu choices The Waypoint Submenu contains the following menu choices Edit allows you to edit the Name...

Страница 81: ...rsor Control key to highlight the waypoint you wish to move the cursor to then use the RIGHT 4 WAY Cusor Control key to select the destination waypoint Save Current Track Save Current Track allows you...

Страница 82: ...sor key once more To cancel clearing the current track press the LEFT Cursor key Save Current Route only when Navigating Save Current Route allows you to save the current route being displayed This me...

Страница 83: ...GHT Cursor key once more To cancel skipping the next waypoint press the LEFT Cursor key Cancel Navigation only when Navigating Cancel Navigation discards the current route and exits Navigation Mode Th...

Страница 84: ...ate canceling MOB navigation 3 The Confirm dialog box will appear To cancel MOB navigation press the RIGHT Cursor key once more To avoid canceling MOB navigation press the LEFT Cursor key Remove Targe...

Страница 85: ...ove Grid on the Navigation X Press menu 2 Use the RIGHT 4 WAY Cursor Control key to remove the grid Sonar Window Combo view only Sonar Window sets the size of the Sonar Window in the Combo View Sonar...

Страница 86: ...ay Cursor Control key to view the Waypoints submenu The Waypoint Submenu contains the following menu choices Edit allows you to edit the Name Position Latitude and Longitude and select the Icon that w...

Страница 87: ...ing X Press menu provides access to the image management and sonar recording functions Press the MENU key once while in the Snapshot and Recording View to access the Snapshot and Recording X Press men...

Страница 88: ...nd Recording View To start sonar recording 1 Highlight Start Recording on the Snapshot and Recording X Press menu and press the RIGHT 4 Way Cursor key to start recording Stop Recording optional purcha...

Страница 89: ...g X Press menu 3 Press the RIGHT 4 Way Cursor key to initiate this procedure 4 A Confirm Dialog box will appear Select Yes to delete the image or No to cancel the operation Delete All Images optional...

Страница 90: ...e RIGHT 4 Way Cursor key to initiate this procedure 4 A Confirm Dialog box will appear Select Yes to delete the recording or No to cancel the operation Delete All Recordings optional purchase MMC SD C...

Страница 91: ...pecify the playback speed for a sonar recording from the Snapshot and Recording View This menu option is only available when you have an optional purchase MMC SD card installed and you are playing bac...

Страница 92: ...recording 1 Highlight Stop Playback on any X Press menu 2 Press the RIGHT 4 Way Cursor key to initiate this procedure NOTE During playback the amount of time memory left to play is indicated by the s...

Страница 93: ...ess the Main Menu System and then press the RIGHT Cursor key to select the Sonar tab NOTE Menu choices will vary depending on system settings such as whether the unit is set for Advanced User mode or...

Страница 94: ...t to 200 kHz only the returns from the 200 kHz narrow beam will be displayed in the Sonar View the Sonar Zoom View the Big Digits View and the Circular Flasher View The Split Sonar View will continue...

Страница 95: ...h ID is turned off the Fishing System shows only the raw sonar returns on the display These returns will often result in arches forming on the display indicating potential targets Due to the transduce...

Страница 96: ...hange the Fish ID Sensitivity setting 1 Highlight Fish ID Sensitivity on the Sonar main menu 2 Use the LEFT or RIGHT 4 WAY Cursor Control keys to change the Fish ID Sensitivity setting Low 1 High 10 D...

Страница 97: ...play See Bottom Presentation for more information To adjust the Bottom View 1 Highlight Bottom View on the Sonar main menu 2 Use the LEFT or RIGHT 4 WAY Cursor Control keys to change the Bottom View s...

Страница 98: ...e Setup Menu Tab User Mode NOTE 83 kHz Sensitivity is particularly useful for adjusting the sensitivity of the 83 kHz sonar returns in the 200 83kHz Split Sonar View The 83kHz sensitivity can be adjus...

Страница 99: ...hase of the QuadraBeam PLUS transducer You can visit our website at www humminbird com to order this accessory online or contact our Customer Resource Center at 1 800 633 1468 NOTE 455 kHz Sensitivity...

Страница 100: ...ires the purchase of the WideSide transducer You can visit our website at www humminbird com to order this accessory online or contact our Customer Resource Center at 1 800 633 1468 NOTE WideSide Sens...

Страница 101: ...either turn Depth Lines On or Off The Depth Lines menu choice is available when User Mode is set to Advanced see Setup Menu Tab User Mode To change the Depth Lines setting 1 Make sure you are in Advan...

Страница 102: ...displayed The Surface Clutter menu choice is available when User Mode is set to Advanced see Setup Menu Tab User Mode To change the Surface Clutter setting 1 Make sure you are in Advanced User Mode th...

Страница 103: ...Low Medium High1 High2 High3 Default Low Max Depth Advanced Max Depth adjusts the maximum depth of operation The performance of your Fishing System can be tuned to the maximum depth you will be fishi...

Страница 104: ...ffects the accuracy of deep water depth readings To change the Water Type setting 1 Make sure you are in Advanced User Mode then highlight Water Type on the Sonar main menu 2 Use the LEFT or RIGHT 4 W...

Страница 105: ...ation Menu Tab Press the MENU key twice to access the Main Menu System then press the RIGHT cursor key to select the Navigation tab NOTE Menu choices will vary depending on system settings Navigation...

Страница 106: ...ck allows you to clear the current track Appearance allows you to change the style and color of the current track Breadcrumb Trail Dashed Line Solid Line or Wide Line and if a line the color of the li...

Страница 107: ...l keys to view the Saved Tracks submenu The Saved Tracks Submenu contains the following menu choices Edit allows you to select a previously saved track and edit its name whether it is visible or not a...

Страница 108: ...be changed Edit allows you to choose from a list of previously saved waypoints then edit the Name Position Latitude and Longitude and select the Icon that will be used to represent the waypoint in the...

Страница 109: ...nts to it immediately Edit allows you to select a previously saved route and edit its name and the waypoints on it Delete allows you to delete a route from a list of previously saved routes Travel all...

Страница 110: ...displayed with one of two orientations True North or Magnetic North To change the North Reference setting 1 Highlight North Reference on the Navigation main menu 2 Use the LEFT or RIGHT 4 WAY Cursor...

Страница 111: ...rack Min Distance to small values will allow you to increase the track resolution Track Min Distance Advanced Track Min Distance allows you to set a minimum distance of travel before a trackpoint is a...

Страница 112: ...e the Track Color Range setting 50 to 3000 feet or 20 to 1000 meters International Units only Default 66 ft 20 m Map Datum Advanced Map Datum allows you to change the map coordinate system used by the...

Страница 113: ...ed Export All Nav Data allows you to export all saved Tracks Waypoints and Routes to an MMC SD card The Export All Nav Data menu choice is only available when User Mode is set to Advanced see Setup Me...

Страница 114: ...er Mode then highlight Delete All Nav Data on the Navigation main menu 2 Use the RIGHT 4 WAY Cursor Control key to delete all navigation data Continuous Navigation Mode Continuous Navigation Mode allo...

Страница 115: ...MENU key twice to access the Main Menu System and then press the RIGHT Cursor key to select the Chart tab NOTE Menu choices will vary depending on system settings such as whether the unit is set for A...

Страница 116: ...ishing areas underwater wrecks tides and currents in addition to the Basic and Navigation information All shows roads buildings railways and other notations in addition to the Basic Navigation and Und...

Страница 117: ...icates an area which contains a different map To change the Map Borders setting 1 Highlight Map Borders on the Chart main menu 2 Use the LEFT or RIGHT 4 WAY Cursor Control keys to change the Map Borde...

Страница 118: ...SD cards To change the Spot Soundings setting 1 Highlight Spot Soundings on the Chart main menu 2 Use the LEFT or RIGHT 4 WAY Cursor Control keys to change the Spot Soundings setting Hidden Visible De...

Страница 119: ...ice is only available when User Mode is set to Advanced see Setup Menu Tab User Mode To set the Simulation Position 1 Activate the cursor and move it to the coordinates from where you want the simulat...

Страница 120: ...are in Advanced User Mode then highlight Set Map Offset on the Chart main menu 3 Use the RIGHT 4 WAY Cursor Control key to set the Map Offset A confirmation dialog box will appear to allow you to cha...

Страница 121: ...ss the Main Menu System The Alarms tab will be the default selection NOTE When an alarm is triggered you can silence it by pressing any key The alarm will be silenced and will not be triggered again u...

Страница 122: ...OFF Fish ID Alarm Fish ID Alarm sounds when the Fishing System detects fish that correspond to the alarm setting Fish ID Alarm will only sound if Fish ID is on To change the Fish ID Alarm setting 1 Hi...

Страница 123: ...4 WAY Cursor Control keys to change the Low Battery Alarm setting Off 8 5V 13 5V Default Off Aux Temp Alarm with optional purchase temp probe or Temp Speed only Aux Temp Alarm sounds when the water te...

Страница 124: ...temperature rises from 56 degrees to 58 degrees the Temp Alarm will also sound To change the Temp Alarm setting 1 Highlight Temp Alarm on the Alarms main menu 2 Use the LEFT or RIGHT 4 Way Cursor Cont...

Страница 125: ...as either exceeded the distance to the destination waypoint or has entered the Arrival Alarm Circle based on the menu setting when navigating Arrival Alarm allows you to set how close the boat must be...

Страница 126: ...d the boat s anchored position if the anchored boat drifts outside of that perimeter the Drift Alarm will sound To change the Drift Alarm setting 1 Highlight Drift Alarm on the Alarms main menu 2 Use...

Страница 127: ...roduced as you adjust the Alarm Tone so that you can select the tone that you can hear best To change the Alarm Tone setting 1 Highlight Alarm Tone on the Alarms main menu 2 Use the LEFT or RIGHT 4 WA...

Страница 128: ...s the tabbed Main Menu System then press the RIGHT cursor key until the Setup tab is selected NOTE Menu choices will vary depending on system settings such as whether the unit is set for Advanced User...

Страница 129: ...its Temp on the Setup menu 2 Use the LEFT or RIGHT 4 WAY Cursor Control keys to change the Units Temp setting Celsius Fahrenheit Default Celsius Units Distance Units Distance selects the units of meas...

Страница 130: ...or Domestic models User Mode User Mode sets the menu system to either Normal or Advanced When set to Normal default setting only the basic menu options are shown When set to Advanced additional menu c...

Страница 131: ...ighlight Reset Triplog on the Setup menu 2 Use the RIGHT 4 WAY Cursor Control key to initiate Triplog Reset 3 The Confirm dialog box will appear To reset the Triplog press the RIGHT Cursor key once mo...

Страница 132: ...m edges of the Sonar View screen or whether a particular window will be turned off displaying nothing in that area you can access this menu choice only when in Advanced User Mode see Setup Menu Tab Us...

Страница 133: ...s procedure 3 The Select Readouts submenu will appear showing a list of all Readouts Use the UP or DOWN Cursor keys to select a particular Readout position then use the RIGHT or LEFT Cursor keys to ch...

Страница 134: ...ight Depth Offset on the Setup menu 2 Use the LEFT or RIGHT 4 WAY Cursor Control keys to change the Depth Offset setting 10 0 to 10 0 feet or 3 to 3 meters International Models only Default 0 Aux Temp...

Страница 135: ...setting 10 0 to 10 0 degrees Default 0 Speed Calibration Advanced with Temp Speed only Speed Calibration will adjust the speed readout by the percentage entered and will appear in the menu if a Temp...

Страница 136: ...astern Standard Time Daylight Saving Time Advanced Daylight Saving Time adjusts the time display to account for local Daylight Saving Time when Time Date is selected as a Digital Readout on the Sonar...

Страница 137: ...mm or dd mm ss Default dd mm mmm Time Format Advanced International only Time Format changes the time format used by the unit This menu choice is available only when in Advanced User Mode see Setup Me...

Страница 138: ...Use the LEFT or RIGHT 4 WAY Cursor Control keys to change the Date Format mm dd yy dd mm yy or yy mm dd Default mm dd yy Digits Format Advanced Digits Format allows you to add a tenth decimal place to...

Страница 139: ...e output when NMEA Output is turned On DPT Depth MTW Water Temperature GLL Lat Lon Position GGA GPS Fix Data RMC Recommended Minimum Specific GNSS Data VTG Course Over Ground and Ground Speed ZDA Time...

Страница 140: ...ates Sonar and removes the Sonar Views from the view rotation To turn Sonar on or off 1 Highlight Sonar on the Setup menu 2 Use the LEFT or RIGHT 4 WAY Cursor Control keys to change the Sonar to On or...

Страница 141: ...The following views are available Bird s Eye View Chart View Combo View WideSide View with optional purchase WideSide transducer Side Beam View with optional purchase QuadraBeam PLUS transducer Sonar...

Страница 142: ...If an accessory is attached however additional menu choices that support the accessory will be added automatically See the Operations Manual that comes with your accessory for detailed information NO...

Страница 143: ...hot and Recording View which shows any existing thumbnails of the screen captures along with any icons representing sonar recordings NOTE You must have an optional purchase MMC SD card installed for t...

Страница 144: ...ighlight a thumbnail using the Up or Down 4 Way Cursor keys then use the Right 4 Way Cursor key to view the full image A border around the full size screen capture indicates that it is just a screen c...

Страница 145: ...rosion from the battery terminals or wiring or actually replacing the battery if necessary Fishing System Defaults to Simulator with a Transducer Attached A connected and functioning transducer will c...

Страница 146: ...mix of air and water flowing around the transducer cavitation may be interfering with the interpretation of sonar data See your Installation Guide for suggestions on adjusting the transducer position...

Страница 147: ...appears To determine whether the boat s engine is the source of the noise increase the RPMs while the boat is in neutral and stationary to see if the noise increases proportionately if noise appears...

Страница 148: ...your depth for a continuous 90 of uninterrupted side to side coverage to 160 feet WeatherSense Fishing Condition Monitor purchase and plug in the WeatherSense accessory to your 700 Series Fishing Syst...

Страница 149: ...ce off the bottom cycle downriggers between two depths and adjust the Positive Ion Control Even see temperature and water clarity at depth and speed at the ball right on screen when using the Cannon S...

Страница 150: ...10 20 VDC LCD Matrix 320 V x 240 H 757c 640 V x 480 H 787c2 and 787c2i Transducer XHS 9 20 T or XN7 9 20 T Transducer Cable Length 20 ft 6 m Current Draw 700 mA 757c 700 mA 787c2 750 mA 787c2 i NOTE...

Страница 151: ...cles are considered outside of the scope of the Directive and EEE for those applications can be considered excluded from the WEEE Directive requirement This symbol WEEE wheelie bin on product indicate...

Страница 152: ...e When speed input is available the Big Digits View also shows the TripLog See TripLog Bottom Black Bottom Black is a Humminbird feature that fills in the area of the display below the bottom contour...

Страница 153: ...ects close to the bottom that fall within the dead zone will probably not be visible in the sonar beam Precision sonar beams such as the Humminbird 20 beam have a smaller dead zone than wider sonar be...

Страница 154: ...h detected in the wider beam are shown as hollow symbols Fish Symbol A Fish Symbol is the graphic that is displayed on the screen when Fish ID determines that a sonar return is likely to be a fish See...

Страница 155: ...ckly and easily Maximum Depth Menu The Maximum Depth Menu is a Humminbird feature that optimizes performance based on the maximum operational depth set by the user Many Humminbird units can operate ac...

Страница 156: ...tal axis can vary greatly depending on boat speed and the Chart Speed setting A greater number of horizontal pixels show more sonar history that the boat has passed through On many models Humminbird p...

Страница 157: ...and results in a more detailed instantaneous view of what is under the boat The Real Time Sonar window is a vertical band at the right side of the display that shows the instantaneous sonar return fr...

Страница 158: ...t to the angler including bait fish game fish thermoclines weed beds subtle structure and more Sonar Update Rate Sonar Update Rate is the number of times per second that the transmitter receiver sends...

Страница 159: ...ognize two very close objects as two distinct targets i e two fish hanging very close or a fish hanging very close to structure Humminbird fishfinders provide a very good 2 1 2 inches of target separa...

Страница 160: ...onar signals and work in conjunction with the transducer Humminbird transmitters have an extremely fast cycling design that can send signals up to 60 times per second as well as produce the varying le...

Страница 161: ...the MENU key Items that appear on the X Press Menu are related to the current view and present the most logical choices for that view Sonar View X Press menus will differ from Chart View X Press menus...

Страница 162: ...can be provided by GPS Bearing BRG Bearing is the direction to a destination waypoint measured in degrees from North i e 321 where 000 is North 090 East 180 is South 270 is West Chartplotter Chartplo...

Страница 163: ...factors which include satellite position in the sky signal strength and others factors Fix Type Fix Type indicates whether the GPS receiver is providing 2D fix or 3D fix A 2D fix requires only three...

Страница 164: ...th an appropriate card reader MMC is the same format that many digital cameras use See SD North Magnetic North is the principle reference point of the compass i e North is 000 Magnetic North relies on...

Страница 165: ...eters 95 of the time Currently SA is inactive and the consumer can enjoy the greater precision GPS provides however the DoD reserves the right to activate SA at any time Speed Over Ground SOG Speed Ov...

Страница 166: ...zooming in or out on the chart The Trolling Grid can also be rotated on the display to orient it for optimal boat course for wave and wind conditions UTC UTC is an acronym for Universal Time Constant...

Страница 167: ...waypoint was created is also saved Waypoint Target Waypoint Target is a Humminbird feature that displays a precise bull s eye around a selected waypoint This bull s eye is used to easily monitor boat...

Страница 168: ...159 Notes...

Страница 169: ...160 Notes...

Страница 170: ...By Telephone Monday Friday 8 00 a m to 4 30 p m Central Standard Time 1 800 633 1468 By e mail typically we respond to your e mail within three business days cservice johnsonoutdoors com For direct sh...

Отзывы: