background image

45

Max Depth 

(Advanced) 

Max Depth

adjusts the maximum depth of operation. The performance of your FishFinder can be

tuned to the maximum depth you will be fishing in by setting the Max Depth. When a maximum
depth is set, your FishFinder will not attempt to acquire sonar data below that depth, thus
increasing overall performance. When Max Depth is set to Auto, the FishFinder will acquire
bottom readings as needed (within the capacity of the unit). If the bottom is deeper than the Max
Depth setting, the digital depth readout will flash, indicating that the FishFinder cannot locate the
bottom. The Max Depth menu choice is available when User Mode is set to Advanced (see 

Setup

Menu Tab: User Mode

). 

To change the Max Depth setting:

1.  Make sure you are in Advanced User Mode, then highlight Max Depth on the Sonar

main menu.

2.  Use the LEFT or RIGHT 4-WAY Cursor Control keys to change the Max Depth setting.

(AUTO, 10 to 1000 feet, 3 to 330 meters 

[International Models Only]

, Default = AUTO) 

Water Type 

(Advanced) 

Water Type

configures your unit for operation in fresh or salt water. The Water Type menu choice

is available when User Mode is set to Advanced (see 

Setup Menu Tab: User Mode

). 

NOTE: 

In salt water, what would be considered a large fish might be 2 to 10 times bigger than a large

fish in fresh water (depending on the type of fish you are seeking).  The salt water setting allows for
a greater range in fish size adjustment to account for this.  Also, make sure that the Water Type is set
accurately, especially in salt water, as this affects the accuracy of deep water depth readings.

To change the Water Type setting:

1.  Make sure you are in Advanced User Mode, then highlight Water Type on the Sonar

main menu.

2.  Use the LEFT or RIGHT 4-WAY Cursor Control keys to change the Water Type setting.

(Fresh, Salt, Default = Fresh)  

44

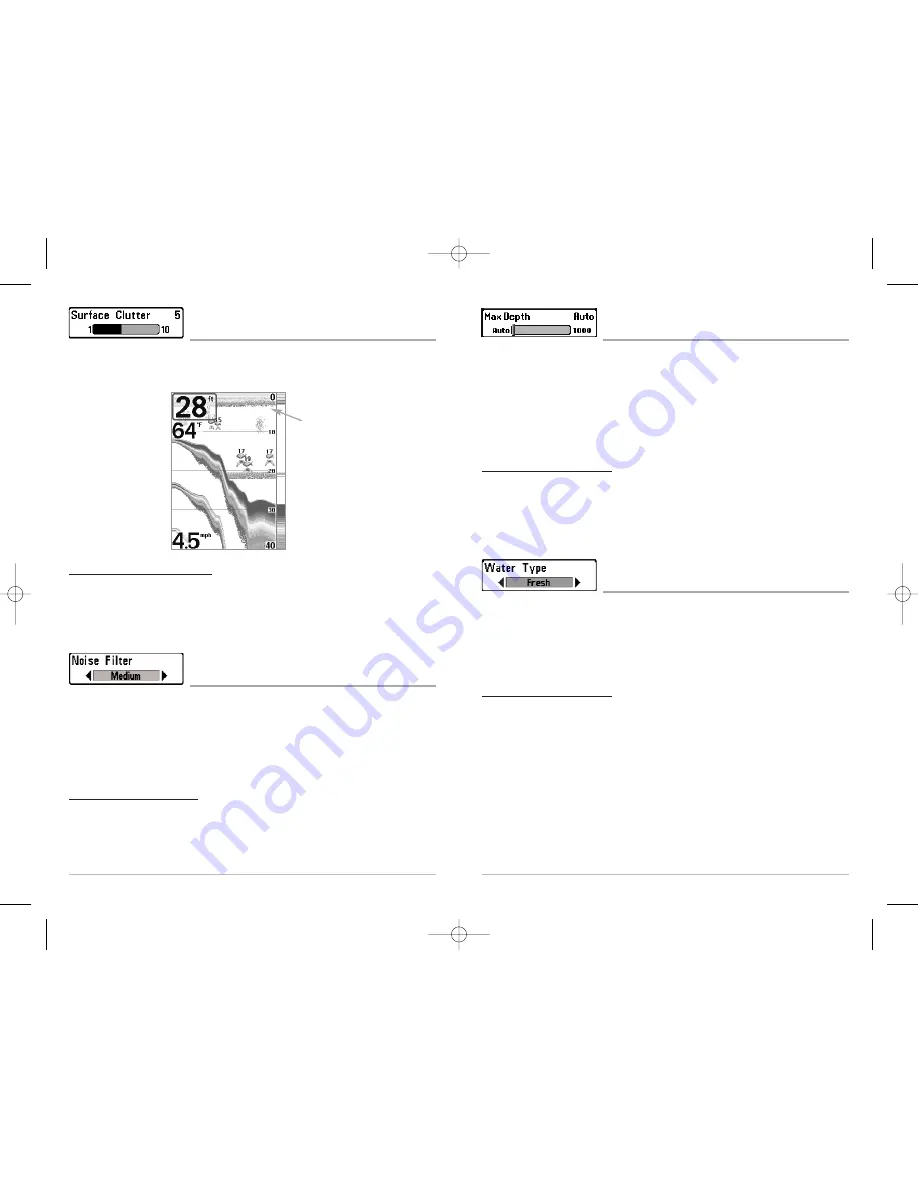
Surface Clutter  

(Advanced)

Surface Clutter

adjusts the filter that removes surface clutter noise caused by algae and aeration.

The lower the setting, the less surface clutter will be displayed. The Surface Clutter menu choice is
available when User Mode is set to Advanced (see 

Setup Menu Tab: User Mode

).

To change the Surface Clutter setting:

1.  Make sure you are in Advanced User Mode, then highlight Surface Clutter on the Sonar

main menu.

2. Use the LEFT or RIGHT 4-WAY Cursor Control keys to change the Surface Clutter setting.

(Low = 1 to High = 10, Default = 5)

Noise Filter 

(Advanced)

Noise Filter

adjusts the sonar Noise Filter to limit interference on the display from sources such as

your boat engine, turbulence, or other sonar devices. The Noise Filter menu choice is available
when User Mode is set to Advanced (see 

Setup Menu Tab: User Mode

). 

NOTE:

The Off setting removes all filtering; Low, Medium and High settings add progressive

filtering of the sonar returns. In some deep water situations, the High setting may actually hinder
your unit’s ability to find the bottom.

To change the Noise Filter setting:

1.  Make sure you are in Advanced User Mode, then highlight Noise Filter on the Sonar

main menu.

2.  Use the LEFT or RIGHT 4-WAY Cursor Control keys to change the Noise Filter setting. (Off,

Low, Medium, High, Default = Off)

Surface 
Clutter

FF595_Man_531385-1_A_PrfE.qxd  12/9/2004  2:41 PM  Page 50

Содержание 595C

Страница 1: ...531385 1_A FishFinder 595c Operations Manual FishFinder 595c Operations Manual FF595_Man_531385 1_A_PrfE qxd 12 9 2004 2 40 PM Page 1 ...

Страница 2: ... purchase and available at a reasonable rate after the one year period For complete details see the separate warranty card includedwithyourunit Weencourageyoutoreadthisoperationsmanualcarefullyinordertoget full benefit from all the features and applications of your Humminbird product Contact our Customer Resource Center at either 1 800 633 1468 or visit our website at www humminbird com WARNING Th...

Страница 3: ...vanced 44 Noise Filter Advanced 44 Max Depth Advanced 45 Water Type Advanced 45 Table of Contents iii Navigation Menu Tab 46 Tracks 47 Waypoints 47 Routes 48 View Orientation 48 Chart Detail Level 49 Map Borders 49 Lat Lon Grid 50 Spot Soundings 50 Shaded Depth 50 North Reference 50 Grid Rotation 51 Trackpoint Interval 51 Track Min Distance Advanced 51 Map Datum Advanced 52 Set Simulation Position...

Страница 4: ... list with Temp Speed Only require the purchase of separate accessories You can visit our website at www humminbird com to order these accessories online or contact our Customer Resource Center at 1 800 633 1468 Table of Contents How Sonar Works Sonartechnologyisbasedonsoundwaves TheHumminbird FishFinderusessonartolocateand definestructure bottomcontourandcomposition aswellasdepthdirectlybelowthet...

Страница 5: ...tes Travel a route and navigate from one waypoint to the next Your FishFinder supports Navionics Gold Chart marine cartography and Navionics HotMaps 2004 Gold for inland fishing NOTE YourFishFinderdoesnotsupportNavionics ClassicCharts onlyNavionics GoldChartsand Navionics HotMaps 2004 Gold Charts Your unit also comes with a built in World map with a more detailed map of North America Domestic mode...

Страница 6: ...f nauticalorstatutemilestraveled RTS RealTimeSonar Window Structure wherefishmaybehiding Thermoclines layers of water with different temperatures that appear at different depths and different times of the year A thermocline typicallyappearsasacontinuousbandofmany colors moving across the display at the same depth BaitBall Fish are displayed as arches and or fish icons and can be set to alarm when ...

Страница 7: ...range sufficient to show the bottom Depth Range is automatically selected to keep the bottom visible on the display although you can adjust it manually as well see Sonar X Press Menu Five additional Digital Readouts display information from optional purchase accessories These information boxes can be customized to show only the information desired see Setup Menu Tab Select Readouts NOTE If the Dep...

Страница 8: ...ater Each vertical band of data received by the control head and plotted on the display represents something that was detected by a sonar return at a particular time As both the boat and the targets fish may be moving the returns are only showing a particular segment of time when objects were detected not exactly where those objects are in relation to other objects shown on the display Real Time S...

Страница 9: ...oomed view on the left The full range view on the right also contains the Zoom Preview Box that shows what part of the full range view is shown in zoom view on the left the Zoom Preview Box tracks the bottom in the full range view As the depth changes the zoomed view updates automatically to display a magnified image of the bottom The Zoom Preview Box shows where the zoomed view is in relation to ...

Страница 10: ...oat Speed of Boat Bearing of Boat with Respect to North Reference Chart View Chart View shows cartography from the built in UniMap or an optional MMC map for the area surrounding your current position The current track also known as the position history or breadcrumb trail showing where the boat has been along with saved tracks waypoints and the current route when navigating are overlaid on the ch...

Страница 11: ...ionBoxesatthebottomofthedisplaywill indicate the distance and bearing to the port from your present position NearestTideStation Tideinformationforthenearesttidestationtoyourpresentpositionwillbe displayed This includes the position of the station and the times of the high and low tides for today s date A tide graph is also displayed showing the rise and fall of the tides for the 24 hour timeperiod...

Страница 12: ...play the Waypoints submenu Programaspecificpositionasawaypoint TocreateawaypointthatisNOTyourcurrentposition from the Waypoints submenu select the Create option and press the RIGHT Cursor key Use the Cursor keys to program a waypoint name latitude longitude and icon before selecting Save Edit a waypoint From the Waypoints submenu select Edit and press the RIGHT Cursor key to displayalistofsavedway...

Страница 13: ...nt first Delete a waypoint From the Waypoints submenu select Delete and press the RIGHT Cursor key todisplayalistofwaypoints Selectthewaypointyouwanttodelete thenpresstheRIGHTCursor key You will be asked to confirm deletion before the waypoint is actually deleted Navigate to a Waypoint or Position Navigate to the cursor position From the Chart or Combo view use the Cursor key to select a position ...

Страница 14: ...want information and press the RIGHT Cursor key The list of waypoints in the route will be shown with the distance and bearing from each waypoint to the next as well as the distance and bearing from the current position to the first waypoint in the route Save or Clear a Current Track Save the current track From the Navigation X Press Menu select Save Current Track and press the RIGHT Cursor key Th...

Страница 15: ...on tab Select Tracks and press the RIGHT Cursor key to display the Tracks submenu Editasavedtrack FromtheTrackssubmenu selectEditandpresstheRIGHTCursorkeytodisplay thelistofsavedtracks SelectthetrackyouwanttoeditandpresstheRIGHTCursorkey Whenthe EditTrackdialogboxappears usetheCursorkeystomovebetweenfields IntheTrackNamefield the UP and DOWN Cursor keys change the letter or number All upper and lo...

Страница 16: ...key Active Cursor In the Bird s Eye View the 4 WAY Cursor Control key controls the motion of the eyepoint In the Chart and Combo Views the 4 WAY Cursor Control key pans the charts Menu Selection Use the DOWN or UP arrow keys to select a menu choice from the menu list then use the LEFT or RIGHT arrow keys to change a menu setting NOTE Menu choices are implemented and saved immediately no further ac...

Страница 17: ...Mode Sonar Tab Advanced Mode Main Menu System Normal User Mode 27 26 Powering Up the Unit Turn on your FishFinder by pressing the POWER key The Title screen is displayed until the FishFinder begins operation Your FishFinder will begin Normal or Simulator operation depending on the presence or absence of a transducer The Menu System The menu system is divided into easy to use menu modules The main ...

Страница 18: ... operation for on the water operation with a transducer connected In addition your FishFinder uses advanced transducer detection methods to determine if a transducer is connected If a functioning transducer is connected Normal operation will be selected automatically at power up and your FishFinder can be used on the water Exit Normal operation by powering your FishFinder off Simulator Use the Sim...

Страница 19: ...currentposition Alight gray bar indicates that the satellite is being monitored but is not yet being used NOTE The GPS Diagnostic View only appears if the GPS Receiver is connected This view also reports the current position local time and date and other numeric information The current GPS Fix Type is reported as No Fix 2D Fix 3D Fix or Enhanced An Enhanced fix has been augmented using information...

Страница 20: ... 20 and the Lower Depth Range to 50 The Sonar View will then show the 30 foot area between 20 and 50 and will not showthesurfaceorthebottom assumingthebottomisdeeperthan50feet and will show greater detail for that area between 20 and 50 feet 32 Sensitivity Sensitivity controls how much detail is shown on the display Increasing the sensitivity shows more sonar returns from small baitfish and suspen...

Страница 21: ...ge 1 Highlight Lower Range on the Sonar X Press Menu 2 Use the LEFT or RIGHT 4 WAY Cursor Control keys to increase or decrease the Lower Range setting AUTO 10 to 1000 feet 3 to 330 meters International Models Only Default AUTO Chart Speed Chart Speed determines the speed at which the sonar information moves across the display and consequently the amount of detail shown A faster speedshowsmoreinfor...

Страница 22: ...presstheRIGHTCursorkey once more To cancel clearing the current track press the LEFT Cursor key Save Current Route Only When Navigating Save Current Route allows you to save the current route being displayed This menu choice will only appear when you are currently navigating a route To Save Current Route 1 Highlight Save Current Route on the Navigation X Press Menu 2 Use the RIGHT 4 WAY Cursor Con...

Страница 23: ...HT 4 WAY Cursor Control key to initiate skipping the next waypoint 3 The Confirm dialog box will appear To skip the next waypoint press the RIGHT Cursor key once more To cancel skipping the next waypoint press the LEFT Cursor key Cancel Navigation Only When Navigating Cancel Navigation discards the current route and exits Navigation Mode This menu choice will only appear when you are currently nav...

Страница 24: ... transducer beam angle the distance to a fish decreases as the fish moves into the beam andthenincreasesasitmovesoutagain creatingaFishArchwhenthisdistancechangeisshown onthedisplay Boatspeed chartspeed andthepositionofthefishwithinthesonarbeamgreatly affect the shape of the arch To turn Fish ID on or off 1 Highlight Fish ID on the Sonar main menu 2 UsetheLEFTorRIGHT4 WayCursorControlkeystoturnthe...

Страница 25: ...r setting displays fewer fish from weak sonar returns This is helpful when seeking larger species of fish Fish Sensitivity is used in conjunction with Fish ID Fish ID must be On for Fish Sensitivity to affect the ability of the FishFinder to identify sonar returns as fish To change the Fish Sensitivity setting 1 Highlight Fish Sensitivity on the Sonar main menu 2 Use the LEFT or RIGHT 4 WAY Cursor...

Страница 26: ...cts the accuracy of deep water depth readings To change the Water Type setting 1 Make sure you are in Advanced User Mode then highlight Water Type on the Sonar main menu 2 Use the LEFT or RIGHT 4 WAY Cursor Control keys to change the Water Type setting Fresh Salt Default Fresh 44 Surface Clutter Advanced Surface Clutter adjusts the filter that removes surface clutter noise caused by algae and aera...

Страница 27: ...t you can set the coordinates to any valid position The Icon used to represent the waypoint in the Chart and Combo Views can also be changed Edit allows you to choose from a list of previously saved waypoints then edit the Name Position Latitude and Longitude and select the Icon that will be used to represent the waypoint in the Chart and Combo Views Delete allows you to delete a waypoint from the...

Страница 28: ...setting Hidden Visible Default Hidden Map Borders Map Borders 48 Routes Routes allows you to view the Routes submenu To view the Routes Submenu 1 Highlight Routes on the Navigation main menu 2 Use the RIGHT 4 WAY Cursor Control keys to view the Routes submenu The Routes Submenu contains the following menu choices Create allows you to create a new empty route and add waypoints to it immediately Edi...

Страница 29: ...re in Advanced User Mode then highlight Track Min Distance on the Navigation main menu 2 Use the LEFT or RIGHT 4 WAY Cursor Control keys to change the Track Min Distance setting 1 to 300 feet or 1 to 100 meters International Units Only Default 16 ft 5 m NOTE During slow travel or drift setting both Trackpoint Interval and Track Min Distance to small values will allow you to increase the track reso...

Страница 30: ...ght Map Datum on the Navigation main menu 2 Use the LEFT or RIGHT 4 WAY Cursor Control keys to change the Map Datum setting Default WGS 84 Set Simulation Position Advanced Set Simulation Position allows you to set the position of the boat used in the Simulator To set the Simulation Position 1 Activate the cursor and move it to the new coordinates 2 MakesureyouareinAdvancedUserMode thenhighlightSet...

Страница 31: ...d to the FishFinder The Low Battery Alarm should be set to warn you when the battery voltagedropsbelowthesafetymarginthatyouhavedetermined Forinstance ifyouarerunning atrollingmotor batteryoperated youwouldwanttosettheLowBatteryAlarmtosoundbefore the battery voltage drops too low for it to be used to start your main gasoline powered engine To change the Low Battery Alarm setting 1 Highlight Low Ba...

Страница 32: ... Alarm Circle 56 Temp Alarm TempAlarmsoundswhenthewatertemperaturedetectedbythe FishFinder reaches the Temp Alarm setting which is either set in degrees Fahrenheit or Celsius International Models Only For example if the Temp Alarm is set to 58 degrees Fahrenheit and the water temperature falls from 60 degrees to 58 degrees the Temp Alarm will sound Similarly if the water temperature rises from 56 ...

Страница 33: ...national Models Only Triplog Reset Only if Temp Speed is Connected Select Views Advanced Select Readouts Advanced Sonar View Only Depth Offset Advanced Temp Offset Advanced Speed Calibration Advanced Only if Temp Speed Connected Setup Menu 58 Alarm Tone Alarm Tone selects the pitch of the alarm sound A brief tone will be produced as you adjust the Alarm Tone so that you can select the tone that yo...

Страница 34: ...h 60 Units Depth Units Depth selects the units of measure for all depth related readouts To change the Units Depth setting 1 Highlight Units Depth on the Setup menu 2 Use the LEFT or RIGHT 4 WAY Cursor Control keys to change the Units Depth setting Meters International Models Only Feet Fathoms Default is Meters for International models and Feet for Domestic models Units Temp International Only Uni...

Страница 35: ...T Cursor keys to change what will be displayed at that position Heading Navigation Position Off Speed Temperature Time Date Triplog Voltage Default Sonar View Customized Sonar View Select Readouts 62 Triplog Reset Triplog Reset resets the Triplog to zero The Triplog provides the following information timer for elapsed time distance traveled since last reset and average speed NOTE See Setup Menu Ta...

Страница 36: ...at dd ddddd dd mm mmm or dd mm ss Default dd mm mmm 64 Depth Offset Advanced Depth Offset will adjust the digital depth readout to indicate depth from the waterline or boats keel Enterapositiveverticalmeasurementfromthetransducertothewaterlinetoreadthedepth fromthewaterline Enteranegativeverticalmeasurementfromthetransducertokeeltoreadthe depth from the keel This menu choice is available only when...

Страница 37: ...ormat Advanced International Only Time Format changes the time format used by the unit This menu choice is available only when in Advanced User Mode see Setup Menu Tab User Mode International Models Only Time Format selects a 12 hour or 24 hour format for the time of day displayed when Time Date is selected as a Digital Readout on the Sonar View see Select Readouts To change the Time Format 1 Make...

Страница 38: ...tecting the transducer Perform the following troubleshooting tasks Using the Installation Guide that also comes with your FishFinder check to make sure thatthetransducercableissecurelyconnectedtotheFishFinder Reconnectifnecessary and power up the FishFinder again to see if this fixes the problem Replace the non functioning transducer with a known good transducer if available and power up the contr...

Страница 39: ...lem Possible Cause Thecontrolheadlosespowerat high speeds Whentheboatmovesathigher speeds the bottom disappears or suddenly weakens or the display contains gaps Therearenofishdetected even when you know they are in the water under the boat or sonar readings seem weak or faulty If the power output of your boat s engine is unregulated the control head may be protecting itself using its over voltage ...

Страница 40: ...totheFishFinder additionalmenusandreadoutsare addedautomaticallytotheMainMenuSystem Accessoriesavailabletodaythataresupportedby your FishFinder include GPS Connection Cable purchase the GPS Connection Cable in order to connect a handheld or other NMEA GPS compatible device that you may already own to your FishFinder NMEA 0183 is a National Marine Electronics Association standard for data communica...

Страница 41: ...ay 8 00 a m to 4 30 p m Central Standard Time 1 800 633 1468 By e mail typically we respond to your e mail within three business days custserv johnsonoutdoors com For direct shipping our address is Humminbird Service Department 678 Humminbird Lane Eufaula AL 36027 USA FF595_Man_531385 1_A_PrfE qxd 12 9 2004 2 41 PM Page 80 ...

Отзывы: