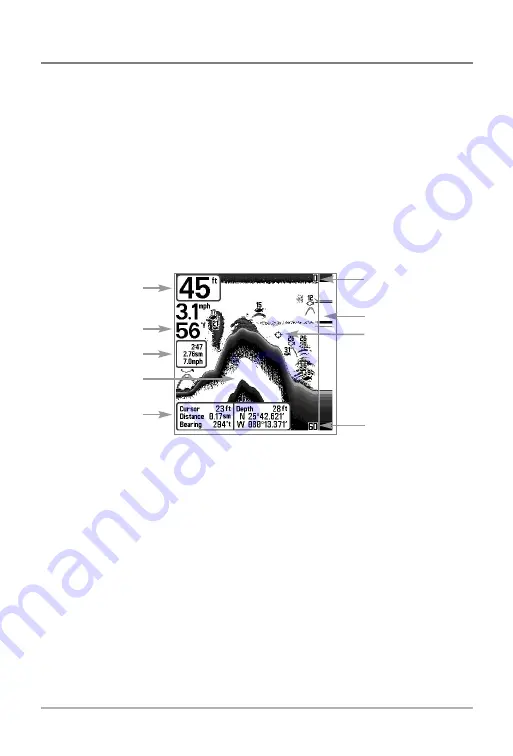
background image

10

Sonar View

Sonar View

presents a historical log of sonar returns. Depth is always displayed.  Readouts for

temperature and speed are automatically displayed if the appropriate accessory is connected. The
most recent sonar returns are charted on the right side of the window; as new information is
received, the older information is moved across the display to the left. A Digital Depth Readout is
displayed in the upper left corner. A scale with Upper and Lower Depth Range readouts appears
along the right edge of the Sonar View. The scale indicates the distance from the surface of the
water to a depth range sufficient to show the bottom. Depth Range is automatically selected to
keep the bottom visible on the display, although you can adjust it manually as well (see 

Sonar 

X-Press™ Menu

). Six additional Digital Readouts display information from optional-purchase

accessories. These information boxes can be customized to show only the information desired
(see 

Setup Menu Tab, Select Readouts

). 

NOTE:

If the Depth number is flashing, it means that the unit is having trouble locating the bottom.

This usually happens if the water is too deep, the transducer is out of the water, the boat is moving
too fast, or for any other reason that the unit can’t accurately receive continuous data.  

Sonar View 

Upper Depth
Range

Sonar History

Window

Depth

Cursor 

Dialog Box

Temperature

Triplog

Lower Depth
Range

RTS® Window

Cursor

Содержание 531427-1_D

Страница 1: ...767 GPS Chartplotter Operations Manual 767 GPS Chartplotter Operations Manual 531427 1_D...

Страница 2: ...NG This device should not be used as a navigational aid to prevent collision grounding boatdamage orpersonalinjury Whentheboatismoving waterdepthmaychangetooquickly toallowtimeforyoutoreact Alwaysoper...

Страница 3: ...14 200 83 kHz Split Sonar View 15 Big Digits View 15 Circular Flasher View 16 Screen Snapshot View 16 Side Beam View with optional purchase QuadraBeam transducer 17 WideSide View with optional purcha...

Страница 4: ...GPS Diagnostic View 38 PC Connect with PC Connect cable only 38 Sonar X Press Menu Sonar views only 39 Side WideSide transducer WideSide view only 40 Sensitivity 41 Upper Range Advanced Sonar Split S...

Страница 5: ...waypoint 52 Screen Snapshot X Press Menu Screen Snapshot view only 53 Delete Image optional purchase MMC SD card only 53 Delete All Images optional purchase MMC SD card only 53 Sonar Menu Tab 54 Beam...

Страница 6: ...Soundings 73 Set Simulation Position Advanced 73 Set Map Offset Advanced 74 Clear Map Offset Advanced 74 Alarms Menu Tab 75 Depth Alarm 76 Fish ID Alarm 76 Low Battery Alarm 77 Temp Alarm 77 Off Cour...

Страница 7: ...sary 97 Sonar Terms 97 GPS Navigation Terms 105 Contact Humminbird 110 NOTE Entries in this Table of Contents which list International only are only available on products sold outside of the U S by ou...

Страница 8: ...r is very fast A sound wave can travel from the surface to a depth of 240 ft 70 m and back again in less than 1 4 of a second It is unlikely that your boat can outrun this sonar signal SONAR is an acr...

Страница 9: ...n Low frequencies 83kHz are typically used to achieve greater depth capability Thepoweroutputistheamountofenergygeneratedbythe sonar transmitter It is commonly measured using two methods Root Mean Squ...

Страница 10: ...affected by such factors as boat speed wave action bottom hardness water conditions and transducer installation QuadraBeam Sonar with optional purchase QuadraBeamTM transducer Your 700 Series Fishing...

Страница 11: ...ait fish in open water The WideSide transducer uses three different sonar elements that transmit signals to the left right and straight down from your boat The downward beamis200kHzwitha24 areaofcover...

Страница 12: ...entpositionisdetermined byreceivingsignalsfromupto16satellitesandmeasuringthe distance from the satellites All satellites broadcast a uniquely coded signal once per second at exactly the same time The...

Страница 13: ...trieve that chart and display it automatically Use the illustration to locate the position of the MMC SD slot cover remove the MMC SD slot cover then insert the MMC SD into the slot The label on the M...

Страница 14: ...the appearance of the second return to determine bottom hardness Hard bottoms will show a strong second return while soft bottoms will show a very weak one or noneatall CursorDialogBox indicatescurso...

Страница 15: ...rossthedisplayatthesamedepth Fish fish are displayed as arches and or fish icons and the unit can be set to alarm when a fish of a certain size is detected When a target is detected and Fish ID TM is...

Страница 16: ...StructureID fromtheX PressTM menu itispossibletoquickly alternate between the two viewing methods NOTE Side Beam View and WideSide View require the purchase of the QuadraBeamTM transducerfortheSideBea...

Страница 17: ...o a depth range sufficient to show the bottom Depth Range is automatically selected to keep the bottom visible on the display although you can adjust it manually as well see Sonar X Press Menu Six add...

Страница 18: ...supdatesatthefastestratepossiblefordepthconditionsandshowsonly the returns from the bottom structure and fish that are within the transducer beam The RTS Window plots the depth and intensity of a sona...

Страница 19: ...Hz Split Sonar Views Bottom Presentation As the boat moves the unit charts the changes in depth on the display to create a profile of the Bottom Contour The type of bottom can be determined from the r...

Страница 20: ...hat strong returns will be clearly visible on the display WhiteLine highlights the strongest sonar returns in white resulting in a distinctive outline This has the benefit of clearly defining the bott...

Страница 21: ...magnified image of the bottom The Zoom Preview Box shows where the zoomed view is in relation to the full range view The Zoom Level or magnification is displayed in the lower left corner and can be ch...

Страница 22: ...igital data in a large easy to see format Depth is always displayed Readouts for temperature speed and Triplog information are displayed automatically if the appropriateaccessoryisconnectedtothe700Ser...

Страница 23: ...nd temperature are always displayed The digital readouts in the Flasher View cannot be customized Screen Snapshot View When Screen Snapshot is enabled from the Accessories menu tab pressing the MARK k...

Страница 24: ...he 4 WAY Cursor keys The selected thumbnail will be highlighted with arrows See the full sized image by selecting a thumbnail using the Up or Down 4 Way Cursor keys then using the Right 4 Way Cursorke...

Страница 25: ...hown inthedown lookingportion soyouactuallyseemoreofthebottom Thedistancecoveredbythe right and left 90 beams is based on the depth setting for the down looking beam up to a maximum of 160 feet Side B...

Страница 26: ...iews are available Left Right and Both The default view is Both Information from both the left and right beams are displayed simultaneously The depth of the water beneath the boat is always displayed...

Страница 27: ...move and turn the eye point so that you can look off to the sides or even behind the boat Pressing the RIGHT or LEFT arrow keys on the 4 WAY Cursor key turns the eye pointrightorleft whilepressingthe...

Страница 28: ...You can use the 4 WAY Cursor Control key to shift pan the chart to another area You can use the ZOOM keys to zoom in and out You can use the INFO key to get information on the chart objects near the c...

Страница 29: ...re drawn above the boat When Course Up orientation is selected the direction of motion of the boat is shown at the top of the display In other words objects ahead of the boat are drawn above the boat...

Страница 30: ...e Chart Info menu will appear You can select the nearest port the nearest tide station or the nearest current station to see information about any of these objects NOTE Thebuilt inUni Map doesnotconta...

Страница 31: ...esenting the shortest intended distance between waypoints You can also view and save tracks which represent the actual path of the boat Waypoints Routes and Tracks Waypointsarestoredpositionsthatallow...

Страница 32: ...ter to give it a different name and select an icon to represent it see Waypoint submenu on the Navigation Main Menu Tab Display the Waypoints Submenu From any view press the MENU key twice to display...

Страница 33: ...to which you want to navigate Press the GOTO key Navigation will begin immediately Navigate to a specified waypoint Press the GOTO key then choose the waypoint to which you would like to navigate fro...

Страница 34: ...he waypoint to which youwanttoaddthegrid Thetrollinggridwillappearonall of the navigation views and can be used as a guide when trolling around a waypoint The grid can be rotated to any desired headin...

Страница 35: ...the RIGHT Cursor key again before the route is deleted Travel a saved route From the Routes submenu select Travel and press the RIGHT Cursor key A listofsavedrouteswillappear Selecttherouteyouwishtotr...

Страница 36: ...ed to confirm deletion before the track is actually deleted Hide or display a saved track From the Tracks submenu select Visibility and press the RIGHT Cursor key to display the list of saved tracks S...

Страница 37: ...to select Nearest Port Nearest Tide Station or Nearest Current Station then use the RIGHT Cursor key to display the requested information NOTE The built in UniMap does not contain Port Tide or Current...

Страница 38: ...ss the MARK key while in any view to mark the position of a waypoint either at the current boat location or if the Cursor is active at the current Cursor location The MARK key only functions if you ha...

Страница 39: ...ve the cursor from the display Accessory Bus UsetheAccessoryBustoexpandthefunctionalityofyour700 Series Fishing System Accessories plug directly into the 700 Series Fishing System enabling Advanced fe...

Страница 40: ...by pressing the POWER LIGHT key The Title screen is displayed until the 700 Series Fishing System begins operation Your 700 Series Fishing System will begin Normal or Simulator operation depending on...

Страница 41: ...ion or Screen Snapshot X PressTM Menu will appear depending on the view you are in Main Menu Tabs Less frequently adjusted menus are grouped into the Main Menu System The MainMenusystemisorganizedunde...

Страница 42: ...changes made while in Advanced Mode will remain in effect after you switch back to Normal Mode See Setup Menu Tab User Mode for specific instructions on changing to Advanced User Mode Total Screen Up...

Страница 43: ...an be used on the water Exit Normal operation by powering your 700 Series Fishing System off Simulator Use the Simulator to learn how to use your 700 Series Fishing System before taking your boat on t...

Страница 44: ...Diagnostic View Exit System Status by powering your Fishing System off Self Test Self Test displays results from the internal diagnostic self test including unit serial number Printed Circuit Board P...

Страница 45: ...A 3D or Enhanced Fix is required for navigation HDOP the Horizontal Dilution of Precision is a GPS system parameter which depends on the current satellite configuration HDOP is used to calculate the...

Страница 46: ...the settings most frequently used Press the MENU key once while in any of the Sonar Views to access the Sonar X PressTM menu NOTE Menuchoiceswillvarydependingonsystemsettingssuchas whethertheunitisset...

Страница 47: ...be accessed from the Sonar X PressTM menu when you are in WideSide view NOTE Side requires the purchase of the WideSide transducer You can visit our website at www humminbird com to order this accesso...

Страница 48: ...y or muddy water If Sensitivity is adjusted too low the display may not show many sonar returns that could be fish NOTE The Sensitivity setting is a global setting and will adjust the sensitivity of a...

Страница 49: ...the Upper and Lower Range regardless of the manual settings entered To adjust the Upper Range 1 Make sure you are in Advanced Mode then highlight Upper Range on the Sonar X PressTM menu 2 Use the LEF...

Страница 50: ...in Manual mode NOTE A minimum distance of 10 feet will be maintained between the Upper and Lower Range regardless of the manual settings entered To adjust the Lower Range 1 Highlight Lower Range on th...

Страница 51: ...ducer Mode and that a WideSide transducer is connected then highlight Side Beam Range on the Sonar X PressTM menu 2 Use the LEFT or RIGHT 4 WAY Cursor Control keys to increase or decrease the Side Bea...

Страница 52: ...rmoclines will be shown using the Structure ID method See Bottom Presentation for more information To adjust the Bottom View 1 Highlight Bottom View on the Sonar X PressTM Menu 2 Use the LEFT or RIGHT...

Страница 53: ...lt Off Cancel Navigation only when Navigating Cancel Navigation discards the current route and exits Navigation Mode This menu choice will only appear when you are currently navigating a route This wi...

Страница 54: ...ccess to the settings most frequently used Press the MENU key once while in the Bird s Eye View the Chart or the Combo View to access the Navigation X PressTM menu NOTE Menu choices will vary dependin...

Страница 55: ...he RIGHT 4 Way Cursor Control key to view the Waypoints submenu which contains the following menu choices The Waypoint Submenu contains the following menu choices Edit allows you to edit the Name Posi...

Страница 56: ...g displayed After the current track is saved a new current track is started To Save Current Track 1 Highlight Save Current Track on the Navigation X PressTM menu 2 Use the RIGHT 4 WAY Cursor Control k...

Страница 57: ...Navigation X PressTM menu 2 Use the RIGHT 4 WAY Cursor Control key to initiate skipping the next waypoint 3 The Confirm dialog box will appear To skip the next waypoint press the RIGHT Cursor key onc...

Страница 58: ...id from the display This menu choice will only appear when a grid has already been applied to a waypoint NOTE See Add a Waypoint Target or Trolling Grid for more information To Remove a Grid 1 Highlig...

Страница 59: ...Control key to view the Waypoints submenu The Waypoint Submenu contains the following menu choices Edit allows you to edit the Name Position Latitude and Longitude and select the Icon that will be us...

Страница 60: ...y Cursor keys to select the image you want to delete 2 Highlight Delete Image on the Screen Snapshot X Press menu 3 Press the RIGHT 4 Way Cursor key to initiate this procedure 4 A Confirm Dialog box w...

Страница 61: ...esstheMainMenuSystemand then press the RIGHT Cursor key to select the Sonar tab NOTE Menu choices will vary depending on system settings such as whether the unit is set for Advanced User mode or what...

Страница 62: ...0 kHz only the returns from the 200 kHz narrow beam will be displayed in the Sonar View the Sonar Zoom View the Big Digits View and the Circular Flasher View The Split Sonar View will continue to disp...

Страница 63: ...ID TM is turned off the 700 Series Fishing System shows only the raw sonar returns on the display These returns will often result in arches forming on the display indicating potential targets Due to...

Страница 64: ...eturns as fish To change the Fish ID Sensitivity setting 1 Highlight Fish ID Sensitivity on the Sonar main menu 2 UsetheLEFTorRIGHT4 WAYCursorControlkeystochangetheFishIDSensitivitysetting Low 1 High...

Страница 65: ...affecting the sensitivity of the 200 kHz returns shown in the 200 kHz sonar window To set the 83 kHz Sensitivity 1 Make sure you are in Advanced User Mode then highlight 83 kHz Sensitivity on the Son...

Страница 66: ...hed to the 700 Series Fishing System The WideSide Sensitivity menu choice is available when Transducer Select is set to WideSide see Sonar Menu Tab Transducer Select and User Mode is set to Advanced s...

Страница 67: ...You can either turn Depth LinesOnorOff TheDepthLinesmenuchoiceisavailablewhenUserModeissettoAdvanced see Setup Menu Tab User Mode To change the Depth Lines setting 1 Make sure you are in Advanced User...

Страница 68: ...ill be displayed The Surface Clutter menu choice is available when User Mode is set to Advanced see Setup Menu Tab User Mode To change the Surface Clutter setting 1 MakesureyouareinAdvancedUserMode th...

Страница 69: ...adjusts the maximum depth of operation The performance of your 700 Series Fishing System can be tuned to the maximum depth you will be fishing in by setting the Max Depth When a maximum depth is set y...

Страница 70: ...is affects the accuracy of deep water depth readings To change the Water Type setting 1 Make sure you are in Advanced User Mode then highlight Water Type on the Sonar main menu 2 Use the LEFT or RIGHT...

Страница 71: ...ation Menu Tab Press the MENU key twice to access the Main Menu System then press the RIGHT cursor key to select the Navigation tab NOTE Menu choices will vary depending on system settings Navigation...

Страница 72: ...umb Trail Dashed Line or Solid Line and if a line the color of the line from light to dark gray to black Saved Tracks Saved Tracks allows you to view the Saved Tracks submenu To view the Saved Tracks...

Страница 73: ...be changed Edit allows you to choose from a list of previously saved waypoints then edit the Name Position Latitude and Longitude and select the Icon that will be used to represent the waypoint in the...

Страница 74: ...ect a previously saved route to use as the current route this menu setting also begins navigation on this route Routes can be traveled in either the forward or reverse direction Info displays informat...

Страница 75: ...ochangetheGridRotationsetting 0 to 89 Default 0 Trackpoint Interval Trackpoint Interval allows you to select the time period between trackpoints The current track can only contain up to 2000 trackpoin...

Страница 76: ...he LEFT or RIGHT 4 WAY Cursor Control keys to change the Track Min Distance setting 1 to 300 feet or 1 to 100 meters International Units only Default 16 ft 5 m NOTE Duringslowtravelordrift settingboth...

Страница 77: ...n Data 1 MakesureyouareinAdvancedUserMode andthatanoptional purchaseMMC SDcard is installed in the slot then highlight Export All Nav Data on the Navigation main menu 2 Use the RIGHT 4 WAY Cursor Cont...

Страница 78: ...PresstheMENUkeytwicetoaccesstheMainMenuSystem andthenpresstheRIGHTCursorkeytoselecttheCharttab NOTE Menu choices will vary depending on system settings such as whether the unit is set for Advanced Use...

Страница 79: ...sic Navigation and Underwater information To change the Chart Detail Level setting 1 Highlight Chart Detail Level on the Chart main menu 2 Use the LEFT or RIGHT 4 WAY Cursor Control keys to change the...

Страница 80: ...dings setting Hidden Visible Default Hidden Set Simulation Position Advanced Set Simulation Position allows you to set the position of the boat used in the Simulator The Set Simulation Position menu c...

Страница 81: ...e sure you are in Advanced User Mode then highlight Set Map Offset on the Chart main menu 3 Use the RIGHT 4 WAY Cursor Control key to set the Map Offset A confirmation dialog boxwillappeartoallowyouto...

Страница 82: ...s the Main Menu System The Alarms tab will be the default selection NOTE When an alarm is triggered you can silence it by pressing any key The alarm will be silenced and will not be triggered again un...

Страница 83: ...F Fish ID Alarm Fish ID Alarm sounds when the Fishing System detects fish that correspond to the alarm setting Fish ID Alarm will only sound if Fish ID TM is on To change the Fish ID Alarm setting 1 H...

Страница 84: ...ght Low Battery Alarm on the Alarms main menu 2 Use the LEFT or RIGHT 4 WAY Cursor Control keys to change the Low Battery Alarm setting Off 8 5V 13 5V Default Off Temp Alarm Temp Alarm sounds when the...

Страница 85: ...International Models only Default 300 ft 100 m Arrival Alarm Arrival Alarm sounds when the boat has either exceeded the distance to the destination waypoint or has entered the Arrival Alarm Circle ba...

Страница 86: ...u 2 Use the LEFT or RIGHT 4 WAY Cursor Control keys to change the Drift Alarm setting Off 25 to 3000 feet 10 to 1000 meters International Models only Default Off Alarm Tone Alarm Tone selects the pitc...

Страница 87: ...the tabbed Main Menu System then press the RIGHT cursor key until the Setup tab is selected NOTE Menu choices will vary depending on system settings such as whether the unit is set for Advanced User...

Страница 88: ...ts Temp on the Setup menu 2 Use the LEFT or RIGHT 4 WAY Cursor Control keys to change the Units Temp setting Celsius Fahrenheit Default Celsius Units Distance Units Distance selects the units of measu...

Страница 89: ...or Domestic models User Mode User Mode sets the menu system to either Normal or Advanced When set to Normal default setting only the basic menu options are shown When set to Advanced additional menu c...

Страница 90: ...og 1 Highlight Reset Triplog on the Setup menu 2 Use the RIGHT 4 WAY Cursor Control key to initiate Triplog Reset 3 TheConfirmdialogboxwillappear ToresettheTriplog presstheRIGHTCursorkeyonce more To c...

Страница 91: ...ries suchasTemp Speed Eachdatawindowcaneitherbeemptyor contain one of the following Course Temperature Navigation Time Date Position Triplog Speed Voltage ToSelectReadouts 1 Make sure you are in Advan...

Страница 92: ...st the temperature readout by the amount entered This menu choice is available only when in Advanced User Mode see Setup Menu Tab User Mode To change the Temp Offset setting 1 Make sure you are in Adv...

Страница 93: ...tandard Time Daylight Saving Time Advanced Daylight Saving Time adjusts the time display to account for local Daylight Saving Time when Time Date is selected as a Digital Readout on the Sonar View see...

Страница 94: ...formatforthetimeofdaydisplayedwhenTime DateisselectedasaDigital ReadoutontheSonarView seeSelectReadouts To change the Time Format 1 Make sure you are in Advanced User Mode then highlight Time Format o...

Страница 95: ...ific GNSS Data VTG Course Over Ground and Ground Speed ZDA Time and Date When navigating the following NMEA sentences are also output when NMEA Output is turned On APB Autopilot Sentence B BWR Bearing...

Страница 96: ...he following views are available Bird s Eye View Chart View Combo View WideSide View withoptional purchaseWideSide transducer SideBeamView withoptional purchaseQuadraBeam transducer Sonar View Sonar Z...

Страница 97: ...Resource Centerat1 800 633 1468foradditionaldetails Using Screen Snapshot Screen Snapshot activates the screen snapshot function When Screen Snapshot is enabled pressing the MARK key creates a saved...

Страница 98: ...r card slot 2 Press the VIEW key until you see the Screen Snapshot View 3 The Screen Snapshot View displays up to three thumbnails of these screen captures at a time You can scroll through the whole l...

Страница 99: ...from the battery terminals or wiring or actually replacing the battery if necessary 700 Series Defaults to Simulator with a Transducer Attached Aconnectedandfunctioningtransducerwillcausethenewly sta...

Страница 100: ...ed A mix of air and water flowing around the transducer cavitation may be interfering with the interpretation of sonar data See your Installation Guide for suggestions on adjusting the transducer posi...

Страница 101: ...re appears To determine whether the boat s engine is the source of the noise increase the RPMs while the boat is in neutral and stationary to see if the noise increases proportionately if noise appea...

Страница 102: ...hing System to obtain barometric pressure readouts and trend data in real time GPS Connection Cable purchase the GPS Connection Cable in order to connect a handheld or other NMEA GPS compatible device...

Страница 103: ...arget Separation 2 1 2 Inches 63 5 mm Power Requirement 10 20 VDC LCD 640 V x 320 H Transducer XHS 9 20 T Transducer Cable Length 20 ft 6 m NOTE Humminbird verifies maximum stated depth in saltwater c...

Страница 104: ...contrast and easy readability even though it can obscure bottom hardness information Bottom Contour Bottom Contour is the profile of the bottom graphed to the display as the depth changes Bottom Hard...

Страница 105: ...ltaneously and combines the information from both beams into one view by overlapping the data on screen or shows each beam individually side by side or permits each beam to be viewed individually full...

Страница 106: ...e the weakersignalsappearbolder Inversegrayscaleworkswellinveryclearwater Debris ladenwater often appears as a lot of clutter on the screen InstantImageUpdate InstantImageUpdateisaHumminbird featureth...

Страница 107: ...axis can vary greatly depending on boat speed and the Chart Speed setting A greater number of horizontal pixels show more sonar history that the boat has passed through On many models Humminbird prov...

Страница 108: ...ottom to be reflected again Second returnsaremorecommoninshallowwaterandoverhardbottoms itisactuallypossibletoseea third sonar return under some circumstances The second return provides useful informa...

Страница 109: ...of other potential objects sunken boats reefs Humminbird units excel at showing structure with great detail over a wider area due to unique sonar configurations developed for the angler Structure ID...

Страница 110: ...itter and receiver are matched parts of the sonar system that send transmit and listen to receive the sonar signals and work in conjunction with the transducer Humminbird transmitters have an extremel...

Страница 111: ...Press menus will differ from Chart View X Press menus etc X Press menus are one of the principal reasons that Humminbird products are easier to use Zoom Zoom is a feature that focuses in on a smaller...

Страница 112: ...along with Tracks Waypoints and Routes All Chartplotters are also considered Trackplotters All Humminbird GPS Combo units are Chartplotters See Trackplotter Cold Start Cold Start refers to the procedu...

Страница 113: ...the location of each of the satellites Heading Heading describes the direction the boat is pointing and is measured in degrees i e 321 where 000 is North 090 East 180 is South 270 is West Due to wind...

Страница 114: ...oints each time one travels through the same area Routes consist of a Start Waypoint an End Waypoint and a series of waypoints in between Users can begin navigation at the beginning the end to run the...

Страница 115: ...d featurethatdisplaysaprecisereferencegridaround awaypoint Thisgridisusedasaguidepatternfortrollingaroundaspecificareatoassureamore efficient and complete coverage of that area Trolling Grid resolutio...

Страница 116: ...precise bull s eye around a selected waypoint This bull s eye is used to easily monitor boat position relative to a waypoint andisusefulforfishingoversubmergedstructure WithWaypointTargets aquicklook...

Страница 117: ...110 Notes...

Страница 118: ...111 Notes...

Страница 119: ...ays By Telephone Monday Friday 8 00 a m to 4 30 p m Central Standard Time 1 800 633 1468 By e mail typically we respond to your e mail within three business days cservice johnsonoutdoors com For direc...

Отзывы: