background image

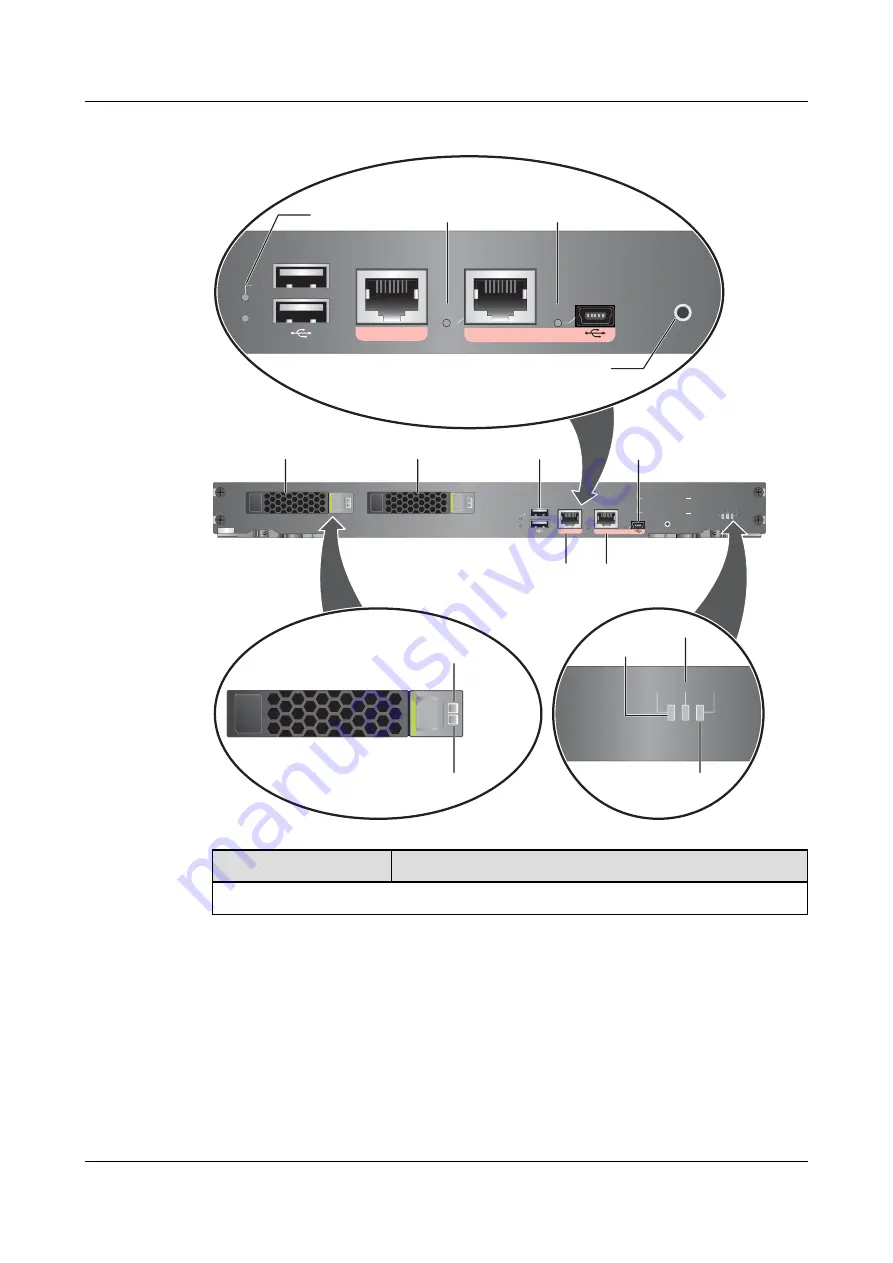
Figure 2-83

 SPUA

MGMT

CONSOLE

0

HDD0

HDD1

RST

EN

EN

SYS ALM MODE

SPUA

HDD0 hard drive HDD1 hard drive

USB port

Console port
(Mini USB)

MGMT port Console port

(RJ45)

SYS

ALM

MODE

SYS indicator

MODE indicator

ALM indicator

MGMT

CONSOLE

0

1

RST

EN

EN

RST button

USB0 or USB1
indicator

EN indicator 
(RJ45)

EN indicator 
(Mini USB)

Alarm indicator

Run indicator

Name

Description

Hard Disk Ports and Indicators

HUAWEI USG6000 Series
Hardware Guide

2 Hardware Overview

Issue 08 (2017-06-30)

Huawei Proprietary and Confidential

Copyright © Huawei Technologies Co., Ltd.

183

Содержание USG6000 Series

Страница 1: ...HUAWEI USG6000 Series V100R001 V500R001 Hardware Guide Issue 08 Date 2017 06 30 HUAWEI TECHNOLOGIES CO LTD ...

Страница 2: ...cument may not be within the purchase scope or the usage scope Unless otherwise specified in the contract all statements information and recommendations in this document are provided AS IS without warranties guarantees or representations of any kind either express or implied The information in this document is subject to change without notice Every effort has been made in the preparation of this d...

Страница 3: ...ersion The following table lists the product version related to this document HUAWEI USG6000 Series Hardware Guide About This Document Issue 08 2017 06 30 Huawei Proprietary and Confidential Copyright Huawei Technologies Co Ltd ii ...

Страница 4: ... WL USG6530 USG6550 USG6570 l USG6600 USG6620 USG6630 USG6650 USG6660 USG6670 USG6680 V100R001 V500R001 Intended Audience This document describes hardware structure installation guide and hardware maintenance The content of this document includes the appearance and specifications of the product the HUAWEI USG6000 Series Hardware Guide About This Document Issue 08 2017 06 30 Huawei Proprietary and ...

Страница 5: ...which if not avoided may result in minor or moderate injury Indicates a potentially hazardous situation which if not avoided could result in equipment damage data loss performance deterioration or unanticipated results NOTICE is used to address practices not related to personal injury NOTE Calls attention to important information best practices and tips NOTE is used to address information not rela...

Страница 6: ...d dialog titles are in boldface For example click OK Multi level menus are in boldface and separated by the signs For example choose File Create Folder Update History Updates between document issues are cumulative Therefore the latest document issue contains all updates made in previous issues Updates in Issue 08 2017 06 30 of Product Version V500R001C60 The eighth commercial release has the follo...

Страница 7: ... SAS600G A If you use SM HDD SAS600G A hard disks on V500R001C20SPC200 earlier versions the SM HDD SAS600G A hard disks will be identified as non Huawei hard disks You need to upgrade the FW version l The 1 U model USG6306 6308 6330 6350 6360 6370 6380 6390 6390E 6507 6530 6550 6570 6620 6630 supports SM HDD SAS600G B hard disk combination For details see Hard Disk Combination SM HDD SAS600G B If ...

Страница 8: ... Cabinet Updates in Issue 02 2014 10 20 of Product Version V100R001C20SPC200 The second commercial release has the following updates The following hardware models are added based on V100R001C10 l USG6310 l USG6330 6350 6360 l USG6530 l 2 3 1 USG6620 6630 Updates in Issue 01 2014 06 13 of Product Version V100R001C10SPC100 Initial commercial release HUAWEI USG6000 Series Hardware Guide About This Do...

Страница 9: ... Supply System 13 2 1 2 5 Heat Dissipation System 15 2 1 2 6 Technical Specifications 15 2 1 3 USG6310S 17 2 1 3 1 Device Overview 17 2 1 3 2 Front Panel 18 2 1 3 3 Rear Panel 19 2 1 3 4 Power Supply System 20 2 1 3 5 Heat Dissipation System 22 2 1 3 6 Technical Specifications 22 2 1 4 USG6310S W 24 2 1 4 1 Device Overview 24 2 1 4 2 Front Panel 25 2 1 4 3 Rear Panel 26 2 1 4 4 Power Supply System...

Страница 10: ...stem 61 2 1 7 6 Technical Specifications 62 2 1 8 USG6370 6380 6390 64 2 1 8 1 Device Overview 64 2 1 8 2 Front Panel 67 2 1 8 3 Rear Panel 72 2 1 8 4 Power Supply System 73 2 1 8 5 Heat Dissipation System 76 2 1 8 6 Technical Specifications 76 2 1 9 USG6390E 79 2 1 9 1 Device Overview 79 2 1 9 2 Front Panel 81 2 1 9 3 Rear Panel 86 2 1 9 4 Power Supply System 87 2 1 9 5 Heat Dissipation System 90...

Страница 11: ...2 4 5 Heat Dissipation System 136 2 2 4 6 Technical Specifications 136 2 3 USG6600 Product Series 139 2 3 1 USG6620 6630 139 2 3 1 1 Device Overview 139 2 3 1 2 Front Panel 141 2 3 1 3 Rear Panel 146 2 3 1 4 Power Supply System 147 2 3 1 5 Heat Dissipation System 150 2 3 1 6 Technical Specifications 150 2 3 2 USG6650 6660 153 2 3 2 1 Device Overview 153 2 3 2 2 Front Panel 156 2 3 2 3 Rear Panel 1...

Страница 12: ...utions 242 3 1 2 Installation Environment Check 243 3 1 3 Instruments Required for the Installation 244 3 2 Installing a Desktop Device USG6305 6305 W 6310S 6310S W 6310S WL OVS 6510 6510 WL 245 3 2 1 Mounting a Device to a Specified Location 245 3 2 1 1 Mounting a Device into a Cabinet 245 3 2 1 2 Mounting a Device on a Workbench 249 3 2 1 3 Mounting a Device Against a Wall 251 3 2 2 Connecting a...

Страница 13: ...n or Off the USG6306 6308 6330 6350 6360 6370 6380 6390 6390E 6507 6530 6550 6570 6620 6630 305 3 5 Installing a 3 U Device USG6650 6660 6670 6680 307 3 5 1 Mounting a Device in a Cabinet 307 3 5 2 Connecting a PGND Cable 314 3 5 3 Installing an Expansion Card 315 3 5 4 Installing Hard Disk Units 318 3 5 5 Connecting a Console Cable 321 3 5 6 Connecting an Ethernet Cable 325 3 5 7 Installing Optic...

Страница 14: ...iFi Antenna 388 A 2 Optical Transceiver 389 A 3 Requirements for Installation Environment 392 A 3 1 Device Position 392 A 3 2 Humidity Temperature and Cleanness 392 A 3 3 ESD Requirements 394 A 3 4 Lightning Protection and Grounding 395 A 3 5 Power Supply 398 A 3 6 Electromagnetic Protection 400 HUAWEI USG6000 Series Hardware Guide Contents Issue 08 2017 06 30 Huawei Proprietary and Confidential C...

Страница 15: ...ly updated and optimized ever since its launch Figure 1 1 displays software versions compatible with the USG and version evolution Figure 1 1 Software Versions Compatible with Hardware HUAWEI USG6000 Series Hardware Guide 1 Software Versions Compatible with Hardware Issue 08 2017 06 30 Huawei Proprietary and Confidential Copyright Huawei Technologies Co Ltd 1 ...

Страница 16: ...2 1 1 1 Device Overview The USG6305 is a 1 U desktop device with an integrated structure The device uses natural cooling provides fixed ports and uses an external power adapter to supply power The device does not support port expansion Appearance Figure 2 1 illustrates the appearance of the USG6305 Figure 2 1 Appearance of USG6305 Front view Rear view Secospace USG6000 0 2 1 3 RST micro SD 12V 2A ...

Страница 17: ...n The link is connected l Blink eight times every second 8 Hz Data is being sent or received l Off The link is disconnected System status indicators PWR indicator green l Steady on The power module works properly l Off The power module is faulty or the power cable is disconnected SYS indicator green l Steady on The system is being powered on or restarted l Blink every two seconds 0 5 Hz The system...

Страница 18: ...6305 provides fixed ports a protective ground terminal RST button and power socket Figure 2 3 illustrates the rear panel of the USG6305 Figure 2 3 USG6305 rear panel Secospace USG6000 0 2 1 3 RST micro SD 12V 2A CONSOLE 0 2 1 3 CONSOLE SN XXXXXXXXXXXXXXXXXXXXXXXXXXX Protective ground terminal USB2 0 port Anti theft locating hole Micro SD card slot RST button 10 100 1000M autosensing Ethernet elect...

Страница 19: ...M autosensing Ethernet electrical ports numbered from GigabitEthernet 0 0 0 to GigabitEthernet 0 0 3 GigabitEthernet 0 0 0 is an inband management port and its default IP address is 192 168 0 1 After this port is connected to your PC through network cables you can log in to the device using Telnet STelnet or web UI to configure or manage the device RST button To restart the device press the RST bu...

Страница 20: ...fter the output current falls within a normal range Output overvoltage protection Intermittently stops output and automatically restores output after the overvoltage condition is removed Output short circuit protection Intermittently provides output and automatically restores normal output after the output short circuit is removed Heat dissipation The power adapter does not have fans and uses natu...

Страница 21: ...al Specifications This section describes the dimensions weight and power and environment specifications of the USG6305 Table 2 3 lists the technical specifications of the USG6305 Table 2 3 USG6305 Technical Specifications Item Description System specifications CPU Multi core 1 0 GHz processor Memory DDR3 1 GB Flash 32 MB NAND Flash 512 MB Micro SD card Optional Purchase one 64 GB micro SD card fro...

Страница 22: ...l cooling Port density Console port 1 RJ45 USB 2 0 port 1 Mandatory service ports 4 10 100 1000M autosensing Ethernet electrical ports Micro SD card slot 1 Expansion slot None Environment specificationsc System reliability MTBF year 14 08 MTTR hour 1 Long term operating temperature 0 C to 45 C Storage temperature 40 C to 70 C Operating relative humidity 5 RH to 95 RH non condensing Storage relativ...

Страница 23: ...W is a 1 U desktop device with an integrated structure The device uses natural cooling provides fixed ports supports WLAN access and uses an external power adapter to supply power The device does not support port expansion Appearance Figure 2 5 illustrates the appearance of the USG6305 W Figure 2 5 Appearance of USG6305 W Rear view PWR SYS ALM USBmicroSD Secospace USG6000 0 1 2 3 ETH 2 4G WLAN 5G ...

Страница 24: ... sent or received l Off The link is disconnected System status indicators PWR indicator green l Steady on The power module works properly l Off The power module is faulty or the power cable is disconnected SYS indicator green l Steady on The system is being powered on or restarted l Blink every two seconds 0 5 Hz The system is running normally l Blink twice every second 2 Hz The system is starting...

Страница 25: ...ff The channel is disabled and the SSID is not allocated WLAN 5G indicator green l Steady on The channel is enabled the SSID is allocated but no device is connecting l Blink every two seconds 0 5 Hz The device is accessing WiFi l Blink twice every second 2 Hz Data is being sent or received l Off The channel is disabled and the SSID is not allocated 2 1 2 3 Rear Panel The rear panel of the USG6305 ...

Страница 26: ... the SN of the device USB 2 0 port l USB ports allow you to insert USB devices for system software upgrades For details on upgrades through USB devices refer to the Upgrade Guide delivered with the device l USB ports allow you to insert 4G LTE data cards For details on the 4G LTE data cards refer to 2 6 4G LTE Data Card Micro SD card slot The micro SD card slot allows you to insert a micro SD card...

Страница 27: ...he RST button can also be used to restore the default settings To do so press and hold down the RST button and power on the device Three to five seconds later when the SYS and ALM indicators on the front panel are both blinking release the RST button Power receptacle Connects to the 4 pin plug of the power adapter Protective ground terminal The M4 OT terminal connects the PGND cable to the ground ...

Страница 28: ... automatically restores output after the overvoltage condition is removed Output short circuit protection Intermittently provides output and automatically restores normal output after the output short circuit is removed Heat dissipation The power adapter does not have fans and uses natural cooling Table 2 5 lists the technical specifications of the 24W power adapter Table 2 5 Technical specificati...

Страница 29: ...ecifications of the USG6305 W Table 2 6 lists the technical specifications of the USG6305 W Table 2 6 USG6305 W Technical Specifications Item Description System specifications CPU Multi core 1 0 GHz processor Memory DDR3 1 GB Flash 32 MB NAND Flash 512 MB Micro SD card Optional Purchase one 64 GB micro SD card from Huawei as required Hard disk Not supported SPUB the service engine Not supported 4G...

Страница 30: ...rs Micro SD card slot 1 Expansion slot None WiFi access specifications Wireless standards IEEE 802 11 a b g n ac Wireless rate 300 Mbit s Frequency bands l 2 412 GHz to 2 472 GHz l 5 18 GHz to 5 825 GHz Maximum transmit powerc l 2 4 GHz 15 dBm l 5 GHz 20 dBm Environment specificationsd System reliability MTBF year 13 8 MTTR hour 1 Long term operating temperature 0 C to 45 C Storage temperature 40 ...

Страница 31: ... 2 1 3 1 Device Overview The USG6310S is a 1 U desktop device with an integrated structure The device uses natural cooling provides fixed ports and uses an external power adapter to supply power The device does not support port expansion Appearance Figure 2 9 illustrates the appearance of the USG6310S Figure 2 9 Appearance of USG6310S Front view Rear view Secospace USG6000 0 2 1 3 4 6 5 7 RST micr...

Страница 32: ...he power module works properly l Off The power module is faulty or the power cable is disconnected SYS indicator green l Steady on The system is being powered on or restarted l Blink every two seconds 0 5 Hz The system is running normally l Blink twice every second 2 Hz The system is starting l Blink eight times every second 8 Hz The system software or configuration file is being upgraded l Off Th...

Страница 33: ... 12V 2A CONSOLE 0 2 1 3 4 6 5 7 SOLE XXXXXXXXXXXXXXXXXXXXXXXXXXX SN Protective ground terminal USB2 0 port Anti theft locating hole Micro SD card slot Anti theft mounting hole micro SD C RST button 10 100 1000M autosensing Ethernet electrical ports Console port Power receptacle Clip hole Name Description SN The serial number that uniquely identifies the device When applying for a license file you ...

Страница 34: ...rnet 0 0 0 to GigabitEthernet 0 0 7 GigabitEthernet 0 0 0 is an inband management port and its default IP address is 192 168 0 1 After this port is connected to your PC through network cables you can log in to the device using Telnet STelnet or web UI to configure or manage the device RST button To restart the device press the RST button Ensure that the running configuration is saved before pressi...

Страница 35: ...fter the output current falls within a normal range Output overvoltage protection Intermittently stops output and automatically restores output after the overvoltage condition is removed Output short circuit protection Intermittently provides output and automatically restores normal output after the output short circuit is removed Heat dissipation The power adapter does not have fans and uses natu...

Страница 36: ... Specifications This section describes the dimensions weight and power and environment specifications of the USG6310S Table 2 9 lists the technical specifications of the USG6310S Table 2 9 USG6310S Technical Specifications Item Description System specifications CPU Multi core 1 0 GHz processor Memory DDR3 1 GB Flash 32 MB NAND Flash 512 MB Micro SD card Optional Purchase one 64 GB micro SD card fr...

Страница 37: ... cooling Port density Console port 1 RJ45 USB 2 0 port 1 Mandatory service ports 8 10 100 1000M autosensing Ethernet electrical ports Micro SD card slot 1 Expansion slot None Environment specificationsc System reliability MTBF year 14 08 MTTR hour 1 Long term operating temperature 0 C to 45 C Storage temperature 40 C to 70 C Operating relative humidity 5 RH to 95 RH non condensing Storage relative...

Страница 38: ...U desktop device with an integrated structure The device uses natural cooling provides fixed ports supports WLAN access and uses an external power adapter to supply power The device does not support port expansion Appearance Figure 2 13 illustrates the appearance of the USG6310S W Figure 2 13 Appearance of USG6310S W Secospace USG6000 0 2 1 3 4 6 5 7 RST micro SD 12V 2A CONSOLE WiFi 0 WiFi 1 PWR S...

Страница 39: ...a is being sent or received l Off The link is disconnected System status indicators PWR indicator green l Steady on The power module works properly l Off The power module is faulty or the power cable is disconnected SYS indicator green l Steady on The system is being powered on or restarted l Blink every two seconds 0 5 Hz The system is running normally l Blink twice every second 2 Hz The system i...

Страница 40: ...f The channel is disabled and the SSID is not allocated WLAN 5G indicator green l Steady on The channel is enabled the SSID is allocated but no device is connecting l Blink every two seconds 0 5 Hz The device is accessing WiFi l Blink twice every second 2 Hz Data is being sent or received l Off The channel is disabled and the SSID is not allocated 2 1 4 3 Rear Panel The rear panel of the USG6310S ...

Страница 41: ... provide the SN of the device USB 2 0 port l USB ports allow you to insert USB devices for system software upgrades For details on upgrades through USB devices refer to the Upgrade Guide delivered with the device l USB ports allow you to insert 4G LTE data cards For details on the 4G LTE data cards refer to 2 6 4G LTE Data Card Micro SD card slot The micro SD card slot allows you to insert a micro...

Страница 42: ...e RST button can also be used to restore the default settings To do so press and hold down the RST button and power on the device Three to five seconds later when the SYS and ALM indicators on the front panel are both blinking release the RST button Power receptacle Connects to the 4 pin plug of the power adapter Protective ground terminal The M4 OT terminal connects the PGND cable to the ground p...

Страница 43: ...d automatically restores output after the overvoltage condition is removed Output short circuit protection Intermittently provides output and automatically restores normal output after the output short circuit is removed Heat dissipation The power adapter does not have fans and uses natural cooling Table 2 11 lists the technical specifications of the 24W power adapter Table 2 11 Technical specific...

Страница 44: ...ifications of the USG6310S W Table 2 12 lists the technical specifications of the USG6310S W Table 2 12 USG6310S W Technical Specifications Item Description System specifications CPU Multi core 1 0 GHz processor Memory DDR3 1 GB Flash 32 MB NAND Flash 512 MB Micro SD card Optional Purchase one 64 GB micro SD card from Huawei as required Hard disk Not supported SPUB the service engine Not supported...

Страница 45: ...rs Micro SD card slot 1 Expansion slot None WiFi access specifications Wireless standards IEEE 802 11 a b g n ac Wireless rate 300 Mbit s Frequency bands l 2 412 GHz to 2 472 GHz l 5 18 GHz to 5 825 GHz Maximum transmit powerc l 2 4 GHz 15 dBm l 5 GHz 20 dBm Environment specificationsd System reliability MTBF year 13 8 MTTR hour 1 Long term operating temperature 0 C to 45 C Storage temperature 40 ...

Страница 46: ...es not support expansion 2 1 5 1 Device Overview The USG6310S WL OVS is a 1 U desktop device with an integrated structure The device uses natural cooling provides fixed ports supports LTE uplink connection and WLAN access and uses an external power adapter to supply power The device does not support port expansion Appearance Figure 2 17 illustrates the appearance of the USG6310S WL OVS Figure 2 17...

Страница 47: ...space USG6000 0 1 2 3 4 5 6 7 ETH 2 4G WLAN 5G LTE WWAN 3G 2G PWR SYS ALM USBmicroSD 2 LTE WWAN 3G 2G 0 1 2 3 4 5 6 7 ETH 2 4G WLAN 5G N LTE status indicators Interface status indicators WiFi status indicators System status indicators Name Description Interface status indicators 0 to 7 green l Steady on The link is connected l Blink eight times every second 8 Hz Data is being sent or received l Of...

Страница 48: ...e l Blink every two seconds 0 5 Hz The signal strength of the LTE 4G link is low l Off There is no LTE 4G signal 3G 2G indicator green l Steady on The signal strength of the 3G 2G link is high l Blink twice every second 2 Hz The signal strength of the 3G 2G link is at middle range l Blink every two seconds 0 5 Hz The signal strength of the 3G 2G link is low l Off There is no 3G 2G signal WWAN indi...

Страница 49: ... USG6310S WL OVS Figure 2 19 USG6310S WL OVS rear panel Secospace USG6000 0 2 1 3 4 6 5 7 RST micro SD 12V 2A CONSOLE LTE DIV WiFi 0 LTE MAIN WiFi 1 Power receptacle Clip hole 0 2 1 3 4 6 5 7 NSOLE WiFi 1 RST button Protective ground terminal 10 100 1000M autosensing Ethernet electrical ports WiFi antenna connectors WiFi antenna connectors LTE antenna connectors LTE antenna connectors SIM card slo...

Страница 50: ...06010308 model SDSDQAE 064G capacity 64GB dimensions H x W x D 1 mm x 15 00 mm x 11 00 mm from Huawei if needed You are advised to install an anti theft board delivered with the device to protect the micro SD card Console port RJ45 Console ports allow you to locally connect a PC to the device You can use a console cable to connect the console port RJ45 on the device to the COM port on your PC and ...

Страница 51: ...r the device Figure 2 20 illustrates the appearance of the power adapter Figure 2 20 Appearance of the 24W power adapter Table 2 13 lists the functions of the 24W power adapter Table 2 13 Functions of the 24W power adapter Item Description Input overcurrent protection Stops power output and does not automatically restore power output after the input current becomes normal Output current limiting p...

Страница 52: ...Weight 0 15 kg Input Rated input voltage range 100 V AC to 240 V AC 50 Hz 60 Hz Maximum input voltage range 90 V AC to 264 V AC 47 Hz to 63 Hz Maximum input current 0 8 A Output Rated output voltage 12 V DC Maximum output voltage range 11 4 V DC to 12 6 V DC Maximum output current 2 A Maximum output power 24 W 2 1 5 5 Heat Dissipation System The USG6310S WL OVS does not have fans and uses natural ...

Страница 53: ...s AC power Supported external AC power adapter Rated input voltage AC 100 V to 240 V 50 Hz 60 Hz Maximum input voltage AC 90 V to 264 V 47 Hz to 63 Hz Maximum input current 0 8 A Maximum output power 24 W Heat dissipation Fan module Has no fan and uses natural cooling Port density Console port 1 RJ45 USB 2 0 port 1 Mandatory service ports l 8 10 100 1000M autosensing Ethernet electrical ports l 2 ...

Страница 54: ...e of 64 kbit s and downlink rate of 64 kbit s l WCDMA PS uplink rate of 384 kbit s and downlink rate of 384 kbit s l HSPA uplink rate of 5 76 Mbit s and downlink rate of 21 6 Mbit s l DC HSPA uplink rate of 5 76 Mbit s and downlink rate of 42 Mbit s l GRPS uplink rate of 85 6 kbit s and downlink rate of 85 6 kbit s l EDGE uplink rate of 236 8 kbit s and downlink rate of 236 8 kbit s Environment sp...

Страница 55: ...port expansion 2 1 6 1 Device Overview The USG6310 6320 is a 1 U desktop device with an integrated structure The device provides fixed ports a built in fan module and uses an external power adapter to supply power The device does not support port expansion Appearance Figure 2 21 illustrates the appearance of the USG6310 6320 Figure 2 21 Appearance of USG6310 6320 Front view Rear view Secospace USG...

Страница 56: ...or details on the 4G LTE data cards refer to 2 6 4G LTE Data Card Interface status indicators 0 to 7 green l Steady on The link is connected l Blink eight times every second 8 Hz Data is being sent or received l Off The link is disconnected System status indicators PWR indicator green l Steady on The power module works properly l Off The power module is faulty or the power cable is disconnected SY...

Страница 57: ...CONSOLE XXXXXXXXXXXXXXXXXXXXXXXXXXX ESN Power receptacle Clip hole 10 100 1000M autosensing Ethernet electrical ports Console port 0 2 4 6 1 3 5 7 RST RST button Protective ground terminal Name Description Console port RJ45 Console ports allow you to locally connect a PC to the device You can use a console cable to connect the console port RJ45 on the device to the COM port on your PC and use a se...

Страница 58: ... the SYS and ALM indicators on the front panel are both blinking release the RST button Protective ground terminal The M4 OT terminal connects the PGND cable to the ground point of the cabinet workbench or wall or the ground bar in an equipment room Power receptacle Connects to the 4 pin plug of the power adapter Clip hole The hole is used to install the power cable clip which is used to bind and ...

Страница 59: ...utomatically restores normal output after the output short circuit is removed Heat dissipation The power adapter does not have fans and uses natural cooling Table 2 17 lists the technical specifications of the 36W power adapter Table 2 17 Technical specifications of the 36W power adapter Item Description Dimensions H x W x D 32 mm x 53 95 mm x 99 45 mm Weight 0 22 kg Input Rated input voltage rang...

Страница 60: ...locates at the air exhaust and cannot be removed Figure 2 25 System air flow 12 V 3A Secospace USG6000 0 2 4 6 1 3 5 7 RST CONSO LE XXX XXX XXX XXX XXX XXX XXX XXX XXX Cool air Hot air 2 1 6 6 Technical Specifications This section describes the dimensions weight and power and environment specifications of the USG6310 6320 Table 2 18 lists the technical specifications of the USG6310 6320 Table 2 18...

Страница 61: ...r panel Left to right air flow Port density Console port 1 RJ45 USB 2 0 port 1 Mandatory service ports 8 10 100 1000M autosensing Ethernet electrical ports Expansion slot None Environment specificationsc System reliability MTBF year 19 06 MTTR hour 1 Short termd operating temperature 5 C to 55 C Long term operating temperature 0 C to 45 C Storage temperature 40 C to 70 C Operating relative humidit...

Страница 62: ...y default However optional modules such as an additional power module hard disk and expansion cards are supported 2 1 7 1 Device Overview The USG6306 6308 6330 6350 6360 uses an integrated chassis that contains the fixed interface board power module and fan module You can also add some optional modules such as hard disk additional power module and expansion cards to improve system reliability and ...

Страница 63: ...each packet parses the content to identify the application of the packet as well as the file virus URL email field intrusion and attack information in the packet or flow and provides the forwarding plane with the detection result for further processing Expansion slot Expansion slots are reserved for expansion cards to provide more ports or functions Table 2 20 lists the supported expansion cards P...

Страница 64: ...ass links NOTE WSIC Wide Service Interface Card 2 1 7 2 Front Panel The front panel of the USG6306 6308 6330 6350 6360 provides fixed ports ESD jack and expansion slots Figure 2 27 illustrates the front panel of the USG6306 6308 6330 6350 6360 Figure 2 27 USG6306 6308 6330 6350 6360 Front Panel Secospace USG6000 0 1 2 3 4 5 4 5 RST SYS ALM PWR HDD MGMT MODE 0 1 2 3 CONSOLE MGMT Expansion slots Fix...

Страница 65: ...for system control and management The interface board provides an out of band management port console port and USB port for management access The interface board is built in and cannot be removed For details on the ports and indicators on the fixed interface board see Fixed interface board Expansion slot Provides two WSIC slots ESD jack The equipment end of the wrist strap is inserted into the ESD...

Страница 66: ... MODE 0 1 2 3 0 1 2 3 4 5 4 5 USB 2 0 port RST button Indicator area 10 100 1000M autosensing Ethernet electrical ports Combo port Optical port indicators ACT LINK Out of band management port Console port Name Description Ports HUAWEI USG6000 Series Hardware Guide 2 Hardware Overview Issue 08 2017 06 30 Huawei Proprietary and Confidential Copyright Huawei Technologies Co Ltd 52 ...

Страница 67: ... the positions of ports A down arrowhead indicates a port at the bottom and an up arrowhead indicates a port at the top Service ports They are four 10 100 1000M autosensing Ethernet electrical ports numbered from GigabitEthernet 1 0 0 to GigabitEthernet 1 0 3 4 to 5 RJ45 SFP NOTE Arrowheads show the positions of ports A down arrowhead indicates a port at the bottom and an up arrowhead indicates a ...

Страница 68: ...ad from or written to the hard disk l Off The hard disk is not detected MODE indicator green l Steady on Hot standby is not configured or hot standby is configured but the device is the standby device in an active standby mode or the hot standby mode is load balancing l Off Hot standby is configured in active standby mode and the device is the standby device MGMT indicator green l Steady on The li...

Страница 69: ...ve ground terminal and hard disk slot for optional hard disk combination Figure 2 29 illustrates the rear panel of the USG6306 6308 6330 6350 6360 Figure 2 29 USG6306 6308 6330 6350 6360 rear panel Secospace USG6000 4 HDD 5 PWR 6 PWR XXXXXXXXXXXXXXXXXXXXXXXXXXX SM HDD SAS300G B OUTPUT ON OFF 100 240V 50 60Hz 2 5A Protective ground terminal Hard disk combination optional Power module Slot numbering...

Страница 70: ... starts to support SM HDD SAS600G B hard disk combination since V500R001C30SPC100 If you use SM HDD SAS600G B hard disk combination on earlier versions the SM HDD SAS600G B hard disk combination will be identified as non Huawei hard disks You need to upgrade the software version l The USG starts to support SM HDD SAS1200G B hard disk combination since V500R001C50 If you use SM HDD SAS1200G B hard ...

Страница 71: ...abnormal or in protection state except hiccup mode protection state in which the indicator blinks Power switch The power switch allows you to turn on or off the power output Power receptacle Connects the C13 plug of the AC power cable Clip hole The hole is used to install the power cable clip which is used to bind and fix the power cable The power cable clip is installed before shipment Table 2 21...

Страница 72: ...erature of the power module reaches a preset threshold the power module stops power output and will automatically restore power output after the temperature drops back to the normal range Heat dissipation The power adapter does not have fans The heat dissipation is provided by the fan module of the device Hot swap Not Supported Table 2 22 lists the technical specifications of the 150W AC power mod...

Страница 73: ...40V 50 60Hz 2 5A Name Description INPUT green l Steady on The input of the AC power module is normal l Off The input of the AC power module is abnormal OUTPUT green l Steady on The output of the AC power module is normal l Off The output of the AC power module is abnormal or in protection state except hiccup mode protection state in which the indicator blinks Power switch The power switch allows y...

Страница 74: ...ltage condition is removed Output short circuit protection Intermittently provides output and automatically restores normal output after the output short circuit is removed Overtemperature protection When the temperature of the power module reaches a preset threshold the power module stops power output and will automatically restore power output after the temperature drops back to the normal range...

Страница 75: ...f key components If the internal device temperature is higher than the specified value the fan speed increases when the temperature falls back to its normal range the fan speed decreases In this way the fan module enables the device to run in normal temperature ensuring device running security and reliability Figure 2 32 illustrates the air flow of the device The air intake areas include the left ...

Страница 76: ...6308 6330 6350 6360 Technical Specifications Item Description System specifications CPU Multi core 1 0 GHz processor Memory DDR3 4 GB Flash 16 MB CF card 2 GB Hard disk Optional hot swappable 300GB 600GB or 1200GB 2 5 inch SAS hard disk The hard disk unit is hot swappable but the hard disk combination is not hot swappable SPUB the service engine Not supported 4G LTE Data Card Supported Dimensions ...

Страница 77: ...ing the rear panel Intake on the front and left sides exhaust on the right side Port density Out of band management port 1 RJ45 Console port 1 RJ45 USB 2 0 port 1 Mandatory service ports l 2 GE Combo ports l 4 10 100 1000M autosensing Ethernet electrical ports Expansion slot 2 WSIC Types of expansion cards l 8GE WSIC 8 1GE RJ45 interface card l 2XG8GE WSIC 8 1GE RJ45 2 10GE SFP interface card l 8G...

Страница 78: ...rt term operating conditions mean that the continuous operating period does not exceed 48 hours and the accumulative total period within a year does not exceed 15 days If the continuous operating period exceeds 48 hours or the total period within a year exceeds 15 days it is regarded as long term l e The ambient temperature change rate of a device with hard disk s is less than or equal to 20 C per...

Страница 79: ...ace USG6000 0 1 2 3 4 5 6 7 8 9 10 11 0 1 RST SYS ALM PWR HDD MGMT MODE 0 1 2 3 CONSOLE MGMT Front view Rear view Expansion slots Fixed interface board Hard disk combination optional Power module Slot for optional power module Table 2 26 describes the functions of the USG6370 6380 6390 components HUAWEI USG6000 Series Hardware Guide 2 Hardware Overview Issue 08 2017 06 30 Huawei Proprietary and Co...

Страница 80: ...e virus URL email field intrusion and attack information in the packet or flow and provides the forwarding plane with the detection result for further processing Expansion slot Expansion slots are reserved for expansion cards to provide more ports or functions Table 2 27 lists the supported expansion cards Power module By default AC power module is provided Two power modules are supported to provi...

Страница 81: ...nt panel of the USG6370 6380 6390 provides fixed ports ESD jack and expansion slots The front panel of the USG6370 6380 6390 is pictured in Figure 2 34 Figure 2 34 USG6370 6380 6390 front panel Secospace USG6000 0 1 2 3 4 5 6 7 8 9 10 11 0 1 RST SYS ALM PWR HDD MGMT MODE 0 1 2 3 CONSOLE MGMT Expansion slots Fixed interface board ESD jack Slot numbering layout 0 1 3 2 0 1 2 3 4 5 6 7 8 9 10 11 0 1 ...

Страница 82: ...nent for system control and management The interface board provides an out of band management port console port and USB port for management access The interface board is built in and cannot be removed For details on the ports and indicators on the fixed interface board see Fixed interface board Expansion slot Provides two WSIC slots ESD jack The equipment end of the wrist strap is inserted into th...

Страница 83: ...SOLE MGMT USB 2 0 port RST button Indicator area 0 1 2 3 4 5 6 7 8 9 10 11 10 100 1000M autosensing Ethernet electrical ports GE optical ports Optical port indicators ACT LINK Out of band management port Console port Name Description Ports HUAWEI USG6000 Series Hardware Guide 2 Hardware Overview Issue 08 2017 06 30 Huawei Proprietary and Confidential Copyright Huawei Technologies Co Ltd 69 ...

Страница 84: ...ces for system software upgrades For details on upgrades through USB devices refer to the Upgrade Guide delivered with the device l USB ports allow you to insert 4G LTE data cards For details on the 4G LTE data cards refer to 2 6 4G LTE Data Card 0 to 7 RJ45 NOTE Arrowheads show the positions of ports A down arrowhead indicates a port at the bottom and an up arrowhead indicates a port at the top S...

Страница 85: ...read from or written to the hard disk l Off The hard disk is not detected MODE indicator green l Steady on Hot standby is not configured or hot standby is configured but the device is the standby device in an active standby mode or the hot standby mode is load balancing l Off Hot standby is configured in active standby mode and the device is the standby device MGMT indicator green l Steady on The ...

Страница 86: ...l hard disk combination Figure 2 36 illustrates the rear panel of the USG6370 6380 6390 Figure 2 36 USG6370 6380 6390 rear panel Secospace USG6000 4 HDD 5 PWR 6 PWR INPUT OUTPUT ON OFF 100 240V 50 60Hz 2 5A XXXXXXXXXXXXXXXXXXXXXXXXXXX SM HDD SAS300G B Protective ground terminal Hard disk combination optional Power module Slot numbering layout 4 HDD 5 PWR 6 PWR Slot for optional power module ESN Na...

Страница 87: ...OTICE l The USG starts to support SM HDD SAS600G B hard disk combination since V500R001C30SPC100 If you use SM HDD SAS600G B hard disk combination on earlier versions the SM HDD SAS600G B hard disk combination will be identified as non Huawei hard disks You need to upgrade the software version l The USG starts to support SM HDD SAS1200G B hard disk combination since V500R001C50 If you use SM HDD S...

Страница 88: ...ule is abnormal OUTPUT green l Steady on The output of the AC power module is normal l Off The output of the AC power module is abnormal or in protection state except hiccup mode protection state in which the indicator blinks Power switch The power switch allows you to turn on or off the power output Power receptacle Connects the C13 plug of the AC power cable Clip hole The hole is used to install...

Страница 89: ...removed Overtemperature protection When the temperature of the power module reaches a preset threshold the power module stops power output and will automatically restore power output after the temperature drops back to the normal range Heat dissipation The power adapter does not have fans The heat dissipation is provided by the fan module of the device Hot swap The device has 1 1 power module redu...

Страница 90: ... in normal temperature ensuring device running security and reliability Figure 2 38 illustrates the air flow of the device The air intake areas include the left side and the hard disk installation slot on the front side and the air exhaust is on the right side The built in fan module locates at the air exhaust and cannot be removed Figure 2 38 System air flow SM H DD S AS 30 0G B Se co sp ac e US ...

Страница 91: ...ully configured 8 6 kg Power specifications AC power Supported By default one power module is provided but two power modules are supported If two power modules are used and one module fails you can hot swap the faulty power module Rated input voltage AC 100 V to 240 V 50 Hz 60 Hz Maximum input voltage AC 90 V to 264 V 47 Hz to 63 Hz Maximum input current AC 2 5 A DC power Not supported Maximum out...

Страница 92: ... year 11 96 MTTR hour 1 Ambient temperature Short termd Without hard disk 5 C to 55 C With hard disk s e 5 C to 40 C Long term Without hard disk 0 C to 45 C With hard disk s e 5 C to 40 C Storage temperature 40 C to 70 C Operating relative humidity Without hard disk 5 RH to 95 RH non condensing With hard disk s 5 RH to 90 RH non condensing Storage relative humidity Without hard disk 5 RH to 95 RH ...

Страница 93: ...odels and provides one power module and fixed ports by default However optional modules such as an additional power module hard disks and expansion cards are supported 2 1 9 1 Device Overview The USG6390E uses an integrated chassis that contains the fixed interface board power module and fan module You can also add some optional modules such as hard disks additional power module and expansion card...

Страница 94: ... each packet parses the content to identify the application of the packet as well as the file virus URL email field intrusion and attack information in the packet or flow and provides the forwarding plane with the detection result for further processing Expansion slot Expansion slots are reserved for expansion cards to provide more ports or functions Table 2 32 lists the supported expansion cards ...

Страница 95: ...l bypass links NOTE WSIC Wide Service Interface Card 2 1 9 2 Front Panel The front panel of the USG6390E provides fixed ports ESD jack and expansion slots The front panel of the USG6390E is pictured in Figure 2 40 Figure 2 40 USG6390E front panel Secospace USG6000 0 1 2 3 4 5 6 7 8 9 10 11 0 1 RST SYS ALM PWR HDD MGMT MODE 0 1 2 3 CONSOLE MGMT Expansion slots Fixed interface board ESD jack Slot nu...

Страница 96: ...component for system control and management The interface board provides an out of band management port console port and USB port for management access The interface board is built in and cannot be removed For details on the ports and indicators on the fixed interface board see Fixed interface board Expansion slot Provides two WSIC slots ESD jack The equipment end of the wrist strap is inserted in...

Страница 97: ... MGMT USB 2 0 port RST button Indicator area 0 1 2 3 4 5 6 7 8 9 10 11 10 100 1000M autosensing Ethernet electrical ports GE optical ports Optical port indicators ACT LINK Out of band management port Console port Name Description Ports HUAWEI USG6000 Series Hardware Guide 2 Hardware Overview Issue 08 2017 06 30 Huawei Proprietary and Confidential Copyright Huawei Technologies Co Ltd 83 ...

Страница 98: ...USB0 and USB1 ports USB ports allow you to insert USB devices for system software upgrades For details on upgrades through USB devices refer to the Upgrade Guide delivered with the device 0 to 7 RJ45 NOTE Arrowheads show the positions of ports A down arrowhead indicates a port at the bottom and an up arrowhead indicates a port at the top Service ports They are eight 10 100 1000M autosensing Ethern...

Страница 99: ...read from or written to the hard disk l Off The hard disk is not detected MODE indicator green l Steady on Hot standby is not configured or hot standby is configured but the device is the standby device in an active standby mode or the hot standby mode is load balancing l Off Hot standby is configured in active standby mode and the device is the standby device MGMT indicator green l Steady on The ...

Страница 100: ...r optional hard disk combination Figure 2 42 illustrates the rear panel of the USG6390E Figure 2 42 USG6390E rear panel Secospace USG6000 4 HDD 5 PWR 6 PWR INPUT OUTPUT ON OFF 100 240V 50 60Hz 2 5A XXXXXXXXXXXXXXXXXXXXXXXXXXX SM HDD SAS300G B Protective ground terminal Hard disk combination optional Power module Slot numbering layout 4 HDD 5 PWR 6 PWR Slot for optional power module ESN Name Descri...

Страница 101: ...st NOTICE l The USG starts to support SM HDD SAS600G B hard disk combination since V500R001C30SPC100 If you use SM HDD SAS600G B hard disk combination on earlier versions the SM HDD SAS600G B hard disk combination will be identified as non Huawei hard disks You need to upgrade the software version l The USG starts to support SM HDD SAS1200G B hard disk combination since V500R001C50 If you use SM H...

Страница 102: ...ule is abnormal OUTPUT green l Steady on The output of the AC power module is normal l Off The output of the AC power module is abnormal or in protection state except hiccup mode protection state in which the indicator blinks Power switch The power switch allows you to turn on or off the power output Power receptacle Connects the C13 plug of the AC power cable Clip hole The hole is used to install...

Страница 103: ...removed Overtemperature protection When the temperature of the power module reaches a preset threshold the power module stops power output and will automatically restore power output after the temperature drops back to the normal range Heat dissipation The power adapter does not have fans The heat dissipation is provided by the fan module of the device Hot swap The device has 1 1 power module redu...

Страница 104: ...peed decreases In this way the fan module enables the device to run in normal temperature ensuring device running security and reliability Figure 2 44 illustrates the air flow of the device The air intake areas include the left side and the hard disk installation slot on the front side and the air exhaust is on the right side The built in fan module locates at the air exhaust and cannot be removed...

Страница 105: ... supported 4G LTE Data Card Not supported Dimensions and weight Dimensions Hb x Wa x D 44 4 mm x 442 mm x 421 mm Weight Standard 6 kg Fully configured 8 7 kg Power specifications AC power Supported By default one power module is provided If two power modules are used and one module fails you can hot swap the faulty power module Rated input voltage AC 100 V to 240 V 50 Hz 60 Hz Maximum input voltag...

Страница 106: ...card Environment specificationsc System reliability MTBF year 10 08 MTTR hour 1 Ambient temperature Short termd Without hard disk 5 C to 55 C With hard disk s e 5 C to 40 C Long term Without hard disk 0 C to 45 C With hard disk s e 5 C to 40 C Storage temperature 40 C to 70 C Operating relative humidity Without hard disk 5 RH to 95 RH non condensing With hard disk s 5 RH to 90 RH non condensing St...

Страница 107: ...6500 Product Series The USG6500 product series includes USG6510 6510 WL 6507 6530 6550 6570 These models are 1 U devices with an integrated structure and fit into a 19 inch standard cabinet A larger model number indicates a higher performance 2 2 1 USG6510 The USG6510 is a 1 U desktop device that provides fixed ports and does not support expansion 2 2 1 1 Device Overview The USG6510 is a 1 U deskt...

Страница 108: ... Steady on The link is connected l Blink eight times every second 8 Hz Data is being sent or received l Off The link is disconnected System status indicators PWR indicator green l Steady on The power module works properly l Off The power module is faulty or the power cable is disconnected SYS indicator green l Steady on The system is being powered on or restarted l Blink every two seconds 0 5 Hz T...

Страница 109: ...vides fixed ports a protective ground terminal RST button and power socket Figure 2 47 illustrates the rear panel of the USG6510 Figure 2 47 USG6510 rear panel Secospace USG6000 0 2 1 3 4 6 5 7 RST micro SD 12V 2A CONSOLE 0 2 1 3 4 6 5 7 SOLE XXXXXXXXXXXXXXXXXXXXXXXXXXX SN Protective ground terminal USB2 0 port Anti theft locating hole Micro SD card slot Anti theft mounting hole micro SD C RST but...

Страница 110: ... autosensing Ethernet electrical ports numbered from GigabitEthernet 0 0 0 to GigabitEthernet 0 0 7 GigabitEthernet 0 0 0 is an inband management port and its default IP address is 192 168 0 1 After this port is connected to your PC through network cables you can log in to the device using Telnet STelnet or web UI to configure or manage the device RST button To restart the device press the RST but...

Страница 111: ...fter the output current falls within a normal range Output overvoltage protection Intermittently stops output and automatically restores output after the overvoltage condition is removed Output short circuit protection Intermittently provides output and automatically restores normal output after the output short circuit is removed Heat dissipation The power adapter does not have fans and uses natu...

Страница 112: ... Specifications This section describes the dimensions weight and power and environment specifications of the USG6510 Table 2 38 lists the technical specifications of the USG6510 Table 2 38 USG6510 Technical Specifications Item Description System specifications CPU Multi core 1 0 GHz processor Memory DDR3 1 GB Flash 32 MB NAND Flash 512 MB Micro SD card Optional Purchase one 64 GB micro SD card fro...

Страница 113: ... cooling Port density Console port 1 RJ45 USB 2 0 port 1 Mandatory service ports 8 10 100 1000M autosensing Ethernet electrical ports Micro SD card slot 1 Expansion slot None Environment specificationsc System reliability MTBF year 14 08 MTTR hour 1 Long term operating temperature 0 C to 45 C Storage temperature 40 C to 70 C Operating relative humidity 5 RH to 95 RH non condensing Storage relative...

Страница 114: ... 1 U desktop device with an integrated structure The device uses natural cooling provides fixed ports supports LTE uplink connection and WLAN access and uses an external power adapter to supply power The device does not support port expansion Appearance Figure 2 49 illustrates the appearance of the USG6510 WL Figure 2 49 Appearance of USG6510 WL Secospace USG6000 0 2 1 3 4 6 5 7 RST micro SD 12V 2...

Страница 115: ...iFi status indicators System status indicators Name Description Interface status indicators 0 to 7 green l Steady on The link is connected l Blink eight times every second 8 Hz Data is being sent or received l Off The link is disconnected System status indicators PWR indicator green l Steady on The power module works properly l Off The power module is faulty or the power cable is disconnected SYS ...

Страница 116: ...s 0 5 Hz The signal strength of the 3G 2G link is low l Off There is no 3G 2G signal WWAN indicator green l Steady on The LTE 4G 3G 2G link is connected or activated l Blink twice every second 2 Hz The LTE 4G 3G 2G network is accessed and data is being transmitted l Off The LTE 4G 3G 2G link is disconnected or is not activated WiFi status indicators WLAN 2 4G indicator green l Steady on The channe...

Страница 117: ...B2 0 port Micro SD card slot Anti theft mounting hole Name Description LTE antenna connector LTE antenna connectors include a MAIN antenna connector and a DIV antenna connector The antennas work together l The MAIN antenna transmits and receives LTE signals l The DIV antenna helps improve the quality of received LTE signals The connectors connect to the LTE antennas to realize wireless access LTE ...

Страница 118: ... 10 100 1000M autosensing Ethernet electrical ports numbered from GigabitEthernet 0 0 0 to GigabitEthernet 0 0 7 GigabitEthernet 0 0 0 is an inband management port and its default IP address is 192 168 0 1 After this port is connected to your PC through network cables you can log in to the device using Telnet STelnet or web UI to configure or manage the device RST button To restart the device pres...

Страница 119: ...fter the output current falls within a normal range Output overvoltage protection Intermittently stops output and automatically restores output after the overvoltage condition is removed Output short circuit protection Intermittently provides output and automatically restores normal output after the output short circuit is removed Heat dissipation The power adapter does not have fans and uses natu...

Страница 120: ...ecifications This section describes the dimensions weight and power and environment specifications of the USG6510 WL Table 2 41 lists the technical specifications of the USG6510 WL Table 2 41 USG6510 WL Technical Specifications Item Description System specifications CPU Multi core 1 0 GHz processor Memory DDR3 1 GB Flash 32 MB NAND Flash 512 MB Micro SD card Optional Purchase one 64 GB micro SD ca...

Страница 121: ...Port density Console port 1 RJ45 USB 2 0 port 1 Mandatory service ports l 8 10 100 1000M autosensing Ethernet electrical ports l 2 WiFi antenna connectors l 2 LTE antenna connectors Micro SD card slot 1 Expansion slot None WiFi access specifications Wireless standards IEEE 802 11 a b g n ac Wireless rate 300 Mbit s Frequency bands l 2 412 GHz to 2 472 GHz l 5 18 GHz to 5 825 GHz Maximum transmit p...

Страница 122: ...Mbit s and downlink rate of 21 6 Mbit s l DC HSPA uplink rate of 5 76 Mbit s and downlink rate of 42 Mbit s l TD HSPA uplink rate of 2 2 Mbit s and downlink rate of 2 8 Mbit s l TD SCDMA PS uplink rate of 384 kbit s and downlink rate of 2 8 Mbit s l GRPS uplink rate of 85 6 kbit s and downlink rate of 85 6 kbit s l EDGE uplink rate of 236 8 kbit s and downlink rate of 236 8 kbit s Environment spec...

Страница 123: ...507 6530 uses an integrated chassis that contains the fixed interface board power module and fan module You can also add some optional modules such as hard disk additional power module and expansion cards to improve system reliability and add more ports Appearance Figure 2 53 illustrates the appearance of the USG6507 6530 Figure 2 53 Appearance of USG6507 6530 Secospace USG6000 4 HDD 5 PWR 6 PWR X...

Страница 124: ...intrusion and attack information in the packet or flow and provides the forwarding plane with the detection result for further processing Expansion slot Expansion slots are reserved for expansion cards to provide more ports or functions Table 2 43 lists the supported expansion cards Power module Build in 150 W power module is provided by default but you can optionally add a 170 W power module for ...

Страница 125: ...3 2 Front Panel The front panel of the USG6507 6530 provides fixed ports ESD jack and expansion slots Figure 2 54 illustrates the front panel of the USG6507 6530 Figure 2 54 USG6507 6530 Front Panel Secospace USG6000 0 1 2 3 4 5 4 5 RST SYS ALM PWR HDD MGMT MODE 0 1 2 3 CONSOLE MGMT Expansion slots Fixed interface board ESD jack Slot numbering layout 0 1 2 3 0 1 2 3 4 5 4 5 RST SYS ALM PWR HDD MGM...

Страница 126: ...ponent for system control and management The interface board provides an out of band management port console port and USB port for management access The interface board is built in and cannot be removed For details on the ports and indicators on the fixed interface board see Fixed interface board Expansion slot Provides two WSIC slots ESD jack The equipment end of the wrist strap is inserted into ...

Страница 127: ...1 2 3 0 1 2 3 4 5 4 5 USB 2 0 port RST button Indicator area 10 100 1000M autosensing Ethernet electrical ports Combo port Optical port indicators ACT LINK Out of band management port Console port Name Description Ports HUAWEI USG6000 Series Hardware Guide 2 Hardware Overview Issue 08 2017 06 30 Huawei Proprietary and Confidential Copyright Huawei Technologies Co Ltd 113 ...

Страница 128: ... the positions of ports A down arrowhead indicates a port at the bottom and an up arrowhead indicates a port at the top Service ports They are four 10 100 1000M autosensing Ethernet electrical ports numbered from GigabitEthernet 1 0 0 to GigabitEthernet 1 0 3 4 to 5 RJ45 SFP NOTE Arrowheads show the positions of ports A down arrowhead indicates a port at the bottom and an up arrowhead indicates a ...

Страница 129: ...d from or written to the hard disk l Off The hard disk is not detected MODE indicator green l Steady on Hot standby is not configured or hot standby is configured but the device is the standby device in an active standby mode or the hot standby mode is load balancing l Off Hot standby is configured in active standby mode and the device is the standby device MGMT indicator green l Steady on The lin...

Страница 130: ...rotective ground terminal and hard disk slot for optional hard disk combination Figure 2 56 illustrates the rear panel of the USG6507 6530 Figure 2 56 USG6507 6530 rear panel Secospace USG6000 4 HDD 5 PWR 6 PWR XXXXXXXXXXXXXXXXXXXXXXXXXXX SM HDD SAS300G B OUTPUT ON OFF 100 240V 50 60Hz 2 5A Protective ground terminal Hard disk combination optional Power module Slot numbering layout 4 HDD 5 PWR 6 P...

Страница 131: ...The USG starts to support SM HDD SAS600G B hard disk combination since V500R001C30SPC100 If you use SM HDD SAS600G B hard disk combination on earlier versions the SM HDD SAS600G B hard disk combination will be identified as non Huawei hard disks You need to upgrade the software version l The USG starts to support SM HDD SAS1200G B hard disk combination since V500R001C50 If you use SM HDD SAS1200G ...

Страница 132: ...abnormal or in protection state except hiccup mode protection state in which the indicator blinks Power switch The power switch allows you to turn on or off the power output Power receptacle Connects the C13 plug of the AC power cable Clip hole The hole is used to install the power cable clip which is used to bind and fix the power cable The power cable clip is installed before shipment Table 2 44...

Страница 133: ...erature of the power module reaches a preset threshold the power module stops power output and will automatically restore power output after the temperature drops back to the normal range Heat dissipation The power adapter does not have fans The heat dissipation is provided by the fan module of the device Hot swap Not Supported Table 2 45 lists the technical specifications of the 150W AC power mod...

Страница 134: ...40V 50 60Hz 2 5A Name Description INPUT green l Steady on The input of the AC power module is normal l Off The input of the AC power module is abnormal OUTPUT green l Steady on The output of the AC power module is normal l Off The output of the AC power module is abnormal or in protection state except hiccup mode protection state in which the indicator blinks Power switch The power switch allows y...

Страница 135: ...tage condition is removed Output short circuit protection Intermittently provides output and automatically restores normal output after the output short circuit is removed Overtemperature protection When the temperature of the power module reaches a preset threshold the power module stops power output and will automatically restore power output after the temperature drops back to the normal range ...

Страница 136: ...mponents If the internal device temperature is higher than the specified value the fan speed increases when the temperature falls back to its normal range the fan speed decreases In this way the fan module enables the device to run in normal temperature ensuring device running security and reliability Figure 2 59 illustrates the air flow of the device The air intake areas include the left side and...

Страница 137: ...hnical Specifications Item Description System specifications CPU Multi core 1 0 GHz processor Memory DDR3 4 GB Flash 16 MB CF card 2 GB Hard disk Optional hot swappable 300GB 600GB or 1200GB 2 5 inch SAS hard disk The hard disk unit is hot swappable but the hard disk combination is not hot swappable SPUB the service engine Not supported 4G LTE Data Card Supported Dimensions and weight Dimensions H...

Страница 138: ...ng the rear panel Intake on the front and left sides exhaust on the right side Port density Out of band management port 1 RJ45 Console port 1 RJ45 USB 2 0 port 1 Mandatory service ports l 2 GE Combo ports l 4 10 100 1000M autosensing Ethernet electrical ports Expansion slot 2 WSIC Types of expansion cards l 8GE WSIC 8 1GE RJ45 interface card l 2XG8GE WSIC 8 1GE RJ45 2 10GE SFP interface card l 8GE...

Страница 139: ...The short term operating conditions mean that the continuous operating period does not exceed 48 hours and the accumulative total period within a year does not exceed 15 days If the continuous operating period exceeds 48 hours or the total period within a year exceeds 15 days it is regarded as long term l e The ambient temperature change rate of a device with hard disk s is less than or equal to 2...

Страница 140: ...areness engine l Management plane provides ports for configuration test and maintenance and implements such functions as running status monitoring environment monitoring log and alarm processing system loading and system upgrades l Forwarding plane parses and processes packets and associates with other planes to forward discard or translate packets l Control plane obtains user authentication infor...

Страница 141: ...nagement port RJ45 l 1 console port RJ45 l 2 USB 2 0 ports l 4 GE optical ports l 8 10 100 1000M autosensing Ethernet electrical ports Table 2 50 lists the supported types of expansion cards Table 2 50 Supported expansion cards Expansion Card Description 8GE WSIC Interface Card Provides eight gigabit RJ45 Ethernet ports 2XG8GE WSIC Interface Card Provides eight gigabit RJ45 ports and two 10 gigabi...

Страница 142: ...stalled now l C is the interface number which begins with 0 and is numbered from bottom to top and left to right Fixed interface board The core component for system control and management The interface board provides an out of band management port console port and USB port for management access The interface board is built in and cannot be removed For details on the ports and indicators on the fix...

Страница 143: ...GMT USB 2 0 port RST button Indicator area 0 1 2 3 4 5 6 7 8 9 10 11 10 100 1000M autosensing Ethernet electrical ports GE optical ports Optical port indicators ACT LINK Out of band management port Console port Name Description Ports HUAWEI USG6000 Series Hardware Guide 2 Hardware Overview Issue 08 2017 06 30 Huawei Proprietary and Confidential Copyright Huawei Technologies Co Ltd 129 ...

Страница 144: ...ces for system software upgrades For details on upgrades through USB devices refer to the Upgrade Guide delivered with the device l USB ports allow you to insert 4G LTE data cards For details on the 4G LTE data cards refer to 2 6 4G LTE Data Card 0 to 7 RJ45 NOTE Arrowheads show the positions of ports A down arrowhead indicates a port at the bottom and an up arrowhead indicates a port at the top S...

Страница 145: ...read from or written to the hard disk l Off The hard disk is not detected MODE indicator green l Steady on Hot standby is not configured or hot standby is configured but the device is the standby device in an active standby mode or the hot standby mode is load balancing l Off Hot standby is configured in active standby mode and the device is the standby device MGMT indicator green l Steady on The ...

Страница 146: ...nal hard disk combination Figure 2 63 illustrates the rear panel of the USG6550 6570 Figure 2 63 USG6550 6570 rear panel Secospace USG6000 4 HDD 5 PWR 6 PWR INPUT OUTPUT ON OFF 100 240V 50 60Hz 2 5A XXXXXXXXXXXXXXXXXXXXXXXXXXX SM HDD SAS300G B Protective ground terminal Hard disk combination optional Power module Slot numbering layout 4 HDD 5 PWR 6 PWR Slot for optional power module ESN Name Descr...

Страница 147: ... NOTICE l The USG starts to support SM HDD SAS600G B hard disk combination since V500R001C30SPC100 If you use SM HDD SAS600G B hard disk combination on earlier versions the SM HDD SAS600G B hard disk combination will be identified as non Huawei hard disks You need to upgrade the software version l The USG starts to support SM HDD SAS1200G B hard disk combination since V500R001C50 If you use SM HDD...

Страница 148: ...ule is abnormal OUTPUT green l Steady on The output of the AC power module is normal l Off The output of the AC power module is abnormal or in protection state except hiccup mode protection state in which the indicator blinks Power switch The power switch allows you to turn on or off the power output Power receptacle Connects the C13 plug of the AC power cable Clip hole The hole is used to install...

Страница 149: ...emoved Overtemperature protection When the temperature of the power module reaches a preset threshold the power module stops power output and will automatically restore power output after the temperature drops back to the normal range Heat dissipation The power adapter does not have fans The heat dissipation is provided by the fan module of the device Hot swap The device has 1 1 power module redun...

Страница 150: ...in normal temperature ensuring device running security and reliability Figure 2 65 illustrates the air flow of the device The air intake areas include the left side and the hard disk installation slot on the front side and the air exhaust is on the right side The built in fan module locates at the air exhaust and cannot be removed Figure 2 65 System air flow SM H DD S AS 30 0G B Se co sp ac e US G...

Страница 151: ...configured 8 6 kg Power specifications AC power Supported By default one power module is provided but two power modules are supported If two power modules are used and one module fails you can hot swap the faulty power module Rated input voltage AC 100 V to 240 V 50 Hz 60 Hz Maximum input voltage AC 90 V to 264 V 47 Hz to 63 Hz Maximum input current AC 2 5 A DC power Not supported Maximum output p...

Страница 152: ... year 11 96 MTTR hour 1 Ambient temperature Short termd Without hard disk 5 C to 55 C With hard disk s e 5 C to 40 C Long term Without hard disk 0 C to 45 C With hard disk s e 5 C to 40 C Storage temperature 40 C to 70 C Operating relative humidity Without hard disk 5 RH to 95 RH non condensing With hard disk s 5 RH to 90 RH non condensing Storage relative humidity Without hard disk 5 RH to 95 RH ...

Страница 153: ... 6680 The USG6600 uses an integrated structure design and fits into a 19 inch standard cabinet USG6620 6630 has the same appearance and are all 1U devices USG6650 6660 6670 6680 has the same appearance and are all 3U devices but they have different standard expansion cards A larger model number in the USG6600 series indicates a higher performance 2 3 1 USG6620 6630 The USG6620 6630 has only AC mod...

Страница 154: ...e provides ports for configuration test and maintenance and implements such functions as running status monitoring environment monitoring log and alarm processing system loading and system upgrades l Forwarding plane parses and processes packets and associates with other planes to forward discard or translate packets l Control plane obtains user authentication information and sends authentication ...

Страница 155: ...agement port RJ45 l 1 console port RJ45 l 2 USB 2 0 ports l 4 GE optical ports l 8 10 100 1000M autosensing Ethernet electrical ports Table 2 55 lists the supported types of expansion cards Table 2 55 Supported expansion cards Expansion Card Description 8GE WSIC Interface Card Provides eight gigabit RJ45 Ethernet ports 2XG8GE WSIC Interface Card Provides eight gigabit RJ45 ports and two 10 gigabit...

Страница 156: ...stalled now l C is the interface number which begins with 0 and is numbered from bottom to top and left to right Fixed interface board The core component for system control and management The interface board provides an out of band management port console port and USB port for management access The interface board is built in and cannot be removed For details on the ports and indicators on the fix...

Страница 157: ...E MGMT USB 2 0 port RST button Indicator area 0 1 2 3 4 5 6 7 8 9 10 11 10 100 1000M autosensing Ethernet electrical ports GE optical ports Optical port indicators ACT LINK Out of band management port Console port Name Description Ports HUAWEI USG6000 Series Hardware Guide 2 Hardware Overview Issue 08 2017 06 30 Huawei Proprietary and Confidential Copyright Huawei Technologies Co Ltd 143 ...

Страница 158: ...SB0 and USB1 ports USB ports allow you to insert USB devices for system software upgrades For details on upgrades through USB devices refer to the Upgrade Guide delivered with the device 0 to 7 RJ45 NOTE Arrowheads show the positions of ports A down arrowhead indicates a port at the bottom and an up arrowhead indicates a port at the top Service ports They are eight 10 100 1000M autosensing Etherne...

Страница 159: ...read from or written to the hard disk l Off The hard disk is not detected MODE indicator green l Steady on Hot standby is not configured or hot standby is configured but the device is the standby device in an active standby mode or the hot standby mode is load balancing l Off Hot standby is configured in active standby mode and the device is the standby device MGMT indicator green l Steady on The ...

Страница 160: ...nal hard disk combination Figure 2 69 illustrates the rear panel of the USG6620 6630 Figure 2 69 USG6620 6630 rear panel Secospace USG6000 4 HDD 5 PWR 6 PWR INPUT OUTPUT ON OFF 100 240V 50 60Hz 2 5A XXXXXXXXXXXXXXXXXXXXXXXXXXX SM HDD SAS300G B Protective ground terminal Hard disk combination optional Power module Slot numbering layout 4 HDD 5 PWR 6 PWR Slot for optional power module ESN Name Descr...

Страница 161: ... NOTICE l The USG starts to support SM HDD SAS600G B hard disk combination since V500R001C30SPC100 If you use SM HDD SAS600G B hard disk combination on earlier versions the SM HDD SAS600G B hard disk combination will be identified as non Huawei hard disks You need to upgrade the software version l The USG starts to support SM HDD SAS1200G B hard disk combination since V500R001C50 If you use SM HDD...

Страница 162: ...ule is abnormal OUTPUT green l Steady on The output of the AC power module is normal l Off The output of the AC power module is abnormal or in protection state except hiccup mode protection state in which the indicator blinks Power switch The power switch allows you to turn on or off the power output Power receptacle Connects the C13 plug of the AC power cable Clip hole The hole is used to install...

Страница 163: ...emoved Overtemperature protection When the temperature of the power module reaches a preset threshold the power module stops power output and will automatically restore power output after the temperature drops back to the normal range Heat dissipation The power adapter does not have fans The heat dissipation is provided by the fan module of the device Hot swap The device has 1 1 power module redun...

Страница 164: ... in normal temperature ensuring device running security and reliability Figure 2 71 illustrates the air flow of the device The air intake areas include the left side and the hard disk installation sloton the front side and the air exhaust is on the right side The built in fan module locates at the air exhaust and cannot be removed Figure 2 71 System air flow SM H DD S AS 30 0G B Se co sp ac e US G...

Страница 165: ...d 6 kg Fully configured 8 7 kg Power specifications AC power Supported By default one power module is provided If two power modules are used and one module fails you can hot swap the faulty power module Rated input voltage AC 100 V to 240 V 50 Hz 60 Hz Maximum input voltage AC 90 V to 264 V 47 Hz to 63 Hz Maximum input current AC 2 5 A DC power Not supported Maximum output power 170 W Heat dissipa...

Страница 166: ...0 08 MTTR hour 1 Ambient temperature Short termd Without hard disk 5 C to 55 C With hard disk s e 5 C to 40 C Long term Without hard disk 0 C to 45 C With hard disk s e 5 C to 40 C Storage temperature 40 C to 70 C Operating relative humidity Without hard disk 5 RH to 95 RH non condensing With hard disk s 5 RH to 90 RH non condensing Storage relative humidity Without hard disk 5 RH to 95 RH non con...

Страница 167: ...ithin a year exceeds 15 days it is regarded as long term l e The ambient temperature change rate of a device with hard disk s is less than or equal to 20 C per hour 2 3 2 USG6650 6660 The USG6650 6660 has a 2XG8GE expansion card and an 8GEF expansion card by default USG6650 has only AC models and USG6660 has both AC and DC models 2 3 2 1 Device Overview The USG6650 6660 uses an integrated chassis ...

Страница 168: ...M MODE SPUA 8GEF 6 4 5 7 6 7 4 5 2 0 1 3 2 3 0 1 0 1 2 3 4 5 6 7 2XG8GE 0 1 0 1 10G Secospace USG6000 1 3 5 7 2 4 6 8 XXXXXXXXXXXXXXXXXXXXXXXXXXX Fan module SPUA Front view Rear view of the AC model Mandatory 2XG8GE interface card Mandatory 8GEF interface card Expansion slots Filler panel Filler panel Fan module SPUA Rear view of the USG6660 DC model Power modules Power modules Table 2 59 describe...

Страница 169: ...d intrusion and attack information in the packet or flow and provides the forwarding plane with the detection result for further processing Interface card mandatory The interface card provides gigabit and 10 gigabit electrical and optical ports The interface card is installed before shipment and can be moved to another slot The interface card is not hot swappable Expansion slot Expansion slots are...

Страница 170: ...card but only in the lower part and in this case no other card can be installed in the upper part Table 2 60 Supported expansion cards Expansion Card Description 8GE WSIC Interface Card Provides eight gigabit RJ45 Ethernet ports 2XG8GE WSIC Interface Card Provides eight gigabit RJ45 ports and two 10 gigabit SFP ports 8GEF WSIC Interface Card Provides eight gigabit SFP ports 4GE BYPASS WSIC Card Pr...

Страница 171: ...ith 0 and is numbered from bottom to top and left to right 2XG8GE expansion card in slot 1 The 2XG8GE card is mandatory and provides eight gigabit RJ45 Ethernet ports and two 10 gigabit SFP ports The interfaces on the interface card are numbered from GigabitEthernet 1 0 0 to GigabitEthernet 1 0 9 left to right For details on the 2XG8GE interface card see 2 4 2 2XG8GE WSIC Interface Card 8GEF expan...

Страница 172: ...nsure that the device is already grounded SN The serial number that uniquely identifies the device When applying for a license file you must provide the SN of the device 2 3 2 3 Rear Panel The USG6650 6660 rear panel provides power modules a fan module and boards such as SPU Figure 2 74 illustrates the rear panel of the USG6650 6660 HUAWEI USG6000 Series Hardware Guide 2 Hardware Overview Issue 08...

Страница 173: ...ew of the USG6660 DC model Fan module Fan module ESD jack ESD jack Slot numbering layout Slot numbering layout Name Description Slot numbering Indicates the layout of the slots including the slot number and module type SPUA the main processing unit in slot SPU11 The core component for system control and management SPUA provides an out of band management port console port and USB port for managemen...

Страница 174: ...slots PWR9 and PWR10 Provides power input and distribution for the device Two DC or AC power modules are mandatory to provide 1 1 power redundancy If one power module fails the other can support the entire system so that you can replace the faulty power module without interrupting device operation For details see 2 3 2 4 Power Supply System ESD jack The equipment end of the wrist strap is inserted...

Страница 175: ...SYS indicator MODE indicator ALM indicator MGMT CONSOLE 0 1 RST EN EN RST button USB0 or USB1 indicator EN indicator RJ45 EN indicator Mini USB Alarm indicator Run indicator Name Description Hard Disk Ports and Indicators HUAWEI USG6000 Series Hardware Guide 2 Hardware Overview Issue 08 2017 06 30 Huawei Proprietary and Confidential Copyright Huawei Technologies Co Ltd 161 ...

Страница 176: ... indicator red l Steady on HDD0 or HDD1 hard disk fails l Off HDD0 or HDD1 hard disk is running normally HDD0 or HDD1 hard disk run indicator green l Steady on HDD0 or HDD1 hard disk is present l Blink HDD0 or HDD1 hard disk is reading or writing data l Off HDD0 or HDD1 hard disk is not detected USB Ports and indicators USB0 and USB1 ports USB ports allow you to insert USB devices for system softw...

Страница 177: ...r on the device Three to five seconds later when the MODE indicator on SPUA is blinking release the RST button to restore the default settings NOTE If a hard disk is installed on the device you must run the disk offline command in system view and wait for approximately 30 seconds until the system displays that the hard disk has stopped working before pressing the RST button Otherwise the data may ...

Страница 178: ...s Item Description Silkscreen SPUA Dimensions H x W x D 40 14 mm x 402 80 mm 270 00 mm Weight 1 kg Power 109 W 2 3 2 4 Power Supply System The USG6650 6660 supports two 350 W power modules for 1 1 redundancy USG6650 supports only AC power modules and USG6660 supports both AC and DC power modules 350 W AC Power Module The 350 W AC power module converts AC power to DC power for the device Figure 2 7...

Страница 179: ...rmal or in protection state except hiccup mode protection state in which the indicator blinks SN The serial number that uniquely identifies the power module Power switch The power switch allows you to turn on or off the power output Power receptacle Connects the C13 plug of the AC power cable Clip hole The hole is used to install the power cable clip which is used to bind and fix the power cable T...

Страница 180: ...ture of the power module reaches a preset threshold the power module stops power output and will automatically restore power output after the temperature drops back to the normal range Heat dissipation The power module does not have fans The heat dissipation is provided by the fan module of the device Hot swap The device has 1 1 power module redundancy You can hot swap a power module without inter...

Страница 181: ...put power module Figure 2 77 illustrates the appearance of the DC power module Figure 2 77 Appearance of the 350 W DC power module PWR350D PWR STATUS NEG RTN 48V 60V 9 6A OFF ON XXXXXXXXXXXXXXXXXXXXXXXXXXX ESN Power switch STATUS indicator Power terminal PW R35 0D PW R STATUS NEG RTN 4 8V 6 0V 9 6A OFF ON XXX XXX XXX XXX XXX XXX XXX XXX XXX HUAWEI USG6000 Series Hardware Guide 2 Hardware Overview ...

Страница 182: ...ter the input current becomes normal Output current limiting protection Intermittently provides output and automatically restores normal output after the output current falls within a normal range Output overvoltage protection Intermittently stops output and automatically restores output after the overvoltage condition is removed Output short circuit protection Intermittently provides output and a...

Страница 183: ... V DC to 12 36 V DC Maximum output power 350 W 2 3 2 5 Heat Dissipation System The USG6650 6660 provides a dedicated fan module for heat dissipation System Air Flow Figure 2 78 illustrates the air flow of the device The air intake areas include the left side and the hard disk installation sloton the front side and the air exhaust is on the right side The fan module locates at the air exhaust of th...

Страница 184: ...T US 9 PW R 10 PW R 11 F A N 12 SPU SPU 13 Cool air Hot air Fan Module The fan module supports hot swapping The fan module consists of a fan tray fans and a fan control board FCB Figure 2 79 illustrates the appearance of the fan module HUAWEI USG6000 Series Hardware Guide 2 Hardware Overview Issue 08 2017 06 30 Huawei Proprietary and Confidential Copyright Huawei Technologies Co Ltd 170 ...

Страница 185: ...normally l Blink green four times every second 4 Hz The communication between the fan module and the device is lost l Blink red The fan module is faulty and an alarm is generated Slot numbering The slot numbering indicate the slot numbers and layout For example 13 FAN means that the fan module is installed in slot 13 SN The serial number that uniquely identifies the fan module HUAWEI USG6000 Serie...

Страница 186: ...mber of fans 3 Fan Speed Adjustment Policy The device adopts the automatic fan speed adjustment technology to monitor the temperature of key components If the internal device temperature is higher than the specified value the fan speed increases when the temperature falls back to its normal range the fan speed decreases In this way the fan module enables the device to run in normal temperature ens...

Страница 187: ...2 mm x 470 mm Weight Standard 18 kg Fully configured 24 kg Power specifications AC power Supported 1 1 power redundancy hot swappable Rated input voltage AC 100 V to 240 V 50 Hz 60 Hz Maximum input voltage AC 90 V to 264 V 47 Hz to 63 Hz Maximum input current AC 5 A DC power Supported only by USG6660 1 1 power redundancy hot swappable Rated input voltage DC 48 V to 60 V Maximum input voltage DC 40...

Страница 188: ...terface card l 4GE BYPASS WSIC 2 electrical links Bypass card Environment specificationsc System reliability MTBF year 27 07 MTTR hour 1 Ambient temperature Short termd Without hard disk 5 C to 55 C With hard disk s e 5 C to 40 C Long term Without hard disk 0 C to 45 C With hard disk s e 5 C to 40 C Storage temperature 40 C to 70 C Operating relative humidity Without hard disk 5 RH to 95 RH non co...

Страница 189: ...s or the total period within a year exceeds 15 days it is regarded as long term l e The ambient temperature change rate of a device with hard disk s is less than or equal to 20 C per hour 2 3 3 USG6670 The USG6670 has both AC and DC models and provides two 2XG8GE expansion cards and one 8GEF expansion card by default 2 3 3 1 Device Overview The USG6670 uses an integrated chassis that contains the ...

Страница 190: ...GEF 6 4 5 7 6 7 4 5 2 0 1 3 2 3 0 1 0 1 2 3 4 5 6 7 2XG8GE 0 1 0 1 10G 0 1 2 3 4 5 6 7 2XG8GE 0 1 0 1 10G Secospace USG6000 1 3 5 7 2 4 6 8 XXXXXXXXXXXXXXXXXXXXXXXXXXX Fan module Fan module SPUA Front view Rear view of the AC model Mandatory 2XG8GE interface card Mandatory 8GEF interface card Expansion slots Filler panel Filler panel SPUA Rear view of the DC model Power modules Power modules Table...

Страница 191: ...on and attack information in the packet or flow and provides the forwarding plane with the detection result for further processing Interface card mandatory The interface card provides gigabit and 10 gigabit electrical and optical ports The interface card is installed before shipment and can be moved to another slot The interface card is not hot swappable Expansion slot Expansion slots are reserved...

Страница 192: ... card but only in the lower part and in this case no other card can be installed in the upper part Table 2 69 Supported expansion cards Expansion Card Description 8GE WSIC Interface Card Provides eight gigabit RJ45 Ethernet ports 2XG8GE WSIC Interface Card Provides eight gigabit RJ45 ports and two 10 gigabit SFP ports 8GEF WSIC Interface Card Provides eight gigabit SFP ports 4GE BYPASS WSIC Card P...

Страница 193: ...e interface number which begins with 0 and is numbered from bottom to top and left to right 2XG8GE expansion card in slot 1 The 2XG8GE card is mandatory and provides eight gigabit RJ45 Ethernet ports and two 10 gigabit SFP ports The interfaces on the interface card are numbered from GigabitEthernet 1 0 0 to GigabitEthernet 1 0 9 left to right For details on the 2XG8GE interface card see 2 4 2 2XG8...

Страница 194: ...om ESD jack The equipment end of the wrist strap is inserted into the ESD jack For the wrist strap to be effective ensure that the device is already grounded SN The serial number that uniquely identifies the device When applying for a license file you must provide the SN of the device 2 3 3 3 Rear Panel The USG6670 rear panel provides power modules a fan module and boards such as SPU Figure 2 82 i...

Страница 195: ...iew of the DC model Fan module Fan module ESD jack ESD jack Slot numbering layout Slot numbering layout Name Description Slot numbering Indicates the layout of the slots including the slot number and module type SPUA the main processing unit in slot SPU11 The core component for system control and management SPUA provides an out of band management port console port and USB port for management acces...

Страница 196: ...slots PWR9 and PWR10 Provides power input and distribution for the device Two DC or AC power modules are mandatory to provide 1 1 power redundancy If one power module fails the other can support the entire system so that you can replace the faulty power module without interrupting device operation For details see 2 3 3 4 Power Supply System ESD jack The equipment end of the wrist strap is inserted...

Страница 197: ...SYS indicator MODE indicator ALM indicator MGMT CONSOLE 0 1 RST EN EN RST button USB0 or USB1 indicator EN indicator RJ45 EN indicator Mini USB Alarm indicator Run indicator Name Description Hard Disk Ports and Indicators HUAWEI USG6000 Series Hardware Guide 2 Hardware Overview Issue 08 2017 06 30 Huawei Proprietary and Confidential Copyright Huawei Technologies Co Ltd 183 ...

Страница 198: ... indicator red l Steady on HDD0 or HDD1 hard disk fails l Off HDD0 or HDD1 hard disk is running normally HDD0 or HDD1 hard disk run indicator green l Steady on HDD0 or HDD1 hard disk is present l Blink HDD0 or HDD1 hard disk is reading or writing data l Off HDD0 or HDD1 hard disk is not detected USB Ports and indicators USB0 and USB1 ports USB ports allow you to insert USB devices for system softw...

Страница 199: ...r on the device Three to five seconds later when the MODE indicator on SPUA is blinking release the RST button to restore the default settings NOTE If a hard disk is installed on the device you must run the disk offline command in system view and wait for approximately 30 seconds until the system displays that the hard disk has stopped working before pressing the RST button Otherwise the data may ...

Страница 200: ...ecifications Table 2 70 SPUA specifications Item Description Silkscreen SPUA Dimensions H x W x D 40 14 mm x 402 80 mm 270 00 mm Weight 1 kg Power 109 W 2 3 3 4 Power Supply System The USG6670 has two 350 W AC or DC power modules for 1 1 power redundancy 350 W AC Power Module The 350 W AC power module converts AC power to DC power for the device Figure 2 84 illustrates the appearance of the AC pow...

Страница 201: ...rmal or in protection state except hiccup mode protection state in which the indicator blinks SN The serial number that uniquely identifies the power module Power switch The power switch allows you to turn on or off the power output Power receptacle Connects the C13 plug of the AC power cable Clip hole The hole is used to install the power cable clip which is used to bind and fix the power cable T...

Страница 202: ...ture of the power module reaches a preset threshold the power module stops power output and will automatically restore power output after the temperature drops back to the normal range Heat dissipation The power module does not have fans The heat dissipation is provided by the fan module of the device Hot swap The device has 1 1 power module redundancy You can hot swap a power module without inter...

Страница 203: ...put power module Figure 2 85 illustrates the appearance of the DC power module Figure 2 85 Appearance of the 350 W DC power module PWR350D PWR STATUS NEG RTN 48V 60V 9 6A OFF ON XXXXXXXXXXXXXXXXXXXXXXXXXXX ESN Power switch STATUS indicator Power terminal PW R35 0D PW R STATUS NEG RTN 4 8V 6 0V 9 6A OFF ON XXX XXX XXX XXX XXX XXX XXX XXX XXX HUAWEI USG6000 Series Hardware Guide 2 Hardware Overview ...

Страница 204: ...ter the input current becomes normal Output current limiting protection Intermittently provides output and automatically restores normal output after the output current falls within a normal range Output overvoltage protection Intermittently stops output and automatically restores output after the overvoltage condition is removed Output short circuit protection Intermittently provides output and a...

Страница 205: ... 64 V DC to 12 36 V DC Maximum output power 350 W 2 3 3 5 Heat Dissipation System The USG6670 provides a dedicated fan module for heat dissipation System Air Flow Figure 2 86 illustrates the air flow of the device The air intake areas include the left side and the hard disk installation sloton the front side and the air exhaust is on the right side The fan module locates at the air exhaust of the ...

Страница 206: ...T US 9 PW R 10 PW R 11 F A N 12 SPU SPU 13 Cool air Hot air Fan Module The fan module supports hot swapping The fan module consists of a fan tray fans and a fan control board FCB Figure 2 87 illustrates the appearance of the fan module HUAWEI USG6000 Series Hardware Guide 2 Hardware Overview Issue 08 2017 06 30 Huawei Proprietary and Confidential Copyright Huawei Technologies Co Ltd 192 ...

Страница 207: ...normally l Blink green four times every second 4 Hz The communication between the fan module and the device is lost l Blink red The fan module is faulty and an alarm is generated Slot numbering The slot numbering indicate the slot numbers and layout For example 13 FAN means that the fan module is installed in slot 13 SN The serial number that uniquely identifies the fan module HUAWEI USG6000 Serie...

Страница 208: ...mm Number of fans 3 Fan Speed Adjustment Policy The device adopts the automatic fan speed adjustment technology to monitor the temperature of key components If the internal device temperature is higher than the specified value the fan speed increases when the temperature falls back to its normal range the fan speed decreases In this way the fan module enables the device to run in normal temperatur...

Страница 209: ...m x 442 mm x 470 mm Weight Standard 20 kg Fully configured 24 kg Power specifications AC power Supported 1 1 power redundancy hot swappable Rated input voltage AC 100 V to 240 V 50 Hz 60 Hz Maximum input voltage AC 90 V to 264 V 47 Hz to 63 Hz Maximum input current AC 5 A DC power Supported 1 1 power redundancy hot swappable Rated input voltage DC 48 V to 60 V Maximum input voltage DC 40 V to 72 V...

Страница 210: ...terface card l 4GE BYPASS WSIC 2 electrical links Bypass card Environment specificationsc System reliability MTBF year 23 67 MTTR hour 1 Ambient temperature Short termd Without hard disk 5 C to 55 C With hard disk s e 5 C to 40 C Long term Without hard disk 0 C to 45 C With hard disk s e 5 C to 40 C Storage temperature 40 C to 70 C Operating relative humidity Without hard disk 5 RH to 95 RH non co...

Страница 211: ...within a year exceeds 15 days it is regarded as long term l e The ambient temperature change rate of a device with hard disk s is less than or equal to 20 C per hour 2 3 4 USG6680 The USG6680 has both AC and DC models and provides two 2XG8GE expansion cards one 8GEF expansion card and one SPUB service engine by default 2 3 4 1 Device Overview The USG6680 uses an integrated chassis that contains th...

Страница 212: ... EN EN SYS ALM MODE SPUA 8GEF 6 4 5 7 6 7 4 5 2 0 1 3 2 3 0 1 0 1 2 3 4 5 6 7 2XG8GE 0 1 0 1 10G 0 1 2 3 4 5 6 7 2XG8GE 0 1 0 1 10G Secospace USG6000 1 3 5 7 2 4 6 8 XXXXXXXXXXXXXXXXXXXXXXXXXXX SPUB SPUA Front view Rear view of the AC model Mandatory 2XG8GE interface card Mandatory 8GEF interface card Expansion slots SPUB SPUA Rear view of the DC model Power modules Power modules Fan module Fan mo...

Страница 213: ...e of each packet parses the content to identify the application of the packet as well as the file virus URL email field intrusion and attack information in the packet or flow and provides the forwarding plane with the detection result for further processing SPUB the service engine SPUB has an IAE to provide content security The CPU resources of SPUB on the USG6680 are dedicated for the IAE Therefo...

Страница 214: ...ypes one for Wide Service Interface Cards WSIC and the other for Extended Service Interface Cards XSIC An XSIC is twice as high as a WSIC An XSIC slot can also hold a WSIC card but only in the lower part and in this case no other card can be installed in the upper part Table 2 78 Supported expansion cards Expansion Card Description 8GE WSIC Interface Card Provides eight gigabit RJ45 Ethernet ports...

Страница 215: ...e interface number which begins with 0 and is numbered from bottom to top and left to right 2XG8GE expansion card in slot 1 The 2XG8GE card is mandatory and provides eight gigabit RJ45 Ethernet ports and two 10 gigabit SFP ports The interfaces on the interface card are numbered from GigabitEthernet 1 0 0 to GigabitEthernet 1 0 9 left to right For details on the 2XG8GE interface card see 2 4 2 2XG8...

Страница 216: ... ESD jack The equipment end of the wrist strap is inserted into the ESD jack For the wrist strap to be effective ensure that the device is already grounded SN The serial number that uniquely identifies the device When applying for a license file you must provide the SN of the device 2 3 4 3 Rear Panel The USG6680 rear panel provides power modules a fan module and boards such as SPU The rear panel ...

Страница 217: ...e SPUB Power modules SPUA 9 PWR 10 PWR 11 F A N 12 SPU SPU 13 Rear view of the AC model Rear view of the DC model Name Description Slot numbering Indicates the layout of the slots including the slot number and module type SPUA the main processing unit in slot SPU11 The core component for system control and management SPUA provides an out of band management port console port and USB port for manage...

Страница 218: ...see 2 3 4 5 Heat Dissipation System Power modules in slots PWR9 and PWR10 Provides power input and distribution for the device Two DC or AC power modules are mandatory to provide 1 1 power redundancy If one power module fails the other can support the entire system so that you can replace the faulty power module without interrupting device operation For details see 2 3 4 4 Power Supply System ESD ...

Страница 219: ...SYS indicator MODE indicator ALM indicator MGMT CONSOLE 0 1 RST EN EN RST button USB0 or USB1 indicator EN indicator RJ45 EN indicator Mini USB Alarm indicator Run indicator Name Description Hard Disk Ports and Indicators HUAWEI USG6000 Series Hardware Guide 2 Hardware Overview Issue 08 2017 06 30 Huawei Proprietary and Confidential Copyright Huawei Technologies Co Ltd 205 ...

Страница 220: ...HDD SAS1200G A hard disk will be identified as non Huawei hard disks You need to upgrade the software version HDD0 or HDD1 hard disk alarm indicator red l Steady on HDD0 or HDD1 hard disk fails l Off HDD0 or HDD1 hard disk is running normally HDD0 or HDD1 hard disk run indicator green l Steady on HDD0 or HDD1 hard disk is present l Blink HDD0 or HDD1 hard disk is reading or writing data l Off HDD0...

Страница 221: ...ault settings Press and hold down the RST button and power on the device Three to five seconds later when the MODE indicator on SPUA is blinking release the RST button to restore the default settings NOTE If a hard disk is installed on the device you must run the disk offline command in system view and wait for approximately 30 seconds until the system displays that the hard disk has stopped worki...

Страница 222: ...raded l Off The system is faulty Table 2 79 describes the SPUA specifications Table 2 79 SPUA specifications Item Description Silkscreen SPUA Dimensions H x W x D 40 14 mm x 402 80 mm 270 00 mm Weight 1 kg Power 109 W SPUB the service engine The SPUB is pictured in Figure 2 92 Figure 2 92 SPUB RUN ALM SPUB RUN ALM RUN indicator ALM indicator HUAWEI USG6000 Series Hardware Guide 2 Hardware Overview...

Страница 223: ...nning normally Table 2 80 describes the SPUB specifications Table 2 80 SPUB specifications Item Description Silkscreen SPUB Dimensions H x W x D 40 14 mm x 402 80 mm 270 00 mm Weight 0 8 kg Power 74 8 W 2 3 4 4 Power Supply System The USG6680 has two 700 W AC or 350 W DC power modules for 1 1 power redundancy 700 W AC Power Module The 700 W AC power module converts AC power to DC power for the dev...

Страница 224: ...s abnormal or in protection state except hiccup mode protection state in which the indicator blinks SN The serial number that uniquely identifies the power module Power switch The power switch allows you to turn on or off the power output Power receptacle Connects the C13 plug of the AC power cable Clip hole The hole is used to install the power cable clip which is used to bind and fix the power c...

Страница 225: ...the output short circuit is removed Overtemperature protection When the temperature of the power module reaches a preset threshold the power module stops power output and will automatically restore power output after the temperature drops back to the normal range Heat dissipation The power module does not have fans The heat dissipation is provided by the fan module of the device Hot swap The devic...

Страница 226: ...earance of the 350 W DC power module PWR350D PWR STATUS NEG RTN 48V 60V 9 6A OFF ON XXXXXXXXXXXXXXXXXXXXXXXXXXX ESN Power switch STATUS indicator Power terminal PW R35 0D PW R STATUS NEG RTN 4 8V 6 0V 9 6A OFF ON XXX XXX XXX XXX XXX XXX XXX XXX XXX Name Description Power switch The power switch allows you to turn on or off the power output HUAWEI USG6000 Series Hardware Guide 2 Hardware Overview I...

Страница 227: ...utput current limiting protection Intermittently provides output and automatically restores normal output after the output current falls within a normal range Output overvoltage protection Intermittently stops output and automatically restores output after the overvoltage condition is removed Output short circuit protection Intermittently provides output and automatically restores normal output af...

Страница 228: ...64 V DC to 12 36 V DC Maximum output power 350 W 2 3 4 5 Heat Dissipation System The USG6680 provides a dedicated fan module for heat dissipation System Air Flow Figure 2 95 illustrates the air flow of the device The air intake areas include the left side and the hard disk installation slot on the front side and the air exhaust is on the right side The fan module locates at the air exhaust of the ...

Страница 229: ...0W A L ST AT US 9 PW R 10 PW R 11 F A N 12 SPU SPU 13 Cool air Hot air Fan Module The fan module supports hot swapping The fan module consists of a fan tray fans and a fan control board FCB Figure 2 96 illustrates the appearance of the fan module HUAWEI USG6000 Series Hardware Guide 2 Hardware Overview Issue 08 2017 06 30 Huawei Proprietary and Confidential Copyright Huawei Technologies Co Ltd 215...

Страница 230: ...normally l Blink green four times every second 4 Hz The communication between the fan module and the device is lost l Blink red The fan module is faulty and an alarm is generated Slot numbering The slot numbering indicate the slot numbers and layout For example 13 FAN means that the fan module is installed in slot 13 SN The serial number that uniquely identifies the fan module HUAWEI USG6000 Serie...

Страница 231: ...mm Number of fans 3 Fan Speed Adjustment Policy The device adopts the automatic fan speed adjustment technology to monitor the temperature of key components If the internal device temperature is higher than the specified value the fan speed increases when the temperature falls back to its normal range the fan speed decreases In this way the fan module enables the device to run in normal temperatur...

Страница 232: ...rd Not supported Dimensions and weight Dimensions Hb x Wa x D 130 5 mm x 442 mm x 470 mm Weight Standard 20 kg Fully configured 26 kg Power specifications AC power Supported 1 1 power redundancy hot swappable Rated input voltage AC 100 V to 240 V 50 Hz 60 Hz Maximum input voltage AC 90 V to 264 V 47 Hz to 63 Hz Maximum input current AC 10 A Maximum output power AC 700 W DC power module Supported 1...

Страница 233: ...GEe Types of expansion cards l 8GE WSIC 8 1GE RJ45 interface card l 2XG8GE WSIC 8 1GE RJ45 2 10GE SFP interface card l 8GEF WSIC 8 1GE SFP interface card l 4GE BYPASS WSIC 2 electrical links Bypass card Environment specificationsc System reliability MTBF year 19 18 MTTR hour 1 Ambient temperature Short termd Without hard disk 5 C to 55 C With hard disk s f 5 C to 40 C Long term Without hard disk 0...

Страница 234: ... 48 hours or the total period within a year exceeds 15 days it is regarded as long term l e As the maximum output power of a USG6680 DC is 350 W to prevent insufficient power supply you can insert up to three WSICs without 2XG8GE or two WSICs with 2XG8GE in the five expansion slots l f The ambient temperature change rate of a device with hard disk s is less than or equal to 20 C per hour 2 4 Expan...

Страница 235: ...e RJ45 Cable Standard Ethernet cable Working mode Full duplex Half duplex Rate 10 100 1000 Mbit s autosensing Port standard IEEE 802 2 802 3 Frame format Ethernet_II Network protocol TCP IP Technical Specifications Table 2 88 lists the technical specifications of the 8GE card Table 2 88 Technical specifications of the 8GE card Item Description Model WSIC 8GE Silkscreen 8GE Dimensions H x W x D 19 ...

Страница 236: ... 2XG8GE 0 1 0 1 10G LINK ACT Name Description Ports 0 to 7 RJ45 Eight 10 100 1000M autosensing Ethernet electrical ports Port 0 SFP 10 gigabit SFP port The port number is 8 and the port connects to the 10GE Optical Transceiver Port 1 SFP 10 gigabit SFP port The port number is 9 and the port connects to the 10GE Optical Transceiver Indicators LINK indicator green l Steady on The link is connected l...

Страница 237: ...ion 8 x gigabit RJ45 port Connector type RJ45 Cable Standard Ethernet cable Working mode Full duplex Half duplex Rate 10 100 1000 Mbit s autosensing Port standard IEEE 802 2 802 3 Frame format Ethernet_II Network protocol TCP IP 2 x 10 gigabit SFP port Connector type SFP Port cable Optical fiber The port requires a 10 gigabit optical transceiver Working mode Full duplex Rate 10 Gbit s Port standar...

Страница 238: ...ivers must be installed on the SFP ports for optical fiber connection Panel Figure 2 99 illustrates the appearance of the 8GEF card panel Figure 2 99 8GEF card panel 8GEF 6 4 5 7 6 7 4 5 2 0 1 3 2 3 0 1 Name Description 0 to 7 SFP Eight gigabit SFP ports numbered from 0 to 7 Each port connects to a Gigabit Optical Transceiver Indicators 0 through 7 green Operating status indicators of ports 0 thro...

Страница 239: ... Table 2 92 lists the technical specifications of the 8GEF card Table 2 92 Technical specifications of the 8GEF card Item Description Model WSIC 8GEF Silkscreen 8GEF Dimensions H x W x D 19 82 mm x 201 00 mm 230 00 mm Weight 0 5 kg Typical power consumption 11 5 W Maximum power consumption 13 5 W Typical heat consumption 39 2 BTU hour Maximum heat consumption 46 1 BTU hour Available slot WSIC or l...

Страница 240: ... card can be used as Layer 3 ports Panel Figure 2 100 illustrates the appearance of the 4GE BYPASS card panel Figure 2 100 4GE BYPASS card panel 0 1 2 3 2 3 0 1 4GE BYPASS 0 1 2 3 Power Off LINK ACT Name Description Ports 0 and 1 RJ45 Two 10 100 1000M autosensing Ethernet electrical ports numbered 0 and 1 The two ports form a bypass port pair When working as the upstream and downstream ports on th...

Страница 241: ...is powered on The bypass formed by GE2 and GE3 is in working state l Off The card is powered off The bypass formed by GE2 and GE3 is in protection state Port Description Table 2 93 lists the attributes of ports on the 4GE BYPASS card Table 2 93 Attributes of ports on the 4GE BYPASS card Attribute Description Connector type RJ45 Cable Standard Ethernet cable Working mode Full duplex Half duplex Rat...

Страница 242: ...A consists of the 2 5 inch SAS300G hard disk and hard disk tray The hard disk unit SM HDD SAS300G A provides the following functions l Stores log and report data l Works with another hard disk unit to form a RAID1 for reliable service data backup Once the working hard disk fails the system automatically reads data from the mirror hard disk ensuring non stop services l Supports hot swap If a hard d...

Страница 243: ... properly RUN indicator green l Steady on The hard disk is running l Blink Data is being read from or written to the hard disk l Off The hard disk is not detected Technical Specifications Table 2 95 lists the technical specifications of the hard disk unit SM HDD SAS300G A Table 2 95 Technical specifications of the hard disk unit SM HDD SAS300G A Item Description Dimensions H x W x D 15 2 mm x 76 5...

Страница 244: ...data l Works with another hard disk unit to form a RAID1 for reliable service data backup Once the working hard disk fails the system automatically reads data from the mirror hard disk ensuring non stop services l Supports hot swap If a hard disk fails you can replace it without powering off the USG After the replacement you can restore data from the mirror hard disk Appearance Figure 2 102 illust...

Страница 245: ...ing properly RUN indicator green l Steady on The hard disk is running l Blink Data is being read from or written to the hard disk l Off The hard disk is not detected Technical Specifications Table 2 96 lists the technical specifications of the hard disk unit SM HDD SAS600G A Table 2 96 Technical specifications of the hard disk unit SM HDD SAS600G A Item Description Dimensions H x W x D 15 2 mm x 7...

Страница 246: ...t data l Works with another hard disk unit to form a RAID1 for reliable service data backup Once the working hard disk fails the system automatically reads data from the mirror hard disk ensuring non stop services l Supports hot swap If a hard disk fails you can replace it without powering off the USG After the replacement you can restore data from the mirror hard disk Appearance Figure 2 103 illu...

Страница 247: ...ng properly RUN indicator green l Steady on The hard disk is running l Blink Data is being read from or written to the hard disk l Off The hard disk is not detected Technical Specifications Table 2 97 lists the technical specifications of the hard disk unit SM HDD SAS1200G A Table 2 97 Technical specifications of the hard disk unit SM HDD SAS1200G A Item Description Dimensions H x W x D 15 2 mm x ...

Страница 248: ...e hard disk card and hard disk unit SM HDD SAS300G A The hard disk combination SM HDD SAS300G B provides the following functions l Stores log and report data l Hard disk unit SM HDD SAS300G A is hot swappable but the hard disk card is not Appearance Figure 2 104 illustrates the appearance of the hard disk combination SM HDD SAS300G B HUAWEI USG6000 Series Hardware Guide 2 Hardware Overview Issue 0...

Страница 249: ...t for hard disk reading and writing and fixes the hard disk unit ALM indicator red l Steady on The hard disk fails l Off The hard disk is running properly RUN indicator green l Steady on The hard disk is running l Blink Data is being read from or written to the hard disk l Off The hard disk is not detected Technical Specifications Table 2 98 lists the technical specifications of the hard disk comb...

Страница 250: ...ombination SM HDD SAS600G B The hard disk combination SM HDD SAS600G B consists of the hard disk card and hard disk unit SM HDD SAS600G A The hard disk combination SM HDD SAS600G B provides the following functions l Stores log and report data l Hard disk unit SM HDD SAS600G A is hot swappable but the hard disk card is not Appearance Figure 2 105 illustrates the appearance of the hard disk combinat...

Страница 251: ...t for hard disk reading and writing and fixes the hard disk unit ALM indicator red l Steady on The hard disk fails l Off The hard disk is running properly RUN indicator green l Steady on The hard disk is running l Blink Data is being read from or written to the hard disk l Off The hard disk is not detected Technical Specifications Table 2 99 lists the technical specifications of the hard disk comb...

Страница 252: ...ination SM HDD SAS1200G B The hard disk combination SM HDD SAS1200G B consists of the hard disk card and hard disk unit SM HDD SAS1200G A The hard disk combination SM HDD SAS1200G B provides the following functions l Stores log and report data l Hard disk unit SM HDD SAS1200G A is hot swappable but the hard disk card is not Appearance Figure 2 106 illustrates the appearance of the hard disk combin...

Страница 253: ...ort for hard disk reading and writing and fixes the hard disk unit ALM indicator red l Steady on The hard disk fails l Off The hard disk is running properly RUN indicator green l Steady on The hard disk is running l Blink Data is being read from or written to the hard disk l Off The hard disk is not detected Technical Specifications Table 2 100 lists the technical specifications of the hard disk c...

Страница 254: ... You should purchase the interface cards according to the network environment Table 2 101 shows the technical specifications of the 4G LTE data cards Table 2 101 Technical specifications of the 4G LTE data cards Model Standard Frequency band E3276s 861 TDD 1900 2300 2600MHz FDD 2600MHz E3276s 150 FDD 800 900 1800 2100 2600MH z E3372s 153 FDD 800 900 1800 2100 2600MH z E8278s 602 TDD 2600MHz FDD 80...

Страница 255: ...00MHz EDGE 850 900 1800 1900MHz E3372h 510 FDD 700 850 AWS 1900 2100 2600MHz UMTS 850 AWS 1900 2100MHz EDGE 850 900 1800 1900MHz NOTE The actual transmission rate of the 4G LTE data card depends on the carrier network HUAWEI USG6000 Series Hardware Guide 2 Hardware Overview Issue 08 2017 06 30 Huawei Proprietary and Confidential Copyright Huawei Technologies Co Ltd 241 ...

Страница 256: ...the operation manual Information marked NOTICE CAUTION WARNING and DANGER in the operation manual is not exhaustive but supplements safety precautions Local Laws and Regulations Comply with local laws and regulations while performing operations on the device All safety precautions in the operation manual only supplement local safety regulations Basic Installation Requirements Requirements for Huaw...

Страница 257: ...re places such as against the wall or on the mounting shelf l Do not block the air vent when the device is running l Tighten the screws with proper tools when installing the panels l Remove all plastic packing materials from the equipment room after the installation is complete 3 1 2 Installation Environment Check Before you install a USG verify that the installation environment meets requirements...

Страница 258: ...to indicate specific lengths with drawn lines Fastening tools l Flat head screwdriver used to fasten small screws and bolts l Phillips screwdriver used to fasten small screws and bolts Drilling tools l Hammer drill used to drill mounting holes during wall mounting l Vacuum cleaner used to remove dust and debris produced while drilling holes l Hammer used to drive the hollow wall anchors into mount...

Страница 259: ... performance specifications of the device such as the voltage current and resistance l Ground resistance tester used to measure the ground resistance l Configuration terminal A common PC is also applicable 3 2 Installing a Desktop Device USG6305 6305 W 6310S 6310S W 6310S WL OVS 6510 6510 WL This chapter provides the cabinet mounting workbench mounting wall mounting and cable connection methods of...

Страница 260: ...e cabinet door In this manual the rear panel of the USG is towards the cabinet door Procedure Step 1 Install mounting ears on the chassis Use a Phillips screwdriver to fix the mounting ears to both sides of the chassis with M4 screws as shown in Figure 3 1 Figure 3 1 Installing the mounting ears on the chassis 12V 2A RST Secospace USG6000 0 2 1 3 4 6 5 7 CONSOLE XXX XXX XXX XXX XXX XXX XXX XXX XXX...

Страница 261: ...3 3 Installing floating nuts 2 3 1 Step 3 Mount the USG in the cabinet 1 Use a Phillips screwdriver to fix M6 screws into two floating nuts of the lower row but do not secure them leaving a 2 mm spacing as shown in Figure 3 4 HUAWEI USG6000 Series Hardware Guide 3 Hardware Installation Issue 08 2017 06 30 Huawei Proprietary and Confidential Copyright Huawei Technologies Co Ltd 247 ...

Страница 262: ...otruding M6 screws 3 Use a Phillips screwdriver to secure the M6 screws install M6 screws for the upper row and fix the USG into the cabinet through mounting ears as shown in Figure 3 5 HUAWEI USG6000 Series Hardware Guide 3 Hardware Installation Issue 08 2017 06 30 Huawei Proprietary and Confidential Copyright Huawei Technologies Co Ltd 248 ...

Страница 263: ... l Ensure that the exhaust of the USG is not blocked by other objects 3 2 1 2 Mounting a Device on a Workbench If you do not have a cabinet you can mount the USG6305 6305 W 6310S 6310S W 6310S WL OVS 6510 6510 WL on a workbench Context The workbench must be l Reliably grounded l Clean firm and securely installed Four rubber feet are delivered with the USG and four round notches are located at the ...

Страница 264: ...Y S A LM U S B mi cro SD W W AN 3G 2G LT E W LAN 2 4G 5G 1 3 5 7 0 2 ETH 4 6 End Follow up Procedure Verify the following after the installation l The USG is securely placed on the workbench l No object blocks the exhaust of the USG and there is at least 10 cm of distance between the USG and surrounding devices l There are no heavy objects on the USG HUAWEI USG6000 Series Hardware Guide 3 Hardware...

Страница 265: ...f two mounting holes on the wall using a ruler and mark the mounting holes with a marker The mounting holes must be on the same horizontal level NOTE l The wall must be a bearing wall Otherwise the wall is not suitable for wall mounting l Ensure that the height of mounting holes is proper so that the indicators are easy to view Figure 3 7 Spacing between mounting holes 270mm 3mm HUAWEI USG6000 Ser...

Страница 266: ...l anchors using a Phillips screwdriver Leave the screws protruding 2 mm from the wall Figure 3 8 Drilling holes and installing mounting screws 25mm 30mm 6 90 2mm 4mm 90 Step 3 Mount a USG on the wall by aligning the mounting brackets on the rear of the USG with the mounting screws NOTE The USG supports upward mounting and downward mounting To prevent water from entering into ports and causing devi...

Страница 267: ...W 6310S 6310S W 6310S WL OVS 6510 6510 WL correctly is a key measure of surge protection and resistance to interference Before using the USG6305 6305 W 6310S 6310S W 6310S WL OVS 6510 6510 WL correctly connect the PGND cable Prerequisites The USG has been installed inside a cabinet Context Instruments required l Phillips screwdriver l Multimeter HUAWEI USG6000 Series Hardware Guide 3 Hardware Inst...

Страница 268: ...inet ground point Workbench ground point Wall ground point PGND cable End Follow up Procedure Verify the following after the cabling is complete l The PGND cable is securely connected to the ground terminal l The electrical resistance between the ground terminal and ground point is less than 5 ohm on a multimeter 3 2 3 Installing a Micro SD Card This section describes how to install a micro SD car...

Страница 269: ...ing a Micro SD Card USG6305 6305 W 6310S 6310S W 6310S WL OVS 6510 6510 WL l Make sure that you have worn an ESD wrist strap and the strap is well grounded before you hold the micro SD card Otherwise the micro SD card may be damaged Procedure Step 1 Determine the slot the slot with a micro SD mark on the rear panel for installing the micro SD card Step 2 Install the micro SD card and anti theft bo...

Страница 270: ...nstall the micro SD card and try again If SD Card Physical State remains the same the USG may fail to identify the micro SD card You are advised to use another micro SD card l If SD Card File System State is Unmounted the micro SD card format might not be ext4 You need to run the reset sd card command in the system view to format the micro SD card 3 2 4 Installing a SIM Card USG6310S WL OVS 6510 W...

Страница 271: ...ard may be damaged Procedure Step 1 Determine the slot the slot with a silkscreen on the rear panel for installing the SIM card Step 2 Install the SIM card and anti theft board NOTE l Keep the notch on the SIM card in the same direction as the notch marked on the left of the SIM card slot l Do not use too much force otherwise the SIM card or SIM card slot might be damaged l The anti theft board is...

Страница 272: ...the SIM card is working properly and has been identified by the USG 3 2 5 Installing an Antenna USG6305 W 6310S W 6310S WL OVS 6510 WL The USG6305 W 6310S W 6310S WL OVS 6510 WL provides an internal Wi Fi module to provide the WLAN access function and the USG6310S WL OVS 6510 WL provides an internal LTE module to provide the LTE access function Both the WLAN and LTE access functions require antenn...

Страница 273: ...or installing the antennas The interfaces with the WiFi 0 and WiFi 1 silkscreens on the rear panel are the interfaces for installing the Wi Fi antenna and the interfaces with the LTE MAIN and LTE DIV silkscreens are the interfaces for installing the LTE antenna Step 2 Install the antennas 1 Take off the protective cap of the antenna connector 2 Install the antenna into the antenna connector of the...

Страница 274: ... 3 4 6 5 7 LT E MAIN WiFi 1 12V 2A 0 2 1 3 4 6 5 7 CONSOLE LT E MAIN WiFi 1 12V 2A 0 2 1 3 4 6 5 7 CONSOLE LT E MAIN WiFi 1 1 2 3 When the USG is installed on the workstation the Wi Fi antenna should be vertical to the workstation and the LTE and Wi Fi antennas should be placed based on the distance requirement and be vertical to the floor HUAWEI USG6000 Series Hardware Guide 3 Hardware Installati...

Страница 275: ... When the USG is mounted to a wall the Wi Fi antenna should be vertical to the wall and the LTE and Wi Fi antennas should be placed based on the distance requirement and be vertical to the wall NOTE The LTE antenna has a sucker at the bottom and can be sucked to the metallic surface If there is no metallic surface on the wall you can use strong tape to fix the LTE antenna on the wall HUAWEI USG600...

Страница 276: ... up Procedure After the antennas are installed do as follows l Before the USG is powered on Check whether the cables and connectors are free of damage or breakage and are connected properly l After the USG is powered on Run the display cellular command in any view to check the Current RSSI value If the value is greater than 75 dbm the signal is good Otherwise adjust the antennas HUAWEI USG6000 Ser...

Страница 277: ... l Prepare cable labels Before cable connection labels must be prepared for the cable NOTICE l Make sure that the PC and the USG are connected to the same ground point Otherwise the console port of the USG may be damaged l Pay attention to port numbering and make sure that the cable is connected to the correct port preventing damage to ports or the device NOTE You can purchase the console cable as...

Страница 278: ... l Windows XP a Start the HyperTerminal Windows operating system or other third party program that supports serial ports on the PC b Create a connection select the serial port and configure the serial port parameters as follows n Bit per second 9600 n Data bit 8 n Parity None n Stop bit 1 n Data flow control None c Click OK The copyright information is displayed on the HyperTerminal You can enter ...

Страница 279: ...rnet Cable Based on the network plan you can connect one end of an Ethernet cable to the Ethernet port of a USG6305 6305 W 6310S 6310S W 6310S WL OVS 6510 6510 WL and the other end to the Ethernet port of the peer device Context Before connecting the Ethernet cable perform the following operations l Check construction conditions The peer device has been installed in the equipment room and the port...

Страница 280: ... or the device might be damaged Procedure Step 1 If multiple network cables need to be connected attach temporary labels to both ends of each cable for identification Step 2 Connect one end of an Ethernet cable to the Ethernet port of the USG and the other end to the Ethernet port of the peer device based on the network plan Figure 3 18 Connecting an Ethernet cable Secospace USG6000 0 2 1 3 4 6 5 ...

Страница 281: ...e Procedure Step 1 Ensure that the PGND cable is properly grounded Step 2 Insert a cable retention clip into the jack next to the power socket Step 3 Connect a power adapter 1 Insert the 4 PIN connector of the power adapter into the power socket on the USG rear panel and adjust the cable retention clip to an appropriate position 2 Use a cable retention clip to bundle the cable of the power adapter...

Страница 282: ...n 3 2 9 Powering On or Off the USG6305 6305 W 6310S 6310S W 6310S WL OVS 6510 6510 WL This section describes how to power on or off the USG6305 6305 W 6310S 6310S W 6310S WL OVS 6510 6510 WL To ensure the normal start and security of the USG6305 6305 W 6310S 6310S W 6310S WL OVS 6510 6510 WL strictly follow the operation guide to power on or off the USG6305 6305 W 6310S 6310S W 6310S WL OVS 6510 6...

Страница 283: ...e every two seconds l Power off the USG NOTICE Before powering off the USG ensure that configuration data is saved Otherwise the configuration data may be lost If the USG will be administratively shut down for a long time turn off the power switch After powering off the USG set it aside properly according to storage requirements End Follow up Procedure After the USG is powered on you can log in to...

Страница 284: ...l The device to be installed is staged near the cabinet for convenience l From the rear perspective of the chassis the cooling wind of the USG flows in on the left and is exhausted on the right When a USG and a device whose cooling wind flows in on the right and is exhausted on the left are installed in the same cabinet adequate space must be reserved between them to avoid thermal cycles You can p...

Страница 285: ...he positions of floating nuts Figure 3 22 Positions of floating nuts 1U For floating nuts device nuts Use M6 screws to fix the floating nuts at the positions specified in Figure 3 22 as shown in Figure 3 23 Figure 3 23 Installing floating nuts 2 3 1 HUAWEI USG6000 Series Hardware Guide 3 Hardware Installation Issue 08 2017 06 30 Huawei Proprietary and Confidential Copyright Huawei Technologies Co ...

Страница 286: ...t M6 Front Rear 2mm 2 Lift the USG move it to the cabinet and hang the mounting ears onto the protruding M6 screws 3 Use a Phillips screwdriver to secure the M6 screws install M6 screws for the upper row and fix the USG into the cabinet through mounting ears as shown in Figure 3 25 HUAWEI USG6000 Series Hardware Guide 3 Hardware Installation Issue 08 2017 06 30 Huawei Proprietary and Confidential ...

Страница 287: ...USG is not blocked by other objects 3 3 1 2 Mounting a Device on a Workbench If you do not have a cabinet you can mount the USG6310 6320 on a workbench Context The workbench must be l Reliably grounded l Clean firm and securely installed Four rubber feet are delivered with the USG and four round notches are located at the bottom of the device to hold the rubber feet HUAWEI USG6000 Series Hardware ...

Страница 288: ...a ce USG60 00 1 3 5 7 0 2 ETH4 6 End Follow up Procedure Verify the following after the installation l The USG is securely placed on the workbench l No object blocks the exhaust of the USG and there is at least 10 cm of distance between the USG and surrounding devices l There are no heavy objects on the USG HUAWEI USG6000 Series Hardware Guide 3 Hardware Installation Issue 08 2017 06 30 Huawei Pro...

Страница 289: ...on the wall using a ruler and mark the mounting holes with a marker The mounting holes must be on the same horizontal level NOTE l The wall must be a bearing wall Otherwise the wall is not suitable for wall mounting l Ensure that the height of mounting holes is proper so that the indicators are easy to view Figure 3 27 Spacing between mounting holes 270mm 3mm HUAWEI USG6000 Series Hardware Guide 3...

Страница 290: ... anchors using a Phillips screwdriver Leave the screws protruding 2 mm from the wall Figure 3 28 Drilling holes and installing mounting screws 25mm 30mm 6 90 2mm 4mm 90 Step 3 Mount a USG on the wall by aligning the mounting brackets on the rear of the USG with the mounting screws NOTE The USG supports upward mounting and downward mounting To prevent water from entering into ports and causing devi...

Страница 291: ...onnecting the PGND cable of a USG6310 6320 correctly is a key measure of surge protection and resistance to interference Before using the USG6310 6320 correctly connect the PGND cable Prerequisites The USG has been installed inside a cabinet Context Instruments required l Phillips screwdriver l Multimeter HUAWEI USG6000 Series Hardware Guide 3 Hardware Installation Issue 08 2017 06 30 Huawei Propr...

Страница 292: ...edure Verify the following after the cabling is complete l The PGND cable is securely connected to the ground terminal l The electrical resistance between the ground terminal and ground point is less than 5 ohm on a multimeter 3 3 3 Connecting a Console Cable After connecting a PC to the console port of a USG6310 6320 with a console cable you can use the terminal emulation program on the PC to acc...

Страница 293: ...fication Step 2 Connect the RJ45 connector of the console cable to the console port RJ45 of the USG Step 3 Connect the DB9 connector of the console cable to the COM port of the management PC Figure 3 31 Connecting a console cable to the USG Console configuration cable COM port Secospace USG6000 0 2 4 6 1 3 5 7 RST 12V 3A CONSOLE XXXXXXXXXXXXXXXXXXXXXXXXXXX CONSOLE Step 4 Remove the temporary label...

Страница 294: ...t 1 n Data flow control None c Click OK The copyright information is displayed on the HyperTerminal You can enter default user name admin and password Admin 123 modify the default password as prompted to log in to the USG CLI l Windows 7 Windows 7 does not include HyperTerminal like Windows XP did However you can download a HyperTerminal program such as PuTTY for free from the Internet PuTTY is us...

Страница 295: ...net port of the peer device Context Before connecting the Ethernet cable perform the following operations l Check construction conditions The peer device has been installed in the equipment room and the port to which the Ethernet cable is to be connected has been determined l Check the cabling route The engineering document should specify the cabling route from the cabinet to the peer device in th...

Страница 296: ...le for identification Step 2 Connect one end of an Ethernet cable to the Ethernet port of the USG and the other end to the Ethernet port of the peer device based on the network plan Figure 3 33 Connecting an Ethernet cable Secospace USG6000 0 2 4 6 1 3 5 7 RST 12V 3A CONSOLE XXXXXXXXXXXXXXXXXXXXXXXXXXX Ethernet cable Ethernet interface of the peer device 0 2 4 6 1 3 5 7 Step 3 Lay out the Ethernet...

Страница 297: ...ention clip into the jack next to the power socket Step 3 Connect a power adapter 1 Plug the C7 plug of the AC power cable into the C14 socket of the power adapter 2 Insert the 4 PIN connector of the power adapter into the power socket on the USG rear panel and adjust the cable retention clip to an appropriate position 3 Use a cable retention clip to bundle the cable of the power adapter and adjus...

Страница 298: ...istinction 3 3 6 Powering On or Off the USG6310 6320 This section describes how to power on or off the USG6310 6320 To ensure the normal start and security of the USG6310 6320 strictly follow the operation guide to power on or off the USG6310 6320 Context Before you power on the USG ensure that l The power cable and PGND cable are properly connected l The power switch in the equipment room is easy...

Страница 299: ...be administratively shut down for a long time turn off the power switch After powering off the USG set it aside properly according to storage requirements End Follow up Procedure After the USG is powered on you can log in to the configuration page for management and maintenance For details refer to the Administrator Guide 3 4 Installing a 1 U Device USG6306 6308 6330 6350 6360 6370 6380 6390 6390E...

Страница 300: ...et Before installing the adjustable guide rail adjust the distance between the front and rear angle gauges rack mounting rails vertical columns to satisfy the installation requirements l The position for the USG in the cabinet is well arranged Ensure that the USG is 1 U of clearance from any devices above and below and 150 mm of clearance from any devices on the right or left l The USG to be insta...

Страница 301: ...are delivered earlier and no longer delivered after they run out Then adjustable guide rails 21242247 are delivered 1 Determine the positions for installing the guide rails and floating nuts as shown in Figure 3 37 Figure 3 38 and Figure 3 39 NOTICE Install the two guide rails at the same height to ensure that the device is level Figure 3 37 Positions of L shaped guide rails and floating nuts 1U L...

Страница 302: ...and floating nuts 1U Front Rear For adjustable guide rail screws Start position of the adjustable guide rail For floating nuts device nuts Positioning block 2 Install the floating nuts that match M6 screws at the positions marked in Figure 3 37 Figure 3 38 and Figure 3 39 Figure 3 40 illustrates how to install a floating nut Figure 3 40 Installing floating nuts 2 3 1 HUAWEI USG6000 Series Hardware...

Страница 303: ...ure 3 41 Figure 3 41 Installing L shape guide rails M6 Front Rear Insert the positioning pins in the front and at the back of the adjustable guide rails 21241561 into the holes at the positions specified in Figure 3 38 Then use the Philips screws to fix the adjustable guide rails inside the cabinet with M6 screws as shown in Figure 3 42 HUAWEI USG6000 Series Hardware Guide 3 Hardware Installation ...

Страница 304: ...as shown in Figure 3 39 to place the guide rails horizontally in the determined installation positions in the racks Use a Phillips screwdriver to fix the adjustable guide rails to the left and right sides of the cabinet with M6 screws as shown in Figure 3 43 HUAWEI USG6000 Series Hardware Guide 3 Hardware Installation Issue 08 2017 06 30 Huawei Proprietary and Confidential Copyright Huawei Technol...

Страница 305: ...inet 1 Lift the USG move it to the cabinet place it onto the guide rails and push it into the cabinet 2 Use M6 screws to fix the mounting ears of the USG to the mounting rack as shown in Figure 3 44 HUAWEI USG6000 Series Hardware Guide 3 Hardware Installation Issue 08 2017 06 30 Huawei Proprietary and Confidential Copyright Huawei Technologies Co Ltd 291 ...

Страница 306: ...ion l Ensure that the USG is placed securely inside the cabinet l Ensure that the exhaust of the USG is not blocked by other objects 3 4 1 2 Mounting a Device on a Workbench If you do not have a cabinet you can mount the USG6306 6308 6330 6350 6360 6370 6380 6390 6390E 6507 6530 6550 6570 6620 6630 on a workbench Context The workbench must be l Reliably grounded l Clean firm and securely installed...

Страница 307: ...nch Se co sp ac e US G6 00 0 0 1 2 3 4 5 6 7 8 9 10 11 0 1 RS T SY S AL M PW R HD D MG MT MO DE 0 1 3 2 CO NS OL E MG MT 0 1 2 3 4 5 6 7 8 9 10 11 0 1 RS T SY S AL M PW R HD D MG MT MO DE 0 1 3 2 CO NS OL E MG MT Se co sp ac e US G6 00 0 End Follow up Procedure Verify the following after the installation l The USG is securely placed on the workbench HUAWEI USG6000 Series Hardware Guide 3 Hardware ...

Страница 308: ...binet Context Instruments required l Phillips screwdriver l Multimeter Procedure Step 1 Loosen and remove the screw of the ground terminal on the lower right of the USG rear panel Step 2 Align the M4 end of the PGND cable with the screw hole of the ground terminal and tighten the screw Step 3 Connect the M6 end of the PGND cable to the ground terminal of the cabinet or workbench Figure 3 46 Connec...

Страница 309: ...se components If the expansion card models are not the same as that labeled on the packing boxes the card is damaged or certain components are loosened contact Huawei technical support engineers l Before you install an expansion card check whether the USG supports this card For details on the hardware description of supported expansion cards see Ports in Device Overview Procedure Step 1 Determine ...

Страница 310: ...into the slot and the blots are tightened l Filler panels are inserted in vacant slots You must insert filler panels in the vacant slots on the USG to prevent dust and ensure heat dissipation 3 4 4 Installing a Hard Disk Combination This section describes how to install a hard disk combination SM HDD SAS300G B SM HDD SAS600G B or SM HDD SAS1200G B for the first time to avoid hard disk damage Conte...

Страница 311: ...he hard disk and do not vibrate bump or stack hard disks Procedure Step 1 Loosen screws on the filler panel and remove the filler panel Step 2 Hold the two side surfaces of a hard disk unit push the hard disk combination into the slot along the guide rails until it is well seated into the slot and fasten screws on the two sides of the hard disk unit Figure 3 48 Installing a hard disk combination S...

Страница 312: ...perations l Check preparations A PC is ready a USG has been installed and the ports to be connected are planned l Prepare cable labels Before cable connection labels must be prepared for the cable NOTICE l Make sure that the PC and the USG are connected to the same ground point Otherwise the console port of the USG may be damaged l Pay attention to port numbering and make sure that the cable is co...

Страница 313: ...s XP a Start the HyperTerminal Windows operating system or other third party program that supports serial ports on the PC b Create a connection select the serial port and configure the serial port parameters as follows n Bit per second 9600 n Data bit 8 n Parity None n Stop bit 1 n Data flow control None c Click OK The copyright information is displayed on the HyperTerminal You can enter default u...

Страница 314: ...ased on the network plan you can connect one end of an Ethernet cable to the Ethernet port of a USG6306 6308 6330 6350 6360 6370 6380 6390 6390E 6507 6530 6550 6570 6620 6630 and the other end to the Ethernet port of the peer device Context Before connecting the Ethernet cable perform the following operations l Check construction conditions The peer device has been installed in the equipment room ...

Страница 315: ...ort module or the device might be damaged Procedure Step 1 If multiple network cables need to be connected attach temporary labels to both ends of each cable for identification Step 2 Connect one end of an Ethernet cable to the Ethernet port of a USG and the other end to the Ethernet port of the peer device based on the network plan Figure 3 51 Connecting an Ethernet cable Secospace USG6000 0 1 2 ...

Страница 316: ...nds the communication may fail NOTICE Huawei optical modules are recommended The optical modules from other vendors may cause faults on the USG due to incompatibility CAUTION Do not look into the optical interface of the optical module or the optical fiber connector without eye protection Before connecting optical fiber cables read the following precautions l Do not overbend optical fibers and the...

Страница 317: ...r to the peer device NOTE Ensure that the Tx and Rx ports are correctly connected Ensure that the TX and RX ports on one end of the optical fiber cable are connected to the RX and TX ports respectively on the other end Figure 3 52 Installing optical transceivers and connecting optical fibers Secospace USG6000 0 1 2 3 4 5 6 7 8 9 10 11 0 1 RST SYS ALM PWR HDD MGMT MODE 0 1 2 3 CONSOLE MGMT Optical ...

Страница 318: ...module requires an AC power cable When two AC power modules are used connect power cables to both AC power modules Context Before connecting the power cables ensure that the AC power supply in the equipment room meets the input requirements of the USG DANGER Do not connect or disconnect the power cables when the USG is powered on Procedure Step 1 Ensure that the PGND cable is adequately grounded S...

Страница 319: ...08 6330 6350 6360 6370 6380 6390 6390E 6507 6530 6550 6570 6620 6630 This section describes how to power on or off the USG6306 6308 6330 6350 6360 6370 6380 6390 6390E 6507 6530 6550 6570 6620 6630 To ensure the normal start and security of the USG6306 6308 6330 6350 6360 6370 6380 6390 6390E 6507 6530 6550 6570 6620 6630 strictly follow the operation guide to power on or off the USG6306 6308 6330...

Страница 320: ...530 6550 6570 6620 6630 runs normally Secospace USG6000 4 HDD 5 PWR 6 PWR INPUT OUTPUT ON OFF 100 240V 50 60Hz 2 5A XXXXXXXXXXXXXXXXXXXXXXXXXXX SM HDD SAS300G B Secospace USG6000 0 1 2 3 4 5 6 7 8 9 10 11 0 1 RST SYS ALM PWR HDD MGMT MODE 0 1 2 3 CONSOLE MGMT NPUT steady green OUTPUT steady green INPUT OUTPUT ON OFF 100 240V 50 60Hz 2 5A Front view Rear view SYS ALM PWR HDD MGMT MODE SYS blinking ...

Страница 321: ... USG6650 6660 6670 6680 This chapter provides the cabinet mounting workbench mounting cable connection and expansion card installation methods of the USG6650 6660 6670 6680 series 3 5 1 Mounting a Device in a Cabinet The USG6650 6660 6670 6680 can be mounted in a 19 inch standard cabinet through L shape guide rails or adjustable guide rails Context The adjustable guide rails parts 21241561 and 212...

Страница 322: ...ar panel of the USG is towards the cabinet door Procedure Step 1 Install mounting ears on the chassis Use a Phillips screwdriver to fix the mounting ears to both sides of the chassis with M4 screws as shown in Figure 3 55 Figure 3 55 Installing the mounting ears on the chassis RU N AL M MG MT CO NS OL E 0 HDD0 HDD1 RS T EN SY S AL M MO DE SP UA EN 1 00 2 40 V 50 60H z 5A ON OFF PW R3 50 A ST AT US...

Страница 323: ... floating nuts device nuts L bottom of the L shape guide rail Figure 3 57 Positions of adjustable guide rails 21241561 and floating nuts 1U For floating nuts device nuts For floating nuts device nuts Start position of the adjustable guide rail For adjustable guide rail screws For positioning pins of the adjustable guide rail For adjustable guide rail screws HUAWEI USG6000 Series Hardware Guide 3 H...

Страница 324: ...llustrates how to install a floating nut Figure 3 59 Installing floating nuts 2 3 1 3 Install guide rails As for adjustable guide rails identify the left and right guide rails and the front and rear ends of each guide rail according to the F L and F R flags on the guide rails Use M6 screws to fix the L shape guide rails at the positions specified in Figure 3 56 as shown in Figure 3 60 HUAWEI USG60...

Страница 325: ... 21241561 into the holes at the positions specified in Figure 3 57 Then use the Philips screws to fix the adjustable guide rails inside the cabinet with M6 screws as shown in Figure 3 61 HUAWEI USG6000 Series Hardware Guide 3 Hardware Installation Issue 08 2017 06 30 Huawei Proprietary and Confidential Copyright Huawei Technologies Co Ltd 311 ...

Страница 326: ...as shown in Figure 3 58 to place the guide rails horizontally in the determined installation positions in the racks Use a Phillips screwdriver to fix the adjustable guide rails to the left and right sides of the cabinet with M6 screws as shown in Figure 3 62 HUAWEI USG6000 Series Hardware Guide 3 Hardware Installation Issue 08 2017 06 30 Huawei Proprietary and Confidential Copyright Huawei Technol...

Страница 327: ...inet 1 Lift the USG move it to the cabinet place it onto the guide rails and push it into the cabinet 2 Use M6 screws to fix the mounting ears of the USG to the mounting rack as shown in Figure 3 63 HUAWEI USG6000 Series Hardware Guide 3 Hardware Installation Issue 08 2017 06 30 Huawei Proprietary and Confidential Copyright Huawei Technologies Co Ltd 313 ...

Страница 328: ... checks after the installation l Ensure that the USG is placed securely inside the cabinet l Ensure that the exhaust of the USG is not blocked by other objects 3 5 2 Connecting a PGND Cable Connecting the PGND cable of a USG6650 6660 6670 6680 correctly is a key measure of surge protection and resistance to interference Before using the USG6650 6660 6670 6680 correctly connect the PGND cable Prere...

Страница 329: ...G 0 1 2 3 4 5 6 7 2XG8GE 0 1 0 1 10G Secospace USG6000 1 3 5 7 2 4 6 8 XXXXXXXXXXXXXXXXXXXXXXXXXXX 1 3 2 Cabinet ground point PGND cable End Follow up Procedure Verify the following after the cabling is complete l The PGND cable is securely connected to the ground terminal l The electrical resistance between the ground terminal and ground point is less than 5 ohm on a multimeter 3 5 3 Installing a...

Страница 330: ...ct Huawei technical support engineers l Before you install an expansion card check whether the USG supports this card For details on the hardware description of supported expansion cards see Ports in Device Overview Procedure Step 1 Determine the slots for installing the expansion cards and note down the slot IDs see the slot numbering on the front panel of the USG Step 2 Based on the type of the ...

Страница 331: ...ll the XSIC card NOTE Huawei does not provide XSIC cards for USG products Before you install the XSIC card remove the filler panels of the WSIC slot and the slot above this slot Install the XSIC card by referring to the procedures for installing the WSIC card End Follow up Procedure Check the following items after the installation is complete l The expansion card is reliably inserted into the slot...

Страница 332: ...ap to protect the USG and hard disks from electrostatic damage l Hold the two side surfaces of a hard disk do not touch the PCB board or squeeze the hard disk and do not vibrate bump or stack hard disks l Only the USG6650 6660 6670 and USG6680 AC support the SM HDD SAS300G A SM HDD SAS600G A and SM HDD SAS1200G A hard disks The USG6680 DC supports only the SM HDD SAS300G A hard disk Installing One...

Страница 333: ... 11 F A N 12 SPU SPU 13 1 2 Step 2 Pull the ejector lever on the hard disk holder and keep it in pulled out state and push the hard disk holder along the guide rails of the slot till the front surface of the hard disk holder touches the USG panel Step 3 Put the ejector lever of the hard disk holder down HUAWEI USG6000 Series Hardware Guide 3 Hardware Installation Issue 08 2017 06 30 Huawei Proprie...

Страница 334: ...correctly installed l After the USG is powered on run the display disk information command in the user view to check whether the Filesystem Status value is Mounted End Installing Two Hard Disk Units Two hard disk units with the same size only support RAID 1 After the hard disk units are installed manually create a RAID group NOTICE Ensure that two hard disks with the same capacity are used for cre...

Страница 335: ... the user view one day later to check whether the Filesystem Status value is Mounted If not contact Huawei technical support personnel n If you run the display device command to display the state of the disk during the synchronization the state will be Abnormal indicating that the disk in unavailable After data synchronization completes the state of the disk will be Normal In the system view run t...

Страница 336: ...oth ends of the cable for distinction Step 2 Connect the console cable l Use the RJ45 console port as the configuration port a Connect the RJ45 connector of the console cable to the RJ45 console port of the USG b Connect the DB9 connector of the console cable to the COM port of the PC Figure 3 68 Connecting the console cable to the USG FAN STATUS FAN 9 PWR 10 PWR 11 F A N 12 SPU SPU 13 RUN ALM SPU...

Страница 337: ...y USG6600 click the corresponding software version node and download MiniUSB_driver_en zip to obtain the mini USB drive program and the installation method NOTE Before you plug in out the USB cable or power on the USG again after you power it off you must disable the serial port communication software first Otherwise the PC may fail to load the mini USB drive program causing the serial port unavai...

Страница 338: ...Download the PuTTY software to the local device and double click it to run the software b Choose Session set the Connection type to Serial c Set the PuTTY parameters Figure 3 70 Setting the PuTTY parameters for connecting the serial port to the USG d Click Open The copyright information is displayed on the HyperTerminal You can enter default user name admin and password Admin 123 modify the defaul...

Страница 339: ...traight through cables Currently Ethernet ports on most devices can dynamically adapt to both types of cables Use proper cables for devices that do not support dynamic adaptation By electromagnetic compatibility Ethernet cables can be classified into ordinary and shielded cables The shielded cables are preferred due to their better electromagnetic compatibility NOTICE Before connecting a cable not...

Страница 340: ...the cable are correct clear neat and facing the same direction l The cables and connectors are free of any damage or breakage and are connected properly and reliably 3 5 7 Installing Optical Transceivers and Connecting Optical Fibers This section describes how to install optical transceivers on the SFP or SFP ports and connect them to the ports of the peer device using optical fibers according to ...

Страница 341: ...cal transceiver into the SFP or SFP port of the USG Step 2 Remove the dust cap from the optical transceiver NOTE Set aside the dust cap properly for future use After optical fiber are disconnected for maintenance use the dust cap to prevent the optical transceiver from dust Step 3 Before connecting an optical fiber attach temporary labels to both ends of the optical fiber for identification Step 4...

Страница 342: ... Repeat Step 1 to Step 4 to install all optical transceivers and connect all optical fibers End Follow up Procedure After you power on the USG check the connection by observing the optical port indicator If the indicator is on or blinks the link is connected or data is being transmitted If the indicator is off the link is disconnected Possible causes for the disconnection are as follows HUAWEI USG...

Страница 343: ...ements of the USG DANGER Do not connect or disconnect the power cables when the USG is powered on Procedure Step 1 Ensure that the PGND cable is properly grounded Step 2 Ensure that the power switch of the USG is OFF Step 3 Connect the power cables to both AC power supply modules one after the other NOTE To increase availability connect the two power supply modules to different power supplies 1 In...

Страница 344: ...cket l If multiple USGs are deployed the power cables of each USG are correctly labeled for distinction 3 5 8 2 Connecting DC Power Cables In standard configuration the USG6660 6670 6680 has two DC power supply modules Each module requires a PGND cable an NEG DC power cable and an RTN DC power cable This section describes how to connect power cables to the two DC supply modules Context Before conn...

Страница 345: ...terminals on the power supply device Figure 3 74 Connecting the DC power cables Secospace USG6000 FAN STATUS FAN 9 PWR 10 PWR 11 F A N 12 SPU SPU 13 RUN ALM SPUB PWR350D PWR STATUS NEG RTN 48V 60V 9 6A OFF ON PWR350D PWR STATUS NEG RTN 48V 60V 9 6A OFF ON MGMT CONSOLE 0 HDD0 HDD1 RST EN EN SYS ALM MODE SPUA NEG RTN NEG RTN PWR STATUS NEG RTN 48V 60V 9 6A OFF ON NEG RTN DC power cable DC power cabl...

Страница 346: ...st the value of L1 based on the value of L that is L1 L 1 to 2 mm Assembling cord end terminals and OT bare crimp terminals requires crimping tools The shapes of the crimped terminals vary with crimping molds Select a proper crimping mold If the power supply device requires to connect to a cord end terminal see Figure 3 75 to assemble the terminal Figure 3 75 Assembling the cord end terminal to th...

Страница 347: ...y follow the operation guide to power on or off the USG6650 6660 6670 6680 Context Before you power on the USG ensure that l The power cable and PGND cable are properly connected l The power switch in the equipment room is easy to locate so that you can power off devices in the case of accidents Procedure l Power on the USG Turn on the switch of the power supply device and then the switch on the p...

Страница 348: ...S Figure 3 78 Indicators on the SPUA when the USG6660 6670 6680 DC model runs normally FAN STATUS FAN 9 PWR 10 PWR 11 F A N 12 SPU SPU 13 RUN ALM SPUB PWR350D PWR STATUS NEG RTN 48V 60V 9 6A OFF ON PWR350D PWR STATUS NEG RTN 48V 60V 9 6A OFF ON MGMT CONSOLE 0 HDD0 HDD1 RST EN EN SYS ALM MODE SPUA SYS ALM MODE ALM off SYS blinking green once every two seconds PWR STATUS NEG RTN 48V 60V 9 6A OFF ON ...

Страница 349: ...hing off the power supply to prevent data loss and hard disk damage You must run the disk offline command in the system view first and wait for about 30 seconds After the system prompts you with a message indicating that hard disks have stopped turn off the power switch of the USG End Follow up Procedure After the USG is powered on you can log in to the configuration page for management and mainte...

Страница 350: ...while working on the USG to avoid possible damages to the USG and expansion cards Procedure Step 1 Ensure that all configurations are saved Step 2 Press the power button to power off the USG Step 3 Take notes on the connections between each Ethernet cable optical fiber and ports on the expansion card Then remove all Ethernet cables and optical fibers from the expansion card For optical fibers remo...

Страница 351: ...nd Figure 4 2 show how to remove the WSIC expansion card Figure 4 1 Removing the WSIC expansion card USG6306 6308 6330 6350 6360 6370 6380 6390 6390E 6507 6530 6550 6570 6620 6630 0 1 2 3 4 5 6 7 8 9 10 11 0 1 RS T SY S AL M PW R HD D MG MT MO DE 0 1 3 2 CO NS OL E MG MT Se co sp ac e US G60 00 0 1 2 3 4 5 6 7 0 10 G 1 2X G8G E 0 1 2 3 4 5 6 7 0 10G 1 2XG8GE 2 1 0 1 2 3 4 5 6 7 0 10G 1 2XG8GE 3 HU...

Страница 352: ...s about USG6650 6660 6670 6680 installation see Installing the Expansion Card USG6650 6660 6670 6680 Step 7 Reconnect the cables and fibers to proper ports based on the connections disconnected previously For details about USG6306 6308 6330 6350 6360 6370 6380 6390 6390E 6507 6530 6550 6570 6620 6630 installation see Connecting the Ethernet Cable USG6306 6308 6330 6350 6360 6370 6380 6390 6390E 65...

Страница 353: ...peak hours l Wear the ESD wrist strap while working on the USG to avoid possible damages to the USG and hard disks l While holding a hard disk do not touch the PCB board or squeeze the disk Carry only one hard disk at a time Do not vibrate crash or pile multiple hard disks up l Put the hard disks inside ESD bags when they are not used l Only the USG6650 6660 6670 and USG6680 AC support the SM HDD ...

Страница 354: ...tton on the right of the hard disk tray to eject the handler 2 Use the handler to pull the hard disk out of the slot 3 Put the replaced hard disk into an ESD bag Figure 4 3 Removing the hard disk USG6306 6308 6330 6350 6360 6370 6380 6390 6390E 6507 6530 6550 6570 6620 6630 SM H DD Se co sp ac e US G60 00 4 HD D 5 PW R 6 PW R IN PU T OUT PU T ON OF F 1 00 24 0V 50 60 Hz 2 5A SM HDD 1 SM HDD SAS300...

Страница 355: ...al Hard Disks The USG6650 6660 6670 6680 supports dual hard disks If a hard disk is faulty for example a hard disk failure log is generated on the USG you can replace the hard disk The hard disk can be replaced no matter when the USG is powered on or off If the USG is powered off skip Step 1 and do not run the disk offline command The following procedure guides you through hard disk replacement wh...

Страница 356: ...minute and run the reset raid primary disk disk id command in the system view to create a RAID group using disk id as the primary disk for data synchronization In this example disk id is the installation slot of the non faulty hard disk Step 5 Wait for four to five hours run the display disk information command and check whether Filesystem Status is Mounted If yes the hard disk is working properly...

Страница 357: ...id possible damages to the USG and hard disks l While holding a hard disk do not touch the PCB board or squeeze the disk Carry only one hard disk at a time Do not vibrate crash or pile multiple hard disks up l Put the hard disks inside ESD bags when they are not used l Only the USG6650 6660 6670 and USG6680 AC support the SM HDD SAS300G A SM HDD SAS600G A and SM HDD SAS1200G A hard disks The USG66...

Страница 358: ...ard disk combination out of the slot Step 4 Hold the two side surfaces of the hard disk combination push the hard disk combination into the slot along the guide rails until it is well seated into the slot and fasten screws on the two sides of the hard disk combination Figure 4 6 Uninstalling the small capacity hard disk combination to be expanded SM H DD NI P6 00 0 4 HD D 5 PW R 6 PW R IN PU T OUT...

Страница 359: ... hot swappable To add a hard disk you must power off the device For details on how to install the hard disk see Installing a Hard Disk Combination Hard disks of the 3 U model are hot swappable Do as follows to add a hard disk on the USG which has been running for some time without any hard disk Step 1 Ensure that all configurations are saved Step 2 Remove the filler panel from the hard disk slot a...

Страница 360: ...C 70 0W A L ST AT US 9 PW R 10 PW R 11 F A N 12 SPU SPU 13 1 2 2 Hold the handlers of the tray and push the tray along the guide rails inside the hard disk slot till the tray panel aligns with the panel of the USG 3 Press the tray handler inwardly to restore the tray HUAWEI USG6000 Series Hardware Guide 4 Maintaining the Hardware Issue 08 2017 06 30 Huawei Proprietary and Confidential Copyright Hu...

Страница 361: ...Hard Disk to Dual Hard Disks The USG6650 6660 6670 6680 supports dual hard disks Do as follows to add a hard disk on the USG which has been running for some time without any hard disk Step 1 Ensure that all configurations are saved Step 2 Remove the filler panel from the hard disk slot HDD0 and HDD1 and install a new hard disk Ensure that the two hard disks have the same capacity Otherwise creatin...

Страница 362: ...C 70 0W A L ST AT US 9 PW R 10 PW R 11 F A N 12 SPU SPU 13 1 2 2 Hold the handlers of the tray and push the tray along the guide rails inside the hard disk slot till the tray panel aligns with the panel of the USG 3 Press the tray handler inwardly to restore the tray HUAWEI USG6000 Series Hardware Guide 4 Maintaining the Hardware Issue 08 2017 06 30 Huawei Proprietary and Confidential Copyright Hu...

Страница 363: ...zed to the secondary disk and the original data on the secondary disk will be overwritten Select the disk id of the primary disk before creating RAID End Expanding Hard Disks from One Hard Disk to Dual Hard Disks with the Same Capacity The USG6650 6660 6670 6680 supports dual hard disks Do as follows to add a hard disk with the same capacity on the USG which has been running for some time with a s...

Страница 364: ...US 1 00 2 40 V 50 60H z 10 A ON OFF PA C 70 0W A L ST AT US 9 PW R 10 PW R 11 F A N 12 SPU SPU 13 1 2 2 Hold the handlers of the tray and push the tray along the guide rails inside the hard disk slot till the tray panel aligns with the panel of the USG 3 Press the tray handler inwardly to restore the tray HUAWEI USG6000 Series Hardware Guide 4 Maintaining the Hardware Issue 08 2017 06 30 Huawei Pr...

Страница 365: ...h hard disks work properly NOTICE After the RAID is created the data in the primary disk will be synchronized to the secondary disk and the original data on the secondary disk will be overwritten Select the disk id of the primary disk before creating RAID End Expanding a Hard Disk from One Small Capacity Hard Disk to One Large Capacity Hard Disk The USG6650 6660 6670 6680 supports SM HDD SAS300G A...

Страница 366: ...RU N AL M MG MT CO NS OL E 0 HDD0 HDD1 RS T EN SY S AL M MO DE SP UA EN 1 00 2 40 V 50 60H z 10 A ON OFF PA C 70 0W A L ST AT US 1 00 2 40 V 50 60H z 10 A ON OFF PA C 70 0W A L ST AT US 9 PW R 10 PW R 11 F A N 12 SPU SPU 13 1 2 3 Step 3 Hold the handlers of the tray and push the tray along the guide rails inside the large capacity hard disk slot till the tray panel aligns with the panel of the USG...

Страница 367: ...80 supports SM HDD SAS300G A SM HDD SAS600G A and SM HDD SAS1200G A hard disks Do as follows to replace the small capacity hard disk with two large capacity hard disks on the USG that has been running with one small capacity hard disk Step 1 Ensure that all configurations are saved Step 2 Run the disk offline command in the system view Wait about 30 seconds until the system indicates that the hard...

Страница 368: ...p 3 Install one large capacity hard disk in slots HDD0 and HDD1 For example to install a large capacity hard disk in slot HDD1 hold the tray handler and push the tray along the guide rails inside the hard disk slot till the tray panel aligns with the panel of the USG Then press the tray handler inwardly to restore the tray HUAWEI USG6000 Series Hardware Guide 4 Maintaining the Hardware Issue 08 20...

Страница 369: ... you can use other services but the hard disks do not record real time logs for these services After data synchronization completes the hard disks automatically start to work You can run the display disk information command in the user view on the next day to check whether Filesystem Status is Mounted If not contact Huawei technical support personnel End Expanding Hard Disks from Two Small Capacit...

Страница 370: ...V 50 60H z 10 A ON OFF PA C 70 0W A L ST AT US 1 00 2 40 V 50 60H z 10 A ON OFF PA C 70 0W A L ST AT US 9 PW R 10 PW R 11 F A N 12 SPU SPU 13 1 2 3 1 Install one large capacity hard disk in slots HDD0 and HDD1 For example to install a large capacity hard disk in slot HDD1 hold the tray handler and push the tray along the guide rails inside the hard disk slot till the tray panel aligns with the pan...

Страница 371: ...E Filesystem Status becomes Mounted four to five hours after the reset raid command is run During this period you can use other services but the hard disks do not record real time logs for these services After data synchronization completes the hard disks automatically start to work You can run the display disk information command in the user view on the next day to check whether Filesystem Status...

Страница 372: ... 6570 6620 6630 Step 1 Determine the location of the power module to be replaced and attack a replacement label on the panel to identify the power module Step 2 Disconnect the power supply device from the power module to be replaced Step 3 Wear an ESD wrist strap Step 4 Remove the power cable connected to the power module 1 Press the baffle on the cable retention clip and remove the cable retentio...

Страница 373: ...OUTPUT ON OFF 100 2 40V 50 6 0Hz 2 5 A IN PUT OUTPUT ON OFF 100 2 40V 50 6 0Hz 2 5 A 2 3 Note down the cause and time of the replacement as well as the bar code of the replaced power module and then put away the replaced power module 4 Take the new power module from the packing box and check whether its model is the same as the replaced one 5 Push the new power module inside the chassis Hold and p...

Страница 374: ...ule USG6650 6660 6670 6680 Step 1 Determine the location of the power module to be replaced and attach a replacement label on the panel to identify the power module Step 2 Disconnect the power supply device from the power module to be replaced Step 3 Wear an ESD wrist strap Step 4 Remove the power cable connected to the power module Refer to the following instructions to remove the power cables l ...

Страница 375: ... RTN OFF ON 1 STATUS NEG RTN OFF ON 2 Step 5 Replace the power module The methods to replace the DC power module and the AC power module are the same The following uses AC power module replacement as an example 1 Use the Phillips screwdriver to loose the screws at the four corners of the power module 2 Pull the handlers at the lower left and lower right corners to pull out the power module HUAWEI ...

Страница 376: ...f the replacement as well as the bar code of the replaced power module and then put away the replaced power module 4 Take the new power module from the packing box and check whether its model is the same as the replaced one 5 Push the new power module inside the chassis Hold and push the module towards the chassis Push the handler in place and fasten the screws HUAWEI USG6000 Series Hardware Guide...

Страница 377: ...dule of the USG is steady green the power module works properly End Follow up Procedure Send the faulty power module to Huawei for repair 4 5 Replacing a Fan Module The fan module of the USG6650 6660 6670 6680 contains multiple fans If a single fan fails replace the fan module as soon as possible Otherwise the system heat dissipation is affected This section is irrelevant to other models that do n...

Страница 378: ...eing scratched by the rotating fans After the fans stop rotating do not touch the fan blades and the rotation axis Otherwise the fan balancing may be damaged resulting in increased noise when the fans are running Figure 4 25 Removing the fan module RU N AL M MG MT CO NS OL E 0 HDD0 HDD1 RS T EN SY S AL M MO DE SP UA EN 1 00 2 40 V 50 60H z 5A ON OFF PW R3 50 A ST AT US 1 00 2 40 V 50 60H z 10 A ON...

Страница 379: ... indicator is blinking green every two seconds 0 5 Hz the new fan module works properly End Follow up Procedure Send the faulty fan module to Huawei for repair 4 6 Replacing a Micro SD Card USG6305 6305 W 6310S 6310S W 6310S WL OVS 6510 6510 WL This section describes how to replace the micro SD card and the precautions Context If the micro SD card has one of the following conditions replace the mi...

Страница 380: ...he micro SD card is offline remove the micro SD card Otherwise the micro SD card might be damaged and the data may be lost Make sure that you have worn an ESD wrist strap and the strap is well grounded before you hold the micro SD card Otherwise the micro SD card may be damaged Procedure Step 1 Ensure that all configurations are saved Step 2 In the system view run the sd card offline command When ...

Страница 381: ...words upwards l Do not use too much force otherwise the micro SD or micro SD card slot might be damaged 1 Insert the micro SD along the guide rail to the micro SD card slot 2 When you hear a click the micro SD card is in position 3 Hook the locating hook on the anti theft board to the locating hole of the rear panel and tighten the captive screw on the anti theft board HUAWEI USG6000 Series Hardwa...

Страница 382: ...t might not be ext4 You need to run the reset sd card command in the system view to format the micro SD card End 4 7 Replacing a SIM Card USG6310S WL OVS 6510 WL If the SIM card is damaged or needs to be replaced with a SIM card with different standards follow the instructions in this section Context Instruments required l Phillips screwdriver l ESD wrist strap NOTE l The USG6310S WL OVS 6510 WL s...

Страница 383: ...nnect the power adapter of the USG from the power supply equipment l Power off the power supply equipment Step 3 Remove the SIM card to be replaced NOTE Do not use too much force otherwise the SIM card or SIM card slot might be damaged 1 Loosen the screws on the anti theft board and remove the anti theft board 2 Press the SIM card along the guide rail to loosen the internal card clip Then the SIM ...

Страница 384: ...IM card is in position 3 Hook the locating hook on the anti theft board to the locating hole of the rear panel and tighten the captive screw on the anti theft board Figure 4 30 Installing the new SIM card and anti theft board Secospace USG6000 0 2 1 3 4 6 5 7 RST micro SD 12V 2A CONSOLE LTE DIV WiFi 0 LTE MAIN WiFi 1 XXXXXXXXXXXXXXXXXXXXXXXXXXX micro SD micro SD micro SD 1 2 3 Step 5 Power on the ...

Страница 385: ...d terminal of the USG and the other end to the ground port of the cabinet l The USG is installed outside the cabinet Connect one end of the PGND cable to the ground terminal of the USG and the other end to the ground bar in the equipment room NOTICE Unreliable grounding may damage the USG Therefore ensure that the USG is reliably grounded during operation Structure and Appearance A PGND cable has ...

Страница 386: ...he OT bare crimp terminal A B 2 Select a matching screw for the screw jack and turn the screw in clockwise direction to fasten it For reliable connection make sure that at least two full threads match each other 3 Pull the power cable gently to verify that it is well connected 4 Connect the other end of the PGND cable to the ground port of the equipment room or cabinet HUAWEI USG6000 Series Hardwa...

Страница 387: ...A 1 2 AC Power Cables This section describes the AC power cables of the USG that uses the AC power supply Learn about the structure and specifications of the AC power cables and the local standards before you purchase any for the USG Use a single phase 3 line electrical outlet that has been properly grounded NOTICE Make sure that the power system of the building has been grounded before you connec...

Страница 388: ... Yellow Green Technical Specifications Table A 3 lists the technical specifications of the AC power cables of some regions for your reference NOTICE You must connect the AC power cable in compliance with local standards and requirements Table A 3 Technical specifications of the AC power cable Item Description Type of connector on the device C13 straight female HUAWEI USG6000 Series Hardware Guide ...

Страница 389: ...r the USG The DC power cables include the RTN cable and NEG 48 V cable Structure and Appearance Both the RTN and NEG 48 V power cables consist of the terminal blocks and cables as shown in Figure A 5 Figure A 5 Appearance of the DC power cable Cable Type Color NEG cable Blue RTN cable Black The USG provides cord end terminals and OT bare crimp terminals You can select one of them based on the actu...

Страница 390: ...onductor Cross Section 2 5mm 2 12 5A Insertion Depth 8mm Blue OT bare crimp terminal Naked Crimping Terminal OT 2 5mm 2 M6 27A Tin Plating Insulated Ring Terminal 16 14AWG blue A 1 4 Console Cable The console cable connects the console port on the USG to the COM port on a PC Learn about the structure and specifications of the console cable before you purchase or make console cables for the USG A c...

Страница 391: ...rom 1 to 9 It connects to the COM port of a PC RJ45 RJ45 connector Pos Pin position Table A 5 Console cable connection scheme RJ45 Pin ID Signal Direction DB9 Pin ID Signal 1 8 CTS Clear to Send 2 6 DSR Data Set Ready 3 2 RXD Receive Data 4 5 GND 5 5 GND 6 3 TXD Transmit Data 7 4 DTR Data Terminal Ready 8 7 RTS Request to Send HUAWEI USG6000 Series Hardware Guide A Appendix Issue 08 2017 06 30 Hua...

Страница 392: ...ector Crystal Connector 8PIN 8BIT Shielded Plug Cable Single Cable Console Serial Port Cable 3m D9F CC4P0 48B S MP8 VI Wire 8 A 1 5 USB Configuration Cable The USB configuration cable connects the console port on the USG mini USB to the USB port on a PC Learn about the structure and specifications of the USB configuration cable before you purchase any for the USG One end of a USB configuration cab...

Страница 393: ...on Connector 1 Mini USB connector 5PIN Female connector Connector 2 USB connector Male connector Cable type Data cable USB mini USB convertor 1M USB data cable A 1 6 Ethernet Cable The Ethernet cable also called the network cable is used for carrying signals on Gigabit networks or networks with a lower packet rate Structure and Appearance An Ethernet cable consists of twisted pairs and RJ45 connec...

Страница 394: ...connection between wires and RJ45 connector pins complies with wiring scheme EIA TIA 568A or EIA TIA 568B as shown in Figure A 11 Figure A 11 Wiring scheme EIA TIA 568A or EIA TIA 568B EIA TIA 568A PIN 8 PIN 1 EIA TIA 568B PIN 8 PIN 1 EIA TIA 568A EIA TIA 568B PINa Wireb PIN Wire 1 Green White 1 Orange White 2 Green 2 Orange HUAWEI USG6000 Series Hardware Guide A Appendix Issue 08 2017 06 30 Huawe...

Страница 395: ...ver cables For interfaces that cannot dynamically adapt to the two types of cables connect interfaces at the same layer using the crossover cables and interfaces at different layers using the straight through cables Figure A 12 and Figure A 13 show how to distinguish and make straight through cables and crossover cables You need to strictly observe the wiring scheme to ensure the quality of servic...

Страница 396: ...tches or hubs Connecting two switches through the uplink interface l Crossover cable The crossover cable uses wiring scheme EIA TIA T568A for one end and EIA TIA T568B for the other as shown in Figure A 13 Figure A 13 Schematic diagram of the connection scheme of crossover cables RJ45 RJ45 EIA TIA 568B EIA TIA 568A 1 7 6 5 4 3 2 8 1 7 6 5 4 3 2 8 You can use the crossover cables in the following s...

Страница 397: ...ether the twisted pair and RJ45 connector are shielded as shown in Figure A 14 and Figure A 15 NOTICE Only shielded cables are supported on the USG Figure A 14 Appearance of a shielded cable Figure A 15 Appearance of an unshielded cable NOTE The figure is for reference only Technical Specifications Table A 8 lists the technical specifications of the Ethernet cable HUAWEI USG6000 Series Hardware Gu...

Страница 398: ...ave incompatibility issues and cause faults on the USG Structure and Appearance Optical fibers are classified into single mode and multi mode optical fibers Single mode optical fibers are used for long distance transmission whereas multi mode optical fibers are used for short distance transmission For indoor optical fibers the cover of single mode optical fibers is usually yellow as shown in Figur...

Страница 399: ...g the connector When you insert the fiber carefully insert the fiber head to the optical interface on the interface board To remove the optical fiber press the pinch on the fiber connector slightly push the fiber connector and then pull it out l SC PC connector The procedure and precautions for inserting and removing SC PC connectors are as follows Insert and remove the connector along the axis wi...

Страница 400: ...ission Mode Connector On the USG On the peer device LC PC LC PC Single mode Multi mode LC PC LC PC LC PC SC PC SC PC LC PC FC PC FC PC Precautions When using optical modules and optical fibers pay attention to the following to ensure proper communication between devices l Use single mode and multi mode optical fibers as required l Tx sending of the local device corresponds to Rx receiving of the p...

Страница 401: ...TE connector through a self contained 3 m feeder for LTE wireless access The LTE antennas are delivered with the models with the built in LTE function Structure and Appearance Figure A 18 shows the appearance of the LTE antenna Figure A 18 LTE antenna Technical Specifications Table A 11 shows the technical specifications of the LTE antenna HUAWEI USG6000 Series Hardware Guide A Appendix Issue 08 2...

Страница 402: ... 5 Polarization Vertical Direction Omnidirectional A 1 9 WiFi Antenna The WiFi antenna is connected to the WiFi connector for WLAN wireless access The WiFi antennas are delivered with the models with the built in WiFi function Structure and Appearance Figure A 19 shows the appearance of the WiFi antenna Figure A 19 WiFi antenna HUAWEI USG6000 Series Hardware Guide A Appendix Issue 08 2017 06 30 Hu...

Страница 403: ...nd its GE and 10GE optical ports support Gigabit and 10 Gigabit optical transceivers respectively Purchase them as required Megabit Optical Transceiver Table A 13 lists the technical specifications of megabit optical transceivers Table A 13 Technical specifications of megabit optical transceiver Model eSFP FE LX SM1310 Transmission distance 15 km Center wavelength 1310 nm Minimum transmit optical ...

Страница 404: ... km Center wavele ngth 850 nm 1310 nm 1310 nm 1310 nm 1550 nm 1550 nm 1550 nm Minim um transm it optical power 9 5 dBm 9 0 dBm 5 0 dBm 5 0 dBm 5 0 dBm 5 0 dBm 2 0 dBm Maxim um transm it optical power 2 5 dBm 3 0 dBm 0 dBm 0 dBm 0 dBm 0 dBm 5 0 dBm Maxim um receive sensitiv ity 17 dBm 20 0 dBm 21 0 dBm 23 0 dBm 22 0 dBm 30 0 dBm 23 0 dBm Satura tion optical power 0 dBm 3 0 dBm 0 dBm 3 0 dBm 3 0 dBm...

Страница 405: ...m 10 km 40 km 0 1 km 0 22 km 80 km Center wavelengt h 850 nm 1310 nm 1550 nm 850 nm 1310 nm 1550 nm Minimum transmit optical power 7 3 dBm 8 2 dBm 4 7 dBm 7 3 dBm 6 5 dBm 0 dBm Maximu m transmit optical power 1 0 dBm 0 5 dBm 4 0 dBm 1 0 dBm 0 5 dBm 4 0 dBm Maximu m receive sensitivity 11 1 dBm 12 6 dBm 14 1 dBm 10 7 dBm 6 5 dBm 24 0 dBm Saturatio n optical power 1 0 dBm 0 5 dBm 0 5 dBm 0 5 dBm 1 5...

Страница 406: ...he cabinet or mounting table must be firm enough to support the weight of the device and its accessories Grounding Ensure that the chassis or mounting table is properly grounded A 3 2 Humidity Temperature and Cleanness This section describes the requirements for the humidity temperature and cleanness of the equipment room To ensure the stability and life cycle of the USG and its components check t...

Страница 407: ...g l With hard disk s 5 RH to 90 RH non condensing Storage humidity l Without hard disk 5 RH to 95 RH non condensing l With hard disk s 5 RH to 90 RH non condensing To meet the requirements listed in Table A 17 take the following measures in the equipment room l Install a permanent temperature controller regardless of the climate conditions l In dry regions use humidifiers or regularly mop the floo...

Страница 408: ...m l Wear an antistatic suit ESD gloves and antistatic shoes before entering the equipment room l Use ESD tools such as ESD wrist straps ESD tweezers and extractors l All the conductors in the equipment room including computer terminals must be properly grounded Set up an antistatic workbench l Electrostatic sources such as non ESD plastic bags non ESD foam and rubber objects must be kept at least ...

Страница 409: ...e installed Place temporarily demounted boards and components on the anti static pad or other effective antistatic materials Do not use non ESD materials such as foam plastic bags and paper bags to wrap or make contact with the boards l Wear an ESD wrist strap before working on board terminals Discharge cables and terminal protection jackets using either contact discharge or air discharge before c...

Страница 410: ...overhead lines After low voltage power cables are led into the equipment room in the AC voltage regulator and AC power distribution box PDB install a lightning arrester for power cables and connect the lightning arrester to the nearest grounding post If the equipment room is located in an urban area the AC power system of the equipment room should have a lightning protection unit with a nominal di...

Страница 411: ...buried under the frozen soil layer Measure the grounding resistance periodically to ensure that the grounding works properly Signal cable layout No overhead signal cable should exist in the communications station Signal cables should be led into the station from underground The communications cables led into or out of the communication station should be protected with metal sheaths or laid out in ...

Страница 412: ...dless of whether the device is in working or standby state The wire type and gauge of each outlet of the power distribution panel must be able to withstand the maximum power load of the devices The specifications for the AC power supply voltage of all communications and power supply devices are as follows l Communications devices must be equipped with AC power supply with the rated voltage ranging...

Страница 413: ...aximum amount of power as the active one and configure another inverter or UPS as the standby Basic DC Power Supply Ensure the reliability of the DC power supply system at the communications site Deploy the power supply device as close as possible to the communications devices so as to shorten the power feeder and lower the circuit voltage drop between the battery port and device port to less than...

Страница 414: ...reduce the battery capacity When it is difficult to improve the reliability of the AC power supply system at a small communications station properly increase the battery capacity l The total capacity configuration of the high frequency switch rectifier should match the communications load power and battery charging power Rectifier modules should use a redundancy configuration If the number of acti...

Страница 415: ...s the working ground of the device and leave as much space as possible between the working ground of the device and the power line ground or lightning protection ground l Ensure that no high power radio transmitter radar transmitter or high frequency high current device is deployed nearby l Take electromagnetic protection measures if necessary HUAWEI USG6000 Series Hardware Guide A Appendix Issue ...

Отзывы: