background image

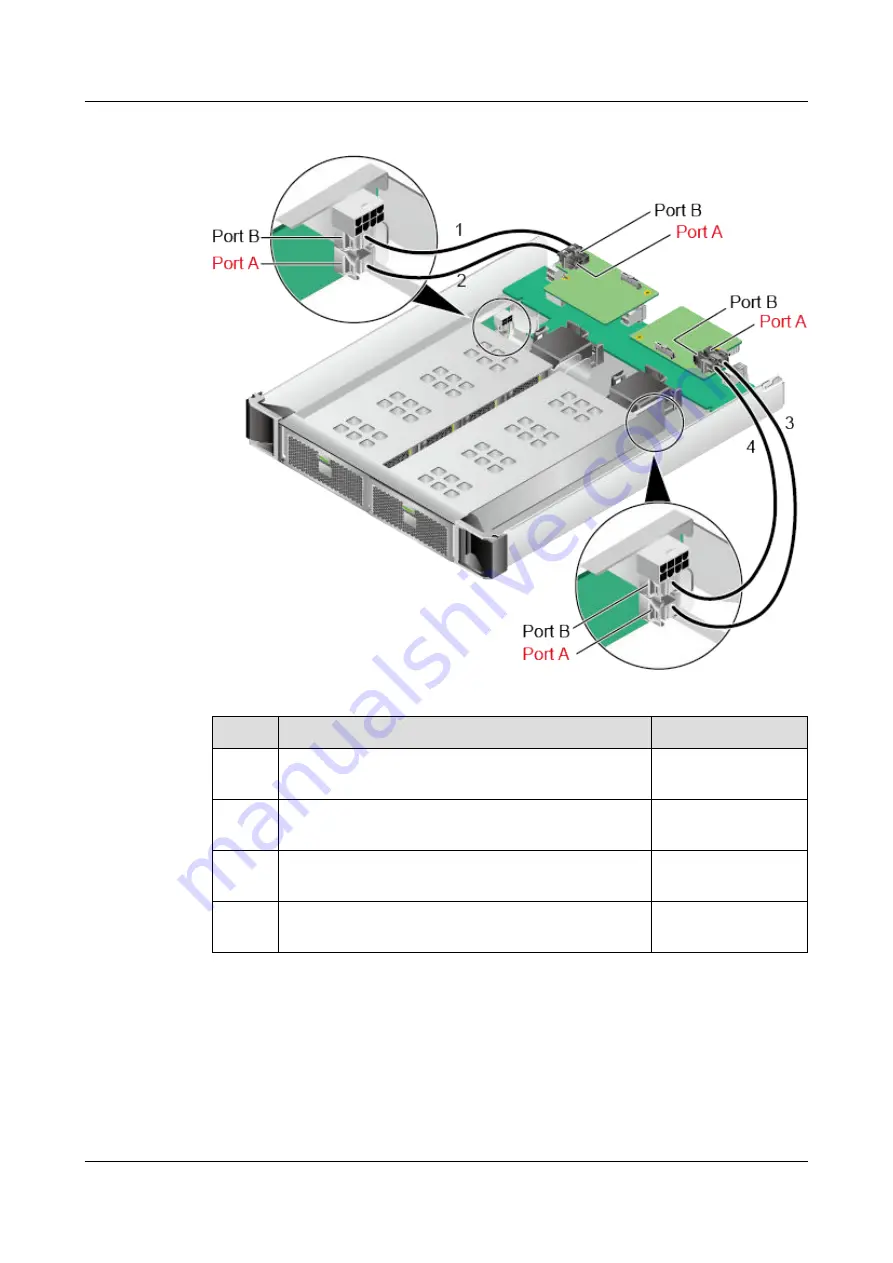
Figure 5-72 Cable connections

No.

Description

BOM Number

1

SAS HD cable (Port B-Port B) for connecting the

hard disk backplane to the RAID controller card

04051115

2

SAS HD cable (Port A-Port A) for connecting the

hard disk backplane to the RAID controller card

04051114

3

SAS HD cable (Port A-Port A) for connecting the

hard disk backplane to the RAID controller card

04051114

4

SAS HD cable (Port B-Port B) for connecting the

hard disk backplane to the RAID controller card

04051115


If cables are not routed as 

Figure 5-71

 or 

Figure 5-72

, the server reports alarm

1B01FFFF. The alarm is cleared when the cables are connected correctly.

Prerequisites

Conditions

RH8100 V3 Server

User Guide

5 Removing and Installing Parts of the RH8100 V3

Issue 30 (2019-12-19)

Copyright © Huawei Technologies Co., Ltd.

190

Содержание RH8100 V3

Страница 1: ...RH8100 V3 Server V100R003 User Guide Issue 30 Date 2019 12 19 HUAWEI TECHNOLOGIES CO LTD ...

Страница 2: ...cribed in this document may not be within the purchase scope or the usage scope Unless otherwise specified in the contract all statements information and recommendations in this document are provided AS IS without warranties guarantees or representations of any kind either express or implied The information in this document is subject to change without notice Every effort has been made in the prep...

Страница 3: ...as follows Symbol Description Indicates an imminently hazardous situation which if not avoided will result in death or serious injury Indicates a potentially hazardous situation which if not avoided could result in death or serious injury Indicates a potentially hazardous situation which if not avoided may result in minor or moderate injury Indicates a potentially hazardous situation which if not ...

Страница 4: ...itching from the Single system to the Dual system and 7 7 2 Switching from the Dual system to the Single system 24 2018 07 23 Added the mapping between CPUs and HFCs 23 2018 06 13 Added 5 11 7 Removing the Rear I O Board and 5 11 8 Installing the Rear I O Board 22 2018 05 08 Updated 3 4 1 Connecting a Ground Cable 21 2018 02 26 Updated 2 6 Logical Structure 20 2017 11 30 Updated 7 3 Changing an iB...

Страница 5: ...6 01 18 Updated 2 6 Logical Structure 06 2015 11 10 Updated 2 5 Physical Structure 05 2015 05 20 Combined the RH8100 V3 Server Installation Guide and RH8100 V3 Server Troubleshooting to form the RH8100 V3 Server User Guide 04 2015 01 08 Added a note for PXE configuration in 7 6 Configuring the BIOS 03 2014 11 20 Added the description of the FM B in 2 5 2 Front I O Module 02 2014 10 25 Updated 2 5 ...

Страница 6: ...alling the RH8100 V3 80 3 1 Installation Overview 80 3 2 Unpacking the Chassis 81 3 3 Installing the Server 83 3 4 Connecting External Cables 89 3 4 1 Connecting a Ground Cable 89 3 4 2 Connecting Cables to a Mouse Keyboard and VGA Port 91 3 4 3 Connecting a Network Cable 93 3 4 4 Connecting to a USB Device 95 3 4 5 Connecting a Serial Cable 97 3 4 6 Connecting a Power Cable 98 3 4 7 Laying Out Ca...

Страница 7: ...ing the Indicator Board Interface Module 144 5 4 4 Installing an Indicator Board Interface Module 147 5 5 Replacing the FM A and Its Internal Components 149 5 5 1 Removing the Front I O Module 149 5 5 2 Installing a Front I O Module 151 5 5 3 Removing a Hard Disk 153 5 5 4 Installing a Hard Disk 154 5 5 5 Removing a Riser Card 156 5 5 6 Installing a Riser Card 158 5 5 7 Removing a PCIe Card 159 5 ...

Страница 8: ...rd Disk Backplane 222 5 7 10 Installing a Hard Disk Backplane 224 5 8 Replacing the FM D and Its Internal Components 225 5 8 1 Removing the Front I O Module 225 5 8 2 Installing a Front I O Module 226 5 8 3 Removing a SATA SAS SSD Hard Disk 228 5 8 4 Installing a SATA SAS SSD Hard Disk 229 5 8 5 Removing an NVMe PCIe SSD 230 5 8 6 Installing an NVMe PCIe SSD 237 5 8 7 Removing a RAID Controller Ca...

Страница 9: ... 6 Powering On and Off the RH8100 V3 303 6 1 Powering On the RH8100 V3 303 6 2 Powering Off the RH8100 V3 304 7 Configuring the RH8100 V3 307 7 1 Configuration Overview 307 7 2 Checking the RH8100 V3 310 7 3 Changing an iBMC User Password 314 7 4 Logging In to the Remote Desktop 316 7 5 Configuring RAID 318 7 6 Configuring the BIOS 323 7 7 Optional Configuring Hard Partitioning 334 7 7 1 Switching...

Страница 10: ...10 2 Obtaining Technical Support 368 A Appendix 370 A 1 Glossary 370 A 2 Sensor List 371 RH8100 V3 Server User Guide Contents Issue 30 2019 12 19 Copyright Huawei Technologies Co Ltd ix ...

Страница 11: ...s or official organizations are allowed to perform hardware installation This product is a Class A device Take protective measures before operating this product in a residential area as it is likely to cause radio interference Personal Safety To ensure personal safety note the following points Only personnel certified or authorized by Huawei are allowed to perform the hardware installation In case...

Страница 12: ...Figure 1 2 shows conductive objects that must be removed before you touch a device Figure 1 2 Conductive objects to be removed Figure 1 3 shows how to wear an ESD wrist strap a Secure the ESD wrist strap around your wrist b Fasten the strap buckle and ensure that the ESD wrist strap is in contact against your skin c Insert the ground terminal attached to the ESD wrist strap into the jack on the gr...

Страница 13: ...Intelligent Computing Compatibility Checker Only maintenance engineers authorized by Huawei are allowed to expand capacity Avoid physical damage caused by electrostatic discharge collision and scratches Before expanding capacity back up data and isolate the equipment from the network to prevent data loss service interruption and network loops After expanding capacity upgrade software to prevent so...

Страница 14: ...ch as optical modules and PCIe GPUs and SSDs separately from bulky items such as chassis and blades See the compatibility list for details about parts supported by a compute node or server Use the Intelligent Computing Compatibility Checker to check parts supported by compute modules or the server Power off all equipment before transportation Do not transport hazardous materials Limits for the Max...

Страница 15: ...25 55 13 General Administration of Quality Supervision Inspection and Quarantine of the People s Republic of China AQSIQ Male 15 33 01 Female 10 22 05 RH8100 V3 Server User Guide 1 Safety Instructions Issue 30 2019 12 19 Copyright Huawei Technologies Co Ltd 5 ...

Страница 16: ...3 on the nameplate RH8100 V3 for short is a general purpose 8 socket rack server developed for Internet Internet data centers IDCs cloud computing enterprise and telecom service applications The RH8100 V3 features high performance computing HPC large memory capacity and high scalability and reliability It is easy to deploy and manage The server is ideal for applications including HPC in memory dat...

Страница 17: ...to external cables such as NICs HBAs IBs You can install PCIe SSDs and GPUs in the slots The front I O module of model B FM B provides storage enhanced configuration The FM B supports a maximum of 24 SAS HDDs SATA HDDs or SSDs and two RAID controller cards It does not support standard PCIe slots The front I O module of model C FM C provides low level configuration The FM C supports a maximum of ei...

Страница 18: ...Figure 2 1 RH8100 V3 FM A Figure 2 2 shows the RH8100 V3 with the FM B RH8100 V3 Server User Guide 2 About the RH8100 V3 Issue 30 2019 12 19 Copyright Huawei Technologies Co Ltd 8 ...

Страница 19: ...Figure 2 2 RH8100 V3 FM B Figure 2 3 shows the RH8100 V3 with the FM C RH8100 V3 Server User Guide 2 About the RH8100 V3 Issue 30 2019 12 19 Copyright Huawei Technologies Co Ltd 9 ...

Страница 20: ...Figure 2 3 RH8100 V3 FM C Figure 2 4 shows the RH8100 V3 with the FM D RH8100 V3 Server User Guide 2 About the RH8100 V3 Issue 30 2019 12 19 Copyright Huawei Technologies Co Ltd 10 ...

Страница 21: ...H8100 V3 FM D Front Panel Figure 2 5 Figure 2 6 Figure 2 7 and Figure 2 8 show the RH8100 V3 front panel RH8100 V3 Server User Guide 2 About the RH8100 V3 Issue 30 2019 12 19 Copyright Huawei Technologies Co Ltd 11 ...

Страница 22: ...ault indicator 8 Hard disk active indicator 9 Hard disk 10 FM A 11 Secondary power button indicator 12 Secondary health indicator 13 Secondary VGA indicator 14 Secondary UID button indicator 15 VGA port 16 USB port 2 17 USB port 1 18 DVD 19 Primary UID button indicator 20 Primary VGA indicator 21 Primary health indicator 22 Primary power button indicator 23 LCD RH8100 V3 Server User Guide 2 About ...

Страница 23: ...ding the ESN label 2 HDD LED board 12 hard disk status indicators on the board 3 HDD drawer 4 FM B Press the yellow ejector release button on the HDD drawer The ejector lever ejects automatically Pull out the HDD drawer by holding the ejector lever Table 2 2 describes the hard disk layout in the left HDD drawer on the RH8100 V3 with the FM B RH8100 V3 Server User Guide 2 About the RH8100 V3 Issue ...

Страница 24: ... with the FM B Table 2 3 Hard disk layout in the right HDD drawer FM B HDD12 HDD15 HDD18 HDD21 HDD13 HDD16 HDD19 HDD22 HDD14 HDD17 HDD20 HDD23 Figure 2 7 RH8100 V3 front panel with the FM C 1 Label including the ESN label 2 Hard disk fault indicator 3 Hard disk active indicator 4 Hard disk RH8100 V3 Server User Guide 2 About the RH8100 V3 Issue 30 2019 12 19 Copyright Huawei Technologies Co Ltd 14...

Страница 25: ... HDD1 HDD3 HDD5 HDD7 Figure 2 8 RH8100 V3 front panel with the FM D 1 Label including the ESN label 2 Hard disk fault indicator 3 Hard disk active indicator 4 Hard disk 5 FM D Table 2 5 describes the hard disk layout of the RH8100 V3 with the FM D RH8100 V3 Server User Guide 2 About the RH8100 V3 Issue 30 2019 12 19 Copyright Huawei Technologies Co Ltd 15 ...

Страница 26: ... describes the mapping between memory board numbers and CPU socket numbers Figure 2 9 Mapping between memory board numbers and CPU socket numbers Rear Panel Figure 2 10 shows the RH8100 V3 rear panel RH8100 V3 Server User Guide 2 About the RH8100 V3 Issue 30 2019 12 19 Copyright Huawei Technologies Co Ltd 16 ...

Страница 27: ...ard 8 9 PCIe card 7 10 PCIe card 6 11 PCIe card 5 12 PCIe card 4 13 PCIe card 3 14 PCIe card 2 hot swappable 15 PCIe card 1 hot swappable 16 PCIe card status indicator 17 PCIe card power indicator 18 PCIe card hot swap button 19 rear I O module 20 Network port connection status indicator The 82599 NIC BC11FXEB indicator is used as an example RH8100 V3 Server User Guide 2 About the RH8100 V3 Issue ...

Страница 28: ...CIe Slots on the Rear I O Module The rear I O module provides 10 standard PCIe slots For details about these slots see Table 2 6 The PCIe slots mapping to a vacant compute module slot are unavailable Table 2 6 PCIe slots on the rear I O module PCI e Slo t Comp ute Modul e PC Ie St an da rd Co nn ect or Ba nd wi dth Bu s Wi dth Por t Nu mb er Hot Swap Bus Device Function Number B D F Slot Size Slo ...

Страница 29: ...00 Full height 3 4 length Slo t 6 Comp ute modul e 4 PC Ie 3 0 x8 x8 Por t 2A Not support ed 40 02 00 Full height 3 4 length Slo t 7 Comp ute modul e 3 PC Ie 3 0 x8 x8 Por t 2A Not support ed 20 02 00 Full height 3 4 length Slo t 8 Comp ute modul e 3 PC Ie 3 0 x8 x8 Por t 3C Not support ed 20 03 02 Full height 3 4 length Slo t 9 Comp ute modul e 3 PC Ie 3 0 x8 x8 Por t 3A Suppor ted 20 03 00 Full ...

Страница 30: ...ources cannot be installed in a restricted PCIe slot that provides no I O resources because the system has insufficient I O resources Restricted PCIe slots support only PCIe cards that do not require I O resources Table 2 7 lists the restricted PCIe slots on the rear I O module Table 2 7 Restricted PCIe slots on the rear I O module Operating Mode Restricted PCIe Slot Single system Slots 4 5 6 and ...

Страница 31: ...8 lists the default values of B D F If PCIes are not in full configuration or a PCIe card with a PCI bridge is configured the values of B D F may differ ESNs An Equipment Serial Number ESN is a string that uniquely identifies a server An ESN is required when you apply for technical support to Huawei Figure 2 11 shows the ESN format by using the example 2102310QPD10F3001263 Figure 2 11 ESN example ...

Страница 32: ... port between system A and system B on the iBMC WebUI or LCD USB port USB 2 0 2 The USB port is connected to a USB device In dual system mode you can switch the USB ports between system A and system B on the iBMC WebUI or LCD Ports on the rear panel are on High performance Fusion Console 1 HFC 1 and HFC 2 Table 2 10 Ports on HFC 1 of the rear panel Name Type Qua ntity Single System Mode Dual Syste...

Страница 33: ...ab le Available Three pin serial port The default baud rate is 115200 bits s In dual system mode this serial port is used as the system serial port by default You can set it as the iBMC serial port on the iBMC CLI In single system mode this serial port is unavailable Networ k port Availa ble for an RH810 0 V3 with eight CPUs Unavai lable for an RH810 0 V3 with four CPUs Available The type and quan...

Страница 34: ...aud rate is 115200 bits s This serial port is used as the system serial port by default You can set it as the iBMC serial port on the iBMC CLI Network port Available Available The type and quantity of network ports vary according to the configured LOM type In single system mode only the LOMs in the HFC 2 slot provide the NC SI function 2 4 Indicators and Buttons This topic describes the RH8100 V3 ...

Страница 35: ...n for 6 seconds to power off the server When the server is ready to be powered on you can press this button to start the server Off System A is not powered on Blinking yellow iBMC in system A is starting Steady yellow The service system in system A will be powered on Steady green The service system in system A is powered on properly NOTE When system A is powered on you can press this button to shu...

Страница 36: ...is button to start system B Primary UID button indicator Blue This button indicator helps identify and locate a server in a cabinet You can turn on or off the UID indicator by manually pressing the UID button or remotely running a command on the iBMC CLI Off The server is not located Steady on The server is located NOTE To reset iBMC hold down the UID button for 4 to 6 seconds This button indicato...

Страница 37: ...alth indicator Red and green Steady green The server is operating properly Blinking red at 1 Hz A major alarm is generated Blinking red at 2 Hz A critical alarm is generated Steady green System A is operating properly Blinking red at 1 Hz A major alarm is generated for system A Blinking red at 2 Hz A critical alarm is generated for system A Secondary health indicator Red and green This indicator i...

Страница 38: ...and description see Huawei V2 and V3 Server RAID Controller Card User Guide Off The hard disk is working properly Blinking yellow The hard disk is located or rebuilding RAID Steady yellow The hard disk is faulty or hard disk members of the RAID array the hard disk is in are abnormal NOTE If the fault indicator is steady yellow run related commands to check the RAID status to determine whether the ...

Страница 39: ...vable The activity indicator is steady green or off and the fault indicator is steady yellow The NVMe PCIe SSD is faulty Hz and the fault indicator is off Data is being read from or written to the NVMe PCIe SSD The activity indicator is off and the fault indicator is blinking yellow at 2 Hz The NVMe PCIe SSD is in the hot insertion process The activity indicator is off and the fault indicator is b...

Страница 40: ...1 Hz The secondary disk in a RAID group is synchronizing data from the primary disk Blinking green at 4 Hz Data access is being performed on the disk or the primary disk in a RAID group is synchronizing data from the secondary disk Steady green The hard disk is detected and inactive Blinking red at 1 Hz The hard disk is located Blinking red at 4 Hz The hard disk in a RAID group cannot be detected ...

Страница 41: ...y pressing the UID button or remotely running a command on the iBMC CLI Off System A is not located Steady on System A is located Secondary UID indicator Blue This indicator is unavailable and off This indicator helps identify and locate system B in a cabinet You can turn on or off the UID indicator by manually pressing the UID button or remotely running a command on the iBMC CLI Off System B is n...

Страница 42: ...ndicator is used as an example Orange Off No data is being transmitted Blinking orange Data is being transmitted Off No data is being transmitted Blinking orange Data is being transmitted Network port connection status indicator The 82599 NIC BC11FXEB indicator is used as an example Green Off The port is not in use Steady green The port is properly connected Off The port is not in use Steady green...

Страница 43: ...icating with the iBMC Blinking green at 4 Hz The fan module fails to communicate with the iBMC Off The server is not powered on Blinking red at 0 5 Hz An alarm is generated for the server and repair need is uncertain Steady red A fan module or the board to which a fan module is connected is faulty and needs to be repaired Steady green The fan module is faulty or is in the online upgrade state An o...

Страница 44: ...rd status indicator Yellow Off The PCIe card is operating properly On The PCIe card is abnormal or the server is in the power on self test POST phase Blinking The PCIe card is waiting to cancel the hot swap operation Off The PCIe card is operating properly On The PCIe card is abnormal or the server is in the POST phase Blinking The PCIe card is waiting to cancel the hot swap operation PCIe card po...

Страница 45: ...operating properly You can hot swap the PCIe card when the system is operating properly Press this button when the PCIe card is operating properly If the PWR indicator is off 10 seconds later remove the PCIe card Press this button after installing the PCIe card If the PWR indicator is steady green 10 seconds later the PCIe card is operating properly Figure 2 12 shows the indicators and button on a...

Страница 46: ...ompute module 1 Memory board button status indicator 2 Memory board ATTN indicator 3 Memory board backup indicator 4 Compute module status indicator RH8100 V3 Server User Guide 2 About the RH8100 V3 Issue 30 2019 12 19 Copyright Huawei Technologies Co Ltd 36 ...

Страница 47: ...n within 5 seconds NOTE This indicator is used only during the hot swap of a memory board The status of this indicator cannot be controlled using the iBMC WebUI iBMC CLI or hardware The meaning of this indicator varies according to the phase For details see the description of memory board hot swap in the RH8100 V3 Server V100R003 Troubleshooting Guide Memory board backup indicator Green Observe th...

Страница 48: ...e a faulty DIMM If a fault occurs in a DIMM on the memory board in the power on state the fault indicator of the DIMM turns on After you remove the memory board and hold down this button the indicator for the faulty DIMM turns on You can easily locate the faulty DIMM for replacement or repair 2 5 Physical Structure This topic describes the RH8100 V3 components Figure 2 14 and Figure 2 15 show the ...

Страница 49: ...front view 1 Chassis 2 DVD drive LCD module 3 Compute module 4 Front I O module the FM A is used as an example in the figure RH8100 V3 Server User Guide 2 About the RH8100 V3 Issue 30 2019 12 19 Copyright Huawei Technologies Co Ltd 39 ...

Страница 50: ...platform module TCM 6 USB flash drive 7 Hot swappable PCIe card 8 Non hot swappable PCIe card 9 Rear I O module Table 2 16 and Table 2 17 describe the RH8100 V3 components Table 2 16 RH8100 V3 components front view No Name Description 1 Chassis Houses and protects all components RH8100 V3 Server User Guide 2 About the RH8100 V3 Issue 30 2019 12 19 Copyright Huawei Technologies Co Ltd 40 ...

Страница 51: ... and FM D configurations You can choose the configuration based on the requirement For details about the front I O module see 2 5 2 Front I O Module Table 2 17 RH8100 V3 components rear view No Name Description 1 Fan module Dissipate heat from the server support hot swap and allow one fan failures If one fan fails the speed of the other fans is adjusted by area to ensure heat dissipation 2 PSU Fou...

Страница 52: ...th two or four GE ports One 10GE NIC with two 10GE ports NOTE Both types of NICs support the Network Controller Sideband Interface NC SI For details about NIC models see Intelligent Computing Compatibility Checker 5 TPM or TCM Choose a TPM or TCM as required A TPM complies with the Trusted Computing Group TCG standards and protects the platform from viruses or unauthorized operations A TCM is a ha...

Страница 53: ...0 V3 compute module Physical Structure The components of the RH8100 V3 compute module CM for short are shown in Figure 2 16 Figure 2 16 Compute module components 1 Compute module 2 Memory 3 Memory 4 CPU 5 Heat sink Table 2 18 describes the RH8100 V3 compute module components RH8100 V3 Server User Guide 2 About the RH8100 V3 Issue 30 2019 12 19 Copyright Huawei Technologies Co Ltd 43 ...

Страница 54: ...Us the server supports only DDR3 DIMMs Each DDR3 DIMM provides a maximum of 64 GB memory capacity The server provides a maximum of 12 TB memory capacity and supports 1333 or 1600 MHz DIMMs When configured with Intel Xeon E7 8800 v3 or E7 8800 v4 CPUs the server supports only DDR4 DIMMs Each DDR4 DIMM provides a maximum of 64 GB memory capacity The server provides a maximum of 12 TB memory capacity...

Страница 55: ... CPUs Configu ration Installed Compute Module Unavailable Device 4 CPUs Compute modules 1 to 4 Front I O module RAID controller card 2 and PCIe slots 14 to 16 in the FM A Rear I O module PCIe slots 1 to 5 LOM 1 indicated by 20 in Figure 2 10 8 CPUs Compute modules 1 to 8 All customer service resources such as hard disks and PCIe cards are available RH8100 V3 Server User Guide 2 About the RH8100 V3...

Страница 56: ... Mapping between logical CPU sockets and physical CPU sockets N core CPU Single System Mode Logical CPU Core Logical CPU Socket Ph ysi cal CP U So ck et 0 to N 1 8N to 9N 1 0 1 N to 2N 1 9N to 10N 1 1 3 2N to 3N 1 10N to 11N 1 2 4 3N to 4N 1 11N to 12N 1 3 2 4N to 5N 1 12N to 13N 1 4 7 5N to 6N 1 13N to 14N 1 5 8 6N to 7N 1 14N to 15N 1 6 6 7N to 8N 1 15N to 16N 1 7 5 RH8100 V3 Server User Guide 2...

Страница 57: ...ows the mapping between logical CPU sockets and physical CPU sockets Table 2 21 Mapping between logical CPU sockets and physical CPU sockets in system A N core CPU System A Logical CPU Core Logical CPU Socket Ph ysi cal CP U So ck et 0 to N 1 4N to 5N 1 0 1 N to 2N 1 5N to 6N 1 1 3 2N to 3N 1 6N to 7N 1 2 4 3N to 4N 1 7N to 8N 1 3 2 RH8100 V3 Server User Guide 2 About the RH8100 V3 Issue 30 2019 1...

Страница 58: ... Socket Ph ysi cal CP U So ck et 0 to N 1 4N to 5N 1 0 5 N to 2N 1 5N to 6N 1 1 6 2N to 3N 1 6N to 7N 1 2 8 3N to 4N 1 7N to 8N 1 3 7 Figure 2 19 Mapping between logical CPU sockets and physical CPU sockets dual system mode RH8100 V3 Server User Guide 2 About the RH8100 V3 Issue 30 2019 12 19 Copyright Huawei Technologies Co Ltd 48 ...

Страница 59: ...e Module describes the numbering rule in the latest version Figure 2 20 DIMM numbering rule on iBMC Figure 2 21 shows the DIMM numbering rule in the alarm description Figure 2 21 DIMM numbering rule in the alarm description Table 2 23 describes the mapping among the DIMM silk screens DIMM numbers on iBMC and DIMM numbers in alarm descriptions for the RH8100 V3 with 12 DDR3 DIMM memory boards RH810...

Страница 60: ...out the mapping between logical CPU sockets and physical CPU sockets see Table 2 20 Table 2 21 and Table 2 22 bb indicates a memory board connector number You do not need to pay attention to it cc indicates the physical slot number of a memory board For details see Figure 2 9 x indicates the physical slot number of a memory board Table 2 24 describes the mapping among the DIMM silk screens DIMM nu...

Страница 61: ... DIMM silk screens DIMM numbers on iBMC and DIMM numbers in alarm descriptions for the RH8100 V3 with 12 DDR4 DIMM memory boards Table 2 25 Mapping among DIMM numbers DIMM Silk Screen DIMM Number on iBMC DIMM Number in the alarm description DIMM00 J1 DIMMa00 Jbb Mcc J01 dimm is x 0 0 DIMM01 J2 DIMMa01 Jbb Mcc J02 dimm is x 0 1 DIMM02 J3 DIMMa02 Jbb Mcc J03 dimm is x 0 2 DIMM10 J4 DIMMa10 Jbb Mcc J...

Страница 62: ...ion DIMM00 J1 DIMMa00 Jbb Mcc J01 dimm is x 0 0 DIMM01 J2 DIMMa01 Jbb Mcc J02 dimm is x 0 1 DIMM10 J4 DIMMa10 Jbb Mcc J04 dimm is x 1 0 DIMM11 J5 DIMMa11 Jbb Mcc J05 dimm is x 1 1 DIMM20 J7 DIMMa20 Jbb Mcc J07 dimm is x 2 0 DIMM21 J8 DIMMa21 Jbb Mcc J08 dimm is x 2 1 DIMM30 J10 DIMMa30 Jbb Mcc J10 dimm is x 3 0 DIMM31 J11 DIMMa31 Jbb Mcc J11 dimm is x 3 1 a indicates a logical CPU socket number Fo...

Страница 63: ...g to Figure 2 22 and Figure 2 23 in the iBMC of the latest version the DIMM silk screens DIMM numbers on iBMC and DIMM numbers in alarm descriptions are consistent 2 5 2 Front I O Module This topic describes the hardware structure of the RH8100 V3 front I O module RH8100 V3 Server User Guide 2 About the RH8100 V3 Issue 30 2019 12 19 Copyright Huawei Technologies Co Ltd 53 ...

Страница 64: ... support standard PCIe slots The front I O module of model C FM C provides low level configuration The FM C supports a maximum of eight SAS HDDs SATA HDDs or SSDs and two RAID controller cards It does not support standard PCIe slots The front I O module of model D FM D supports NVMe PCIe SSDs The FM D supports a maximum of eight SAS HDDs SATA HDDs SSDs or NVMe PCIe SSDs and two RAID controller car...

Страница 65: ...The FM A supports the following models of RAID controller cards RU320BC Uses the LSISAS2208 chip Supports RAID 0 1 5 6 10 50 and 60 Supports an iBBU or a supercapacitor for power failure protection RU130 Uses the LSISAS3008 chip Supports RAID 0 1 10 and 1E Does not support power failure protection RU430C Uses the LSISAS3108 chip Supports RAID 0 1 5 6 10 50 and 60 Supports a supercapacitor for powe...

Страница 66: ...tection for a RAID controller card 8 PCIe card This card is installed on a PCIe riser card The FM A supports PCIe 3 0 x4 PCIe 3 0 x8 and PCIe 3 0 x16 cards The PCIe card can be a PCIe SSD card or GPU without external cables Figure 2 25 shows the PCIe slot layout for the FM A Figure 2 25 PCIe slot layout for the FM A The FM A provides six standard PCIe slots Table 2 28 describes the slots The PCIe ...

Страница 67: ...3 Com pute mod ule 1 PCI e 3 0 x16 x16 Port 3A Not support ed 00 03 00 Full height full length Sl ot 14 Com pute mod ule 8 PCI e 3 0 x8 x8 Port 3A Not support ed A0 03 00 Full height half length Sl ot 15 Com pute mod ule 8 PCI e 3 0 x8 x8 Port 3C Not support ed A0 03 02 Full height half length Sl ot 16 Com pute mod ule 5 PCI e 3 0 x16 x16 Port 3A Not support ed E0 03 00 Full height full length RA ...

Страница 68: ...els have the same RAID controller card slots as the FM A Restricted PCIe slots Some PCIe cards require I O resources When installing PCIe cards in PCIe slots note the following points A PCIe card that requires no I O resources can be installed in any PCIe slot A PCIe card that requires I O resources cannot be installed in a restricted PCIe slot that provides no I O resources because the system has...

Страница 69: ...alled in a restricted PCIe slot the server reports a critical alarm indicating an I O resource configuration error To clear this alarm install the PCIe card in an unrestricted PCIe slot FM B Figure 2 26 shows the FM B components Figure 2 26 FM B component structure 1 FM B 2 Hard disk 3 HDD drawer 4 Front IO Board B FIO B 5 RAID 1 6 RAID 2 RH8100 V3 Server User Guide 2 About the RH8100 V3 Issue 30 ...

Страница 70: ...controller card The FM B supports two SR430C RAID controller cards Each SR430C RAID controller card Uses the LSISAS3108 chip Supports RAID 0 1 5 6 10 50 and 60 Supports a supercapacitor for power failure protection Supports RAID level migration and drive roaming The FM B supports the following RAID controller cards RAID controller card 1 on compute module 1 RAID controller card 2 on compute module...

Страница 71: ...Hard disk Hard disks are hot swappable and store data for the RH8100 V3 The FM C supports a maximum of eight 2 5 inch SAS HDDs SATA HDDs or SSDs 2 FM C The FM C supports hard disks RAID controller cards and an iBBU or a supercapacitor 3 Hard disk backplane The hard disk backplane provides ports for connecting to hard disks and RAID controller cards RH8100 V3 Server User Guide 2 About the RH8100 V3...

Страница 72: ...0C LSISAS3108 RAID controller cards supports RAID 0 1 5 6 10 50 and 60 and supercapacitors for power failure protection The FM C supports two RAID controller cards which are configured for different compute modules RAID 1 is configured for compute module 1 RAID 2 is configured for compute module 5 NOTE If compute module 1 or 5 is not installed the corresponding RAID controller card is unavailable ...

Страница 73: ...5 FIO D The FIO D houses a RAID controller card and provides the management function 6 7 RAID controller card The FM D supports SR430C LSISAS3108 RAID controller cards and supports multiple RAID levels RAID level migration and drive roaming SR430C LSISAS3108 RAID controller cards supports RAID 0 1 5 6 10 50 and 60 and supercapacitors for power failure protection The FM D supports two RAID controll...

Страница 74: ...our hot swappable ones High performance Fusion Console HFC module The RH8100 V3 requires two HFC modules to work together As the core control unit of the RH8100 V3 the HFC modules implement power control and system configuration and management and provide flexible LAN on motherboard LOM options Power supply unit PSU supplies power to the server Fan module dissipates heat for the server Topologies ...

Страница 75: ...memory buffer E7 8800 v2 The maximum transmission rate of SMI2 is 2666 MT s E7 8800 v3 The maximum transmission rate of SMI2 is 3200 MT s E7 8800 v4 The maximum transmission rate of SMI2 is 3200 MT s JC 0 JC 1 JC 2 and JC 3 JC stands for Jordan Creek which refers to the scalable memory buffer on an Intel E7 v2 CPU platform E7 8800 v2 supports Intel C102 C104 scalable memory buffer E7 8800 v3 suppo...

Страница 76: ...Figure 2 30 Memory subsystem topology Figure 2 31 PCIe topology FM A RH8100 V3 Server User Guide 2 About the RH8100 V3 Issue 30 2019 12 19 Copyright Huawei Technologies Co Ltd 66 ...

Страница 77: ...Figure 2 32 PCIe topology FM B or FM C Figure 2 33 Topology of I O ports single system mode RH8100 V3 Server User Guide 2 About the RH8100 V3 Issue 30 2019 12 19 Copyright Huawei Technologies Co Ltd 67 ...

Страница 78: ...te in single system or dual system mode The default mode is single system The dual system mode is also called dual partition mode In this mode the RH8100 V3 operates as two 4 socket systems systems A and B which are also called partitions A and B The operating mode of the RH8100 V3 can be set based on service requirements to maximize return on investment ROI The FusionPar technology uses the follo...

Страница 79: ... Huawei Server Brickland Platform BIOS Parameter Reference The RAS features are considered from top level architecture design to underlying hardware design and are ensured by following stringent processes in the R D and test phases 2 8 Hard Partitioning Feature The RH8100 V3 employs the Huawei FusionPar technology to implement the hard partitioning function The RH8100 V3 can operate in single syst...

Страница 80: ...between the operating modes using the iBMC WebUI or LCD Easy switching You can implement one click switching of the LCD and DVD drive between the two partitions using the iBMC WebUI or LCD The RH8100 V3 operates in single system mode by default You can switch the RH8100 V3 to the dual system mode using the FusionPar technology In dual system mode all in band resources including CPUs DIMMs Peripher...

Страница 81: ...orts NIC with four GE ports NIC with two 10GE SFP optical ports NIC with two 10GE electrical ports 2 PCIe card The following PCIe cards are supported Standard PCIe 2 0 x4 card Standard PCIe 2 0 x8 card Standard PCIe 2 0 x16 card The RH8100 V3 supports a maximum of four standard PCIe 2 0 x16 cards Standard PCIe 3 0 x4 card Standard PCIe 3 0 x8 card Standard PCIe 3 0 x16 card The RH8100 V3 supports ...

Страница 82: ...8800 v2 IvyBridge EX processors Each processor supports up to 37 5 MB L3 cache capacity and 15 cores Four processors can also be configured A maximum of eight Intel Xeon E7 8800 v3 Haswell EX processors Each processor supports up to 45 MB L3 cache capacity and 18 cores Four processors can also be configured A maximum of eight Intel Xeon E7 8800 v4 Broadwell EX processors Each processor supports up...

Страница 83: ...the hardware RAID function NOTE The RH8100 V3 cannot be equipped with Huawei ES3000 V3 NVMe PCIe SSDs and Intel NVMe PCIe SSDs at the same time When Huawei ES3000 V3 NVMe PCIe SSDs are installed upgrade the ES3000 V3 driver to the latest version The download path is as follows https support huawei com enterprise en servers es3000 v3 pid 21500649 software RAID support A RAID controller card support...

Страница 84: ...CIe SSD cards and Intel NVMe PCIe SSDs at the same time When Huawei ES3000 V3 NVMe PCIe SSD cards are installed upgrade the ES3000 V3 driver to the latest version The download path is as follows https support huawei com enterprise en servers es3000 v3 pid 21500649 software External ports and buttons Front panel two USB 2 0 ports one Power button one UID button one VGA port and one touchable LCD di...

Страница 85: ...ions Category Item Specifications Mechanical specifications Chassis dimensions H x W x D 352 mm x 447 mm x 855 mm 13 86 in x 17 60 in x 33 66 in Installation space The server fits into a universal cabinet complying with the IEC 297 standard Cabinet width 19 in Cabinet depth 1000 mm 39 37 in Guide rail installation requirements are as follows L shaped guide rails apply only to a Huawei cabinet Adju...

Страница 86: ... change rate 20 C h 36 F h Long term storage temperature 21 C to 27 C 69 8 F to 80 6 F Humidity Operating humidity 10 RH to 90 RH non condensing Storage humidity 5 RH to 95 RH non condensing Humidity change rate 20 RH h Long term storage humidity 30 RH to 69 RH Altitude 3000 m 9842 40 ft The highest operating temperature decreases by 1 C 1 8 F with every increase of 300 m 984 24 ft in an altitude ...

Страница 87: ...nd levels generated during server operating vary depending on the server configuration load and ambient temperature Corrosive air pollutant Corrosion rate of the copper test piece 300 Å month in compliance with the ANSI ISA 71 04 2013 gaseous corrosion level G1 Corrosion rate of the silver test piece 200 Å month Particulate pollutant The ISO14664 1 Class 8 requirements are met You are advised to a...

Страница 88: ...d contact with the handle 2000 W AC PSU 90 V AC to 264 V AC at 50 Hz or 60 Hz 240 V DC 3000 W AC PSU 90 V AC to 264 V AC at 50 Hz or 60 Hz 240 V DC NOTE The recommended current specifications for the external power circuit breaker connected to the RH8100 V3 are as follows AC 32 A DC 63 A 380 V HV DC 32 A Input current 2500 W DC PSU 63 A 2000 W AC DC PSU 10 A 3000 W AC DC PSU 16 A NOTE A 2000 W PSU...

Страница 89: ...nput 2500 W 180 242 V AC input 3000 W 200 264 V AC input 3000 W 216 264 V DC input Power consumption specifications Power consumption for 4 socket server Maximum power consumption 1313 94 W Typical power consumption 1041 54 W Minimum power consumption 769 73 W Power consumption for 4 socket server Maximum power consumption 2627 88 W Typical power consumption 2083 07 W Minimum power consumption 153...

Страница 90: ...midity all conform to the following requirements Space Requirements Install the RH8100 V3 in an access restricted area Keep the area where the server will be installed clean and tidy Keep a clearance of 800 mm 31 50 in between walls and the front and rear doors of the cabinet to facilitate heat dissipation and device maintenance Cabinet Requirements Use a general cabinet that is 19 inches wide and...

Страница 91: ...lowing rule when installing the RH8100 V3 Servers can be stacked in a cabinet If the cabinet space is sufficient the distance between two adjacent servers is 1 U high The RH8100 V3 is heavy Install it in the lower part of the cabinet to keep the cabinet in balance 3 2 Unpacking the Chassis This topic describes how to unpack the server chassis Scenarios Unpack the server chassis Before performing t...

Страница 92: ...Feedback Form Step 2 To avoid personal injury or equipment damage be careful when using a box cutter Use a box cutter to cut the pressure sensitive adhesive tape on the package and open the package Step 3 Based on Figure 3 1 and Table 3 2 check that the components are in good condition without defects such as oxidation chemical corrosion missing components or other damage incurred during transport...

Страница 93: ...guide rails 3 One rack server End 3 3 Installing the Server This topic describes how to install the RH8100 V3 Scenarios Install the RH8100 V3 if Additional RH8100 V3s are required in a cabinet to expand capacity The RH8100 V3 is faulty and needs to be replaced with a new one RH8100 V3 Server User Guide 3 Installing the RH8100 V3 Issue 30 2019 12 19 Copyright Huawei Technologies Co Ltd 83 ...

Страница 94: ...his operation Tools The following tools are available ESD gloves ESD wrist strap Phillips screwdriver Procedure Step 1 Specify the server installation position Figure 3 2 shows the position in which the floating nuts are installed When you install the guide rails make sure that screws are not installed in the four lower square holes shown in the Figure 3 2 The holes are used for installing the cha...

Страница 95: ...gether to tighten the screws The middle of two adjacent square holes with small spacing is the boundary of two Us See Figure 3 3 The boundary between Us is used as the reference for calculating device installation space Figure 3 3 Spacing of 1 U on a guide rail of a cabinet RH8100 V3 Server User Guide 3 Installing the RH8100 V3 Issue 30 2019 12 19 Copyright Huawei Technologies Co Ltd 85 ...

Страница 96: ...in Figure 3 5 Then install the other guide rail in the same way The meanings of the identifiers on the inner sides of a guide rail are as follows F L indicates that the guide rail needs to be installed on the left side of the cabinet and the end marked with the identifier is the front side of the guide rail F R indicates that the guide rail needs to be installed on the right side of the cabinet an...

Страница 97: ...dule See step 2 in Figure 3 6 3 Hold the ejector levers and pull the compute module out of the slot See step 3 in Figure 3 6 Figure 3 6 Removing a compute module 4 Place the removed compute module onto an ESD platform Step 5 Install the RH8100 V3 1 Lift the RH8100 V3 on both sides and move it to the cabinet at least four persons are required to perform this operation 2 Place the RH8100 V3 onto the...

Страница 98: ...protection covers of the captive screws See step 3 in Figure 3 7 Step 6 Install the compute module after installing the RH8100 V3 chassis 1 Hold the ejector levers on the compute module and insert the compute module into the slot slowly See step 1 in Figure 3 8 2 Lower the ejector levers on the compute module See step 2 in Figure 3 8 RH8100 V3 Server User Guide 3 Installing the RH8100 V3 Issue 30 ...

Страница 99: ...repare a ground cable The cable model must be determined based on the site requirement When DC power supplies are used the PSU ground terminal must be grounded The server does not provide a ground at delivery The ground cable model must be selected based on the site requirement The customer needs to prepare a UL 10 AWG yellow and green adhesive chassis ground cable with a maximum length of 2 m The...

Страница 100: ... 9 The devices in a cabinet such as the power distribution box PDB and chassis use the same type of ground cables The resistance between the chassis and the earth must be less than 5 ohms Figure 3 9 Ground cable Procedure Step 1 Wear an ESD wrist strap or ESD gloves Step 2 Use a Phillips screwdriver to loosen the screw in the ground point on the rear of the server and connect one end of the ground...

Страница 101: ... near busbar of the cabinet with the M6 screw End 3 4 2 Connecting Cables to a Mouse Keyboard and VGA Port Scenarios After powering on the server set the basic input output system BIOS and RAID and log in to the operating system OS The front and rear panels of the server provide DB15 video graphics array VGA ports but have no standard PS2 port for a keyboard or mouse You can connect the keyboard a...

Страница 102: ...able to the keyboard and mouse Step 3 Connect the DB15 connector on the VGA cable to the VGA port on the front or rear panel of the server and tighten the two screws on the connector to secure the cable Step 4 Connect the other end of the VGA cable to the VGA port on the monitor Tighten the two screws on the connector to secure the cable Figure 3 11 Connecting a USB to PS 2 cable and a VGA cable R...

Страница 103: ...lectrostatic discharge ESD wrist strap or ESD gloves used to prevent ESD damage Diagonal pliers used to trim the cable ties after binding cables RJ45 crimping tool used to make network cable connectors Network cable tester used to test the cable connectivity Multimeter used to test the resistance Hardware Use a network cable tester to check that the new network cable works properly Check that the ...

Страница 104: ...e bending radius of no less than 4 cm 1 57 in to prevent damage to core wires Check that the cable insulation layer is intact Ensure that cables are routed for easy maintenance and capacity expansion Network cables must be bound using cable ties to ensure proper routing Check that network cables are bound together neatly and properly are routed straightly and close to each other Cable ties must be...

Страница 105: ...e peer device connected by the new network cable If the peer device cannot be pinged check whether the network cable is damaged or the connectors are not secured Step 8 Bind the new network cable with other cables Bind the new network cable in the same way as the existing network cables You can also remove all cable ties and bind all of the network cables again if necessary End 3 4 4 Connecting to...

Страница 106: ...ver Data Check that data has been copied to the USB storage device to be connected Tools Electrostatic discharge ESD wrist strap Hardware The USB storage device to be connected operates properly Procedure Step 1 Connect the USB device to the USB port on the RH8100 V3 See Figure 3 13 Figure 3 13 Connecting to a USB device End RH8100 V3 Server User Guide 3 Installing the RH8100 V3 Issue 30 2019 12 1...

Страница 107: ...s are required for this operation Data You have determined the cabinet number and installation position for the server to be connected Tools ESD wrist strap or ESD gloves used to prevent ESD damage Documents For details about the command for setting the serial port as the iBMC serial port see the Huawei Rack Server iBMC User Guide Hardware Serial cable with an RJ45 connector Procedure Step 1 Conne...

Страница 108: ...stalled The following describes how to connect AC and DC power cables Connect AC or DC power cables based on the PSU type Prerequisites Conditions The power cable must be securely connected To ensure device and human safety use the dedicated power cable The power cable is used only for the RH8100 V3 Do not use the power cable for other devices The RH8100 V3 supports 2000 W and 3000 W AC PSUs RH810...

Страница 109: ...ble must be at least 250 V and the cable current must be at least 16 A The connector of the power distribution unit PDU must be the same as the connector on the PSU If you use DC PSUs a PGND cable is properly connected to the RH8100 V3 Data No data preparation is required for this operation Tools ESD wrist strap or ESD gloves used to prevent ESD damage Procedure Connect an AC power cable 1 Connect...

Страница 110: ...ontally secured at the rear of the cabinet Select a jack on the nearest AC power socket in accordance with the installation plan 4 Bind the AC power cable to the cable trough on the cabinet using cable ties Connect DC power cables 5 Loosen the screw on the PSU cover and remove the cover See Figure 3 16 RH8100 V3 Server User Guide 3 Installing the RH8100 V3 Issue 30 2019 12 19 Copyright Huawei Tech...

Страница 111: ...See step 1 in Figure 3 17 Figure 3 17 Connecting DC power cables 7 Install and screw the cover for the PSU See step 2 in Figure 3 17 8 Connect the other end of each DC power cable to the DC power distribution cabinet PDC based on the chassis power cable connection rules 9 Bind the DC power cables to the cable trough on the cabinet using cable ties RH8100 V3 Server User Guide 3 Installing the RH810...

Страница 112: ...er positions inside the cabinet Route cables straightly and bind them neatly The bending radius of a cable varies with the position where the cable is bent If you need to bend a cable in its middle the bending radius must be at least twice the diameter of the cable If you need to bend a cable at the output terminal of a connector the bending radius must be at least five times the cable diameter an...

Страница 113: ...hecklist Table 3 3 Cable connection checklist Item Description Power cable The power cable is connected correctly to the rear of the chassis Network cable Network cables are connected correctly to the management Ethernet ports or service Ethernet ports on the rear panel of the chassis Ground cable The server is grounded through the cabinet Ensure that the cabinet is properly grounded RH8100 V3 Ser...

Страница 114: ...d programs running on it Prerequisites Conditions NOTICE At least four people are required to lift the RH8100 V3 because it is heavy All services and programs running on the RH8100 V3 are stopped Data Data on the RH8100 V3 has been backed up Tools ESD wrist strap or ESD gloves used to prevent ESD damage Screwdriver used to loosen screws Hardware Spare RH8100 V3 and its components RH8100 V3 Server ...

Страница 115: ...ease buttons to eject the ejector levers See step 1 in Figure 4 1 2 Raise both ejector levers on the compute module See step 2 in Figure 4 1 3 Hold the ejector levers and pull the compute module out of the slot See step 3 in Figure 4 1 Figure 4 1 Removing a compute module 4 Place the removed compute module onto an ESD platform Step 4 Remove the protection covers of the captive screws on the RH8100...

Страница 116: ... 4 2 Step 6 Pull the RH8100 V3 out of the cabinet along the guide rails See step 3 in Figure 4 2 Step 7 Place the removed RH8100 V3 onto an ESD platform Then install a new chassis or relocate the removed RH8100 V3 End RH8100 V3 Server User Guide 4 Removing the RH8100 V3 Issue 30 2019 12 19 Copyright Huawei Technologies Co Ltd 106 ...

Страница 117: ...er Upgrade Guide iBMC and Huawei Server Firmware Upgrade Guide 5 1 Replaceable Parts 5 2 Replacing a Compute Module and Its Internal Components 5 3 Replacing a DVD Drive LCD Module and Its Internal Components 5 4 Replacing the Indicator Board and Its Interface Board 5 5 Replacing the FM A and Its Internal Components 5 6 Replacing the FM B and Its Internal Components 5 7 Replacing the FM C and Its ...

Страница 118: ...ery unit iBBU Supercapacitor Fan module Power supply unit PSU High performance Fusion Console HFC Trusted platform module TPM Network interface card NIC USB flash drive Rear I O module The preceding parts are for reference only Actual replaceable parts may differ 5 2 Replacing a Compute Module and Its Internal Components This topic describes how to replace a compute module and its internal compone...

Страница 119: ...removing a compute module Tools ESD gloves Packaging materials for example an ESD bag Procedure Step 1 Wear an ESD wrist strap or ESD gloves For details see 1 Safety Instructions Step 2 Ensure that the system where the compute module is located is powered off the power indicator of the system is off Press the ejector release buttons to eject the ejector levers See step 1 in Figure 5 1 Step 3 Raise...

Страница 120: ...e Module This topic describes how to install a compute module when you replace the original one or replace the CPU on the compute module Scenarios Install a compute module if A compute module has failed The CPU on a compute module has failed Prerequisites Conditions You have powered off the RH8100 V3 For details see 6 2 Powering Off the RH8100 V3 Then you have removed all power cables from the ser...

Страница 121: ...SD bag Hardware Spare compute module Procedure Step 1 Wear an ESD wrist strap or ESD gloves For details see 1 Safety Instructions Step 2 Take the spare compute module out of the ESD bag and install a CPU of the required model on the compute module Step 3 Insert the compute module into the slot while holding the ejector levers on the compute module See step 1 in Figure 5 2 Step 4 Lower the ejector ...

Страница 122: ...8100 V3 You have located the RH8100 V3 based on the preceding information and labeled its panel to prevent misoperations You have determined the position on the RH8100 V3 for removing a memory board Tools ESD gloves Packaging materials for example an ESD bag Procedure Step 1 Wear an ESD wrist strap or ESD gloves For details see 1 Safety Instructions Step 2 Configure the BIOS and migrate data to an...

Страница 123: ...ment solution based on the critical operation process to avoid service interruption When equipped with E7 v4 processors the RH8100 V3 does not support the DIMM hot swap function 1 Select one of the following migration methods NOTICE Migrate data to a spare memory board only when the CPU usage and memory usage are both less than 50 Otherwise services may be affected To migrate data to a spare memor...

Страница 124: ...utton again within 5 seconds the data migration starts In this situation the memory board status indicator is blinking and the ATTN indicator is off When the data migration is complete the faulty memory board powers off In this situation the memory board status indicator and the ATTN indicator are both off The memory board is removable If the data migration fails the faulty memory board does not p...

Страница 125: ... board in an ESD bag End 5 2 4 Installing a Memory Board This topic describes how to install a memory board Scenarios Install a memory board if A memory board has failed The memory capacity needs to be expanded A DIMM needs to be replaced with a new model Prerequisites Conditions RH8100 V3 Server User Guide 5 Removing and Installing Parts of the RH8100 V3 Issue 30 2019 12 19 Copyright Huawei Techn...

Страница 126: ...ample an ESD bag Hardware Spare memory board Procedure Step 1 Wear an ESD wrist strap or ESD gloves For details see 1 Safety Instructions Step 2 Take the spare memory board out of the ESD bag and install all DIMMs of the required model on the memory board Step 3 Insert the memory board slowly into the slot on the compute module while holding the ejector lever on the memory board See step 1 in Figu...

Страница 127: ...hat new CPUs are compatible with other components of the server For details use the Intelligent Computing Compatibility Checker Scenarios NOTICE Only the personnel authorized by Huawei and Huawei technical support can remove a CPU from a Huawei server Do not wear ESD gloves during CPU replacement The gloves may catch on pins on the CPU socket and damage it RH8100 V3 Server User Guide 5 Removing an...

Страница 128: ... number of the RH8100 V3 You have located the RH8100 V3 based on the preceding information and labeled its panel to prevent misoperations You have determined the position on the RH8100 V3 for removing a CPU Tools ESD wrist strap Packaging materials for example an ESD bag Procedure Step 1 Wear an ESD wrist strap or ESD gloves For details see 1 Safety Instructions Step 2 Open the levers near the hea...

Страница 129: ...p 5 Raise the securing rod near the or label See step 2 in Figure 5 7 Step 6 Lift the load plate to a fully open position and remove the CPU from the socket See steps 3 and 4 in Figure 5 7 Step 7 Use a tissue to clean off any residual thermal paste from the CPU and place the CPU installation tool with the CPU inside in an ESD bag Step 8 Align the CPU protective cover with the CPU socket and place ...

Страница 130: ...y Checker Scenarios NOTICE Only the personnel authorized by Huawei and Huawei technical support personnel can install a CPU in Huawei servers Do not wear ESD gloves during CPU replacement The gloves may catch on pins on the CPU socket and damage it Install a CPU if A CPU has failed A CPU needs to be replaced with a new model Prerequisites Conditions You have powered off the RH8100 V3 For details s...

Страница 131: ...TICE If a CPU socket has bent pins or foreign objects stop installing the CPU and contact Huawei technical support Step 4 Use a tissue to clean off any residual oil thermal compound or foreign objects from the CPU or heat sink before installation Step 5 Determine the area on the heat sink for contacting the CPU and paste thermal compound in the center of the area Paste a suitable amount of thermal...

Страница 132: ...Dual line pasting cross pasting five point pasting and S shape pasting apply to a large square socket Figure 5 9 Pasting methods Step 6 Use a clean card to smear the thermal compound over the entire center of the CPU The thermal compound layer is as thick as a common piece of paper Figure 5 10 shows the smeared thermal compound layer Ensure that the thermal compound is painted evenly and fully RH8...

Страница 133: ...ectly placed to avoid any twisted pins Lift the CPU until it is out of the socket and then place it in the socket properly Hold the CPU horizontally align the triangle on the CPU with the triangle on the CPU socket and place the CPU vertically downward into the CPU socket by avoiding touching the securing rods See step 1 in Figure 5 11 Ensure that the CPU is properly installed Figure 5 12 shows an...

Страница 134: ...r label See step 3 in Figure 5 11 Step 10 Lower the securing rod near the or label See step 4 in Figure 5 11 Step 11 Align the heat sink with the fastening studs on the CPU socket and place the heat sink on the CPU See step 1 in Figure 5 13 RH8100 V3 Server User Guide 5 Removing and Installing Parts of the RH8100 V3 Issue 30 2019 12 19 Copyright Huawei Technologies Co Ltd 124 ...

Страница 135: ...ave removed the memory board from the RH8100 V3 For details see 5 2 3 Removing a Memory Board Data You have obtained the cabinet number and chassis number of the RH8100 V3 You have located the RH8100 V3 based on the preceding information and labeled its panel to prevent misoperations You have determined the position on the RH8100 V3 for removing a DIMM Tools RH8100 V3 Server User Guide 5 Removing ...

Страница 136: ... removed DIMM in an ESD bag End 5 2 8 Installing a DIMM This topic describes how to install a DIMM Scenarios Install a DIMM if A DIMM has failed A DIMM needs to be replaced with a new model The memory capacity needs to be expanded The rules for installing DIMMs are as follows If each memory board supports 12 DIMMs the RH8100 V3 supports 192 DDR3 or DDR4 DIMMs Each memory board provides four memory...

Страница 137: ...mory board with 12 DIMMs Table 5 2 Memory channels Memory Channel Composition Primary Slot Channel 0 J1 J1 J2 J3 Channel 1 J4 J4 J5 J6 Channel 2 J7 J7 J8 J9 Channel 3 J10 J10 J11 J12 Table 5 3 describes DIMM configuration rules RH8100 V3 Server User Guide 5 Removing and Installing Parts of the RH8100 V3 Issue 30 2019 12 19 Copyright Huawei Technologies Co Ltd 127 ...

Страница 138: ... the internal structure of a memory board with 8 DIMMs and Table 5 4 lists the memory channels Figure 5 16 Internal structure of a memory board with 8 DIMMs Table 5 4 Memory channels Memory Channel Composition Primary Slot Channel 0 J1 J1 J2 Channel 1 J4 J4 J5 Channel 2 J7 J7 J8 Channel 3 J10 J10 J11 Table 5 5 describes DIMM configuration rules RH8100 V3 Server User Guide 5 Removing and Installing...

Страница 139: ...tion on the RH8100 V3 for installing a DIMM Tools ESD gloves Packaging materials for example an ESD bag Hardware Spare DIMM Procedure Step 1 Wear an ESD wrist strap or ESD gloves For details see 1 Safety Instructions Step 2 Take the spare DIMM out of its ESD bag Step 3 Open the two fixing clips of the DIMM slot See Figure 5 17 Figure 5 17 Opening the fixing clips of a DIMM slot Step 4 Align the DI...

Страница 140: ... Scenarios Remove a DVD drive LCD module if The DVD drive LCD module has failed The LCD has failed The DVD drive has failed Prerequisites Conditions None Data You have obtained the cabinet number and chassis number of the RH8100 V3 You have located the RH8100 V3 based on the preceding information and labeled its panel to prevent misoperations RH8100 V3 Server User Guide 5 Removing and Installing P...

Страница 141: ...the DVD drive LCD module out of the slot while holding the handle See step 2 in Figure 5 19 Figure 5 19 Removing a DVD drive LCD module Step 4 Remove the DVD drive and LCD from the DVD drive LCD module and place the module in an ESD bag End 5 3 2 Installing a DVD Drive LCD Module This topic describes how to install a DVD drive LCD module when you replace the original one or replace an LCD or a DVD...

Страница 142: ...oves Packaging materials for example an ESD bag Hardware Spare DVD drive LCD module Procedure Step 1 Wear an ESD wrist strap or ESD gloves For details see 1 Safety Instructions Step 2 Take the spare DVD drive LCD module out of the ESD bag and install an LCD and DVD drive on the DVD drive LCD module For details see 5 3 4 Installing an LCD and 5 3 6 Installing a DVD Drive Step 3 Insert the DVD drive...

Страница 143: ...see 5 3 1 Removing a DVD Drive LCD Module Data You have obtained the cabinet number and chassis number of the RH8100 V3 You have located the RH8100 V3 based on the preceding information and labeled its panel to prevent misoperations You have determined the position on the RH8100 V3 for removing an LCD Tools ESD gloves RH8100 V3 Server User Guide 5 Removing and Installing Parts of the RH8100 V3 Iss...

Страница 144: ... Figure 5 21 Step 4 Remove the LCD in the arrow direction See step 3 in Figure 5 21 Step 5 Disconnect the cable from the LCD See step 4 in Figure 5 21 Figure 5 21 Removing an LCD Step 6 Place the removed LCD in an ESD bag End 5 3 4 Installing an LCD This topic describes how to install an LCD Scenarios Install an LCD if the original one has failed RH8100 V3 Server User Guide 5 Removing and Installi...

Страница 145: ...ple an ESD bag Hardware Spare LCD Procedure Step 1 Wear an ESD wrist strap or ESD gloves For details see 1 Safety Instructions Step 2 Take the spare LCD out of its ESD bag Step 3 Connect a cable to the DVD drive LCD module See step 1 in Figure 5 22 Step 4 Place the LCD in the frame and press the LCD in the arrow direction until you hear a sound which indicates that the LCD is secured See step 2 in...

Страница 146: ...ls see 5 3 1 Removing a DVD Drive LCD Module Data You have obtained the cabinet number and chassis number of the RH8100 V3 You have located the RH8100 V3 based on the preceding information and labeled its panel to prevent misoperations You have determined the position on the RH8100 V3 for removing the DVD drive Tools RH8100 V3 Server User Guide 5 Removing and Installing Parts of the RH8100 V3 Issu...

Страница 147: ...e LCD module in the arrow direction and remove the cover See steps 2 and 3 in Figure 5 23 Figure 5 23 Removing a cover from a DVD drive LCD module Step 4 Remove the cable from the DVD drive See step 1 in Figure 5 24 Step 5 Push the plastic latch on the DVD drive in the arrow direction and push the DVD drive outwards to remove it from the chassis See steps 2 and 3 in Figure 5 24 RH8100 V3 Server Us...

Страница 148: ...1 Removing a DVD Drive LCD Module Data You have obtained the cabinet number and chassis number of the RH8100 V3 You have located the RH8100 V3 based on the preceding information and labeled its panel to prevent misoperations You have determined the position on the RH8100 V3 for installing a DVD drive Tools ESD gloves Packaging materials for example an ESD bag M3 Phillips screwdriver Hardware RH810...

Страница 149: ...n Figure 5 25 Figure 5 25 Installing a DVD drive Description BOM Number Cable for connecting the DVD drive to the DVD drive LCD module 04050603 Step 5 Install the cover of the DVD drive LCD module in the arrow direction See steps 1 and 2 in Figure 5 26 Step 6 Tighten the screw on the DVD drive LCD module using a Phillips screwdriver See step 3 in Figure 5 26 RH8100 V3 Server User Guide 5 Removing ...

Страница 150: ...0 V3 For details see 6 2 Powering Off the RH8100 V3 Then you have removed all power cables from the server Data You have obtained the cabinet number and chassis number of the RH8100 V3 You have located the RH8100 V3 based on the preceding information and labeled its panel to prevent misoperations You have determined the position on the RH8100 V3 for removing the indicator board Tools ESD gloves Fl...

Страница 151: ...1 and 2 in Figure 5 27 Step 3 Remove the mounting ear in the arrow direction See 2 in Figure 5 27 Figure 5 27 Removing a mounting ear Step 4 Remove the indicator board from the mounting ear See step 1 in Figure 5 28 Step 5 Remove the cables from the indicator board See step 2 in Figure 5 28 RH8100 V3 Server User Guide 5 Removing and Installing Parts of the RH8100 V3 Issue 30 2019 12 19 Copyright H...

Страница 152: ...tor board Scenarios Install an indicator board if the original one has failed Prerequisites Conditions You have powered off the RH8100 V3 For details see 6 2 Powering Off the RH8100 V3 Then you have removed all power cables from the server Data RH8100 V3 Server User Guide 5 Removing and Installing Parts of the RH8100 V3 Issue 30 2019 12 19 Copyright Huawei Technologies Co Ltd 142 ...

Страница 153: ...ESD bag Hardware Spare indicator board Procedure Step 1 Wear an ESD wrist strap or ESD gloves For details see 1 Safety Instructions Step 2 Take the spare indicator board out of its ESD bag Step 3 Connect all cables to the indicator board See step 1 in Figure 5 29 Step 4 Install the indicator board in the mounting ear See step 2 in Figure 5 29 Figure 5 29 Installing an indicator board RH8100 V3 Ser...

Страница 154: ...nstall the mounting ear in the arrow direction and ensure that each latch is securely inserted into its hole See step 1 in Figure 5 30 Figure 5 30 Installing a mounting ear End 5 4 3 Removing the Indicator Board Interface Module This topic describes how to remove the indicator board interface module RH8100 V3 Server User Guide 5 Removing and Installing Parts of the RH8100 V3 Issue 30 2019 12 19 Co...

Страница 155: ...3 You have located the RH8100 V3 based on the preceding information and labeled its panel to prevent misoperations You have determined the position on the RH8100 V3 for removing the indicator board interface module Tools ESD gloves Packaging materials for example an ESD bag M3 Phillips screwdriver Procedure Step 1 Wear an ESD wrist strap or ESD gloves For details see 1 Safety Instructions Step 2 O...

Страница 156: ...the indicator board interface module See step 1 in Figure 5 32 Step 5 Remove cables from the indicator board interface module See step 2 in Figure 5 32 RH8100 V3 Server User Guide 5 Removing and Installing Parts of the RH8100 V3 Issue 30 2019 12 19 Copyright Huawei Technologies Co Ltd 146 ...

Страница 157: ...wering Off the RH8100 V3 Then you have removed all power cables from the server You have removed the DVD drive LCD module from the RH8100 V3 For details see 5 3 1 Removing a DVD Drive LCD Module You have removed the indicator board For details see 5 4 1 Removing the Indicator Board Data You have obtained the cabinet number and chassis number of the RH8100 V3 You have located the RH8100 V3 based on...

Страница 158: ...bles to the indicator board interface module See step 1 in Figure 5 33 Step 3 Close the upper cover for the indicator board interface module See step 2 in Figure 5 33 Figure 5 33 Installing an indicator board interface module Step 4 Insert the indicator board interface module into the slot See step 1 in Figure 5 34 Step 5 Close the latch to secure the indicator board interface module See step 2 in...

Страница 159: ...O module Scenarios Remove the front I O module if The front I O module has failed A riser card on the front I O module has failed A PCIe card on the front I O module has failed A RAID controller card on the front I O module has failed An intelligent backup battery unit iBBU on the front I O module has failed A supercapacitor on the front I O module has failed RH8100 V3 Server User Guide 5 Removing...

Страница 160: ...osition on the RH8100 V3 for removing the front I O module Tools ESD gloves Packaging materials for example an ESD bag Procedure Step 1 Wear an ESD wrist strap or ESD gloves For details see 1 Safety Instructions Step 2 Raise both ejector levers on the front I O module See step 1 in Figure 5 35 Step 3 Pull the front I O module out of the slot while holding the ejector levers See step 2 in Figure 5 ...

Страница 161: ...g Off the RH8100 V3 Then you have removed all power cables from the server You have installed PCIe cards on the front I O module to be installed For details see 5 5 8 Installing a PCIe Card You have installed riser cards on the front I O module to be installed For details see 5 5 6 Installing a Riser Card You have installed RAID controller cards on the front I O module to be installed For details ...

Страница 162: ...onents such as riser cards PCIe cards RAID controller cards iBBUs and supercapacitors on the front I O module Step 3 Gently insert the front I O module into the slot while holding the ejector levers on the front I O module See step 1 in Figure 5 36 Step 4 Lower the ejector levers on the front I O module See step 2 in Figure 5 36 RH8100 V3 Server User Guide 5 Removing and Installing Parts of the RH...

Страница 163: ...to remove a hard disk Scenarios Remove a hard disk if The hard disk has failed The hard disk needs to be replaced with a new model The hard disk has no free space RH8100 V3 Server User Guide 5 Removing and Installing Parts of the RH8100 V3 Issue 30 2019 12 19 Copyright Huawei Technologies Co Ltd 153 ...

Страница 164: ... ESD bag Procedure Step 1 Wear an ESD wrist strap or ESD gloves For details see 1 Safety Instructions Step 2 Press the release button on the hard disk enclosure See step 1 in Figure 5 37 The ejector lever automatically ejects Figure 5 37 Removing a hard disk Step 3 Hold the ejector lever on the hard disk enclosure and pull out the hard disk for about 3 cm 1 18 in Wait at least 30s until the hard d...

Страница 165: ...el to prevent misoperations You have determined the position on the RH8100 V3 for installing a hard disk Tools ESD gloves Packaging materials for example an ESD bag Hardware Spare hard disk Procedure Step 1 Wear an ESD wrist strap or ESD gloves For details see 1 Safety Instructions Step 2 Take the spare hard disk out of its ESD bag Step 3 Fully open the ejector lever and push the hard disk into th...

Страница 166: ...or details see 5 5 1 Removing the Front I O Module Data You have obtained the cabinet number and chassis number of the RH8100 V3 You have located the RH8100 V3 based on the preceding information and labeled its panel to prevent misoperations You have determined the position on the RH8100 V3 for removing a riser card Tools ESD gloves Packaging materials for example an ESD bag M3 Phillips screwdrive...

Страница 167: ...ver See step 3 in Figure 5 40 Step 7 Lift the riser card See step 4 in Figure 5 40 Figure 5 40 Removing a riser card Step 8 Remove all PCIe cards from the riser card and place the riser card in an ESD bag For details about how to remove a PCIe card see 5 5 7 Removing a PCIe Card End RH8100 V3 Server User Guide 5 Removing and Installing Parts of the RH8100 V3 Issue 30 2019 12 19 Copyright Huawei Te...

Страница 168: ...sed on the preceding information and labeled its panel to prevent misoperations You have determined the position on the RH8100 V3 for installing a riser card Tools ESD gloves Packaging materials for example an ESD bag M3 Phillips screwdriver Hardware Spare riser card Procedure Step 1 Wear an ESD wrist strap or ESD gloves For details see 1 Safety Instructions Step 2 Take the spare riser card out of...

Страница 169: ...ns See steps 1 and 2 in Figure 5 42 Figure 5 42 Installing a cover for the front I O module End 5 5 7 Removing a PCIe Card This topic describes how to remove a PCIe card RH8100 V3 Server User Guide 5 Removing and Installing Parts of the RH8100 V3 Issue 30 2019 12 19 Copyright Huawei Technologies Co Ltd 159 ...

Страница 170: ...r of the RH8100 V3 You have located the RH8100 V3 based on the preceding information and labeled its panel to prevent misoperations You have determined the position on the RH8100 V3 for removing a PCIe card Tools ESD gloves Packaging materials for example an ESD bag Procedure Step 1 Wear an ESD wrist strap or ESD gloves For details see 1 Safety Instructions Step 2 Optional If the RH8100 V3 is conf...

Страница 171: ... 6 Push the plastic latch outwards See step 4 in Figure 5 44 Step 7 Remove the PCIe card See step 5 in Figure 5 44 Figure 5 44 Removing a PCIe card Step 8 Place the removed PCIe card in an ESD bag End 5 5 8 Installing a PCIe Card This topic describes how to install a PCIe card RH8100 V3 Server User Guide 5 Removing and Installing Parts of the RH8100 V3 Issue 30 2019 12 19 Copyright Huawei Technolo...

Страница 172: ... RH8100 V3 For details see 5 5 5 Removing a Riser Card Data You have obtained the cabinet number and chassis number of the RH8100 V3 You have located the RH8100 V3 based on the preceding information and labeled its panel to prevent misoperations You have determined the position on the RH8100 V3 for installing a PCIe card Tools ESD gloves Packaging materials for example an ESD bag Hardware Spare PC...

Страница 173: ...ws positions of cable ports If a GPU provides two power ports randomly connect the two power ports to those on the front I O module If a GPU provides only one power port connect the power port to any power port on the front I O module RH8100 V3 Server User Guide 5 Removing and Installing Parts of the RH8100 V3 Issue 30 2019 12 19 Copyright Huawei Technologies Co Ltd 163 ...

Страница 174: ... V3 Then you have removed all power cables from the server You have removed the front I O module from the RH8100 V3 For details see 5 5 1 Removing the Front I O Module Data You have obtained the cabinet number and chassis number of the RH8100 V3 You have located the RH8100 V3 based on the preceding information and labeled its panel to prevent misoperations You have determined the position on the R...

Страница 175: ...re 5 47 Step 3 Remove the cover from the front I O module in the arrow direction See step 2 in Figure 5 47 Figure 5 47 Removing a cover from a front I O module Step 4 Loosen the screws fastening the RAID controller card See step 1 in Figure 5 48 Step 5 Pull out the RAID controller card slowly See step 2 in Figure 5 48 RH8100 V3 Server User Guide 5 Removing and Installing Parts of the RH8100 V3 Iss...

Страница 176: ...ls see 6 2 Powering Off the RH8100 V3 Then you have removed all power cables from the server You have removed the front I O module from the RH8100 V3 For details see 5 5 1 Removing the Front I O Module Data You have obtained the cabinet number and chassis number of the RH8100 V3 You have located the RH8100 V3 based on the preceding information and labeled its panel to prevent misoperations You hav...

Страница 177: ... RAID controller card with the port on the mainboard and insert the RAID controller card slowly into the mainboard See step 1 in Figure 5 49 Step 4 Tighten the screws on the RAID controller card See step 2 in Figure 5 49 Figure 5 49 Installing a RAID controller card Step 5 Install the cover of the front I O module in the arrow directions See steps 1 and 2 in Figure 5 50 RH8100 V3 Server User Guide...

Страница 178: ...V3 Then you have removed all power cables from the server You have removed the front I O module from the RH8100 V3 For details see 5 5 1 Removing the Front I O Module Data You have obtained the cabinet number and chassis number of the RH8100 V3 You have located the RH8100 V3 based on the preceding information and labeled its panel to prevent misoperations You have determined the position on the RH...

Страница 179: ...le in the arrow direction See step 2 in Figure 5 51 Figure 5 51 Removing a cover from a front I O module Step 4 Remove the cable from the iBBU See step 1 in Figure 5 52 Step 5 Open the latches on the iBBU deck and remove the iBBU See steps 2 and 3 in Figure 5 52 Figure 5 52 Removing an iBBU RH8100 V3 Server User Guide 5 Removing and Installing Parts of the RH8100 V3 Issue 30 2019 12 19 Copyright H...

Страница 180: ...sis number of the RH8100 V3 You have located the RH8100 V3 based on the preceding information and labeled its panel to prevent misoperations You have determined the position on the RH8100 V3 for installing an iBBU Tools ESD gloves Packaging materials for example an ESD bag Hardware Spare iBBU Procedure Step 1 Wear an ESD wrist strap or ESD gloves For details see 1 Safety Instructions Step 2 Take t...

Страница 181: ...odule End 5 5 13 Removing a Supercapacitor This topic describes how to remove a supercapacitor Scenarios You can configure a supercapacitor to provide power failure protection for the LSISAS2208 or LSISAS3108 controller card Remove a supercapacitor if RH8100 V3 Server User Guide 5 Removing and Installing Parts of the RH8100 V3 Issue 30 2019 12 19 Copyright Huawei Technologies Co Ltd 171 ...

Страница 182: ...d labeled its panel to prevent misoperations You have determined the position on the RH8100 V3 for removing a supercapacitor Tools ESD gloves Packaging materials for example an ESD bag Phillips screwdriver Procedure Step 1 Wear an ESD wrist strap or ESD gloves For details see 1 Safety Instructions Step 2 Press the button on the cover of the front I O module See step 1 in Figure 5 55 Step 3 Remove ...

Страница 183: ...he supercapacitor cover in their respective directions while pulling out the supercapacitor cover and remove the supercapacitor cover See steps 1 and 2 in Figure 5 57 Step 7 Remove the cable from the supercapacitor See step 3 in Figure 5 57 Figure 5 57 Removing a supercapacitor RH8100 V3 Server User Guide 5 Removing and Installing Parts of the RH8100 V3 Issue 30 2019 12 19 Copyright Huawei Technol...

Страница 184: ...binet number and chassis number of the RH8100 V3 You have located the RH8100 V3 based on the preceding information and labeled its panel to prevent misoperations You have determined the position on the RH8100 V3 for installing a supercapacitor Tools ESD gloves Packaging materials for example an ESD bag Phillips screwdriver Hardware Spare supercapacitor Procedure Step 1 Wear an ESD wrist strap or E...

Страница 185: ...screws on the supercapacitor tray See step 2 in Figure 5 59 Figure 5 59 Installing a supercapacitor tray Step 7 Install the cover of the front I O module in the arrow directions See steps 1 and 2 in Figure 5 60 RH8100 V3 Server User Guide 5 Removing and Installing Parts of the RH8100 V3 Issue 30 2019 12 19 Copyright Huawei Technologies Co Ltd 175 ...

Страница 186: ...the RH8100 V3 For details see 5 7 1 Removing the Front I O Module Data You have obtained the cabinet number and chassis number of the RH8100 V3 You have located the RH8100 V3 based on the preceding information and labeled its panel to prevent misoperations You have determined the position on the RH8100 V3 for removing the hard disk backplane Tools ESD gloves Packaging materials for example an ESD ...

Страница 187: ... Figure 5 61 Step 4 Remove the hard disk backplane in the arrow direction See step 4 in Figure 5 61 Step 5 Place the removed hard disk backplane in an ESD bag End 5 5 16 Installing a Hard Disk Backplane This topic describes how to install a hard disk backplane Scenarios Install a hard disk backplane if the original one has failed Prerequisites Conditions You have powered off the RH8100 V3 For deta...

Страница 188: ...rd disk backplane Procedure Step 1 Wear an ESD wrist strap or ESD gloves For details see 1 Safety Instructions Step 2 Take the spare hard disk backplane out of its ESD bag Step 3 Install the hard disk backplane into the I O module in the arrow direction after aligning the connectors on them See step 1 in Figure 5 62 Step 4 Lower the ejector levers on both sides of the backplane until the captive s...

Страница 189: ...ails see 6 2 Powering Off the RH8100 V3 Then you have removed all power cables from the server Data You have obtained the cabinet number and chassis number of the RH8100 V3 You have located the RH8100 V3 based on the preceding information and labeled its panel to prevent misoperations You have determined the position on the RH8100 V3 for removing the front I O module Tools ESD gloves Packaging mat...

Страница 190: ...6 11 Removing a Hard Disk Backplane End 5 6 2 Installing a Front I O Module This topic describes how to install a front I O module Scenarios Install a front I O module if The front I O module has failed A RAID controller card on the front I O module has failed A supercapacitor on the front I O module has failed A hard disk indicator panel has failed A hard disk backplane has failed Prerequisites C...

Страница 191: ...100 V3 You have located the RH8100 V3 based on the preceding information and labeled its panel to prevent misoperations You have determined the position on the RH8100 V3 for installing a front I O module Tools ESD gloves Packaging materials for example an ESD bag Procedure Step 1 Wear an ESD wrist strap or ESD gloves For details see 1 Safety Instructions Step 2 Take out the front I O module from t...

Страница 192: ...he hard disk has no free space and needs to be replaced The server does not need to be powered off when the hard disk is removed Prerequisites Conditions Data in the disk is backed up and the RAID configuration is deleted if there are services running on the RH8100 V3 Data You have obtained the cabinet number and chassis number of the RH8100 V3 RH8100 V3 Server User Guide 5 Removing and Installing...

Страница 193: ...3 HDD6 HDD9 HDD1 HDD4 HDD7 HDD10 HDD2 HDD5 HDD8 HDD11 Table 5 7 describes the hard disk layout in the right HDD drawer on the RH8100 V3 with the FM B Table 5 7 Hard disk layout in the right HDD drawer FM B HDD12 HDD15 HDD18 HDD21 HDD13 HDD16 HDD19 HDD22 HDD14 HDD17 HDD20 HDD23 Tools ESD gloves Packaging materials for example an ESD bag Procedure Step 1 Wear an ESD wrist strap or ESD gloves For det...

Страница 194: ...Pull out the hard disk for about 3 cm 1 18 in while holding the ejector lever on the hard disk enclosure Wait at least 30s until the hard disk stops spinning and then remove the hard disk from the RH8100 V3 See step 2 in Figure 5 66 Step 6 Place the removed hard disk in an ESD bag End 5 6 4 Installing a Hard Disk This topic describes how to install a hard disk RH8100 V3 Server User Guide 5 Removin...

Страница 195: ... panel to prevent misoperations You have determined the position on the RH8100 V3 for installing a hard disk Tools ESD gloves Packaging materials for example an ESD bag Hardware A hard disk to be installed in the RH8100 V3 Procedure Step 1 Wear an ESD wrist strap or ESD gloves For details see 1 Safety Instructions Step 2 Take the spare hard disk out of its ESD bag Step 3 Fully open the ejector lev...

Страница 196: ...osure See step 2 in Figure 5 68 End 5 6 5 Removing a RAID Controller Card This topic describes how to remove a RAID controller card Scenarios Remove a RAID controller card if The RAID controller card has failed The RAID controller card needs to be replaced with a new model Prerequisites Conditions You have powered off the RH8100 V3 For details see 6 2 Powering Off the RH8100 V3 Then you have remov...

Страница 197: ...ing a RAID controller card Tools ESD gloves Phillips screwdriver M3 Packaging materials for example an ESD bag Procedure Step 1 Wear an ESD wrist strap or ESD gloves For details see 1 Safety Instructions Step 2 Press the two buttons on the front I O module cover See step 1 in Figure 5 69 Step 3 Remove the cover from the front I O module in the arrow direction See step 2 in Figure 5 69 Figure 5 69 ...

Страница 198: ...ler Card This topic describes how to install a RAID controller card Scenarios Install a RAID controller card if A RAID controller card has failed A RAID controller card needs to be replaced with a new model If the RH8100 V3 is configured with a RAID controller card the cable connections between the RAID controller card and the hard disk backplane are shown in Figure 5 71 RH8100 V3 Server User Guid...

Страница 199: ...t B for connecting the hard disk backplane to the RAID controller card 04051116 If the RH8100 V3 is configured with two RAID controller cards the cable connections between the RAID controller cards and the hard disk backplane are shown in Figure 5 72 RH8100 V3 Server User Guide 5 Removing and Installing Parts of the RH8100 V3 Issue 30 2019 12 19 Copyright Huawei Technologies Co Ltd 189 ...

Страница 200: ...A for connecting the hard disk backplane to the RAID controller card 04051114 4 SAS HD cable Port B Port B for connecting the hard disk backplane to the RAID controller card 04051115 If cables are not routed as Figure 5 71 or Figure 5 72 the server reports alarm 1B01FFFF The alarm is cleared when the cables are connected correctly Prerequisites Conditions RH8100 V3 Server User Guide 5 Removing and...

Страница 201: ...RH8100 V3 for installing a RAID controller card Tools ESD gloves Phillips screwdriver M3 Packaging materials for example an ESD bag Hardware A RAID controller card to be installed in the RH8100 V3 Procedure Step 1 Wear an ESD wrist strap or ESD gloves For details see 1 Safety Instructions Step 2 Take the spare RAID controller card out of its ESD bag Step 3 Align the RAID controller card with the c...

Страница 202: ...e control card is configured a supercapacitor can be configured for backup power supply Remove a supercapacitor if The supercapacitor has failed The supercapacitor is low Prerequisites Conditions You have powered off the RH8100 V3 For details see 6 2 Powering Off the RH8100 V3 Then you have removed all power cables from the server You have removed the front I O module For details see 5 6 1 Removin...

Страница 203: ...or ESD gloves For details see 1 Safety Instructions Step 2 Press the two buttons on the front I O module cover See step 1 in Figure 5 75 Step 3 Take out the cover of the front I O module in the arrow direction See step 2 in Figure 5 75 Figure 5 75 Removing a cover from a front I O module Step 4 Loosen the screws on both sides of the supercapacitor support See step 1 in Figure 5 76 Step 5 Pull out ...

Страница 204: ...steps 1 and 2 in Figure 5 77 Step 7 Remove power cables connecting to the supercapacitor See step 3 in Figure 5 77 Figure 5 77 Removing a supercapacitor Step 8 Place the removed supercapacitor in an ESD bag End RH8100 V3 Server User Guide 5 Removing and Installing Parts of the RH8100 V3 Issue 30 2019 12 19 Copyright Huawei Technologies Co Ltd 194 ...

Страница 205: ...r of the RH8100 V3 You have located the RH8100 V3 based on the preceding information and labeled its panel to prevent misoperations You have determined the position on the RH8100 V3 for installing a supercapacitor Tools ESD gloves Packaging materials for example an ESD bag Phillips screwdriver Hardware Spare supercapacitor Procedure Step 1 Wear an ESD wrist strap or ESD gloves For details see 1 Sa...

Страница 206: ...on both sides of the supercapacitor tray See step 2 in Figure 5 79 Figure 5 79 Installing a supercapacitor tray Step 7 Install the cover of the front I O module in the arrow direction See steps 1 and 2 in Figure 5 80 RH8100 V3 Server User Guide 5 Removing and Installing Parts of the RH8100 V3 Issue 30 2019 12 19 Copyright Huawei Technologies Co Ltd 196 ...

Страница 207: ...ave removed all power cables from the server You have removed the front I O module For details see 5 6 1 Removing the Front I O Module Data You have obtained the cabinet number and chassis number of the RH8100 V3 You have located the RH8100 V3 based on the preceding information and labeled its panel to prevent misoperations You have determined the position on the RH8100 V3 for removing the hard di...

Страница 208: ... lever automatically ejects Figure 5 81 Pulling out a hard disk enclosure Step 3 Pull out the hard disk enclosure by holding the ejector lever See step 2 in Figure 5 81 Step 4 Loosen the screws on the hard disk indicator panel See step 1 in Figure 5 82 Step 5 Remove the hard disk indicator panel See step 2 in Figure 5 82 RH8100 V3 Server User Guide 5 Removing and Installing Parts of the RH8100 V3 ...

Страница 209: ...r Panel This topic describes how to install a hard disk indicator panel Scenarios Install a hard disk indicator panel when it is faulty and needs to be replaced Prerequisites Conditions You have powered off the RH8100 V3 For details see 6 2 Powering Off the RH8100 V3 Then you have removed all power cables from the server You have removed the front I O module For details see 5 6 1 Removing the Fron...

Страница 210: ...or panel Procedure Step 1 Wear an ESD wrist strap or ESD gloves For details see 1 Safety Instructions Step 2 Take the spare hard disk indicator panel out of its ESD bag Step 3 Insert the hard disk indicator panel into the port See step 1 in Figure 5 83 Step 4 Tighten the screw on the hard disk indicator panel See step 2 in Figure 5 83 Step 5 Install the hard disk enclosure panel See step 3 in Figu...

Страница 211: ... disk backplane Scenarios Remove a hard disk backplane when it is faulty and needs to be replaced Prerequisites Conditions You have powered off the RH8100 V3 For details see 6 2 Powering Off the RH8100 V3 Then you have removed all power cables from the server You have removed the hard disk indicator panel For details see 5 6 9 Removing a Hard Disk Indicator Panel Data You have obtained the cabinet...

Страница 212: ...tions Step 2 Press the two buttons on the front I O module cover See step 1 in Figure 5 85 Step 3 Take out the cover of the front I O module in the arrow direction See step 2 in Figure 5 85 Figure 5 85 Removing a cover from a front I O module Step 4 Remove all cables connecting to the hard disk backplane Step 5 Press the release button that secures the ejector lever See step 1 in Figure 5 86 The e...

Страница 213: ... Step 7 Press down the buckle See step 1 in Figure 5 87 Step 8 Pull out the hard disk enclosure as far as it will go See step 2 in Figure 5 87 Figure 5 87 Fully pulling out a hard disk enclosure RH8100 V3 Server User Guide 5 Removing and Installing Parts of the RH8100 V3 Issue 30 2019 12 19 Copyright Huawei Technologies Co Ltd 203 ...

Страница 214: ...he hard disk enclosure in the arrow direction See step 2 in Figure 5 88 Figure 5 88 Removing a hard disk enclosure Step 11 Loosen the screws on one side of the hard disk enclosure See step 1 in Figure 5 89 Figure 5 89 Removing a hard disk backplane RH8100 V3 Server User Guide 5 Removing and Installing Parts of the RH8100 V3 Issue 30 2019 12 19 Copyright Huawei Technologies Co Ltd 204 ...

Страница 215: ...Data You have obtained the cabinet number and chassis number of the RH8100 V3 You have located the RH8100 V3 based on the preceding information and labeled its panel to prevent misoperations You have determined the position on the RH8100 V3 for installing the hard disk backplane Tools ESD gloves Packaging materials for example an ESD bag Phillips screwdriver Hardware Spare hard disk backplane Proc...

Страница 216: ...l For details see 5 6 10 Installing a Hard Disk Indicator Panel Step 7 Place the hard disk enclosure on the guide rails pull it out as far as it will go and secure the hard disk enclosure on the guide rail See step 1 in Figure 5 91 RH8100 V3 Server User Guide 5 Removing and Installing Parts of the RH8100 V3 Issue 30 2019 12 19 Copyright Huawei Technologies Co Ltd 206 ...

Страница 217: ... enclosure Step 8 Push the hard disk enclosure into the front I O module See step 1 in Figure 5 92 RH8100 V3 Server User Guide 5 Removing and Installing Parts of the RH8100 V3 Issue 30 2019 12 19 Copyright Huawei Technologies Co Ltd 207 ...

Страница 218: ... FM C and its internal components 5 7 1 Removing the Front I O Module This topic describes how to remove the front I O module Scenarios Remove the front I O module if The front I O module has failed A RAID controller card on the front I O module has failed A supercapacitor on the front I O module has failed A hard disk backplane has failed Prerequisites Conditions RH8100 V3 Server User Guide 5 Rem...

Страница 219: ... strap or ESD gloves For details see 1 Safety Instructions Step 2 Raise both ejector levers on the front I O module See step 1 in Figure 5 93 Step 3 Pull the front I O module out of the slot while holding the ejector levers See step 2 in Figure 5 93 Figure 5 93 Removing a front I O module Step 4 Remove the RAID controller cards supercapacitor and hard disk backplane from the front I O module and p...

Страница 220: ...lled For details see 5 7 9 Removing a Hard Disk Backplane Data You have obtained the cabinet number and chassis number of the RH8100 V3 You have located the RH8100 V3 based on the preceding information and labeled its panel to prevent misoperations You have determined the position on the RH8100 V3 for removing the front I O module Tools ESD gloves Packaging materials for example an ESD bag Procedu...

Страница 221: ...rd disk Prerequisites Conditions You have backed up the data on the hard disk to be removed and deleted RAID configuration from the hard disk if services are running on the RH8100 V3 Data You have obtained the cabinet number and chassis number of the RH8100 V3 You have located the RH8100 V3 based on the preceding information and labeled its panel to prevent misoperations RH8100 V3 Server User Guid...

Страница 222: ...l out the hard disk for about 3 cm 1 18 in Wait at least 30s until the hard disk stops spinning and then remove it from the RH8100 V3 See step 2 in Figure 5 95 Step 4 Place the removed hard disk in an ESD bag End 5 7 4 Installing a Hard Disk This topic describes how to install a hard disk Scenarios Install a hard disk if A hard disk has failed A hard disk needs to be replaced with a new model A ha...

Страница 223: ...e the spare hard disk out of its ESD bag Step 3 Fully open the ejector lever and push the hard disk into the hard disk enclosure along the guide rails until the hard disk is in place See 1 in Figure 5 96 Figure 5 96 Installing a hard disk Step 4 Ensure that the ejector lever is engaged with the left partition board in the front I O module and close the ejector lever to completely insert the hard d...

Страница 224: ...ber of the RH8100 V3 You have located the RH8100 V3 based on the preceding information and labeled its panel to prevent misoperations You have determined the position on the RH8100 V3 for removing a RAID controller card Tools ESD gloves M3 Phillips screwdriver Packaging materials for example an ESD bag Procedure Step 1 Wear an ESD wrist strap or ESD gloves For details see 1 Safety Instructions Ste...

Страница 225: ...roller card if A RAID controller card on the front I O module has failed A RAID controller card needs to be replaced with a new model If the RH8100 V3 is configured with a RAID controller card the cable connections between the RAID controller card and the hard disk backplane are shown in Figure 5 98 RH8100 V3 Server User Guide 5 Removing and Installing Parts of the RH8100 V3 Issue 30 2019 12 19 Co...

Страница 226: ...ller card 04050905 3 SAS HD cable Port B Port B for connecting the hard disk backplane to the RAID controller card 04050905 If the RH8100 V3 is configured with two RAID controller cards the cable connections between the RAID controller cards and the hard disk backplane are shown in Figure 5 99 RH8100 V3 Server User Guide 5 Removing and Installing Parts of the RH8100 V3 Issue 30 2019 12 19 Copyrigh...

Страница 227: ...ws a server reports alarm 1B01FFFF Reconnect the cables to clear the alarm Prerequisites Conditions You have powered off the RH8100 V3 For details see 6 2 Powering Off the RH8100 V3 Then you have removed all power cables from the server You have removed the front I O module from the RH8100 V3 For details see 5 7 1 Removing the Front I O Module You have removed the intelligent backup battery unit i...

Страница 228: ...or ESD gloves For details see 1 Safety Instructions Step 2 Take the spare RAID controller card out of its ESD bag Step 3 Align the connector on the RAID controller card with the port on the mainboard and insert the RAID controller card slowly into the mainboard See step 1 in Figure 5 100 Step 4 Tighten the screws on the RAID controller card See step 2 in Figure 5 100 Figure 5 100 Installing a RAID...

Страница 229: ...a You have obtained the cabinet number and chassis number of the RH8100 V3 You have located the RH8100 V3 to be removed based on the preceding information and have labeled its panel to prevent misoperations You have determined the position on the RH8100 V3 for removing a supercapacitor Tools ESD gloves Packaging materials for example an ESD bag Phillips screwdriver Procedure Step 1 Wear an ESD wri...

Страница 230: ...d remove the supercapacitor cover See steps 1 and 2 in Figure 5 102 Step 5 Remove the cable from the supercapacitor See step 3 in Figure 5 102 Figure 5 102 Removing a supercapacitor Step 6 Place the removed supercapacitor in an ESD bag End RH8100 V3 Server User Guide 5 Removing and Installing Parts of the RH8100 V3 Issue 30 2019 12 19 Copyright Huawei Technologies Co Ltd 220 ...

Страница 231: ...100 V3 You have located the RH8100 V3 to be removed based on the preceding information and have labeled its panel to prevent misoperations You have determined the position on the RH8100 V3 for installing a supercapacitor Tools ESD gloves Packaging materials for example an ESD bag Phillips screwdriver Hardware Spare supercapacitor Procedure Step 1 Wear an ESD wrist strap or ESD gloves For details s...

Страница 232: ...the screws on the supercapacitor tray See step 2 in Figure 5 104 Figure 5 104 Installing a supercapacitor tray End 5 7 9 Removing a Hard Disk Backplane This topic describes how to remove a hard disk backplane RH8100 V3 Server User Guide 5 Removing and Installing Parts of the RH8100 V3 Issue 30 2019 12 19 Copyright Huawei Technologies Co Ltd 222 ...

Страница 233: ...preceding information and labeled its panel to prevent misoperations You have determined the position on the RH8100 V3 for installing the rear hard disk backplane Tools ESD gloves Packaging materials for example an ESD bag Phillips screwdriver Procedure Step 1 Wear an ESD wrist strap or ESD gloves For details see 1 Safety Instructions Step 2 Remove all cables from the hard disk backplane Step 3 Lo...

Страница 234: ...nd chassis number of the RH8100 V3 You have located the RH8100 V3 based on the preceding information and labeled its panel to prevent misoperations You have determined the position on the RH8100 V3 for installing the front hard disk backplane Tools ESD gloves Packaging materials for example an ESD bag Phillips screwdriver Hardware Spare hard disk backplane Procedure Step 1 Wear an ESD wrist strap ...

Страница 235: ... Scenarios Remove the front I O module if The front I O module has failed A RAID controller card on the front I O module has failed A supercapacitor on the front I O module has failed The hard disk backplane on the front I O module has failed Prerequisites Conditions You have powered off the RH8100 V3 For details see 6 2 Powering Off the RH8100 V3 Then you have removed all power cables from the se...

Страница 236: ...e step 1 in Figure 5 107 Step 3 Pull the front I O module out of the slot while holding the ejector levers See step 2 in Figure 5 107 Figure 5 107 Removing a front I O module Step 4 Remove the RAID controller cards supercapacitor and hard disk backplane from the front I O module and place the front I O module in an ESD bag For details see 5 8 7 Removing a RAID Controller Card 5 8 9 Removing a Supe...

Страница 237: ...Disk Backplane Data You have obtained the cabinet number and chassis number of the RH8100 V3 You have located the RH8100 V3 based on the preceding information and labeled its panel to prevent misoperations You have determined the position on the RH8100 V3 for removing the front I O module Tools ESD gloves Packaging materials for example an ESD bag Procedure Step 1 Wear an ESD wrist strap or ESD gl...

Страница 238: ...ng a hard disk Prerequisites Conditions You have backed up the data on the hard disk to be removed and deleted RAID configuration from the hard disk if services are running on the RH8100 V3 Data You have obtained the cabinet number and chassis number of the RH8100 V3 You have located the RH8100 V3 based on the preceding information and labeled its panel to prevent misoperations RH8100 V3 Server Us...

Страница 239: ...the hard disk for about 3 cm 1 18 in Wait at least 30s until the hard disk stops spinning and then remove it from the RH8100 V3 See step 2 in Figure 5 109 Step 4 Place the removed hard disk in an ESD bag End 5 8 4 Installing a SATA SAS SSD Hard Disk This topic describes how to install a hard disk Scenarios Install a hard disk if A hard disk has failed A hard disk needs to be replaced with a new mo...

Страница 240: ...e spare hard disk out of its ESD bag Step 3 Fully open the ejector lever and push the hard disk into the hard disk enclosure along the guide rails until the hard disk is in place See 1 in Figure 5 110 Figure 5 110 Installing a hard disk Step 4 Lower the ejector lever until the hard disk enclosure clips to the beam of the front I O module and the hard disk is fully installed to the front I O module...

Страница 241: ...s number of the RH8100 V3 You have located the RH8100 V3 based on the preceding information and labeled its panel to prevent misoperations You have determined the position on the RH8100 V3 for removing an NVMe PCIe SSD You have obtained a list of all operating systems OSs supported by NVMe PCIe SSDs For details see 2 9 Software and Hardware Compatibility If NVMe PCIe SSDs are installed in slots HD...

Страница 242: ...operties from the shortcut menu In the displayed dialog box view the value of Location for the hard disk 3 Determine whether the hard disk is an NVMe PCIe SSD according to the value of Location For an NVMe PCIe SSD record its drive letter See Figure 5 111 and Figure 5 112 Figure 5 111 Mapping between the slot ID and drive letter of an NVMe PCIe SSD 1 RH8100 V3 Server User Guide 5 Removing and Inst...

Страница 243: ...e NVMe PCIe SSD ejection tool EjectTool and view the NVMe PCIe SSDs running on the server See Figure 5 113 Figure 5 113 Viewing running NVMe PCIe SSDs RH8100 V3 Server User Guide 5 Removing and Installing Parts of the RH8100 V3 Issue 30 2019 12 19 Copyright Huawei Technologies Co Ltd 233 ...

Страница 244: ...cting the NVMe PCIe SSD to be ejected Do not eject a running NVMe PCIe SSD If you attempt to eject a running NVMe PCIe SSD EjectTool prompts you to stop all services on it first as shown in Figure 5 115 Figure 5 115 Prompting you to stop all services on an NVMe PCIe SSD RH8100 V3 Server User Guide 5 Removing and Installing Parts of the RH8100 V3 Issue 30 2019 12 19 Copyright Huawei Technologies Co...

Страница 245: ...ter Stop all programs accessing the NVMe PCIe SSD If a file system is mounted to the NVMe PCIe SSD unmount the file system from it Query the mapping between slot IDs and drive letters of NVMe PCIe SSDs using the following method a Open the command terminal on the OS run the cat sys bus pci slots slot address command to query the bus IDs that map to slot IDs and record all bus IDs For example slot ...

Страница 246: ... NVMe PCIe SSD drive letter nvme0n1 maps to slot ID 31 Figure 5 118 Mapping between NVMe PCIe SSD drive letters PCIe bus IDs and 80 IDs Run the following command to remove the NVMe PCIe SSD echo n sys bus pci slots slot power In the command the value of n can be 0 or 1 The value 0 indicates hot removal and the value 1 indicates hot insertion If the value 0 is used the hot removal command is execut...

Страница 247: ...ly Do not insert multiple NVMe PCIe SSDs simultaneously The interval between the insertion operations of two NVMe PCIe SSDs must be longer than 30 seconds If you insert an NVMe PCIe SSD when the RH8100 V3 is on standby information about the new NVMe PCIe SSD is displayed on the iBMC page shown by choosing System Info Storage only after the operating system OS is powered on If some SAS HDDs SATA HD...

Страница 248: ...nloadcenter intel com download 28326 v t Copy the driver package to the OS decompress the package and run the SetupNVMe exe file in the Installer64 folder to install the driver After the driver is installed rescan for hardware changes to detect NVMe PCIe SSDs The recommended driver package is Intel Windows NVMe driver 1 2 0 1002 x64 zip Step 4 Install the NVMe PCIe SSD Install the NVMe PCIe SSD on...

Страница 249: ...the American keyboard Huqzei é34 for the French keyboard and Huawei12 for the English keyboard Open the boot configuration screen and set Boot Type to UEFI Boot Type Press F10 to save the setting and exit Install Windows Server 2012 on the NVMe PCIe SSD Set the UEFI mode Download the NVMe PCIe SSD driver for Windows Server 2012 and generate an ISO or IMG file Install the OS If the NVMe PCIe SSD ca...

Страница 250: ...el to prevent misoperations You have determined the position on the RH8100 V3 for removing a RAID controller card Tools ESD gloves M3 Phillips screwdriver Packaging materials for example an ESD bag Procedure Step 1 Wear an ESD wrist strap or ESD gloves For details see 1 Safety Instructions Step 2 Remove the cables from the RAID controller card See step 1 in Figure 5 119 Step 3 Loosen the screws on...

Страница 251: ...V3 is configured with a RAID controller card the cable connections between the RAID controller card and the hard disk backplane are shown in Figure 5 120 Figure 5 120 Cable connections 1 No Description BOM Number 1 Signal cable for connecting the hard disk backplane to the front I O module 04051340 2 SAS HD cable Port A Port A for connecting the hard disk backplane to the RAID controller card 0405...

Страница 252: ...escription BOM Number 1 Signal cable for connecting the hard disk backplane to the front I O module 04051340 2 SAS HD cable Port A Port A for connecting the hard disk backplane to the RAID controller card 04050905 3 SAS HD cable Port B Port B for connecting the hard disk backplane to the RAID controller card 04050905 4 Power cable for connecting the hard disk backplane to the front I O module 0415...

Страница 253: ...eceding information and labeled its panel to prevent misoperations You have determined the position on the RH8100 V3 for installing a RAID controller card Tools ESD gloves M3 Phillips screwdriver Packaging materials for example an ESD bag Hardware Spare RAID controller card Procedure Step 1 Wear an ESD wrist strap or ESD gloves For details see 1 Safety Instructions Step 2 Take the spare RAID contr...

Страница 254: ... off the RH8100 V3 For details see 6 2 Powering Off the RH8100 V3 Then you have removed all power cables from the server You have removed the front I O module from the RH8100 V3 For details see 5 8 1 Removing the Front I O Module Data You have obtained the cabinet number and chassis number of the RH8100 V3 You have located the RH8100 V3 to be removed based on the preceding information and have lab...

Страница 255: ...f the server See step 2 in Figure 5 123 Figure 5 123 Removing a supercapacitor tray Step 4 Open the two latches on the supercapacitor cover in their respective directions while pulling out the supercapacitor cover and remove the supercapacitor cover See steps 1 and 2 in Figure 5 124 Step 5 Remove the cable from the supercapacitor See step 3 in Figure 5 124 RH8100 V3 Server User Guide 5 Removing an...

Страница 256: ... For details see 6 2 Powering Off the RH8100 V3 Then you have removed all power cables from the server You have removed the front I O module from the RH8100 V3 For details see 5 8 1 Removing the Front I O Module Data You have obtained the cabinet number and chassis number of the RH8100 V3 You have located the RH8100 V3 to be removed based on the preceding information and have labeled its panel to ...

Страница 257: ...tep 4 Place the supercapacitor in the tray and push down the supercapacitor cover in the arrow direction until the latches on the supercapacitor cover snap into the tray See step 2 in Figure 5 125 Figure 5 125 Installing a supercapacitor Step 5 Place the supercapacitor tray in the front I O module See step 1 in Figure 5 126 Step 6 Tighten the screws on the supercapacitor tray See step 2 in Figure ...

Страница 258: ...ved the front I O module from the RH8100 V3 For details see 5 8 1 Removing the Front I O Module Data You have obtained the cabinet number and chassis number of the RH8100 V3 You have located the RH8100 V3 based on the preceding information and labeled its panel to prevent misoperations You have determined the position on the RH8100 V3 for installing the rear hard disk backplane Tools ESD gloves Pa...

Страница 259: ...ckplane in an ESD bag End 5 8 12 Installing a Hard Disk Backplane This topic describes how to install the front hard disk backplane Scenarios Install the front hard disk backplane if the original one has failed Prerequisites Conditions You have powered off the RH8100 V3 For details see 6 2 Powering Off the RH8100 V3 Then you have removed all power cables from the server You have removed the front ...

Страница 260: ...ane Procedure Step 1 Wear an ESD wrist strap or ESD gloves For details see 1 Safety Instructions Step 2 Take the spare front hard disk backplane out of its ESD bag Step 3 Install the hard disk backplane on to the front I O module in the arrow direction See step 1 in Figure 5 128 Step 4 Tighten the screws on the hard disk backplane See step 2 in Figure 5 128 Figure 5 128 Installing a hard disk back...

Страница 261: ...led its panel to prevent misoperations You have determined the position on the RH8100 V3 for removing a fan module Tools ESD gloves Packaging materials for example an ESD bag Procedure Step 1 Wear an ESD wrist strap or ESD gloves For details see 1 Safety Instructions Step 2 Press and hold down the plastic latch on the inner side of the fan module handle See step 1 in Figure 5 129 Step 3 Pull the f...

Страница 262: ... fan module in an ESD bag End 5 9 2 Installing a Fan Module This topic describes how to install a fan module Scenarios Install a fan module if the original one has failed RH8100 V3 Server User Guide 5 Removing and Installing Parts of the RH8100 V3 Issue 30 2019 12 19 Copyright Huawei Technologies Co Ltd 252 ...

Страница 263: ...odule Tools ESD gloves Packaging materials for example an ESD bag Hardware Spare fan module Procedure Step 1 Wear an ESD wrist strap or ESD gloves For details see 1 Safety Instructions Step 2 Take the spare fan module out of its ESD bag Step 3 Insert the fan module horizontally into the chassis until the fan module snaps into the chassis See Figure 5 130 RH8100 V3 Server User Guide 5 Removing and ...

Страница 264: ...has failed The AC PSU needs to be replaced with a new model Prerequisites Conditions When four PSUs are configured remove one PSU without powering off the RH8100 V3 if the other two or three PSUs are operating properly Observe the PSU RH8100 V3 Server User Guide 5 Removing and Installing Parts of the RH8100 V3 Issue 30 2019 12 19 Copyright Huawei Technologies Co Ltd 254 ...

Страница 265: ...Step 1 Wear an ESD wrist strap or ESD gloves For details see 1 Safety Instructions Step 2 Optional If only two PSUs are configured power off the RH8100 V3 For details see 6 2 Powering Off the RH8100 V3 Step 3 Open the power cable clip See step 1 in Figure 5 131 Step 4 Remove the power cable from the PSU to be replaced See step 2 in Figure 5 131 Figure 5 131 Removing a power cable Step 5 Press the ...

Страница 266: ...ow to install an AC power supply unit PSU Scenarios Install an AC PSU if An AC PSU has failed An AC PSU needs to be replaced with a new model Two AC PSUs need to be added to improve reliability when only two AC PSUs are configured for the RH8100 V3 Prerequisites Conditions RH8100 V3 Server User Guide 5 Removing and Installing Parts of the RH8100 V3 Issue 30 2019 12 19 Copyright Huawei Technologies...

Страница 267: ...gloves Packaging materials for example an ESD bag Hardware Spare AC PSU Procedure Step 1 Wear an ESD wrist strap or ESD gloves For details see 1 Safety Instructions Step 2 Take the spare AC PSU out of its ESD bag Step 3 Slide the spare AC PSU into a slot for example slot 4 as far as it will go See Figure 5 133 Figure 5 133 Installing an AC PSU RH8100 V3 Server User Guide 5 Removing and Installing ...

Страница 268: ...n Figure 5 134 End 5 9 5 Removing a DC PSU This topic describes how to remove a DC power supply unit PSU Scenarios Remove a DC PSU if The DC PSU has failed The DC PSU needs to be replaced with a new model Prerequisites Conditions RH8100 V3 Server User Guide 5 Removing and Installing Parts of the RH8100 V3 Issue 30 2019 12 19 Copyright Huawei Technologies Co Ltd 258 ...

Страница 269: ... ESD wrist strap or ESD gloves For details see 1 Safety Instructions Step 2 Loosen the screw on the PSU cover and remove the cover See step 1 in Figure 5 135 Step 3 Loosen the screw on the positive and negative power cables and remove the cables See step 2 in Figure 5 135 Figure 5 135 Removing power cables Step 4 Press the latch on the PSU and pull out the PSU halfway while holding the handle See ...

Страница 270: ...narios Install a DC PSU if A DC PSU has failed A DC PSU needs to be replaced with a new model Two DC PSUs need to be added to improve reliability when only two DC PSUs are configured for the RH8100 V3 Prerequisites Conditions None RH8100 V3 Server User Guide 5 Removing and Installing Parts of the RH8100 V3 Issue 30 2019 12 19 Copyright Huawei Technologies Co Ltd 260 ...

Страница 271: ...r example an ESD bag Phillips screwdriver Hardware Spare DC PSU Procedure Step 1 Wear an ESD wrist strap or ESD gloves For details see 1 Safety Instructions Step 2 Take the spare DC PSU out of its ESD bag Step 3 Push the spare DC PSU into a slot for example slot 4 along the guide rails until the PSU clicks into place See Figure 5 137 Figure 5 137 Installing a DC PSU RH8100 V3 Server User Guide 5 R...

Страница 272: ...tep 5 Install the cover for the PSU and tighten the screw to secure the cover See step 2 in Figure 5 138 End 5 10 Replacing an HFC and Its Internal Components This topic describes how to replace a High performance Fusion Console HFC and its internal components 5 10 1 Removing an HFC This topic describes how to remove a High performance Fusion Console HFC RH8100 V3 Server User Guide 5 Removing and ...

Страница 273: ... use HFCs whose BOM number is 03022JBN When E7 v4 CPUs are configured use HFCs whose BOM number is 03023URP When replacing CPUs of different platforms ensure that new CPUs are compatible with other components of the server For details use the Intelligent Computing Compatibility Checker Scenarios Remove an HFC if The HFC has failed The trusted platform module TPM or trusted cryptography module TCM ...

Страница 274: ...evers See step 3 in Figure 5 139 Figure 5 139 Removing an HFC Step 5 Remove the TPM or TCM and USB flash drive from the connectors on the HFC and place the HFC in an ESD bag End 5 10 2 Installing an HFC This topic describes how to install a High performance Fusion Console HFC when you replace the original one or replace the USB flash drive trusted platform module TPM or trusted cryptography module...

Страница 275: ... CPUs are configured use HFCs whose BOM number is 03023URP When replacing CPUs of different platforms ensure that new CPUs are compatible with other components of the server For details use the Intelligent Computing Compatibility Checker Scenarios Install an HFC if An HFC has failed The TPM or TCM on the HFC has failed The USB flash drive on the HFC has failed Prerequisites Conditions You have pow...

Страница 276: ...e step 2 in Figure 5 140 Figure 5 140 Installing an HFC End 5 10 3 Removing a TPM or TCM This topic describes how to remove a trusted platform module TPM or trusted cryptography module TCM Scenarios Remove a TPM or TCM if The TPM or TCM has failed The TPM or TCM needs to be replaced with a new model A TPM and a TCM are similar in terms of appearance and replacement procedure This topic describes h...

Страница 277: ...3 based on the preceding information and labeled its panel to prevent misoperations You have determined the position on the RH8100 V3 for removing a TPM Tools ESD gloves M3 Phillips screwdriver Packaging materials for example an ESD bag Procedure Step 1 Wear an ESD wrist strap or ESD gloves For details see 1 Safety Instructions Step 2 Loosen the screw on the TPM using a Phillips screwdriver See st...

Страница 278: ...moved all power cables from the server You have removed the High performance Fusion Console HFC from the RH8100 V3 For details see 5 10 1 Removing an HFC Data You have obtained the cabinet number and chassis number of the RH8100 V3 You have located the RH8100 V3 based on the preceding information and labeled its panel to prevent misoperations You have determined the position on the RH8100 V3 for i...

Страница 279: ...ribes how to remove a network interface card NIC Scenarios Remove a NIC if The NIC has failed The NIC needs to be replaced with a new model Prerequisites Conditions You have powered off the RH8100 V3 For details see 6 2 Powering Off the RH8100 V3 Then you have removed all power cables from the server Data RH8100 V3 Server User Guide 5 Removing and Installing Parts of the RH8100 V3 Issue 30 2019 12...

Страница 280: ...wrist strap or ESD gloves For details see 1 Safety Instructions Step 2 Hold down the blue button above the NIC See step 1 in Figure 5 143 Step 3 Remove the NIC from the slot See step 2 in Figure 5 143 Figure 5 143 Removing a NIC Step 4 Place the removed NIC in an ESD bag End 5 10 6 Installing a NIC This topic describes how to install a network interface card NIC Scenarios Install a NIC if A NIC ha...

Страница 281: ...revent misoperations You have determined the position on the RH8100 V3 for installing a NIC Tools ESD gloves Packaging materials for example an ESD bag Hardware Spare NIC Procedure Step 1 Wear an ESD wrist strap or ESD gloves For details see 1 Safety Instructions Step 2 Take the spare NIC out of its ESD bag Step 3 Push the NIC into the High performance Fusion Console HFC as far as it will go See F...

Страница 282: ...see 5 10 1 Removing an HFC Data You have obtained the cabinet number and chassis number of the RH8100 V3 You have located the RH8100 V3 based on the preceding information and labeled its panel to prevent misoperations You have determined the position on the RH8100 V3 for removing a USB flash drive Tools ESD gloves Packaging materials for example an ESD bag Procedure Step 1 Wear an ESD wrist strap ...

Страница 283: ...g Off the RH8100 V3 Then you have removed all power cables from the server You have removed the High performance Fusion Console HFC from the RH8100 V3 For details see 5 10 1 Removing an HFC Data You have obtained the cabinet number and chassis number of the RH8100 V3 You have located the RH8100 V3 based on the preceding information and labeled its panel to prevent misoperations You have determined...

Страница 284: ...rt the USB flash drive into the connector shown in Figure 5 146 other connectors cannot be used Figure 5 146 Installing a USB flash drive End 5 10 9 Removing a Battery This topic describes how to remove a battery Scenarios Remove a battery if The battery has failed The battery needs to be replaced with a new model RH8100 V3 Server User Guide 5 Removing and Installing Parts of the RH8100 V3 Issue 3...

Страница 285: ...have located the RH8100 V3 based on the preceding information and labeled its panel to prevent misoperations You have determined the position on the RH8100 V3 for removing a battery Tools ESD gloves Packaging materials for example an ESD bag Procedure Step 1 Wear an ESD wrist strap or ESD gloves For details see 1 Safety Instructions Step 2 Pull up the right end of the battery and remove it from th...

Страница 286: ...laced with a new model Prerequisites Conditions You have powered off the RH8100 V3 For details see 6 2 Powering Off the RH8100 V3 Then you have removed all power cables from the server You have removed the High performance Fusion Console HFC from the RH8100 V3 For details see 5 10 1 Removing an HFC RH8100 V3 Server User Guide 5 Removing and Installing Parts of the RH8100 V3 Issue 30 2019 12 19 Cop...

Страница 287: ...D bag Hardware Spare battery Procedure Step 1 Wear an ESD wrist strap or ESD gloves For details see 1 Safety Instructions Step 2 Take the spare battery out of its ESD bag Step 3 Hold the battery with the side marked with text facing upwards insert the left end of the battery into the slot and gently press down the battery until it is properly installed in the slot See Figure 5 148 RH8100 V3 Server...

Страница 288: ...nal components 5 11 1 Removing a Rear I O Module This topic describes how to remove a rear I O module Scenarios Remove a rear I O module if The rear I O module has failed A non hot swappable PCIe card on the rear I O module has failed RH8100 V3 Server User Guide 5 Removing and Installing Parts of the RH8100 V3 Issue 30 2019 12 19 Copyright Huawei Technologies Co Ltd 278 ...

Страница 289: ...materials for example an ESD bag Procedure Step 1 Wear an ESD wrist strap or ESD gloves For details see 1 Safety Instructions Step 2 Push the release buttons inwards See step 1 in Figure 5 149 The ejector levers eject automatically Step 3 Raise both ejector levers on the rear I O module See step 2 in Figure 5 149 Step 4 Slowly pull out the rear I O module while holding the ejector levers See step ...

Страница 290: ...talling a Rear I O Module This topic describes how to install a rear I O module when you replace the original one or replace a non hot swappable PCIe card on the rear I O module Scenarios Install a rear I O module if RH8100 V3 Server User Guide 5 Removing and Installing Parts of the RH8100 V3 Issue 30 2019 12 19 Copyright Huawei Technologies Co Ltd 280 ...

Страница 291: ...n and labeled its panel to prevent misoperations You have determined the position on the RH8100 V3 for installing a rear I O module Tools ESD gloves Packaging materials for example an ESD bag Hardware Spare rear I O module Procedure Step 1 Wear an ESD wrist strap or ESD gloves For details see 1 Safety Instructions Step 2 Take the spare rear I O module out of the ESD bag and install all non hot swa...

Страница 292: ... Red Hat Enterprise Linux 6 4 RHEL 6 9 supports hot swap of HBAs BOM 06030217 and 82599 NICs BOM 02311DVM By default SUSE Linux Enterprise Server 11 SP3 does not support the hot swap feature of a PCIe card To enable SUSE Linux Enterprise Server 11 SP3 to support this feature run the modprobe pciehp command to load the hot swap driver To view the hot swap driver run the modinfo pciehp command Other...

Страница 293: ...the position on the RH8100 V3 for removing a PCIe card Tools ESD gloves Packaging materials for example an ESD bag Procedure Step 1 Wear an ESD wrist strap or ESD gloves For details see 1 Safety Instructions Step 2 Press the hot swap button on the right of the PCIe card 15 16 and 17 in Figure 2 10 show the positions of the status indicator power indicator and hot swap button on the PCIe card respe...

Страница 294: ...ith the RH8100 V3 If yes go to Step 9 If no go to Step 7 Step 7 Loosen the screws on the plastic latch and remove it See steps 1 and 2 in Figure 5 152 or Figure 5 153 RH8100 V3 Server User Guide 5 Removing and Installing Parts of the RH8100 V3 Issue 30 2019 12 19 Copyright Huawei Technologies Co Ltd 284 ...

Страница 295: ...Figure 5 152 Removing a plastic latch large card RH8100 V3 Server User Guide 5 Removing and Installing Parts of the RH8100 V3 Issue 30 2019 12 19 Copyright Huawei Technologies Co Ltd 285 ...

Страница 296: ...c latch small card Step 8 Pull the PCIe card out of the slot See Figure 5 154 or Figure 5 155 RH8100 V3 Server User Guide 5 Removing and Installing Parts of the RH8100 V3 Issue 30 2019 12 19 Copyright Huawei Technologies Co Ltd 286 ...

Страница 297: ...Figure 5 154 Pulling out a PCIe card large card RH8100 V3 Server User Guide 5 Removing and Installing Parts of the RH8100 V3 Issue 30 2019 12 19 Copyright Huawei Technologies Co Ltd 287 ...

Страница 298: ...rd This topic describes how to install a hot swappable Peripheral Component Interconnect Express PCIe card Scenarios Install a hot swappable PCIe card if the original one has failed Prerequisites Conditions RH8100 V3 Server User Guide 5 Removing and Installing Parts of the RH8100 V3 Issue 30 2019 12 19 Copyright Huawei Technologies Co Ltd 288 ...

Страница 299: ...t Tool Otherwise after you press the hot swap button the Qlogic card cannot be powered off because the Qlogic card driver is used by the management software Data You have obtained the cabinet number and chassis number of the RH8100 V3 You have located the RH8100 V3 based on the preceding information and labeled its panel to prevent misoperations You have determined the position on the RH8100 V3 fo...

Страница 300: ...Figure 5 156 Inserting a PCIe card large card RH8100 V3 Server User Guide 5 Removing and Installing Parts of the RH8100 V3 Issue 30 2019 12 19 Copyright Huawei Technologies Co Ltd 290 ...

Страница 301: ...e plastic latch in the arrow direction and tighten the screws on the latch See steps 1 and 2 in Figure 5 158 or Figure 5 159 RH8100 V3 Server User Guide 5 Removing and Installing Parts of the RH8100 V3 Issue 30 2019 12 19 Copyright Huawei Technologies Co Ltd 291 ...

Страница 302: ...Figure 5 158 Installing a plastic latch large card RH8100 V3 Server User Guide 5 Removing and Installing Parts of the RH8100 V3 Issue 30 2019 12 19 Copyright Huawei Technologies Co Ltd 292 ...

Страница 303: ...l card Step 6 Insert the PCIe card into a slot on the rear I O module as far as it will go See Figure 5 160 RH8100 V3 Server User Guide 5 Removing and Installing Parts of the RH8100 V3 Issue 30 2019 12 19 Copyright Huawei Technologies Co Ltd 293 ...

Страница 304: ...t 10 seconds until the power indicator is steady on which indicates that the power supply to the PCIe card is normal End 5 11 5 Removing a Non Hot Swappable PCIe Card This topic describes how to remove a non hot swappable PCIe card Scenarios Remove a non hot swappable PCIe card if it has failed Prerequisites Conditions You have powered off the RH8100 V3 For details see 6 2 Powering Off the RH8100 ...

Страница 305: ...trap or ESD gloves For details see 1 Safety Instructions Step 2 Press the latch on the cover of the rear I O module in the arrow direction See step 1 in Figure 5 161 Step 3 Open the cover of the rear I O module See step 2 in Figure 5 161 Step 4 Lift the PCIe card slowly out of the slot See step 3 in Figure 5 161 Figure 5 161 Removing a non hot swappable PCIe card Step 5 Place the removed PCIe card...

Страница 306: ...n and labeled its panel to prevent misoperations You have determined the position on the RH8100 V3 for installing a PCIe card Tools ESD gloves Packaging materials for example an ESD bag Hardware Spare PCIe card Procedure Step 1 Wear an ESD wrist strap or ESD gloves For details see 1 Safety Instructions Step 2 Take the spare PCIe card out of its ESD bag Step 3 Insert the PCIe card into a PCIe slot ...

Страница 307: ...affle End 5 11 7 Removing the Rear I O Board This topic describes how to remove the rear I O board before replacing it with a new one Scenarios Remove the rear I O board before replacing it with a new one Requirements Prerequisites You have powered off the server For details see 6 2 Powering Off the RH8100 V3 After the server is powered off disconnect all the power cables RH8100 V3 Server User Gui...

Страница 308: ...beled its panel to prevent misoperations Tools ESD gloves Packaging materials for example an ESD bag Procedure Step 1 Wear an ESD wrist strap or ESD gloves For details see 1 Safety Instructions Step 2 Flip the rear I O module 180 in the arrow direction to ensure that the rear I O board in it faces upwards See step 1 in Figure 5 164 Step 3 Press the button on the bottom cover of the rear I O module...

Страница 309: ...ear I O board Step 6 Place the removed rear I O board in an ESD bag End 5 11 8 Installing the Rear I O Board This topic describes how to install the rear I O board when the original one has failed Scenarios Install the rear I O board to replace a faulty one RH8100 V3 Server User Guide 5 Removing and Installing Parts of the RH8100 V3 Issue 30 2019 12 19 Copyright Huawei Technologies Co Ltd 299 ...

Страница 310: ...obtained the cabinet number and chassis number of the RH8100 V3 You have located the RH8100 V3 based on the preceding information and labeled its panel to prevent misoperations Tools ESD gloves Packaging materials for example an ESD bag Hardware Rear I O board to be installed Procedure Step 1 Wear an ESD wrist strap or ESD gloves For details see 1 Safety Instructions Step 2 Take the spare rear I O...

Страница 311: ...ar I O module in the arrow direction See step 1 in Figure 5 167 Then flip the rear I O module 180 in the arrow direction See step 2 in Figure 5 167 RH8100 V3 Server User Guide 5 Removing and Installing Parts of the RH8100 V3 Issue 30 2019 12 19 Copyright Huawei Technologies Co Ltd 301 ...

Страница 312: ...Figure 5 167 Installing the bottom cover End RH8100 V3 Server User Guide 5 Removing and Installing Parts of the RH8100 V3 Issue 30 2019 12 19 Copyright Huawei Technologies Co Ltd 302 ...

Страница 313: ...it is maintained The method for powering on the RH8100 V3 varies according to the scenario Prerequisites Conditions The RH8100 V3 and its internal components are properly installed The server is properly grounded Data You have determined the cabinet number and installation position for the RH8100 V3 to be powered on You have obtained the IP address user name and password for the iBMC management ne...

Страница 314: ... the server is in dual system mode run the ipmcset d powerstate v 1 command on the iBMC CLI of system A to remotely power on system A and run this command on the iBMC CLI of system B to remotely power on system B Use the iBMC WebUI to power on the server When the server is in single system mode log in to the iBMC WebUI choose Power on the menu bar choose Power Control in the navigation tree and cl...

Страница 315: ...owered off forcibly wait for more than 10 seconds for the server to power off completely Do not power on the server again before it is completely powered off Forced power off may damage user programs or unsaved data Exercise caution when performing this operation Power off the server to have it enter the standby state Use the KVM to shut down the server operating system OS When the server is in si...

Страница 316: ... the secondary power button on the front panel to power off system B In the remote management scenario use the iBMC CLI to power off the server When the server is in single system mode run the ipmcset d powerstate v 0 command on the iBMC CLI to remotely power off the server When the server is in dual system mode run the ipmcset d powerstate v 0 command on the iBMC CLI of system A to remotely power...

Страница 317: ...Desktop 7 5 Configuring RAID 7 6 Configuring the BIOS 7 7 Optional Configuring Hard Partitioning 7 8 Installing an OS 7 1 Configuration Overview This topic describes the default data and initial configuration process Default Data Table 7 1 lists the default user name password and IP addresses required for configuring the RH8100 V3 RH8100 V3 Server User Guide 7 Configuring the RH8100 V3 Issue 30 20...

Страница 318: ...dual system mode Default IP address 192 168 2 100 Default subnet mask 255 255 255 0 IP address and subnet mask of the iBMC management network port of system B when the RH8100 V3 is in dual system mode Default IP address 192 168 2 101 Default subnet mask 255 255 255 0 iBMC login data User name and password Default user name root Default password Huawei12 Configuration Process Figure 7 1 shows the i...

Страница 319: ...n Check the RH8100 V3 After logging in to the iBMC WebUI Check that the RH8100 V3 version information is correct Check that no alarm is generated for the RH8100 V3 Change an iBMC user password Change the default password of an iBMC user RH8100 V3 Server User Guide 7 Configuring the RH8100 V3 Issue 30 2019 12 19 Copyright Huawei Technologies Co Ltd 309 ...

Страница 320: ... larger values so that the names differ from the network port names of any external NIC For details see 9 3 Querying and Changing the Network Port Names of the Internal NIC Install an operating system OS Install an OS for the RH8100 V3 7 2 Checking the RH8100 V3 This topic describes how to check the initial status of the RH8100 V3 Scenarios Log in to the iBMC WebUI or CLI and check RH8100 V3 statu...

Страница 321: ... 2 4 Indicators and Buttons Log in to the iBMC WebUI 2 Set an IP address for the PC and ensure that the IP address is on the same network segment as the iBMC management network port 3 Connect the Ethernet port on the PC to the iBMC management network port on HFC 2 over the LAN Figure 7 3 shows the network connection RH8100 V3 Server User Guide 7 Configuring the RH8100 V3 Issue 30 2019 12 19 Copyri...

Страница 322: ...e iBMC WebUI enter the IP address In dual system mode both system A and system B of the RH8100 V3 have an iBMC management network port IP address To log in to the iBMC WebUI of system A enter the IP address of system A To log in to the iBMC WebUI of system B enter the IP address of system B If the system displays the message The maximum number of sessions has been reached when you attempt to log i...

Страница 323: ... the server on the iBMC WebUI 5 Check the server version information Choose Information on the menu bar choose Information Summary in the navigation tree and view the server version information See Figure 7 5 Check that the server version information meets site requirements Figure 7 5 Checking version information RH8100 V3 Server User Guide 7 Configuring the RH8100 V3 Issue 30 2019 12 19 Copyright...

Страница 324: ... the server Impact on the System This operation has no adverse impact on the system Prerequisites Conditions You have logged in to the iBMC WebUI over a network port For details see 9 2 Logging In to the iBMC WebUI Data Table 7 3 lists the default iBMC user name and password Table 7 3 Default iBMC user name and password Default User Name and Password Description User name root Password Huawei12 Th...

Страница 325: ... In the navigation tree choose User Settings The User Settings page is displayed as shown in Figure 7 7 If Password Complexity Check is set to Enable the system performs the password complexity check when you change a user password Figure 7 7 User Settings Step 2 Click for the user whose password needs to be changed The area for modifying user information is displayed below as shown in Figure 7 8 ...

Страница 326: ...tor it Prerequisites Conditions No special conditions are required for this operation Data The following data is available IP address of the iBMC management network port iBMC user name and password The default user name is root and the default password is Huawei12 Procedure Step 1 Log in to the iBMC WebUI For details see 9 2 Logging In to the iBMC WebUI Step 2 On the menu bar choose Remote The Rem...

Страница 327: ...layed as shown in Figure 7 10 Remote Virtual Console Shared Mode allows two users to access and manage the server simultaneously One user can view the operations performed by the other user Remote Virtual Console Private Mode allows only one user to access and manage the server at a time RH8100 V3 Server User Guide 7 Configuring the RH8100 V3 Issue 30 2019 12 19 Copyright Huawei Technologies Co Lt...

Страница 328: ...and V3 Server RAID Controller Card User Guide There are three methods for identifying the model of a RAID controller card Using BIOS Boot Information LSISAS2208 controller card Press Ctrl H for WebBIOS or press Ctrl Y for Preboot CLI is displayed during system startup as shown in Figure 7 11 RH8100 V3 Server User Guide 7 Configuring the RH8100 V3 Issue 30 2019 12 19 Copyright Huawei Technologies C...

Страница 329: ...ure 7 12 Figure 7 12 Boot information displayed for the LSISAS3008 controller card The preceding information is for reference only The actual information displayed may differ LSISAS3108 controller card Press Ctrl R to Run MegaRAID Configuration Utility is displayed during system startup as shown in Figure 7 13 Figure 7 13 Boot information displayed for the LSISAS3108 controller card RH8100 V3 Serv...

Страница 330: ...g in to the iBMC WebUI 2 Choose Information on the menu bar and then choose Component Info in the navigation tree 3 On the Component Info page view the model of the RAID controller card See Figure 7 14 RH8100 V3 Server User Guide 7 Configuring the RH8100 V3 Issue 30 2019 12 19 Copyright Huawei Technologies Co Ltd 320 ...

Страница 331: ...nent Info The preceding information is for reference only The actual information displayed may differ RH8100 V3 Server User Guide 7 Configuring the RH8100 V3 Issue 30 2019 12 19 Copyright Huawei Technologies Co Ltd 321 ...

Страница 332: ...208 RU320BC controller card Figure 7 15 LSISAS2208 RU320BC controller card LSISAS3008 SR130 controller card Figure 7 16 shows the LSISAS3008 SR130 controller card Figure 7 16 LSISAS3008 SR130 controller card LSISAS3108 SR430C controller card Figure 7 17 shows the LSISAS3108 SR430C controller card RH8100 V3 Server User Guide 7 Configuring the RH8100 V3 Issue 30 2019 12 19 Copyright Huawei Technolog...

Страница 333: ...ive standby switchover occurs in the BIOSs the BIOS passwords and custom BIOS settings settings in the BIOS Setup in the active and standby BIOS flashes are not synchronized to each other That is after an active standby switchover the BIOS password and custom BIOS settings in the previously standby flash are used Prerequisites Conditions The RH8100 V3 is powered on You have logged in to the iBMC W...

Страница 334: ...iguring the BIOS Restart the RH8100 V3 Step 1 On the real time desktop click on the menu bar Step 2 Select Reset RH8100 V3 Server User Guide 7 Configuring the RH8100 V3 Issue 30 2019 12 19 Copyright Huawei Technologies Co Ltd 324 ...

Страница 335: ... BIOS Clearing the CMOS will not forcibly restore the default BIOS password After the BIOS is upgraded the BIOS password is not forcibly restored to the default one but is the last specified one before the upgrade If you clear the BIOS password before the upgrade the BIOS has no password after the upgrade If you change the BIOS password before the upgrade the BIOS password after the upgrade is the...

Страница 336: ...DIMM configurations on all memory boards be the same to facilitate data migration The RH8100 V3 has memory boards in two rows Data can be migrated only between memory boards in the same row Step 1 Start the BIOS Setup Utility choose IntelRCSetup Memory RAS Configuration and set Memory Migration to Enable See Figure 7 20 RH8100 V3 Server User Guide 7 Configuring the RH8100 V3 Issue 30 2019 12 19 Co...

Страница 337: ...to migrate data to a spare memory board when the number of correctable errors in a DIMM on a memory board has reached the threshold If Migration Trigger Mode is set to Auto the system automatically migrates data from the faulty memory board to a spare one when the number of correctable errors in a DIMM on the faulty memory board has reached the threshold RH8100 V3 Server User Guide 7 Configuring t...

Страница 338: ... to a memory board in the upper row See Figure 7 22 For example Board 1 indicates the leftmost memory board in the upper row Board 3 indicates the second memory board from the left in the upper row and so on RH8100 V3 Server User Guide 7 Configuring the RH8100 V3 Issue 30 2019 12 19 Copyright Huawei Technologies Co Ltd 328 ...

Страница 339: ...o a memory board in the lower row See Figure 7 23 For example Board 2 indicates the leftmost memory board in the lower row Board 4 indicates the second memory board from the left in the lower row and so on RH8100 V3 Server User Guide 7 Configuring the RH8100 V3 Issue 30 2019 12 19 Copyright Huawei Technologies Co Ltd 329 ...

Страница 340: ...e MC1 End Set the BIOS Password Step 1 Select the Security tab The Security screen is displayed as shown in Figure 7 24 RH8100 V3 Server User Guide 7 Configuring the RH8100 V3 Issue 30 2019 12 19 Copyright Huawei Technologies Co Ltd 330 ...

Страница 341: ...rd type configured in the OS is the same as the actual keyboard type enter the password by using the actual keyboard If the keyboard type configured in the OS is different from the actual keyboard type enter the password by using the keyboard configured in the OS Step 3 Optional After the setting select Clear Administrator Password to clear the password End Set the Server Boot Priority Step 1 Sele...

Страница 342: ...le the PXE Function for a NIC Step 1 Select the Boot tab The Boot screen is displayed as shown in Figure 7 26 RH8100 V3 Server User Guide 7 Configuring the RH8100 V3 Issue 30 2019 12 19 Copyright Huawei Technologies Co Ltd 332 ...

Страница 343: ...in HFC 1 Other ports cannot be configured with PXE Step 2 Select PXE1 Configuration or PXE2 Configuration and press Enter Step 3 Choose Enable from the shortcut menu and press Enter to enable the PXE function for the specified network port End Select BEV as a Boot Option Step 1 Select a boot option and press or to change the order of the boot option Select BEV as a boot option The one at the top o...

Страница 344: ... single system to the dual system Scenarios Switch the operating mode of the RH8100 V3 from the single system to the dual system Impact on the System After the operating mode is switched from the single system to the dual system the management IP address of the standby iBMC is restored to 192 168 2 101 Prerequisites Conditions The RH8100 V3 is operating properly Data None RH8100 V3 Server User Gui...

Страница 345: ...Workflow RH8100 V3 Server User Guide 7 Configuring the RH8100 V3 Issue 30 2019 12 19 Copyright Huawei Technologies Co Ltd 335 ...

Страница 346: ...e two partitions 2 Adjust the hardware configurations for the two partitions and ensure that the hardware modules are installed properly Resource allocation of the front panel in dual system is shown in Figure 7 27 Figure 7 28 Figure 7 29 Figure 7 30 and Table 7 4 Figure 7 27 Resource allocation of the front panel FM A in dual system RH8100 V3 Server User Guide 7 Configuring the RH8100 V3 Issue 30...

Страница 347: ...ion of the front panel FM B in dual system Figure 7 29 Resource allocation of the front panel FM C in dual system RH8100 V3 Server User Guide 7 Configuring the RH8100 V3 Issue 30 2019 12 19 Copyright Huawei Technologies Co Ltd 337 ...

Страница 348: ...mory boards 9 to 16 with a maximum of 96 DIMMs Hard disks Six hard disks HDD0 to HDD5 FM A Twelve hard disks HDD0 to HDD11 FM B Four hard disks HDD0 to HDD3 FM C Four hard disks HDD0 to HDD3 FM D Six hard disks HDD6 to HDD11 FM A Twelve hard disks HDD12 to HDD23 FM B Four hard disks HDD4 to HDD7 FM C Four hard disks HDD4 to HDD7 FM D Figure 7 31 and Table 7 5 show resource allocation of the rear p...

Страница 349: ...B PCIe slots on the rear I O modul e Slots 6 to 10 Slots 1 to 5 HFCs HFC 2 HFC 1 LAN on mothe rboard LOM HFC 2 LOM HFC 1 LOM Resource allocation of the front panel in dual system mode is shown in Figure 7 32 Figure 7 33 and Table 7 6 RH8100 V3 Server User Guide 7 Configuring the RH8100 V3 Issue 30 2019 12 19 Copyright Huawei Technologies Co Ltd 339 ...

Страница 350: ...location of the FM A in dual system Figure 7 33 Resource allocation of the FM B FM C or FM D in dual system RH8100 V3 Server User Guide 7 Configuring the RH8100 V3 Issue 30 2019 12 19 Copyright Huawei Technologies Co Ltd 340 ...

Страница 351: ...ing hardware requirements Eight CPUs function properly Both CM 1 and CM 5 have at least one DIMM The compute modules in slot 1 and slot 5 are installed properly and RAID controller cards of the same model are installed in the FM No miniSAS cable needs to be connected to the RAID controller cards installed in FM A MiniSAS cables must be connected to the RAID controller cards installed in FM B FM C ...

Страница 352: ...is powered on iBMC is also powered on automatically Log in to iBMC 4 For details see 9 2 Logging In to the iBMC WebUI For the FM A only Set the RAID mode 5 On the menu bar choose Config 6 In the left panel choose System The System page is displayed as shown in Figure 7 34 Table 7 8 describes hard partitioning parameters RH8100 V3 Server User Guide 7 Configuring the RH8100 V3 Issue 30 2019 12 19 Co...

Страница 353: ...Figure 7 34 System page RH8100 V3 Server User Guide 7 Configuring the RH8100 V3 Issue 30 2019 12 19 Copyright Huawei Technologies Co Ltd 343 ...

Страница 354: ...uct nameplate When the RH8100 V3 switches from the single system to the dual system the IP address of the management network port in system B is restored to 192 168 2 101 NOTE If the RH8100 V3 is in single system and the OS is powered on the switching from the single system to the dual system will fail If the RH8100 V3 is in dual system and the OS of system A or B is powered on the switching from ...

Страница 355: ...you are advised to switch the RAID mode from single RAID to dual RAID by using the iBMC of system A In dual RAID mode system A uses RAID 1 and system B uses RAID 2 Do not switch the RAID mode from dual RAID to single RAID Do not use the iBMC of system B to configure the RAID mode If you want to select Dual RAID ensure that the RH8100 V3 has two RAID controller cards Before you switch the RAID mode...

Страница 356: ... is powered off iBMC is still available but the CPUs and DIMMs are powered off Change the RH8100 V3 operating mode Then iBMC restarts automatically 13 On the menu bar choose Config 14 In the left panel choose System The System page is displayed 15 In the Set FusionPar area select Dual system and enter the standby iBMC user name and password as shown in Figure 7 36 Figure 7 36 Set FusionPar area 16...

Страница 357: ...to the Single system This topic describes how to switch the RH8100 V3 from the dual system to the single system Scenarios Switch the operating mode of the RH8100 V3 from the dual system to the single system Impact on the System After the operating mode is switched from the dual system to the single system the management IP address of the standby iBMC is lost and the user name and password are rest...

Страница 358: ...Logging In to the iBMC WebUI Use iBMC to power off the server 3 On the menu bar choose Power 4 In the left panel choose Power Control The Power Control page is displayed on the right 5 In the Virtual Power Button area click Power Off The message Operation succeeded is displayed After the server is powered off iBMC is still available but the CPUs and DIMMs are powered off Set the operating mode The...

Страница 359: ...ervice systems have been properly powered off and iBMC is not being upgraded Are you sure to perform the switching If the switching is successful iBMC will restart If the iBMC or CPLD versions differ the switching fails After the switching the user name password and IP address of the standby iBMC are restored to factory settings 10 Click OK iBMC restarts After the restart the hard partitioning swi...

Страница 360: ... between the two systems when you install an OS by using a physical DVD drive in dual system mode The following OSs support hot swap of PCIe cards Windows Server 2008 R2 Windows Server 2012 SUSE Linux Enterprise Server 11 SP3 and Red Hat Enterprise Linux 6 4 For details about how to install an OS see the Huawei Server OS Installation Guide RH8100 V3 Server User Guide 7 Configuring the RH8100 V3 Is...

Страница 361: ...tive maintenance and common operations and obtain other resources for troubleshooting Huawei servers It guides you through the server troubleshooting process For details see Huawei Servers Troubleshooting RH8100 V3 Server User Guide 8 Troubleshooting Issue 30 2019 12 19 Copyright Huawei Technologies Co Ltd 351 ...

Страница 362: ...thods for querying and setting the IP address of the iBMC management network port in the basic input output system BIOS Methods for querying and setting the IP address of the iBMC management network port on the LCD Table 9 1 lists the default IP addresses of the iBMC management network ports Table 9 1 Default IP addresses Product Type Default IP Address Server in single system mode 192 168 2 100 S...

Страница 363: ... or French keyboard The default BIOS password is Huawei12 for the American keyboard Huqzei é34 for the French keyboard and Huawei12 for the English keyboard When entering the BIOS password on the remote virtual console If the keyboard type configured in the OS is the same as the actual keyboard type enter the password by using the actual keyboard If the keyboard type configured in the OS is differ...

Страница 364: ... configuration and press Enter The BMC network configuration screen is displayed as shown in Figure 9 3 Figure 9 3 BMC network configuration RH8100 V3 Server User Guide 9 Common Operations Issue 30 2019 12 19 Copyright Huawei Technologies Co Ltd 354 ...

Страница 365: ...tting screen is displayed as shown in Figure 9 4 Figure 9 4 Setting Step 2 Set the IP address 1 Click the Mgmt Port tab The Mgmt Port screen is displayed as shown in Figure 9 4 2 Set the IP address of the management network port based on the parameter information described in Table 9 2 The soft keyboard is displayed after you click the text box You can use the soft keyboard to set the IP address o...

Страница 366: ...IP address of the management network port only after the DHCP function is disabled Value ON and OFF means DHCP function is enabled means DHCP function is disabled Setting method Tap to enable the DHCP function Tap to disable the DHCP function OFF RH8100 V3 Server User Guide 9 Common Operations Issue 30 2019 12 19 Copyright Huawei Technologies Co Ltd 356 ...

Страница 367: ...mbers Each set is separated by period The value ranges from 0 to 255 Setting method use the soft keyboard 192 168 30 126 Subnet Mask Indicates the subnet mask of the management network port Setting method use the soft keyboard 255 255 255 0 Default GateWay Indicates the gateway address of the management network port Setting method use the soft keyboard 192 168 30 1 IPv6 RH8100 V3 Server User Guide...

Страница 368: ...the management network port only after the DHCP function is disabled Value ON and OFF means DHCP function is enabled means DHCP function is disabled Setting method Tap to enable the DHCP function Tap to disable the DHCP function OFF RH8100 V3 Server User Guide 9 Common Operations Issue 30 2019 12 19 Copyright Huawei Technologies Co Ltd 358 ...

Страница 369: ...into eight sets Each set has four hexadecimal numbers Each set is separated by colon The value ranges from 0 to 9 and a to f Setting method use the soft keyboard 2001 1 174 Prefix Length Indicates the type of IPv6 address The default value is 64 indicating the subnet in the Local Area Network LAN Setting method use the soft keyboard 64 RH8100 V3 Server User Guide 9 Common Operations Issue 30 2019 ...

Страница 370: ...equired software versions Ensure that the local PC meets the following networking conditions The local PC is connected to the iBMC management network port on the server by using a network cable The IP addresses of the local PC and the iBMC management network port are on the same network segment Table 9 3 Software requirements for the local PC OS Browser JRE Windows 7 32 bit Windows 7 64 bit Intern...

Страница 371: ...4 0 Windows Server 2012 64 bit Internet Explorer 10 0 to 11 0 JRE 1 7 U45 JRE 1 8 U45 JRE 1 8 U144 Mozilla Firefox 39 0 to 54 0 Google Chrome 21 0 to 44 0 Red Hat 6 0 64 bit Mozilla Firefox 39 0 to 54 0 JRE 1 7 U45 JRE 1 8 U45 JRE 1 8 U144 MAC X v10 7 Safari 8 0 JRE 1 7 U45 JRE 1 8 U45 JRE 1 8 U144 Mozilla Firefox 39 0 to 54 0 To download the JRE of a required version visit http www oracle com tec...

Страница 372: ...anagement network port is planned as follows In single system mode the RH8100 V3 has only one iBMC management network port IP address To log in to the iBMC WebUI enter the IP address In dual system mode both system A and system B of the RH8100 V3 have an iBMC management network port IP address To log in to the iBMC WebUI of system A enter the IP address of system A To log in to the iBMC WebUI of s...

Страница 373: ...ke the names differ from the network port names of any external NIC Ensure to meet the following conditions The RH8100 V3 is in dual system mode The network ports on the internal NIC BCM5720 have been enabled in the BIOS For details see Miscellaneous Configuration in the Huawei Server Brickland Platform BIOS Parameter Reference The RH8100 V3 is powered on You have logged in to the command line int...

Страница 374: ...the ifconfig a command to list all network ports In the command output ethX indicates a network port name 3 Run the ethtool i ethX command to query the value of bus info for each network port In the command ethX is a network port name queried in step 2 Compare the values of bus info queried in step 1 with those queried in step 3 If two values of bus info are the same the corresponding ethX is a ne...

Страница 375: ...information eth86 and eth87 are the network port names of the internal NIC Change them as required SUBSYSTEM net ACTION add ID 0000 07 00 0 IMPORT lib udev rename_netiface k eth86 SUBSYSTEM net ACTION add ID 0000 07 00 1 IMPORT lib udev rename_netiface k eth87 RH8100 V3 Server User Guide 9 Common Operations Issue 30 2019 12 19 Copyright Huawei Technologies Co Ltd 365 ...

Страница 376: ... V3 6 After the RH8100 V3 restarts Querying the Network Port Names of the Internal NIC again and check that the network port names are successfully changed RH8100 V3 Server User Guide 9 Common Operations Issue 30 2019 12 19 Copyright Huawei Technologies Co Ltd 366 ...

Страница 377: ...he following preparations before contacting Huawei technical support Collecting Fault Information You need to collect the following information Your company name and detailed address Contact name and telephone number Time when the fault occurred Fault symptom Device type and software version Measures taken after the fault occurred and results Fault severity and expected rectification deadline Prep...

Страница 378: ...rning about products Huawei Enterprise Support Community Servers for learning and discussion News For notices about product life cycles warnings and updates visit Support Bulletins Product Bulletins Cases Learn about server applications at Intelligent Computing Case Library The Intelligent Computing Product Case Query Assistant is available only to Huawei partners and Huawei engineers Huawei Techn...

Страница 379: ... Contact technical support at your local Huawei office RH8100 V3 Server User Guide 10 Obtaining Help Issue 30 2019 12 19 Copyright Huawei Technologies Co Ltd 369 ...

Страница 380: ...inboard It is usually used on a device that requires high space utilization E Ethernet A baseband local area network LAN architecture developed by Xerox Corporation by jointly with Intel and DEC Ethernet uses the Carrier Sense Multiple Access Collision Detection CSMA CD access method and allows data transfer over various cables at 10 Mbit s The Ethernet specification is the basis for the IEEE 802 ...

Страница 381: ...n RAID array provides higher storage and redundancy performance than a single hard disk redundan cy The ability of a system to have a backup device automatically take over services from a failed device S SEL Stands for system event log A nonvolatile storage area and associated interfaces for storing system platform events for fault diagnosis and system recovery server A special computer that provi...

Страница 382: ...nt in position U16 on a front I O module FioInlet R Temp Temperature on the right of the air intake vent of a front I O module Component in position U52 on a front I O module FioInlet L Temp Temperature on the left of the air intake vent of a front I O module Component in position U54 on a front I O module LedBoard Temp Indicator board temperature Left mounting ear FANN F Speed Fan speed Front Fan...

Страница 383: ...e N indicates the fan module ID The value ranges from 1 to 5 FANN R Status Fan fault status Rear FANN Presence Fan presence status Component in position U6028 on the HFC N indicates the fan module ID CPUN Status CPU status including the installation status thermtrip CAT error BIST and disabled CPU N indicates the CPU ID The value ranges from 1 to 8 CPUN QPI Link Quick Path Interconnect QPI bus err...

Страница 384: ...atus of the MISC cable to hard disk backplane C This sensor exists when a 24 disk backplane is configured Bkp MISC Cable Connection status of the MISC cable to the hard disk backplane This sensor exists when an 8 disk backplane is configured RAIDN Temp RAID controller card temperature This sensor is available except for the LSI SAS2308 RAID controller card CPUN MEM Temp CPU DIMM temperature DIMM c...

Страница 385: ...imeOut Power on timeout PwrCap Status Power capping status PortN Link Down NIC1NIC network port link status K1GPUN Temp GPU temperature K2GPUN Temp K10GPUN Temp K20XGPUN Temp K20CGPUN Temp K20MGPUN Temp K40MGPUN Temp M2090GPUN Temp MEM Brd Config Mixed installation of memory risers memory board modules CPU Brd Config Mixed configuration of CPU boards No SD Card SD card status RH8100 V3 Server User...

Страница 386: ...vent SEL Status SEL full or clearing events Op Log Full Operation log full or clearing events Sec Log Full Security log full or clearing events CPU NUM Config The number of CPUs does not meet the requirement CPU Match The CPU type does not match HPC Match The type of the HPC1 is different from that of the HPC2 HPCN Type The HPC type does not match the CPU board or CPU SSD DiskN Temp SSD Temperatur...

Отзывы: