5
2
Requirements for Installing a Chassis and Mounting Ears
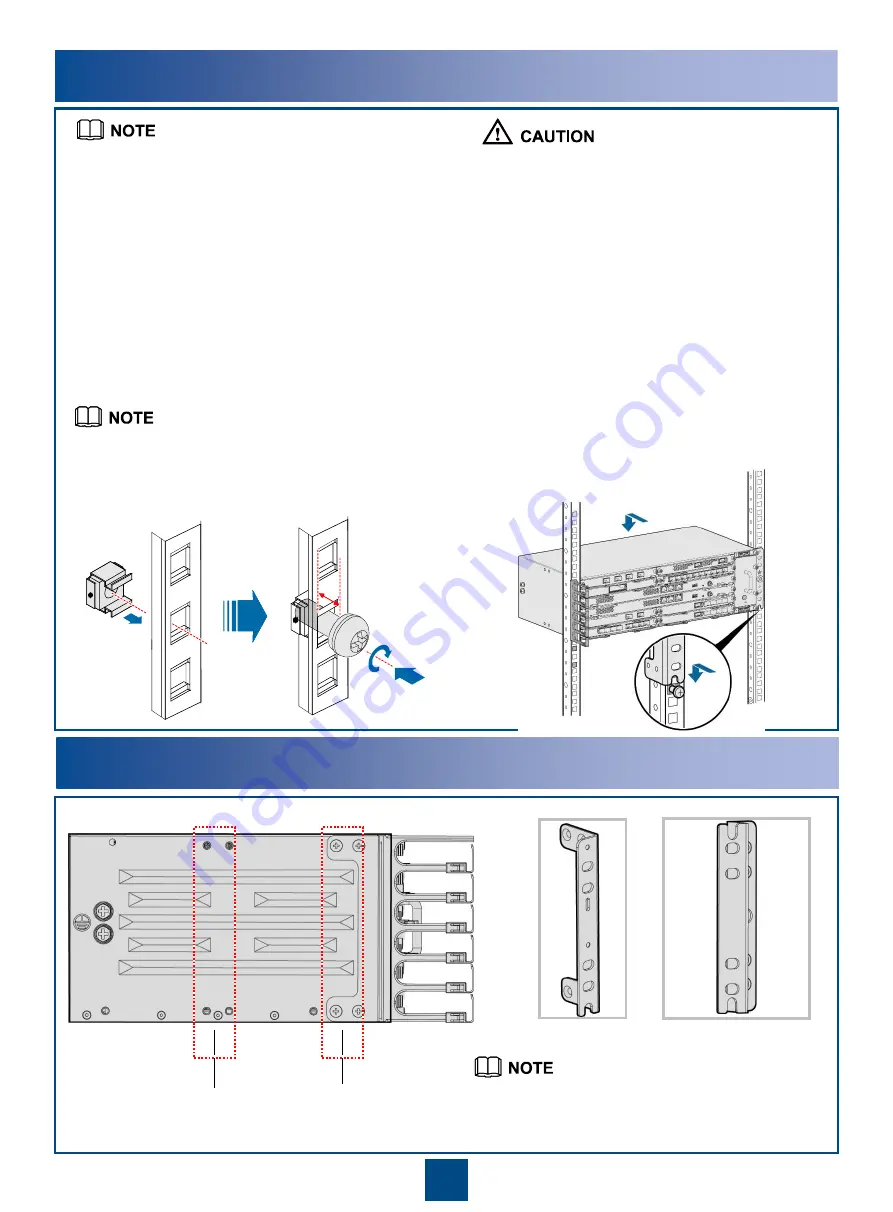
1. Mount M6 screws into the bottom floating nuts in the columns in the
cabinet, and reserve sufficient space between each M6 screw and the
column for installing a mounting ear. Ensure that each M6 screw is
inserted into the floating nut enough to prevent the chassis from falling.
The device must be installed in an ETSI cabinet or a standard 19-inch cabinet. The cabinet
may be installed on an ESD floor or a concrete floor. For details about how to install a
cabinet, see the
Cabinet Installation Guide
delivered with a cabinet.
Huawei A63B cabinet is recommended. If customers choose to purchase cabinets by
themselves, the cabinets must meet the following requirements:
1.19- or 21-inch cabinet with a depth of greater than or equal to 300 mm.
2.The cabling space in front of the cabinet complies with the cabling space requirements of
boards. If a board requires optical modules or attenuators with a puller, ensure that sufficient
space is available for routing optical fibers. It is recommended that the distance between the
cabinet door and the front panel of the board be greater than or equal to 120 mm (4.72 in.)
in the case of a convex door or open rack.
3.The device is designed with left-to-right airflow. Therefore, leave a minumum space of 75
mm on both the left and right sides of the cabinet to ensure good ventilation.
4.The porosity of each cabinet door must be greater than 50%, meeting heat dissipation
requirements of devices.
5.The cabinet has installation accessories, such as guide rails, floating nuts, and screws.
6.The cabinet has a ground terminal to connect to the device.
7.The cabinet has a cable outlet on the top or at the bottom for overhead or underfloor
cabling.
8.For cabinets with left-to-right air channels, such as open racks, installing cabinets side by
side may cause cascaded heating. Therefore, you are advised not to install cabinets with
left-to-right air channels side by side. If side-by-side installation cannot be avoided, it is
recommended that the distance between cabinets be at least 500 mm (19.67 in.).
2. Place the chassis into the cabinet such that the
mounting ears fit onto the M6 screws. Then, tighten
the M6 screws to secure the chassis to the columns.
The device can be installed in a cabinet without guide rails.
To install a chassis in a standard 19-inch cabinet, use
only pre-assembled mounting ears. To install a chassis in
an ETSI cabinet, use both pre-assembled and transit
mounting ears.
3
Introduction to Mounting Ears and Their Positions
Position for a mounting ear if
the chassis is installed in an
ETSI cabinet with middle
columns
Position for a mounting ear if the
chassis is installed in an ETSI
cabinet with front columns or in a
standard 19-inch cabinet
ETSI transit mounting
ear
Mounting ear pre-
assembled on a chassis
•
When installing devices, ensure that the total heat
consumption of all devices in the cabinet is less than or
equal to the heat dissipation capability of the cabinet.
•
To prevent heat dissipation from being affected by air
return, devices must be installed at an interval of 2 U or
more in the cabinet. In addition, the middle-column
cabinets support device stacking.
•
Ensure that heat dissipation holes on the panel are not
blocked.
•
When the chassis is installed together with other
equipment in the same cabinet, do not install the
chassis near the air exhaust vent of other equipment.
•
Determine whether the air exhaust vent affects adjacent
devices to avoid high temperature of adjacent devices.


