background image

N2000H V3 Appliance 
User Guide 

2 Installing and Removing the N2000H V3 


Issue 04 (2018-11-06) 

Huawei Proprietary and Confidential                                     

Copyright © Huawei Technologies Co., Ltd. 

33 


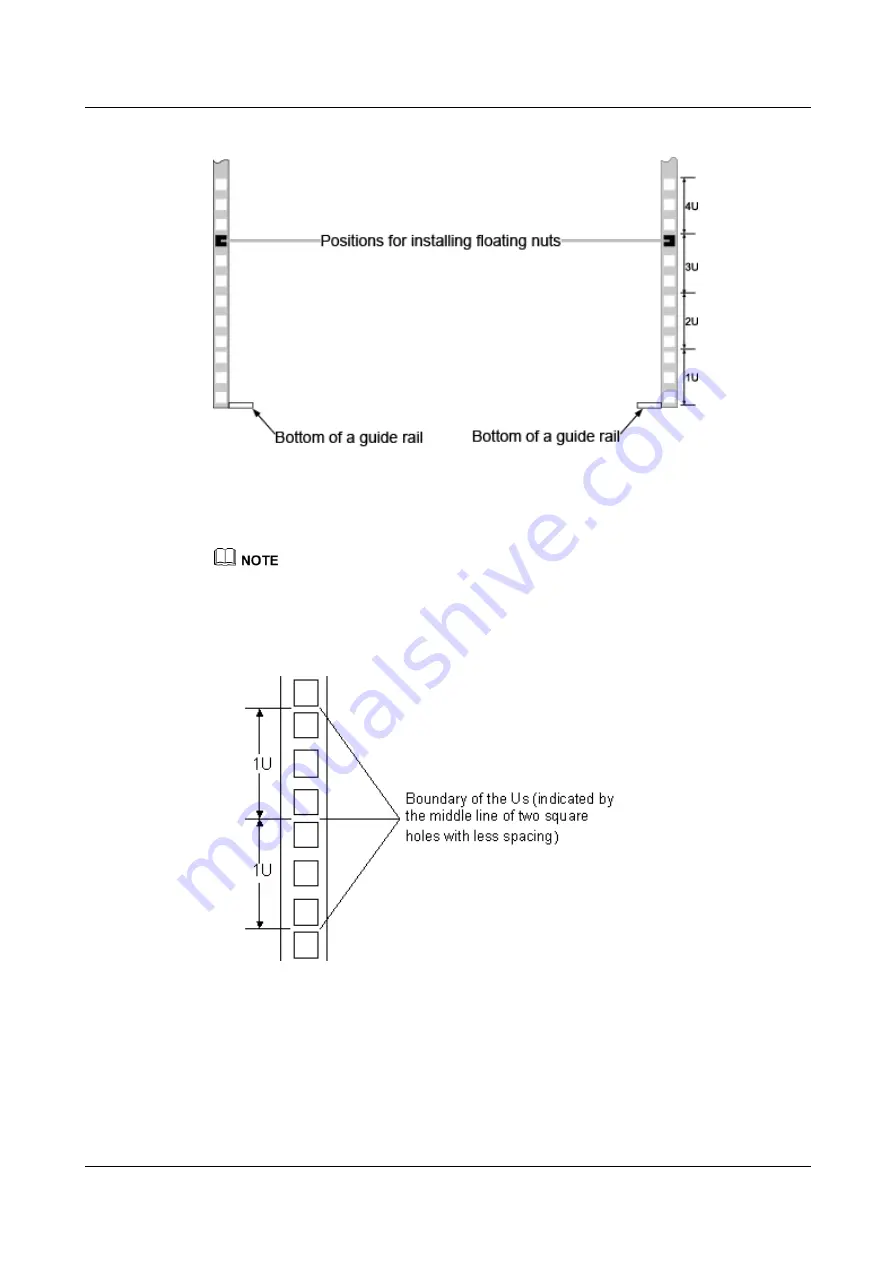
Figure 2-1


Positions for installing floating nuts 


Step 2


Install floating nuts. 

1.


Determine the position for installing a floating nut based on the installation plan. 


The floating nuts and screws are used together, to tighten the screws. 

The middle of two adjacent square holes with small spacing is the boundary of two Us. Se

Figure 2-2

The boundary between Us is used as the reference for calculating device installation space. 

Figure 2-2


Spacing of 1 U on a guide rail of a rack 


2.


Fasten one end of a floating nut to the installation hole in a guide rail at the front of the 
rack. See 

Figure 2-3

. 

Содержание N2000H V3

Страница 1: ...N2000H V3 Appliance V100R003 User Guide Issue 04 Date 2018 11 06 HUAWEI TECHNOLOGIES CO LTD ...

Страница 2: ...e customer All or part of the products services and features described in this document may not be within the purchase scope or the usage scope Unless otherwise specified in the contract all statements information and recommendations in this document are provided AS IS without warranties guarantees or representations of any kind either express or implied The information in this document is subject...

Страница 3: ...ls that may be found in this document are defined as follows Symbol Description Indicates an imminently hazardous situation which if not avoided will result in death or serious injury Indicates a potentially hazardous situation which if not avoided could result in death or serious injury Indicates a potentially hazardous situation which if not avoided may result in minor or moderate injury Indicat...

Страница 4: ...lative The latest document issue contains all changes made in previous issues Issue 01 2015 07 25 This issue is the first official release Issue 02 2015 08 07 Add the security policy and the maintenance policy of the system for the appliance Issue 03 2017 07 06 Delete the support for the Virtualization Hyper V Add the note about the dis support about the third party software or applications Issue ...

Страница 5: ...and Removing the N2000H V3 29 2 1 Installation Overview 29 2 2 Unpacking the Chassis 30 2 3 Installing the N2000H V3 31 2 3 1 Installing the N2000H V3 by Using L Shaped Guide Rails 32 2 3 2 Installing the N2000H V3 by Using Adjustable Guide Rails 35 2 3 3 Installing the N2000H V3 on Holding Rails 39 2 4 Connecting External Cables 46 2 4 1 Connecting Cables to a Mouse Keyboard and VGA Port 46 2 4 2...

Страница 6: ...er Groups 94 4 7 2 Configuring Sharing Features 96 4 7 2 4 Configuring a CIFS Share 96 4 7 2 5 Configuring an NFS Share 99 4 7 2 6 Configuring an FTP Share 102 4 7 2 7 Configuring an HTTP Share 104 4 7 3 Configuring Value Added Features 106 4 7 3 8 Configuring Deduplication 106 4 7 3 9 Configuring the iSCSI Target Server 107 4 7 3 10 Configuring BranchCache Hosted Cache Mode 110 4 7 3 11 Configuri...

Страница 7: ... the Riser Card 159 7 13 Installing a Riser Card 161 7 14 Removing a PCIe Card 163 7 14 1 Removing a PCIe Card from the Riser Card 163 7 14 2 Removing a PCIe Card from the Mainboard 165 7 15 Installing a PCIe Card 166 7 15 1 Installing a PCIe Card on the Riser Card 166 7 15 2 Installing a PCIe Card on the Mainboard 168 7 16 Removing a TPM 169 7 17 Installing a TPM 171 7 18 Removing a USB Flash Dri...

Страница 8: ...Installing a Front Mounting Ear Plate 236 8 Troubleshooting Guide 239 8 1 Troubleshooting Process Overview 239 8 2 Troubleshooting Preparations 240 8 3 Collecting Fault Information 241 8 4 Clearing an Alarm 243 8 5 Identifying a Fault 243 8 6 Alarm Information 245 8 6 1 Alarm Syntax 246 9 Common Operations 247 9 1 Querying and Setting the IP Address of the Management Network Port 247 9 2 Logging I...

Страница 9: ... Huawei Technologies Co Ltd viii A How to Obtain Help 267 A 1 Preparations For Contacting Huawei 267 A 1 1 Collecting Troubleshooting Information 267 A 1 2 Making Debugging Preparations 268 A 2 How to Use the Document 268 A 3 How to Obtain Help from Website 268 A 4 Ways to Contact Huawei 268 B Glossary 269 ...

Страница 10: ...topic describes the indicators and buttons on the N2000H V3 1 5 Physical Structure This topic describes the N2000H V3 components 1 6 Mainboard Layout This topic describes the ports on the N2000H V3 mainboard 1 7 Internal Cabling This topic describes the internal cabling rules for your reference 1 8 Logical Structure This topic describes the logical structure of the N2000H V3 1 9 RAS Features This ...

Страница 11: ...dely used in a variety of industries such as media and entertainment finance and public security Table 1 1 lists five configurations supported by the N2000H V3 Table 1 1 N2000H V3 configurations Configura tion Number of Hard Disks Supported RAID Controller Card Configuration CPU Configurati on Configurati on 1 24 front 3 5 inch SAS HDDs SATA HDDs or SSDs 12 rear 3 5 inch SAS HDDs SATA HDDs or SSDs...

Страница 12: ...ct Overview Issue 04 2018 11 06 Huawei Proprietary and Confidential Copyright Huawei Technologies Co Ltd 3 Figure 1 1 N2000H V3 1 2 Appearance This topic describes the N2000H V3 panels Front Panel Figure 1 2 shows the N2000H V3 front panel ...

Страница 13: ...t 3 Hard disk fault indicator 4 Hard disk active indicator 5 Hard disks numbered 0 to 23 from top down and from left to right 6 Fault diagnosis LED 7 Health indicator 8 UID button indicator 9 Power button indicator 10 Label including ESN label Rear Panel Figure 1 3 shows the N2000H V3 rear panel Figure 1 3 N2000H V3 rear panel 1 Rear hard disk 2 Hard disk fault indicator 3 Hard disk active indicat...

Страница 14: ...e 2 supports only one riser card if the Appliance in dual CPU configuration is not equipped with rear hard disks One riser card provides two or three PCIe slots You can configure a GE NIC in position 16 in Figure 1 3 The rear hard disks in position 17 shown in Figure 1 3 are numbered as follows Numbered 24 to 35 from top down and from left to right when the N2000H V3 is equipped with one RAID cont...

Страница 15: ...port is connected to a USB device NOTICE Before connecting to an external USB device check that the USB device operates properly AAppliance may fail if it is connected to an abnormal USB device Table 1 3 Ports on the rear panel Port Type Quantity Description VGA port DB 15 1 The port is connected to a terminal such as a monitor or KVM USB port USB3 0 2 The USB port is connected to a USB device NOT...

Страница 16: ... and Buttons This topic describes the indicators and buttons on the N2000H V3 You can observe the indicators to determine the status of the N2000H V3 Table 1 4 describes the indicators and buttons on the N2000H V3 front panel Table 1 4 Indicators and buttons on the front panel Silk Screen Meaning Color State Description Fault diagnosis digital tube The Appliance is operating properly Error Code A ...

Страница 17: ...d You can hold down the UID button for 4 to 6 seconds to reset iBMC Health indicator Red and green Steady green The Appliance is operating properly Blinking red at 1 Hz A major alarm is generated Blinking red at 5 Hz A critical alarm is generated Hard disk active indicator Green Off The hard disk is not detected or is faulty Blinking green Data is being read from written to the hard disk or synchr...

Страница 18: ...2000H V3 rear panel Table 1 5 Indicators on the rear panel Indicator Color State Data transmission status indicator Orange Off No data is being transmitted Blinking Data is being transmitted Connection status indicator Green Steady green The port is properly connected Off The port is not in use UID indicator Blue Steady on The Appliance is being located Off The Appliance is not being located PSU i...

Страница 19: ...isks Steady green The hard disk is inactive Hard disk fault indicator Yellow Off The hard disk is operating properly or hard disks cannot be detected in the RAID group Blinking yellow The hard disk is being located or the RAID is being reconstructed Steady yellow The hard disk is not detected or is faulty 1 5 Physical Structure This topic describes the N2000H V3 components Figure 1 5 shows the N20...

Страница 20: ... Rear hard disk module 2 I O module 2 corresponding to CPU 2 3 PSU 4 LOM 5 PCIe card 6 RAID controller card 7 TPM 8 DIMM 9 Heat sink 10 CPU 11 Mainboard 12 PSU backplane 13 Hard disk 14 Rear hard disk backplane for 12 disks 15 Chassis 16 Air duct 17 Fan module 18 Front hard disk backplane Table 1 6 describes the N2000H V3 components Table 1 6 Components No Compone nt Description ...

Страница 21: ...D controller card The N2000H V3 supports the LSISAS3108 controller card which support multiple RAID levels RAID level migration and RAID configuration memory The supported RAID controller cards are described as follows LSISAS3108 SR430C 2 GB Supports RAID 0 1 10 5 50 6 and 60 Provides a supercapacitor for power off protection Supports a maximum of 32 hard disks LSISAS3108 SR630C 1 GB 2 GB Supports...

Страница 22: ...ides CPU sockets DIMM slots and PCIe slots and integrates basic components such as the BIOS chip and Platform Controller Hub PCH chip C612 The system mainboard integrates the display chip and provides 32 MB display memory The maximum resolution is 1920 x 1200 at 60 Hz with 16 M colors 12 PSU backplane The backplane connects PSUs to the mainboard 13 Hard disk The N2000H V3 uses hot swappable hard d...

Страница 23: ...pic describes the ports on the N2000H V3 mainboard Figure 1 6 and Figure 1 7 show the ports on the N2000H V3 mainboard Figure 1 6 Mainboard layout dual CPU configuration 1 Serial port J55 COM CONN 2 VGA port J54 3 Management network port J33 4 USB 3 0 port 2 J39 5 USB 3 0 port 1 J40 6 UID button indicator 7 PCIe x8 slot J49 X8 PCIE SLOT HH HL 8 PCIe x8 slot J50 X8 PCIE SLOT ...

Страница 24: ...ont hard disk backplane power connector J30 PWR CONN1 20 Front hard disk backplane signal connector J1003 HDD BP CONN 21 Left mounting ear connector J42 22 SATA SATADOM 1 J37 23 SATA SATADOM 2 J38 24 PSU backplane connector J31 25 Rear hard disk backplane power connector 2 J29 PWR CONN3 26 TPM CONN J35 27 Dual SD card mezz module J57 SD BOARD 28 Riser card slot J3 J1005 1 7 Internal Cabling This t...

Страница 25: ...oard 2 SAS HD cable Port B Port B for connecting the front hard disk backplane to the RAID controller card on the mainboard 3 SAS HD cable one into two cable for connecting the front hard disk backplane J31 rear port to the rear hard disk backplane J3 for two disks 4 Signal cable for connecting the front hard disk backplane J35 to the mainboard J42 Signal cables for connecting the rear hard disk b...

Страница 26: ...ting the rear hard disk backplane for 12 disks to the front hard disk backplane 3 SAS cable Port C Port C for connecting the rear hard disk backplane for 12 disks to the front hard disk backplane 4 Signal cable for connecting the rear hard disk backplane J1 for 12 disks to the front hard disk backplane J36 The rear hard disk backplane for 12 disks is connected to the standard RAID controller card ...

Страница 27: ...for connecting the rear hard disk backplane for 12 disks to the standard RAID controller card in a PCIe slot 2 SAS cable Port B Port B for connecting the rear hard disk backplane for 12 disks to the standard RAID controller card in a PCIe slot 3 Signal cable for connecting the rear hard disk backplane J1 for 12 disks to the front hard disk backplane J36 Storage Power Cabling Power cables to the fr...

Страница 28: ...backplane for two disks 1 Power cable for connecting the rear hard disk backplane J1 BP PWR for two disks to the mainboard J28 PWR CONN2 2 Power cable for connecting the rear hard disk backplane J1 BP PWR for two disks to the mainboard J29 PWR CONN3 3 Power cable for connecting the front hard disk backplane J61 POWER to the PSU backplane J4 Power cable for connecting the rear hard disk backplane f...

Страница 29: ...idential Copyright Huawei Technologies Co Ltd 20 Figure 1 11 Power cable for connecting the rear hard disk backplane J24 POWER for 12 disks to the mainboard J30 PWR CONN1 Front Mounting Ear Cabling Cables for connecting the front mounting ears on the left and right of the N2000H V3 to the mainboard ...

Страница 30: ...ath Interconnect QPI buses which provide the maximum transmission speed of 9 6 GT s Figure 1 14 shows the logical structure of the N2000H V3 in dual CPU configuration The N2000H V3 in single CPU configuration supports only one Intel Xeon E5 2600 v3 Haswell EP series CPU and eight DDR4 DIMMs Figure 1 15 shows the logical structure of the N2000H V3 in single CPU configuration The CPUs connect to two...

Страница 31: ...d by the N2000H V3 Table 1 7 describes the RAS features supported by the N2000H V3 You can configure these features to improve Appliance RAS For details about how to configure RAS features see the HUAWEI Appliance Grantley Platform BIOS Parameter Reference Table 1 7 RAS features Mod ule Feature Description CPU Corrected machine check interrupt CMCI This feature corrects error triggered interrupts ...

Страница 32: ...s feature optimizes data stream distribution and reduces the error possibility to improve the reliability of data streams in the memory and the capability to detect address errors PCIe PCIe advanced error reporting This feature improves Appliance serviceability QPI Intel QPI link level retry This feature provides a retry mechanism upon errors to improve QPI reliability Intel QPI protocol protectio...

Страница 33: ...m serviceability BIOS abstraction layer for error handling The basic input output system BIOS processes errors and reports the error information to the OS and iBMC in compliance with specifications to improve system serviceability BIOS based predictive failure analysis PFA The BIOS provides physical unit information for DIMM errors and the OS traces and predicts errors and isolates error memory pa...

Страница 34: ...t Intel C612 DIMM Dual CPU configuration up to 16 DDR4 DIMM slots 8 DIMMs per CPU for installing either RDIMMs or LRDIMMs single CPU configuration up to eight DDR4 DIMM slots for installing either RDIMMs or LRDIMMs 16 x 16 GB RDIMMs for two CPUs with a maximum memory capacity of 256 GB Maximum memory speed 2133 MHz Memory protection technologies Error Checking and Correction ECC memory mirroring S...

Страница 35: ...o 3 5 inch hard disk slots Port Two USB 2 0 ports Two USB 3 0 ports one DB15 VGA port one DB9 serial port and one RJ45 system management port on the rear panel One internal USB 3 0 port and two Mini SSD SATADOM ports Fan module Four hot swappable fan modules tolerating the failure of a single fan PSU Two hot swappable PSUs are in redundancy mode 750 W AC Platinum PSU supporting 240 V HV DC System ...

Страница 36: ... Rated input voltage AC PSUs 100 V to 240 V AC DC PSUs 48 V to 60 V DC 240 V HV DC PSUs 192 V to 288 V DC 380 V HV DC PSUs 260 V to 400 V DC NOTE The recommended current specification for the external power circuit breaker connected to the Appliance is 32 A Temperature Operating temperature 5 C to 40 C 41 F to 104 F Storage temperature 40 C to 65 C 40 F to 149 F Temperature change rate 20 C h 36 F...

Страница 37: ... LWAd and declared average bystander position A weighted sound pressure levels LpAm when the Appliance is operating in a 23 C 73 4 F ambient environment Noise emissions are measured in accordance with ISO 7999 ECMA 74 and declared in accordance with ISO 9296 ECMA 109 Idle LWAd 48 2 Bels LpAm 65 5 dBA Operating LWAd 53 0 Bels LpAm 70 3 dBA NOTE The actual sound levels generated when the Appliance i...

Страница 38: ... the N2000H V3 This topic describes how to install the N2000H V3 2 4 Connecting External Cables This topic describes how to connect cables for the Appliance 2 5 Removing the N2000H V3 This topic describes how to remove the N2000H V3 2 1 Installation Overview This topic describes the checking before the installation and the rules for installing the N2000H V3 For details about the safety instruction...

Страница 39: ...dity Requirements Deploy temperature control devices all year long in any climates In dry areas use humidifiers to ensure the ambient humidity In areas with high humidity use dehumidifiers Table 2 1 Temperature and humidity requirements in the equipment room Item Description Temperature 5 C to 40 C 41 F to 104 F Humidity 8 RH to 90 RH non condensing Installation Rules The N2000H V3 is 4 U high and...

Страница 40: ...hesive tape is unsealed fill in the Cargo Problems Feedback Form Step 2 When using a paper knife to unpack a packing case ensure that the knife edge is of a proper protrusion to avoid hurting hands or damaging the device in the packing case Use a paper knife to cut the pressure sensitive adhesive tape on the packing case and open the packing case Step 3 Based on Table 2 2 check that the components...

Страница 41: ...stalled You are advised to use the guide rails delivered with the Appliance to ensure even loading Impact on the System This operation has no adverse impact on the system Prerequisites Conditions Make the following preparations before installing the N2000H V3 A rack is properly installed The installation environment meets the requirements specified in 2 1 Installation Overview Data Data preparatio...

Страница 42: ...alling a floating nut based on the installation plan The floating nuts and screws are used together to tighten the screws The middle of two adjacent square holes with small spacing is the boundary of two Us See Figure 2 2 The boundary between Us is used as the reference for calculating device installation space Figure 2 2 Spacing of 1 U on a guide rail of a rack 2 Fasten one end of a floating nut ...

Страница 43: ... 3 Installing a floating nut 3 Fasten the upper end of the floating nut to the mounting bar at the front of the rack by using the floating nut mounting bar Step 3 Install L shaped guide rails 1 Place a guide rail horizontally in the planned position and keep the guide rail contact with the mounting bars in the rack See Figure 2 4 Figure 2 4 Installing an L shaped guide rail ...

Страница 44: ... Place the N2000H V3 on the guide rails and push it into the rack as shown in Figure 2 5 Figure 2 5 Installing the N2000H V3 3 When the two mounting ears on the N2000H V3 contact the mounting bars on the rack tighten the captive screws on the mounting ears to secure the N2000H V3 End 2 3 2 Installing the N2000H V3 by Using Adjustable Guide Rails Operation Scenario The adjustable guide rails apply ...

Страница 45: ...alling a floating nut based on the installation plan The floating nuts and screws are used together to tighten the screws The middle of two adjacent square holes with small spacing is the boundary of two Us See Figure 2 7 The boundary between Us is used as the reference for calculating device installation space Figure 2 7 Spacing of 1 U on a guide rail of a rack 2 Fasten one end of a floating nut ...

Страница 46: ...ack See step 1 in Figure 2 9 The three holes in each mounting ear of a guide rail should be within a 1 U mark 2 Insert the plug into the position on the top of the mounting ear to secure the guide rail See step 2 in Figure 2 9 Bottom square hole on the front side of the guide rail Top square hole on the rear side of the guide rail 3 Optional Install an M6 screw in the first square hole at the rear...

Страница 47: ...ry and Confidential Copyright Huawei Technologies Co Ltd 38 Figure 2 9 Installing an adjustable guide rail Step 4 Installing the N2000H V3 1 At least four persons lift the N2000H V3 on two sides and move it to the rack 2 Place the N2000H V3 on the guide rails and push it into the rack as shown in Figure 2 10 ...

Страница 48: ...3 3 Installing the N2000H V3 on Holding Rails Context Holding rails apply to the rack where the distance between the front and rear mounting bars is 609 mm to 914 mm Procedure Step 1 Install the front end and rear end of the holding rail 1 Hold down the plate on the front end of the holding rail and pull out the hook See steps 1 and 2 in Figure 2 11 2 Insert the positioning pins on the rear end of...

Страница 49: ...Copyright Huawei Technologies Co Ltd 40 Figure 2 11 Installing the front end and rear end of the holding rail Step 2 Install the Appliance 1 Pull out an inner rail from a holding rail until the inner rail cannot move push the release button upward and remove the inner rail from the holding rail See steps 1 and 2 in Figure 2 12 ...

Страница 50: ...06 Huawei Proprietary and Confidential Copyright Huawei Technologies Co Ltd 41 Figure 2 12 Removing an inner rail 2 Align the inner rail with the fastening screw on one side of the Appliance and push the inner rail forward so that the inner rail is secured to the Appliance See Figure 2 13 ...

Страница 51: ...ht Huawei Technologies Co Ltd 42 Figure 2 13 Installing an inner rail 3 Use the same method to install another inner rail on the opposite side of the Appliance 4 Lift the Appliance align the inner rails with the holding rails and push the Appliance into the rack See Figure 2 14 At least four persons are required to lift the Appliance ...

Страница 52: ... 04 2018 11 06 Huawei Proprietary and Confidential Copyright Huawei Technologies Co Ltd 43 Figure 2 14 Installing a Appliance on holding rails 5 Press the release buttons on both sides and push the Appliance into the rack until the Appliance cannot move forward See Figure 2 15 ...

Страница 53: ...emoving the N2000H V3 Issue 04 2018 11 06 Huawei Proprietary and Confidential Copyright Huawei Technologies Co Ltd 44 Figure 2 15 Pushing a Appliance into a rack 6 Tighten the captive screws on the mounting ears to secure the Appliance See Figure 2 16 ...

Страница 54: ...support lever into the outer rails on both left and right sides See step 1 in Figure 2 17 2 Insert the nail heads on the left outer rail into the holes in the outer support lever of the cabling rack and pull the cabling rack out to secure it See step 2 in Figure 2 17 3 Insert the nail heads on the left inner rail into the holes in the inner support lever of the cabling rack and pull the cabling ra...

Страница 55: ...ternal Cables This topic describes how to connect cables for the Appliance 2 4 1 Connecting Cables to a Mouse Keyboard and VGA Port Scenarios After powering on a Appliance you need to configure the basic input output system BIOS and redundant array of independent disks RAID and log in to the operating system OS Before performing these operations you need to connect cables to a mouse keyboard and v...

Страница 56: ...sing a USB to PS 2 cable Prerequisites Conditions No special condition is required for this operation Data Data preparation is not required for this operation Procedure Step 1 Connect the USB connector on the PS2 cable to the USB port on the front or rear panel of the Appliance Step 2 Connect the connectors on the other end of the PS2 cable to the keyboard and mouse Step 3 Connect the DB15 connect...

Страница 57: ...ischarge ESD wrist strap or ESD gloves used to prevent ESD damage Diagonal pliers used to trim the cable ties after binding cables RJ45 crimping tool used to make network cable connectors Network cable tester used to test the cable connectivity Multimeter used to test the resistance Hardware Use a network cable tester to check that the new network cable works properly Check that the new network ca...

Страница 58: ...ble with the bending radius no less than 4 cm 1 57 in to prevent damage to core wires Check that the cable insulation layer is not damaged Ensure that cables are routed for easy maintenance and capacity expansion Network cables must be bound to ensure proper routing Check that network cables are bound neatly and appropriately and that they are straightly stretched and close to each other Cable tie...

Страница 59: ...he same method as the existing one You can also remove all cable ties and bind all network cables again End 2 4 3 Connecting a Cable to a 10GE Port Background Information You can connect an optical fiber or SFP cable to a 10GE port You need to determine the type of cable to be connected depending on site requirements Operation Scenario Connect a cable to a 10GE port in any of the following scenari...

Страница 60: ...P cables from power cables and signal cables when laying out the cables Bend an optical fiber or SFP cable with a bending radius of at least 4 cm 1 57 in to prevent damage to core wires Ensure that the cable is intact Ensure that optical fibers or SFP cables are laid out for easy maintenance and capacity expansion Optical fibers must be bound Ensure that optical fibers are routed straightly and bo...

Страница 61: ...prietary and Confidential Copyright Huawei Technologies Co Ltd 52 Figure 2 20 Connecting an optical fiber Step 5 When you use an SFP cable 1 Remove the old SFP cable Gently push the power connector inwards and pull out the latch to remove the SFP cable See Figure 2 21 Do not directly pull out the latch ...

Страница 62: ...Co Ltd 53 Figure 2 21 Removing an SFP cable 2 Connect the new SFP cable Remove the dust proof cap of the port and insert the cable connector into the port See Figure 2 22 When you hear a click sound and the cable cannot be pulled out the connector is securely connected Figure 2 22 Connecting an SFP cable Step 6 Check that the new cable is properly connected ...

Страница 63: ...optical fibers again if necessary End 2 4 4 Connecting a USB Device Scenarios Use a USB keyboard and mouse to set parameters after logging in to the operating system OS Use a USB storage device DVD ROM drive or floppy disk drive FDD to transmit data or install an OS Prerequisites Conditions Confirm the Appliance installation position in the rack Obtain the USB device to be connected and place it n...

Страница 64: ...ich works as the system serial port by default You can set it to the iBMC serial port on the iBMC CLI As the system serial port It is used for monitoring the operating system OS status As the iBMC serial port It is used for debugging and locating a fault Prerequisites Conditions No special condition is required for this operation Data You have determined the rack number and installation position f...

Страница 65: ... Do not exert excessive force otherwise the pins in the serial port may be damaged Align the connector on the serial cable with the serial port and insert the connector into the serial port as shown in Figure 2 24 Step 2 Tighten the screws on the connector to secure the serial cable Figure 2 24 Connecting a serial cable End 2 4 6 Connecting a Power Cable Scenarios Connect a power cable for the App...

Страница 66: ...ely connected To ensure device and human safety use the dedicated power cables A power cable is used only for specified Appliances Do not use power cables for other devices Data Data preparation is not required for this operation Tools Electrostatic discharge ESD wrist strap or ESD gloves used to prevent ESD damage Procedure Connecting AC Power Cables 1 Connect the one end of the AC power cable to...

Страница 67: ...ails see Connecting DC Power Cables 5 Connect the power cable to the wiring terminal on the PSU until the power cable snaps into the spring See Figure 2 26 Connect the OT terminal on the negative power cable to the NEG wiring terminal on the PSU Connect the OT terminal on the positive power cable to the RTN wiring terminal on the PSU Connect the OT terminal on the ground cable to the ground termin...

Страница 68: ...onnections and damage to the cable insulation layer Surplus parts of the cables are rolled up and bound in a proper position in the rack Cables are straight and tidily bundled in a rack The bending radius of a cable varies according to different parts of the cable If a cable needs to bend in the middle the bending radius must be at least twice the diameter of the cable If a cable bends at the outp...

Страница 69: ...able connection checklist Item Description Power cable The power cable is correctly connected to the rear of the chassis Network cable Network cables are correctly connected to the management Ethernet ports or service Ethernet ports on the rear panel of the chassis Ground cable NOTE The N2000H V3 provides no grounding port It is grounded through the cabinet Ensure that the cabinet is properly grou...

Страница 70: ...0H V3 before it is removed Tools Electrostatic discharge ESD wrist strap or ESD gloves used to prevent ESD damage Screwdriver used to loosen the screws on the panel Hardware The spare N2000H V3 and its components are obtained Procedure Step 1 Power off the N2000H V3 Step 2 Disconnect all power cables and signal cables from the N2000H V3 Step 3 Loosen the captive screws on the N2000H V3 panel using...

Страница 71: ...stalling and Removing the N2000H V3 Issue 04 2018 11 06 Huawei Proprietary and Confidential Copyright Huawei Technologies Co Ltd 62 Step 5 Place the removed N2000H V3 on the ESD platform for maintenance for example parts replacement End ...

Страница 72: ...ow to power off the Appliance 3 1 Powering On This topic describes how to power on the Appliance Scenarios The Appliance is to be powered on after being properly installed The Appliance is to be powered on after being maintained Prerequisites Conditions The Appliance and internal components are properly installed Data You have determined the rack number and installation position for the device to ...

Страница 73: ... OK to power on the Appliance Power on the iBMC by running commands for remote management On the iBMC CLI run the ipmcset d powerstate v 1 command to power on the Appliance remotely End Verification Check the indicator status after the Appliance is powered on 3 2 Powering Off This topic describes how to power off the Appliance Scenarios The Appliance is to be powered off for maintenance The Applia...

Страница 74: ...the Appliance enter the standby state Use the keyboard mouse and monitor to shut down the Appliance operating system OS Hold down the power button on the front panel until the Appliance is powered off Power off the Appliance by running commands for remote management On the iBMC CLI run the ipmcset d powerstate v 0 command to power off the Appliance remotely The iBMC WebUI is available After loggin...

Страница 75: ... RAID Properties This topic describes how to configure RAID properties 4 4 Configuring the BIOS This topic describes how to configure the basic input output system BIOS for the N2000H V3 4 5 Changing an iBMC User Password This topic describes how to change an iBMC user password 4 6 Installing an OS This topic describes how to install an operating system OS for the N2000H V3 4 1 Configuration Overv...

Страница 76: ...ement network port Default IP address 192 168 2 100 Default subnet mask 255 255 255 0 iBMC management system login information User name and password Default user name root Default password Huawei12 BIOS Password Default password Huawei12 Administrator of the OS Password Default password Huawei12 4 1 2 Configuration Process This topic describes the process for configuring the Appliance Figure 4 1 ...

Страница 77: ...ironment PXE options of the network interface card NIC and BIOS password Changing the user password for iBMC Change the default password for the iBMC Installing an operating system OS For details see HUAWEI Appliance OS Installation Guide 4 2 Checking the N2000H V3 This topic describes how to check the N2000H V3 initial status Scenarios Log in to the iBMC WebUI or CLI to check the health status of...

Страница 78: ...tem login information User name and password Default user name root Default password Huawei12 BIOS Password Default password Huawei12 Documents For details about the CLI see the HUAWEI Rack Appliance iBMC User Guide Workflow Check the N2000H V3 by following the sequence described in Figure 4 2 Determine the checking method based on actual site requirements Figure 4 2 Process for checking the N2000...

Страница 79: ...gement network port by using a network cable iii Run Internet Explorer on the PC enter the IP address of the iBMC management network port user name and password to log in You are advised to change the default password when you log in to the iBMC for the first time For details see 4 5 Changing an iBMC User Password b View the N2000H V3 version information In the navigation tree choose Information C...

Страница 80: ...ng a network cable iii Run the Secure Shell SSH tool on the PC and enter the IP address of the iBMC management network port user name and password to log in To log in to iBMC over SSH is secure by default If the SSH service is disabled enable the SSH service on the Config Port Settings page on the WebUI of iBMC b View the N2000H V3 version information Check that the N2000H V3 versions meet the sit...

Страница 81: ...N2000H V3 iBMC ipmcget d health System in health state If the message System in health state is displayed no further action is required If an alarm is generated clear the alarm by referring to d to e d Query alarms for the N2000H V3 iBMC ipmcget d healthevents System in health state e Clear alarms by referring to the HUAWEI Rack Appliance Alarm Handling iBMC End 4 3 Configuring RAID Properties Thi...

Страница 82: ...displayed during the system startup as shown in Figure 4 6 Figure 4 6 Boot information displayed for the LSISAS3008 controller card The preceding information is for reference only The actual information may be different from the example LSISAS3108 controller card Press Ctrl R to Run MegaRAID Configuration Utility is displayed during the system startup as shown in Figure 4 7 Figure 4 7 Boot informa...

Страница 83: ...in the navigation tree choose Component Info The Component Info page is displayed 3 View the RAID controller card information as shown in Figure 4 8 Figure 4 8 Component information example The preceding information is for reference only The actual information may be different from the example Checking the Appearance LSISAS2308 controller card Figure 4 9 shows the LSISAS2308 controller cards ...

Страница 84: ...etary and Confidential Copyright Huawei Technologies Co Ltd 75 Figure 4 9 LSISAS2308 controller card LSISAS3008 controller card Figure 4 10 shows the LSISAS3008 controller cards Figure 4 10 LSISAS3008 controller card LSISAS3108 controller card Figure 4 11 shows the LSISAS3108 controller cards ...

Страница 85: ... BIOS for the N2000H V3 in remote control mode The configuration items are as follows Appliance boot mode Network drive Preboot execute environment PXE on the network interface card NIC Setting the BIOS Password For details about how to configure the BIOS see the HUAWEI Appliance Grantley Platform BIOS Parameter Reference Prerequisites Conditions The N2000H V3 is powered on You have logged in to t...

Страница 86: ... Restart the Appliance 1 Click on the menu bar on the remote virtual console For details about how to log in to the remote virtual console see 7 4 Logging In to the Remote Virtual Console 2 Select Reset The system displays Are you sure to perform this operation 3 Click Yes The Appliance restarts 4 Press Delete repeatedly when the screen shown in the following figure is displayed during the Applian...

Страница 87: ...rd is Huawei12 To ensure system security you are advised to change the default BIOS password after the first login For details see Set the BIOS password Set the Appliance boot mode 6 Choose Boot Boot Type and press Enter 7 In the displayed dialog box select Dual Boot Type or Legacy Boot Type and press Enter 8 Choose Legacy Boot Type Order and press Enter The Boot Type Order screen is displayed The...

Страница 88: ... Boot Options Set the boot option to the network 9 Select boot options that are to be configured and press or to change the boot sequence Set the first boot option to PXE The option at the top of the boot option list is the first boot option and the one at the bottom is the last boot option To move a boot option up press To move a boot option down press Configure the PXE 10 Choose Advanced PXE Con...

Страница 89: ...ht Huawei Technologies Co Ltd 80 Figure 4 15 PXE Configuration 11 Select the network port to be configured and press Enter 12 Choose Enabled from the shortcut menu and press Enter to enable the PXE function for the NIC Set the BIOS password 13 Select the Security tab The Security screen is displayed as shown in Figure 4 16 ...

Страница 90: ...ailures with wrong passwords Restart the Appliance to unlock it The supervisor password must be a string of 8 to 16 characters including special characters including spaces and at least two types of the following characters uppercase letters lowercase letters and digits A new password cannot be the same as one of the previous five passwords After the supervisor password is set the following menu i...

Страница 91: ... 4 4 Default user name and password Default User Name and Password Description User name root Password Huawei12 The default user of the iBMC belongs to the administrator group and has full rights to access all iBMC resources and perform all operations Documents The following describes how to change a user password on the iBMC WebUI For details about how to change a password on the iBMC CLI see the...

Страница 92: ...e password is to be changed Step 3 Change the password as prompted End 4 6 Installing an OS This topic describes how to install an operating system Windows Storage Server 2012 R2 for the N2000 V3 4 6 1 Envirament Preparing Step 1 Press DEL button at the appliance booting set the date and time of the BIOS to be de actual date and time And then enter F9 make the configuration of Load Optimal Default...

Страница 93: ... for the BIOS just see chapter 4 4 for reference Step 3 And then enter F10 to save the configuration and reboot the system 4 6 2 OS installation Step 1 Mount the virtual CD to load the ISO of the OS if the OS is prepared as the ISO Figure 4 19 Mount the virtual CD Step 2 Or if there is a physical DVD just attach the DVD to the USB port of the appliance Step 3 Reboot the appliance press F11 at the ...

Страница 94: ...User Guide 4 Configuring the N2000H V3 Issue 04 2018 11 06 Huawei Proprietary and Confidential Copyright Huawei Technologies Co Ltd 85 Figure 4 20 Select the DVD as the boot device Step 4 Press any key to boot from the DVD ...

Страница 95: ...N2000H V3 Issue 04 2018 11 06 Huawei Proprietary and Confidential Copyright Huawei Technologies Co Ltd 86 Figure 4 21 Boot from the DVD Figure 4 22 Windows setup Step 5 At the beginning of the installation select the language and the data time format ...

Страница 96: ...ing the N2000H V3 Issue 04 2018 11 06 Huawei Proprietary and Confidential Copyright Huawei Technologies Co Ltd 87 Figure 4 23 Select the language and other preferences Step 6 Select the Install now to continue Figure 4 24 Press the Install now ...

Страница 97: ...ng the N2000H V3 Issue 04 2018 11 06 Huawei Proprietary and Confidential Copyright Huawei Technologies Co Ltd 88 Step 7 Input the key to activate the Windows Figure 4 25 Input the key purchased Step 8 Confirm and accept the license and continue ...

Страница 98: ...g the N2000H V3 Issue 04 2018 11 06 Huawei Proprietary and Confidential Copyright Huawei Technologies Co Ltd 89 Figure 4 26 Accept the license and next Step 9 Select the custom to continue for the fresh installation Figure 4 27 Custom to install ...

Страница 99: ...and Confidential Copyright Huawei Technologies Co Ltd 90 Step 10 Select the SATA DOM as the device to install and partitioning Figure 4 28 Select the SATADOM Total size 128GB and portioning Step 11 The OS will install automatically and after the installation a reboot would be executed automatically ...

Страница 100: ...i Proprietary and Confidential Copyright Huawei Technologies Co Ltd 91 Figure 4 29 Installation is undergoing Step 12 After the reboot the password should be input Step 13 Finally the installation is completed You could press Ctrl Alt Delete to login the system Figure 4 30 Login screen ...

Страница 101: ...LUMES area Step 3 In the New Volume Wizard window the Before You Begin page is displayed by default Click Next Step 4 On the Server and Disk page select Disk1 and click Next Step 5 Set a volume size On the Size page the following parameters are displayed Available Capacity indicates the available disk space that can be allocated Minimum size indicates the minimum capacity that a volume to be creat...

Страница 102: ... is correct Then click Create to create a volume Step 10 If all configuration tasks on the Results page are in the Completed state the volume is created successfully Click Close End Result After creating a volume perform the following steps to check whether the parameters are set correctly Choose File and Storage Services Volumes from the navigation tree of the Server Manager In the VOLUMES area c...

Страница 103: ... server IIS Web Server Security Common HTTP Features FTP Server FTP Service FTP Extensibility Management Tools IIS Management Console The following features are configured for role File And Storage Services Storage Services File and iSCSI Services File Server DFS Replication DFS Namespaces Server for NFS Data Deduplication File Server Resource Manager Step 6 After checking the factory configuratio...

Страница 104: ...cription that is clear enough you can set Full name to the same value of User name department1 user Description Describes the role and rights of a newly added user For guests of department 1 to access computers or domains Password Specifies a login password for a newly added user Password 1 Confirm password Repeats the login password assigned to a newly added user Password 1 User must change passw...

Страница 105: ...e object names to select area enter the name of a local user for example department1 user Click OK End Result After configuring and adding the local user to the Users group perform the following steps to check whether parameters are set successfully Choose the Users node If the user list displayed on the right contains user department1 user the user is added successfully Choose the Groups node A l...

Страница 106: ...lect the volume or folder you want to share The share location is classified into Select by volume and Type a custom path Select by volume enables you to specify the volume you want to share In this mode the system automatically creates a shares folder in the root path on the specified volume and uses shares as the shared folder Type a custom path enables you to specify the folder you want to shar...

Страница 107: ...tification in the scenario where the capacity of a shared folder has reached the threshold Soft quota indicates that the system still allows data write after sending an email or event notification in the scenario where the capacity of a shared folder has reached the threshold Step 10 Confirm that the configuration information displayed on the Confirmation page is correct Then click Create Step 11 ...

Страница 108: ...NIX hosts to access shared folders on a server you must configure and enable the NFS sharing feature Prerequisites The hardware of the N2000 server has been installed and powered on You have logged in to Windows Storage Server 2012 Procedure Step 1 Choose File and Storage ServicesShares from the navigation tree of the Server Manager that is automatically started after a login to the operating syst...

Страница 109: ...ct all check boxes in the Keberos v5 authentication area In addition select No server authentication and Enable unmapped user access Then click Next Step 7 Set share permission If you need to set share permission for multiple clients perform the following steps for each of the clients 1 Click Add The Add Permissions windows is displayed 2 Set Host to the IP address of the client that you want to a...

Страница 110: ...ose Create Quota from the shortcut menu 5 Click Browse and set Quota Path Quota rules are applied to the folder you have selected for example shares If you do not want to set a quota restriction on the shared folder click Do not apply a quota and then click Next If you want to set a quota restriction on the shared folder click Apply a quota based on the template and select a quota template A quota...

Страница 111: ...e cat xxx txt command to view the specified file The file contents in the shared directory are displayed 6 Add and delete folders and files on the local client Then check that these changes are made accordingly in the shared directory 7 To enable the client to automatically mount the N2000 shared directory after the client is restarted run the vi etc fstab command and add 97 100 100 121 shares mnt...

Страница 112: ...er name department1 user 3 Set Permissions based on the actual service plan For example select Read and Write Step 6 Click Finish In the navigation tree of Internet Information Service IIS Manager FTP site information is generated under name of the local server Sites Step 7 Optional Set FTP IP address and domain restrictions 1 In the navigation tree of Internet Information Service IIS Manager choo...

Страница 113: ...ver mode allowing you to share and transfer information easily and quickly To enable clients running HTTP based browsers to access the shared contents on a server you must configure and enable the HTTP share feature on the server Prerequisites The hardware of the N2000 server has been installed and powered on You have logged in to Windows Storage Server 2012 Procedure Step 1 Choose Tools Internet ...

Страница 114: ...tions 1 In the navigation tree of Internet Information Service IIS Manager choose the website In the information area double click IP Address and Domain Restrictions 2 In the Actions area click Add Allow Entry to specify IP addresses that are allowed to access the website To allow a specific IP address to access the shared folder on the website click Specific IP Address and enter the IP address fo...

Страница 115: ...e Configure Data Deduplication from the shortcut menu Step 3 In the Deduplication Settings window set parameters based on your actual requirements 1 Set Deduplicate files folder than in days The default value is 5 indicating that deduplication is implemented on files stored for at least five days You are advised to keep the default value 2 Set File extensions to exclude so that deduplication is no...

Страница 116: ... 00 in weekends when the traffic is light Durati on in hours Specifies the duration for which deduplication tasks keep being carried out Set Duration in hours to 12 so that deduplication tasks keep being carried out for 12 hours until 20 00 5 Click OK End Result After configuring deduplication choose Server Manager File and Storage Services Volumes In the VOLUMES area Deduplication Rate and Dedupl...

Страница 117: ...and click Install The Results page is displayed 4 Wait until a message indicating that the installation is successful is displayed Then click Close 5 In the SERVERS area right click the local server If iSCSI Target Settings in the shortcut menu is black the iSCSI target server is added successfully 6 In the SERVICES area check that the Microsoft iSCSI Software Target service is in the Running stat...

Страница 118: ... the IP address that communicates with the iSCSI server and click OK 10 On the Enable Authentication Service page keep the default settings and click Next The Confirmation page is displayed 11 Confirm that all the information is correct and click Create The Results page is displayed 12 Wait until a message indicating that the creation is successful is displayed Then click Close Step 7 Optional Ena...

Страница 119: ... of the clients have been added to a domain and an SSL certificate is imported into the cache server Procedure Step 1 On the content server add the BranchCache role 1 Choose Dashboard Add roles and features from the navigation tree of the Server Manager that is automatically started after a login to the operating system 2 In the Add Roles and Features Wizard window the Before You Begin page is dis...

Страница 120: ... click Enabled 5 Click OK Then check that Status of Turn on BranchCache has changed to Enabled 6 Double click Set BranchCache Hosted Cache mode and click Enabled 7 Set Options to the name of the hosted cache server for example wssguroup com RH2285 121 8 Click OK Then check that Status of Set BranchCache Hosted Cache mode has changed to Enabled Step 5 Deploy an SSL certificate on the cache server 1...

Страница 121: ...ed Cache Server Uses HTTPS from the drop down list and click Next On the Predefined Rules page keep the default settings and click Next Click Allow the connection and then click Finish 5 Set Outbound Rules Right click Outbound Rules and choose New Rule from the shortcut menu Click Predefined select BranchCache Content Retrieval Uses HTTP from the drop down list and click Next On the Predefined Rul...

Страница 122: ... link utilization frequency and accelerates responses to the accesses from branches to a remote server Clients in a branch use locally cached data to decrease the traffic over WAN links The distributed cache mode is applicable to the scenario where a branch has less than 50 employees In this mode a dedicated cache server is not required Instead Windows 7 clients that work in distributed cache mode...

Страница 123: ...lick Enabled 5 In the Options area Allow hash publication only for shared folders on which BranchCache is enabled is generated by default indicating that hash values are calculated and released only for a CIFS shared folder that has the BranchCache feature enabled Keep the default settings and click OK 6 Check that Status of Hash Publication for BranchCache has changed to Enabled Step 3 On the con...

Страница 124: ...les distributed on multiple servers are presented to users as if the files reside in the same location on a network Users can organize the shared folders that reside on different computers on the same network to form a separate logical and hierarchical shared file system Prerequisites The hardware of the N2000 server has been installed and powered on You have logged in to Windows Storage Server 20...

Страница 125: ... contents in the logical folder to be stored on multiple servers for DFS mirroring purposes repeat Step 9 3 to Step 9 6 to add a shared folder on another physical server for this logical folder 8 In the Replication dialog box click Yes The Replicate Folder Wizard window is displayed Step 10 On the Replication Group and Replication Folder Name page click Next Step 11 On the Replication Eligibility ...

Страница 126: ...lick Next 1 Select the desired bandwidth from the Bandwidth drop down list for example 4Mbps 2 Click Replicate during the specified days and times and then click Edit Schedule 3 Make a detailed daily replication plan For example plan a replication between 00 00 to 06 00 from Monday to Friday and plan a replication between 08 00 to 20 00 from Saturday to Sunday Step 15 After you confirm that the pa...

Страница 127: ...irus software This topic describes how to use a common antivirus software taking OfficeScan as an example 5 3 System Patch Update This topic describes how to update the appliance system 5 1 System Security Reinforce Before shipment the Windows Storage Server 2012 R2 system of the appliance has implemented some security reinforce according to the Security Red line of the Huawei The detailed policy ...

Страница 128: ... to log security alerts Disabled Devices Allowed to format and eject removable media Administrators Prevent users from installing printer drivers Enabled Domain Member Digitally encrypt or sign secure channel data always Enabled Digitally encrypt secure channel data when possible Enabled Digitally sign secure channel data when possible Enabled Disable machine account password changes Disabled Maxi...

Страница 129: ...tOptions System CurrentControlSet Control Server Applications Software Microsoft Windows NT CurrentVersion Remotely accessible registry paths and subpaths System CurrentControlSet Control Print Printers System CurrentControlSet Services Eventlog Software Microsoft OLAP Server Software Microsoft Windows NT CurrentVersion Print Software Microsoft Windows NT CurrentVersion Windows System CurrentContr...

Страница 130: ...llow automatic administrative logon Disabled Allow floppy copy and access to all drives and all folders Disabled Shutdown Allow system to be shutdown without having to log on Disabled System Objects Require case insensitivity for non Windows subsystems Enabled Strengthen default permissions of internal system objects Enabled User Account Control Admin Approval Mode for the Built in Administrator a...

Страница 131: ...day s Minimum password length 14 character s Password complexity Enabled Store passwords using reversible encryption Disabled 3 Detailed Security Auditing Account Logon Credential Validation Success Failure Account Management Computer Account Management Success Failure Distribution Group Management Success Failure Other Account Management Events Success Failure Security Group Management Success Fa...

Страница 132: ...ystem Extension Success Failure System Integrity Success Failure 4 Event Log Settings Application Log Maximum event log size Invalid data Retain old events Disabled Security Log Maximum event log size Invalid data Retain old events Disabled Setup Log Setup Log Maximum Event Log Size Invalid data Setup Log Retain old events Disabled System Log Maximum event log size Invalid data Retain old events D...

Страница 133: ...ntication Enabled 3 Terminal Service Configuration Always prompt for password upon connection Enabled Do not allow drive redirection Enabled Do not allow passwords to be saved Enabled Set client connection encryption level High 4 Windows Components App runtime Allow Microsoft accounts to be optional Enabled Attachment Manager Do not preserve zone information in file attachments Disabled Notify ant...

Страница 134: ...cast response Domain No Apply local connection security rules Domain Yes Apply local firewall rules Domain Yes Display a notification Domain Yes Firewall state Domain On Inbound connections Domain Block Default Outbound connections Domain Allow Logging Domain Log dropped packets Domain Yes Log successful connections Domain Yes Name Domain SYSTEMROOT System32 logfiles firewall domainfw log Size lim...

Страница 135: ...lic Yes Log successful connections Public Yes Name Public SYSTEMROOT System32 logfiles firewall publicfw log Size limit KB Public 16384 KB 6 Windows Update Do not adjust default option to Install Updates and Shut Down in Shut Down Windows dialog box Disabled Do not display Install Updates and Shut Down option in Shut Down Windows dialog box Disabled No auto restart with logged on users for schedul...

Страница 136: ...obal objects Administrators NT AUTHORITY SERVICE NT AUTHORITY LOCAL SERVICE NT AUTHORITY NETWORK SERVICE Create permanent shared objects Create symbolic links Administrators Debug programs Administrators Deny access to this computer from the network Guests Deny logon as a batch job Guests Deny logon as a service Guests Deny logon locally Guests Deny logon through Terminal Service Guests Enable com...

Страница 137: ...rators Shut down the system Administrators Synchronize directory service data Take ownership of file or other objects Administrators 5 2 System Patch Update There are two ways to update the system of Windows Storage Server 2012 R2 manually and automatically 5 2 1 Update Automatically Conditions Windows Storage Server 2012 R2 could connect the Microsoft website and this way is recommended Step 1 Su...

Страница 138: ...ep 2 Input Windows Storage Server 2012 R2 in the Search window then all of the update for windows Storage Server 2012 R2 would be displayed The updates for Windows Server 2012 R2 would be used Step 3 According to the actual application select the associate patch to download security drivers etc Step 4 Upload the patch to the system and install the patches directly Step 5 After the installation you...

Страница 139: ...N2000H V3 Appliance User Guide 5 System Security Policy Issue 04 2018 11 06 Huawei Proprietary and Confidential Copyright Huawei Technologies Co Ltd 130 Figure 5 3 View update history ...

Страница 140: ...cutity Configuration and Reinforce The security configuration and reinforce of the system should be configured as described in chapter 5 1 The customer could follow their own security policy to reinforce the system 6 1 3 Routine Maintenance for Anti virus Software The routine maintenance policy for the antivirus software should be implemented according to the antivirus software actually installed ...

Страница 141: ... disk 7 4 Removing a PSU This topic describes how to remove an AC or DC power supply unit PSU 7 5 Installing a PSU This topic describes how to install an AC or DC power supply unit PSU 7 6 Removing the Chassis Cover This topic describes how to remove the chassis cover from the N2000H V3 before replacing any N2000H V3 part in the chassis 7 7 Installing a Chassis Cover This topic describes how to in...

Страница 142: ...USB Flash Drive from the Chassis This topic describes how to remove a USB flash drive before replacing it with a new one 7 19 Installing a USB Flash Drive in the Chassis This topic describes how to install a USB flash drive in the chassis 7 20 Removing a System Battery This topic describes how to remove a system battery 7 21 Installing a System Battery This topic describes how to install a system ...

Страница 143: ...tall a network interface card NIC 7 34 Removing a SATA DOM This topic describes how to remove a Serial Advanced Technology Attachment SATA Disk on Module DOM before replacing it with a new one 7 35 Installing a SATA DOM This topic describes how to install a Serial Advanced Technology Attachment SATA Disk on Module DOM to replace the original one 7 36 Removing an SD Card This topic describes how to...

Страница 144: ...front mounting ear plate 7 45 Installing a Front Mounting Ear Plate This topic describes how to install a front mounting ear plate 7 1 Replaceable Parts This topic describes the replaceable parts of the N2000H V3 The N2000H V3 is 4U high and has the following replaceable parts Hard disk Power supply unit PSU Fan module Peripheral Component Interconnect Express PCIe card on the riser card Riser car...

Страница 145: ...hard disk Prerequisites Conditions If services are running on the N2000H V3 you have backed up the data on the hard disk to be removed and delete RAID configuration from the hard disk Data You have determined the position on the N2000H V3 for removing a hard disk You have obtained the rack number and chassis number of the N2000H V3 You have located the N2000H V3 based on the preceding information ...

Страница 146: ...s the hard disk ejector lever See step 1 in Figure 5 2 The ejector lever automatically ejects Figure 7 2 Removing a hard disk Step 3 Hold the ejector lever and pull out the hard disk for about 3 cm 1 18 in See step 2 in Figure 5 2 Wait for at least 30 seconds until the hard disk stops working Then remove the hard disk from the N2000H V3 See step 3 in Figure 5 2 Step 4 Place the removed hard disk i...

Страница 147: ...fore installing a hard disk Prerequisites Conditions No special condition is required for this operation Data You have determined the position on the N2000H V3 for installing a hard disk You have obtained the rack number and chassis number of the N2000H V3 You have located the N2000H V3 based on the preceding information and labeled its panel to prevent misoperations Tools ESD gloves Packaging mat...

Страница 148: ... into the chassis along the guide rails until it does not move See step 1 in Figure 5 4 Figure 7 4 Installing a hard disk Step 4 Ensure that the ejector lever is fastened to the chassis beam and lower the ejector lever to completely insert the hard disk into the chassis See step 2 in Figure 5 4 Observe the hard disk indicators to check the hard disk operating status For details about the indicator...

Страница 149: ... the N2000H V3 if the other PSU is operating properly and its power rating is greater than or equal to the rated power of the N2000H V3 Observe the PSU indicators to check the PSU operating status For details about the indicators see 1 4 Indicators and Buttons Data You have determined the position on the N2000H V3 for removing a PSU You have obtained the rack number and chassis number of the N2000...

Страница 150: ...Huawei Technologies Co Ltd 141 Figure 7 5 Opening a cable tie Step 3 Remove the power cable from the PSU to be replaced See Figure 5 6 Figure 7 6 Removing a power cable Step 4 Press the spring on the PSU in the arrow direction and pull the PSU out of the slot while holding the handle See steps 1 and 2 in Figure 5 7 ...

Страница 151: ...t PSU before replacing it with a new one Scenarios Remove a DC PSU in any of the following scenarios A DC PSU fails A DC PSU is to be replaced with a new model Prerequisites Conditions When two PSUs are configured remove one PSU without powering off the N2000H V3 if the other PSU is operating properly Observe the PSU indicators to check the PSU operating status For details about the indicators see...

Страница 152: ...rmation and labeled its panel to prevent misoperations Tools ESD gloves or ESD wrist strap Packaging materials for example an ESD bag Procedure Step 1 Hold down the spring above the power cable using a flat head screwdriver to eject the power cable See Figure 5 8 Figure 7 8 Removing power cables Step 2 Hold down the spring on the PSU and pull out part of the PSU while holding the handle See step 1...

Страница 153: ...ic describes how to install an AC or DC power supply unit PSU 7 5 1 Installing an AC PSU This topic describes how to install an AC power supply unit PSU Scenarios Install an AC PSU in any of the following scenarios An AC PSU fails An AC PSU is to be replaced with a new model An AC PSU is to be added to improve reliability when only one AC PSU is configured for the N2000H V3 Prerequisites Condition...

Страница 154: ...e N2000H V3 based on the preceding information and labeled its panel to prevent misoperations Tools ESD gloves Packaging materials for example an ESD bag Hardware You have obtained a spare AC PSU Procedure Step 1 Take the spare AC PSU out of the ESD bag Step 2 Push the spare AC PSU along the guide rails into a slot until you hear a sound The PSU spring snaps into the latch so that the PSU does not...

Страница 155: ...onfidential Copyright Huawei Technologies Co Ltd 146 Figure 7 11 Connecting a power cable to an AC PSU Step 4 Secure the power cable using a cable tie See Figure 5 12 Figure 7 12 Securing a power cable End 7 5 2 Installing a DC PSU This topic describes how to install a DC power supply unit PSU ...

Страница 156: ...You have determined the position on the N2000H V3 for installing a DC PSU You have obtained the rack number and chassis number of the N2000H V3 You have located the N2000H V3 based on the preceding information and labeled its panel to prevent misoperations Tools ESD gloves Packaging materials for example an ESD bag Hardware You have obtained a spare DC PSU Procedure Step 1 Take the spare DC PSU ou...

Страница 157: ...tep 3 Connect the power cable to the wiring terminal on the PSU until the power cable snaps into the spring See Figure 5 14 Connect the OT terminal on the negative power cable to the NEG wiring terminal on the PSU Connect the OT terminal on the positive power cable to the RTN wiring terminal on the PSU Connect the OT terminal on the ground cable to the ground terminal on the PSU ...

Страница 158: ...e replacing any N2000H V3 part in the chassis Scenarios Remove the chassis cover from the N2000H V3 before replacing any N2000H V3 part in the chassis Prerequisites Conditions You have removed the N2000H V3 before removing its chassis cover For details see 2 5 Removing the N2000H V3 Data You have obtained the rack number and chassis number of the N2000H V3 You have located the N2000H V3 based on t...

Страница 159: ...the handle of the chassis cover using a flat head screwdriver See step 1 in Figure 5 15 Step 2 Open the handle to push the chassis cover backwards See step 2 in Figure 5 15 Figure 7 15 Removing a chassis cover Step 3 Lift the chassis cover See step 3 in Figure 5 15 End 7 7 Installing a Chassis Cover This topic describes how to install the chassis cover for the N2000H V3 after replacing one or more...

Страница 160: ...r details see 2 5 Removing the N2000H V3 Data You have obtained the rack number and chassis number of the N2000H V3 You have located the N2000H V3 based on the preceding information and labeled its panel to prevent misoperations Tools ESD gloves Flat head screwdriver Procedure Step 1 Place the chassis cover horizontally align it with the fixing slots on both side panels of the chassis and close th...

Страница 161: ... Technologies Co Ltd 152 Figure 7 16 Installing a chassis cover End 7 8 Removing the Air Duct This topic describes how to remove the air duct Scenarios Remove the air duct in any of the following scenarios The air duct fails A CPU dual in line memory module DIMM or supercapacitor is to be replaced Prerequisites Conditions ...

Страница 162: ...ocated the N2000H V3 based on the preceding information and labeled its panel to prevent misoperations Tools ESD gloves Packaging materials for example an ESD bag Procedure Step 1 Open the two latches on the supercapacitor tray in their respective directions and remove the supercapacitor tray See steps 1 and 2 in Figure 5 17 You need to remove the supercapacitor tray before replacing the air duct ...

Страница 163: ...tall an air duct in any of the following scenarios An air duct fails A CPU dual in line memory module DIMM or supercapacitor is to be replaced Prerequisites Conditions You have removed the chassis cover from the N2000H V3 For details see 5 6 Removing the Chassis Cover Data You have determined the position on the N2000H V3 for installing an air duct You have obtained the rack number and chassis num...

Страница 164: ... obtained a spare air duct Procedure Step 1 Take the spare air duct out of the ESD bag Step 2 Align the positioning pins on the air duct with the fixing holes on the mainboard by following the instructions on the chassis and vertically place the air duct downwards See Figure 5 19 Figure 7 19 Installing an air duct Step 3 Optional Install the supercapacitor tray on the air duct in the arrow directi...

Страница 165: ...new one Scenarios Remove a fan module before replacing it with a new one Prerequisites Conditions You have removed the chassis cover from the N2000H V3 For details see 5 6 Removing the Chassis Cover Data You have determined the position on the N2000H V3 for removing a fan module You have obtained the rack number and chassis number of the N2000H V3 You have located the N2000H V3 based on the preced...

Страница 166: ...d 157 Packaging materials for example an ESD bag Procedure Step 1 Lift the fan module slowly out of the N2000H V3 See in Figure 5 21 Step 2 Remove the fan module from the slot Figure 7 21 Removing a fan module Step 3 Place the removed fan module in an ESD bag End 7 11 Installing a Fan Module This topic describes how to install a fan module ...

Страница 167: ...Data You have determined the position on the N2000H V3 for installing a fan module You have obtained the rack number and chassis number of the N2000H V3 and labeled its panel to prevent misoperations Tools ESD gloves Packaging materials for example an ESD bag Hardware You have obtained a spare fan module Procedure Step 1 Take the spare fan module out of the ESD bag Step 2 Insert the fan module alo...

Страница 168: ...i Technologies Co Ltd 159 Figure 7 22 Installing a fan module End 7 12 Removing the Riser Card This topic describes how to remove the riser card before replacing it with a new one Scenarios Remove the riser card in any of the following scenarios The riser card fails The mainboard is to be removed Prerequisites Conditions ...

Страница 169: ...0H V3 for removing the riser card You have obtained the rack number and chassis number of the N2000H V3 and labeled its panel to prevent misoperations Tools ESD gloves Packaging materials for example an ESD bag Procedure Step 1 Lift the riser card tray See Figure 5 23 Figure 7 23 Removing a riser card tray Step 2 Remove the PCIe cards from the riser card tray For details see 5 14 1 Removing a PCIe...

Страница 170: ... Scenarios Install a riser card to replace the original one Prerequisites Conditions You have powered off the N2000H V3 For details see 3 2 Powering Off You have removed the chassis cover from the N2000H V3 For details see 5 6 Removing the Chassis Cover Data You have determined the position on the N2000H V3 for installing a riser card You have obtained the rack number and chassis number of the N20...

Страница 171: ...re Step 1 Take the spare riser card out of the ESD bag Step 2 Push the riser card in the arrow direction until it does not move See step 1 in Figure 5 25 Step 3 Screw the riser card See 2 in Figure 5 25 Figure 7 25 Installing a riser module Step 4 Install a PCIe card on the riser card For details see 5 15 1 Installing a PCIe Card on the Riser Card Step 5 Install the riser card tray See step in Fig...

Страница 172: ... PCIe card on the riser card and a PCIe card on the mainboard 7 14 1 Removing a PCIe Card from the Riser Card This topic describes how to remove a Peripheral Component Interconnect Express PCIe card from the riser card Scenarios Remove a PCIe card in any of the following scenarios A PCIe card fails The riser card connected to a PCIe card is to be removed A PCIe card is to be replaced with a new mo...

Страница 173: ...000H V3 for removing a PCIe card You have obtained the rack number and chassis number of the N2000H V3 You have located the N2000H V3 based on the preceding information and labeled its panel to prevent misoperations Tools ESD gloves Packaging materials for example an ESD bag Procedure Step 1 Horizontally push the PCIe card latch outwards to release it See step 1 in Figure 5 27 Step 2 Open the PCIe...

Страница 174: ...s You have powered off the N2000H V3 For details see 3 2 Powering Off You have removed the chassis cover from the N2000H V3 For details see 5 6 Removing the Chassis Cover Data You have determined the position on the N2000H V3 for removing a PCIe card You have obtained the rack number and chassis number of the N2000H V3 You have located the N2000H V3 based on the preceding information and labeled i...

Страница 175: ... bag End 7 15 Installing a PCIe Card This topic describes how to install a Peripheral Component Interconnect Express PCIe card on the riser card and on the mainboard 7 15 1 Installing a PCIe Card on the Riser Card This topic describes how to install a Peripheral Component Interconnect Express PCIe card on the riser card Scenarios Install a PCIe card Prerequisites Conditions You have powered off th...

Страница 176: ...e N2000H V3 for installing a PCIe card You have obtained the rack number chassis number and slot number of the N2000H V3 and labeled its panel to prevent misoperations Tools ESD gloves Packaging materials for example an ESD bag Hardware You have obtained a spare PCIe card Procedure Step 1 Insert the PCIe card into a PCIe expansion slot See step 1 in Figure 5 29 Step 2 Close the latch See step 2 in...

Страница 177: ... You have removed the chassis cover from the N2000H V3 For details see 5 6 Removing the Chassis Cover Data You have determined the position on the N2000H V3 for installing a PCIe card You have obtained the rack number and chassis number of the N2000H V3 You have located the N2000H V3 based on the preceding information and labeled its panel to prevent misoperations Tools ESD gloves Packaging materi...

Страница 178: ... a trusted platform module TPM before replacing it with a new one Scenarios Remove a TPM in any of the following scenarios A TPM fails A TPM is to be replaced with a new model Prerequisites Conditions You have powered off the N2000H V3 For details see 3 2 Powering Off You have removed the N2000H V3 from the rack For details see 2 5 Removing the N2000H V3 You have removed the chassis cover from the...

Страница 179: ...00H V3 for removing a TPM You have obtained the rack number and chassis number of the N2000H V3 You have located the N2000H V3 based on the preceding information and labeled its panel to prevent misoperations Tools ESD gloves ESD wrist strap M3 Phillips screwdriver Packaging materials for example an ESD bag Procedure Step 1 Determine the TPM position See Figure 5 31 Figure 7 31 Determining the TPM...

Страница 180: ...End 7 17 Installing a TPM This topic describes how to install a trusted platform module TPM Scenarios Install a TPM in any of the following scenarios A TPM fails A TPM is to be replaced with a new model Prerequisites Conditions You have powered off the N2000H V3 For details see 3 2 Powering Off You have removed the N2000H V3 from the rack For details see 2 5 Removing the N2000H V3 You have removed...

Страница 181: ...Data You have determined the position on the N2000H V3 for installing a TPM You have obtained the rack number and chassis number of the N2000H V3 You have located the N2000H V3 based on the preceding information and labeled its panel to prevent misoperations Tools ESD gloves M3 Phillips screwdriver Packaging materials for example an ESD bag Hardware You have obtained a spare TPM Procedure Step 1 T...

Страница 182: ...ver See step 2 in Figure 5 34 End 7 18 Removing a USB Flash Drive from the Chassis This topic describes how to remove a USB flash drive before replacing it with a new one Scenarios Remove a USB flash drive in any of the following scenarios A USB flash drive fails A USB flash drive is to be replaced with a new model Prerequisites Conditions You have removed the chassis cover from the N2000H V3 For ...

Страница 183: ...nformation and labeled its panel to prevent misoperations Tools ESD gloves or ESD wrist strap M3 Phillips screwdriver Packaging materials for example an ESD bag Procedure Step 1 Remove the USB flash drive from the connector on the mainboard See Figure 5 35 Figure 7 35 Removing a USB flash drive Step 2 Place the removed USB flash drive in an ESD bag End 7 19 Installing a USB Flash Drive in the Chas...

Страница 184: ...s see 5 6 Removing the Chassis Cover Data You have determined the position on the N2000H V3 for installing a USB flash drive You have obtained the rack number and chassis number of the N2000H V3 You have located the N2000H V3 based on the preceding information and labeled its panel to prevent misoperations Tools ESD gloves M3 Phillips screwdriver Packaging materials for example an ESD bag Hardware...

Страница 185: ...a System Battery This topic describes how to remove a system battery Scenarios A system battery fails A system battery is low Prerequisites Conditions You have powered off the N2000H V3 For details see 3 2 Powering Off You have removed the chassis cover from the N2000H V3 For details see 5 6 Removing the Chassis Cover Data You have obtained the rack number chassis number and slot number of the N20...

Страница 186: ...s panel to prevent misoperations Tools ESD wrist strap or ESD gloves Procedure Step 1 Pull upwards the right end of the system battery and remove it from the slot See step 1 in Figure 5 37 Figure 7 37 Removing a system battery Step 2 Place the removed system battery in an ESD bag End 7 21 Installing a System Battery This topic describes how to install a system battery Scenarios A system battery fa...

Страница 187: ...ave obtained the rack number and chassis number of the N2000H V3 You have located the N2000H V3 based on the preceding information and labeled its panel to prevent misoperations Tools ESD wrist strap or ESD gloves Procedure Step 1 Take the spare system battery out of the ESD bag Step 2 Hold the system battery with the side marked with text facing upwards insert the left end of the system battery i...

Страница 188: ...hassis Cover You have removed the riser card tray above the RAID controller card For details see 5 12 Removing the Riser Card You have removed the supercapacitor from the N2000H V3 if any For details see 5 24 Removing a Supercapacitor Data You have determined the position on the N2000H V3 for removing the RAID controller card You have obtained the rack number and chassis number of the N2000H V3 Yo...

Страница 189: ... 39 Position of a RAID controller card Step 2 Hold down the latches on the cables to the RAID controller card and remove the cables from the RAID controller card For details see 1 7 Internal Cabling Step 3 Unscrew the RAID controller card See step 1 in Figure 5 40 Step 4 Lift the RAID controller card slowly out of the Appliance See step 2 in Figure 5 40 ...

Страница 190: ...method for installing the RAID controller card varies with the RAID controller cards Scenarios Install a RAID controller card in any of the following scenarios A RAID controller card fails A RAID controller card is to be replaced with a new model Prerequisites Conditions You have powered off the N2000H V3 For details see 3 2 Powering Off You have removed the chassis cover from the N2000H V3 For de...

Страница 191: ...s ESD gloves M3 Phillips screwdriver Packaging materials for example an ESD bag Hardware You have obtained a spare RAID controller card Procedure Step 1 Optional Remove the rubber plugs from the ports on the RAID controller card if any See Figure 5 41 Figure 7 41 Ports with rubber plugs Step 2 Take the spare RAID controller card out of the ESD bag Step 3 Determine the position for installing the R...

Страница 192: ...Position of a RAID controller card Step 4 Align the connector on the RAID controller card with the port on the mainboard and insert the RAID controller card slowly into the mainboard See step 1 in Figure 5 43 Step 5 Screw the RAID controller card See step 2 in Figure 5 43 Step 6 Connect cables to the RAID controller card For details see 1 7 Internal Cabling ...

Страница 193: ...for the controller card Remove a supercapacitor in any of the following scenarios A supercapacitor fails A supercapacitor is low Prerequisites Conditions You have powered off the N2000H V3 For details see 3 2 Powering Off You have removed the chassis cover from the N2000H V3 For details see 5 6 Removing the Chassis Cover You have removed the riser card tray above the RAID controller card For detai...

Страница 194: ... Phillips screwdriver Procedure Step 1 Unscrew the trans flash module TFM See step 1 in Figure 5 45 Step 2 Vertically lift the trans flash module TFM out of the RAID controller card See step 2 in Figure 5 45 Step 3 Determine the supercapacitor position See Figure 5 44 Figure 7 44 Determining the supercapacitor position Step 4 Horizontally open the plastic latches that secure the supercapacitor See...

Страница 195: ...nstall a supercapacitor Scenarios You can configure a supercapacitor for the controller card Install a supercapacitor in any of the following scenarios A supercapacitor fails A supercapacitor is low Prerequisites Conditions You have powered off the N2000H V3 For details see 3 2 Powering Off You have removed the chassis cover from the N2000H V3 For details see 5 6 Removing the Chassis Cover You hav...

Страница 196: ...isoperations Tools ESD gloves Packaging materials for example an ESD bag Phillips screwdriver Hardware You have obtained a spare supercapacitor Procedure Step 1 Take the supercapacitor out of the ESD bag Step 2 Determine the supercapacitor position See Figure 5 46 Figure 7 46 Determining the supercapacitor position Step 3 Place the supercapacitor downwards and exert even force to install it in the...

Страница 197: ...ling a supercapacitor End 7 26 Removing a CPU This topic describes how to remove a CPU before replacing it with a new one Scenarios Only the personnel authorized by Huawei and Huawei technical support can remove a CPU from a Huawei Appliance Do not wear ESD gloves to prevent damage to the pins on the CPU socket Remove a CPU in any of the following scenarios A CPU fails A CPU is to be replaced with...

Страница 198: ...or details see 5 6 Removing the Chassis Cover You have removed the air duct from the N2000H V3 For details see 5 8 Removing the Air Duct Data You have determined the position on the N2000H V3 for removing a CPU You have obtained the rack number and chassis number of the N2000H V3 and labeled its panel to prevent misoperations Tools ESD wrist strap M3 Phillips screwdriver Packaging materials for ex...

Страница 199: ...ts Issue 04 2018 11 06 Huawei Proprietary and Confidential Copyright Huawei Technologies Co Ltd 190 Figure 7 48 CPU position 2 Use a Phillips screwdriver to loosen the four screws on the heat sink in the diagonal direction See step 1 in Figure 5 49 ...

Страница 200: ...tary and Confidential Copyright Huawei Technologies Co Ltd 191 Figure 7 49 Removing a heat sink 3 Do not use any tool or sharp object to lift the securing rod on the CPU socket Otherwise the compute node may be damaged Raise the securing rod near the or label See step 1 in Figure 5 50 ...

Страница 201: ...lace the removed CPU in an ESD bag Ensure that CPU sockets are installed with CPUs or protective covers during transportation and storage 7 Optional Install a CPU protective cover a Close the CPU cover See step 1 in Figure 5 51 8 Hold the CPU protective cover horizontally aligning its edges with those of the CPU socket and fit the protective cover securely onto the socket See step 2 in Figure 5 51...

Страница 202: ...i technical support can install a CPU on a Huawei Appliance Do not wear ESD gloves to prevent damage to the pins on the CPU socket Install a CPU in any of the following scenarios A CPU fails A CPU is to be replaced with a new model Prerequisites Conditions You have powered off the N2000H V3 For details see 3 2 Powering Off You have removed the chassis cover from the N2000H V3 For details see 5 6 R...

Страница 203: ...s stop installing CPUs and contact Huawei technical support 3 Before installing a CPU or heat sink use tissue to clean up the oil remaining thermal grease or foreign objects on their surfaces 4 Determine the area on the heat sink for contacting the CPU and paste thermal grease in the center of the area Paste appropriate amount of thermal grease evenly on the CPU surface Use a syringe to measure th...

Страница 204: ...nt pasting and S shape pasting apply to a large square socket Figure 7 52 Pasting methods 5 Use a clean card to smear the thermal grease over the entire center of the CPU The thermal grease layer is as thick as a common piece of pater Figure 5 53 shows the smeared thermal grease layer Ensure that the thermal grease is evenly and fully painted Figure 7 53 Smeared thermal grease layer 6 ...

Страница 205: ... not move the CPU if it is not correctly placed to avoid any twisted pins Lift the CPU until it is out of the socket and then place it in the socket properly Keep CPUs straight down and slide the CPUs in CPU sockets See step 1 in Figure 5 54 Align the triangle mark on the CPU with the triangle mark on the CPU socket to ensure that the CPU is properly installed Figure 5 55 shows a CPU that is incor...

Страница 206: ...56 Figure 5 56 shows the heat sink direction Figure 7 56 Installing a heat sink 11 Use a Phillips screwdriver to tighten the four screws on the heat sink in the diagonal direction See step 2 in Figure 5 56 End 7 28 Removing a DIMM This topic describes how to remove a dual in line memory module DIMM before replacing it with a new one Scenarios Remove a DIMM in any of the following scenarios A DIMM ...

Страница 207: ...n on the N2000H V3 for removing a DIMM You have obtained the rack number and chassis number of the N2000H V3 and labeled its panel to prevent misoperations Tools ESD gloves Packaging materials for example memory riser box Procedure Step 1 Open the two fixing clips of the DIMM slot simultaneously See step 1 in Figure 5 57 Figure 7 57 Removing a DIMM Step 2 Remove the DIMM from the slot See step 2 i...

Страница 208: ...ed with a new model The memory capacity is to be expanded The rules for installing DIMMs are as follows The N2000H V3 in dual CPU configuration provides 16 double data rate 4 DDR4 DIMM slots Each memory riser integrates two memory channels 0 and 1 Figure 5 58 shows the memory channels Figure 7 58 Memory channels dual CPU configuration The N2000H V3 in single CPU configuration provides eight DDR4 D...

Страница 209: ...ists the memory channels Table 7 2 Memory channels CPU Memory Channel CPU 1 000 A 010 B 020 C 030 D 001 E 011 F 021 G 031 H CPUs 1 and 2 000 A 100 A 010 B 110 B 020 C 120 C 030 D 130 D 001 E 101 E 011 F 111 F 021 G 121 G 031 H 131 H Table 5 3 describes DIMM configuration rules Table 7 3 DIMM configuration rules CPU DIMM Installation Sequence CPUs 1 and 2 Install DIMMs in alphabetical order of chan...

Страница 210: ...d from the N2000H V3 if any For details see 5 12 Removing the Riser Card Data You have determined the position on the N2000H V3 for installing a DIMM You have obtained the rack number and chassis number of the N2000H V3 and labeled its panel to prevent misoperations Tools ESD gloves Packaging materials for example memory riser box Hardware You have obtained a spare DIMM Procedure Step 1 Take the s...

Страница 211: ...3 For details see 3 2 Powering Off You have removed the chassis cover from the N2000H V3 For details see 5 6 Removing the Chassis Cover You have removed the supercapacitor if it is configured For details see 5 24 Removing a Supercapacitor You have removed the air duct from the N2000H V3 For details see 5 8 Removing the Air Duct You have removed the riser card from the N2000H V3 For details see 5 1...

Страница 212: ...2000H V3 For details see 5 4 Removing a PSU You have removed all cables from the mainboard The cables include those connected to the hard disk backplane and the left and right mounting ears You have removed all fan modules from the N2000H V3 For details see 5 10 Removing a Fan Module Data You have determined the position on the N2000H V3 for removing the mainboard You have obtained the rack number...

Страница 213: ...yright Huawei Technologies Co Ltd 204 Figure 7 62 Removing fan supports Step 2 Remove all cables from the mainboard For details see 1 7 Internal Cabling Remove the FFC cable to avoid cable damage caused by the removal of the mainboard frame See Figure 5 63 If the FFC cable is damaged the Appliance cannot work ...

Страница 214: ...7 Replacing Parts Issue 04 2018 11 06 Huawei Proprietary and Confidential Copyright Huawei Technologies Co Ltd 205 Figure 7 63 Removing an FFC cable Step 3 Unscrew the mainboard using a Phillips screwdriver See step 1 in Figure 5 64 ...

Страница 215: ...V3 while holding the handle See step 2 in Figure 5 64 Do not hold any other protruding part on the mainboard to lift it Otherwise the components on the mainboard may be damaged Step 5 Place the removed mainboard in an ESD bag Before putting the mainboard into an ESD bag check that a protective cover is installed on a vacant CPU socket For details about how to install a protective cover see 5 26 Re...

Страница 216: ... the redundant array of independent disks RAID controller card from the N2000H V3 For details see 5 22 Removing the RAID Controller Card You have removed the network interface card NIC from the N2000H V3 For details see 5 32 Removing a NIC You have removed all power supply units PSUs from the N2000H V3 For details see 5 4 Removing a PSU You have removed all cables from the mainboard The cables inc...

Страница 217: ...bjects are detected on CPU sockets stop installing mainboard and contact Huawei technical support Step 3 Place the mainboard into the N2000H V3 and push the mainboard in the arrow direction until it does not move while holding the handle See step 1 in Figure 5 65 Step 4 Screw the mainboard using the Phillips screwdriver See step 2 in Figure 5 65 Figure 7 65 Installing the mainboard Step 5 Connect ...

Страница 218: ...k interface card NIC before replacing it with a new one Scenarios Remove a NIC in any of the following scenarios A NIC fails A NIC is to be replaced with a new model Prerequisites Conditions You have powered off the N2000H V3 For details see 3 2 Powering Off You have removed the chassis cover from the N2000H V3 For details see 5 6 Removing the Chassis Cover You have removed the that is above the N...

Страница 219: ...ed the N2000H V3 based on the preceding information and labeled its panel to prevent misoperations Tools ESD gloves Packaging materials for example an ESD bag Phillips screwdriver Procedure Step 1 Unscrew the NIC using a Phillips screwdriver See step 1 in Figure 5 67 Figure 7 67 Removing a NIC Step 2 Pull out part of the NIC to have the NIC disconnected from the port on the mainboard and then remo...

Страница 220: ...s see 5 31 Installing the Mainboard You have removed the chassis cover from the N2000H V3 For details see 5 6 Removing the Chassis Cover You have removed the I O module or that is above the NIC For details see 5 12 Removing the Riser Card Data You have determined the position on the N2000H V3 for installing a NIC You have obtained the rack number and chassis number of the N2000H V3 and labeled its...

Страница 221: ...moving a SATA DOM This topic describes how to remove a Serial Advanced Technology Attachment SATA Disk on Module DOM before replacing it with a new one Scenarios Remove a SATA DOM when it fails Prerequisites Conditions You have powered off the N2000H V3 For details see 3 2 Powering Off You have removed the chassis cover from the N2000H V3 For details see 5 6 Removing the Chassis Cover ...

Страница 222: ...ave obtained the rack number and chassis number of the N2000H V3 You have located the N2000H V3 based on the preceding information and labeled its panel to prevent misoperations Tools ESD gloves Packaging materials for example an ESD bag Procedure Step 1 Determine the position of the SATADOM on the N2000H V3 See Figure 5 69 Figure 7 69 SATADOM position Step 2 Press the button on the side of the SA...

Страница 223: ...ology Attachment SATA Disk on Module DOM to replace the original one Scenarios Install a SATA DOM when the original one fails Prerequisites Conditions You have powered off the N2000H V3 For details see 3 2 Powering Off You have removed the chassis cover from the N2000H V3 For details see 5 6 Removing the Chassis Cover Data You have determined the position on the N2000H V3 for installing a SATA DOM...

Страница 224: ...ologies Co Ltd 215 ESD gloves Packaging materials for example an ESD bag Procedure Step 1 Take the spare SATA DOM out of the ESD bag Step 2 Determine the position of the SATADOM on the N2000H V3 See Figure 5 71 Figure 7 71 SATADOM position Step 3 Insert the SATA DOM vertically into the connector on the mainboard See Figure 5 72 ...

Страница 225: ... following scenarios The SD card fails The SD card is to be replaced with a new model Prerequisites Conditions You have powered off the N2000H V3 For details see 3 2 Powering Off You have removed the chassis cover from the N2000H V3 For details see 5 6 Removing the Chassis Cover Data You have determined the position on the N2000H V3 for removing an SD card You have obtained the rack number and cha...

Страница 226: ... Step 1 Press the SD card in the arrow direction See step 1 in Figure 5 73 Figure 7 73 Removing an SD card Step 2 Remove the SD card from the connector on the mainboard See step 2 in Figure 5 73 Step 3 Place the removed SD card in an ESD bag End 7 37 Installing an SD Card This topic describes how to install an SD card to replace the original one Scenarios Install an SD card in any of the following...

Страница 227: ...cover from the N2000H V3 For details see 5 6 Removing the Chassis Cover Data You have determined the position on the N2000H V3 for installing an SD card You have obtained the rack number and chassis number of the N2000H V3 You have located the N2000H V3 based on the preceding information and labeled its panel to prevent misoperations Tools ESD gloves Packaging materials for example an ESD bag Proc...

Страница 228: ...s how to remove the front hard disk backplane before replacing it with a new one Scenarios Remove the front hard disk backplane before replacing it with a new one Prerequisites Conditions You have powered off the N2000H V3 For details see 3 2 Powering Off You have removed the chassis cover from the N2000H V3 For details see 5 6 Removing the Chassis Cover You have removed all hard disks from the N2...

Страница 229: ...e position on the N2000H V3 for removing the front hard disk backplane You have obtained the rack number and chassis number of the N2000H V3 You have located the N2000H V3 based on the preceding information and labeled its panel to prevent misoperations Tools ESD gloves M3 Phillips screwdriver Packaging materials for example an ESD bag Procedure Step 1 Remove the cables between the front hard disk...

Страница 230: ...ackplane Scenarios Install the front hard disk backplane to replace the original one Prerequisites Conditions You have powered off the N2000H V3 For details see 3 2 Powering Off You have removed the chassis cover from the N2000H V3 For details see 5 6 Removing the Chassis Cover You have removed all hard disks from the N2000H V3 For details see 5 2 Removing a Hard Disk You have removed the air duct...

Страница 231: ...e N2000H V3 based on the preceding information and labeled its panel to prevent misoperations Tools ESD gloves M3 Phillips screwdriver Packaging materials for example an ESD bag Procedure Step 1 Take the spare front hard disk backplane out of the ESD bag Step 2 Hook the hard disk backplane and push it in the arrow direction until the latch is locked and it does not move See Figure 5 76 Figure 7 76...

Страница 232: ...rear hard disk backplane You have obtained the rack number and chassis number of the N2000H V3 You have located the N2000H V3 based on the preceding information and labeled its panel to prevent misoperations Tools ESD wrist strap or ESD gloves M3 Phillips screwdriver Packaging materials for example an ESD bag Procedure Remove the rear hard disk backplane for 12 disks a Remove the air duct and all ...

Страница 233: ... Issue 04 2018 11 06 Huawei Proprietary and Confidential Copyright Huawei Technologies Co Ltd 224 Figure 7 77 Removing a mainboard frame e Press the release button and pull the mainboard out of the chassis completely See steps 3 and 4 in Figure 5 78 ...

Страница 234: ...Remove the rear hard disks from the rear hard disk backplane g Remove all cables from the rear hard disk backplane For details see 1 7 Internal Cabling h Hold down and open the latch on the rear hard disk backplane lift the backplane until it cannot move upward and pull it out in the arrow direction to remove it See Figure 5 79 Figure 7 79 Removing the rear hard disk backplane for 12 disks ...

Страница 235: ...ag Remove the rear hard disk backplane for two disks a Determine the position for removing the rear hard disk backplane for two disks Figure 5 80 shows an example Figure 7 80 Position for removing the rear hard disk backplane for two disks b Remove all cables from the rear hard disk module For details see 1 7 Internal Cabling c Unscrew the rear hard disk module and lift it to remove it See Figure ...

Страница 236: ...ologies Co Ltd 227 Figure 7 81 Removing a rear hard disk module d Remove all hard disks from the hard disk module e Unscrew the rear hard disk backplane and remove it in arrow direction See Figure 5 82 Figure 7 82 Removing the rear hard disk backplane for two disks f Place the removed rear hard disk backplane in an ESD bag End ...

Страница 237: ...the N2000H V3 For details see 5 6 Removing the Chassis Cover Data You have determined the position on the N2000H V3 for installing the rear hard disk backplane You have obtained the rack number and chassis number of the N2000H V3 You have located the N2000H V3 based on the preceding information and labeled its panel to prevent misoperations Tools ESD wrist strap or ESD gloves M3 Phillips screwdriv...

Страница 238: ...d For details see 1 7 Internal Cabling e Install all hard disks in the rear hard disk backplane Install a rear hard disk backplane for two disks a Take the spare rear hard disk backplane out of the ESD bag b Install the rear hard disk backplane in the rear hard disk module in the arrow direction and screw the hard disk backplane See Figure 5 84 Figure 7 84 Installing a rear hard disk backplane for...

Страница 239: ...rd disk backplane For details see 1 7 Internal Cabling End 7 42 Removing the PSU Backplane This topic describes how to remove the power supply unit PSU backplane Scenarios Remove the PSU backplane before replacing it with a new one Prerequisites Conditions You have powered off the N2000H V3 For details see 3 2 Powering Off You have removed the chassis cover from the N2000H V3 For details see 5 6 R...

Страница 240: ...he PSU backplane You have obtained the rack number and chassis number of the N2000H V3 You have located the N2000H V3 based on the preceding information and labeled its panel to prevent misoperations Tools ESD wrist strap or ESD gloves Packaging materials for example an ESD bag Procedure Step 1 Remove all PSUs Step 2 Remove all cables from the PSU backplane Step 3 Lift the PSU backplane to remove ...

Страница 241: ...or details see 5 6 Removing the Chassis Cover You have removed the air duct from the N2000H V3 For details see 5 8 Removing the Air Duct Data You have determined the position on the N2000H V3 for installing the PSU backplane You have obtained the rack number and chassis number of the N2000H V3 You have located the N2000H V3 based on the preceding information and labeled its panel to prevent misope...

Страница 242: ...d 7 44 Removing a Front Mounting Ear Plate This topic describes how to remove a front mounting ear plate Scenarios Remove a front mounting ear plate before replacing it with a new one The Appliance has two front mounting ears One is on the left of its front panel and the other is on the right This topic uses the front mounting ear on the left as an example Prerequisites Conditions You have powered...

Страница 243: ...ou have located the N2000H V3 based on the preceding information and labeled its panel to prevent misoperations Tools ESD wrist strap or ESD gloves Packaging materials for example an ESD bag Phillips screwdriver Procedure Step 1 Loosen the screws that secure the front mounting ear to the N2000H V3 See step 1 in Figure 5 88 Step 2 Pull out the front mounting ear in the arrow direction See step 2 in...

Страница 244: ...04 2018 11 06 Huawei Proprietary and Confidential Copyright Huawei Technologies Co Ltd 235 Figure 7 88 Removing a front mounting ear Step 5 Remove the cable from the mounting ear plate and remove the mounting ear plate in the arrow direction See Figure 5 89 ...

Страница 245: ...ag End 7 45 Installing a Front Mounting Ear Plate This topic describes how to install a front mounting ear plate Scenarios Install a front mounting ear plate to replace the original one The Appliance has two front mounting ears One is on the left of its front panel and the other is on the right This topic uses the front mounting ear on the left as an example Prerequisites Conditions You have power...

Страница 246: ...trap or ESD gloves Packaging materials for example an ESD bag Phillips screwdriver Hardware You have obtained the spare front mounting ear plate to be installed for the N2000H V3 Procedure Step 1 Take the spare front mounting ear plate out of the ESD bag Step 2 Connect the cable to the front mounting ear plate and install the front mounting ear plate in the arrow direction See step 1 in Figure 5 9...

Страница 247: ...d Confidential Copyright Huawei Technologies Co Ltd 238 Step 5 Tighten the screws See step 2 in Figure 5 91 Step 6 Install the front mounting ear on the side of the chassis front panel and screw the mounting ear See steps 3 and 4 in Figure 5 91 Figure 7 91 Installing a front mounting ear End ...

Страница 248: ...pic describes how to collect fault information including the Appliance status logs and alarms by observing indicators and using the iBMC WebUI 8 4 Clearing an Alarm This topic describes how to clear an alarm 8 5 Identifying a Fault This topic describes how to identify a fault 8 6 Alarm Information This topic describes N2000H V3 alarm information 8 1 Troubleshooting Process Overview This topic desc...

Страница 249: ...ight Huawei Technologies Co Ltd 240 Figure 8 1 Troubleshooting process The troubleshooting process shown in Figure 6 1 is a recommended but not the only way to troubleshoot 8 2 Troubleshooting Preparations This topic describes the fault information to be recorded and the preparations to be made before troubleshooting ...

Страница 250: ...lectrostatic discharge ESD wrist strap and serial port or Secure Shell SSH connection software PuTTY To diagnose the Appliance offline turn off the power to the Appliance and peripheral devices Follow the proper power off procedure if possible a Exit all the programs b Log out of the operating system c Power off the Appliance d Remove the power cable from the chassis 8 3 Collecting Fault Informati...

Страница 251: ...he navigation tree choose Alarm SEL Events Logs You can view the system event logs on the System Events page f In the navigation tree choose Remote Control g Click the Remote Virtual Console shared mode link The Remote Control screen is displayed showing the real time desktop of the Appliance You can also click Remote Virtual Console private mode to go to the real time desktop of the Appliance The...

Страница 252: ... operation Documents You have obtained the HUAWEI Rack Appliance Alarm Handling iBMC document Procedure Step 1 Check whether the collected fault information contains any alarm If yes go to Step 2 If no go to Step 4 Step 2 Clear the alarm according to the alarm reference For details see the HUAWEI Rack Appliance Alarm Handling iBMC Step 3 Check whether the fault persists If yes go to Step 4 If no n...

Страница 253: ...tep 2 Rectify the fault according to the troubleshooting suggestion Step 3 Check whether the fault is rectified If yes no further action is required If no go to Step 4 Step 4 Check that the power supply to the chassis is correct If the indicator on the power supply unit PSU is steady green the power supply is normal Step 5 Check that the keyboard video and mouse KVM cable is properly connected to ...

Страница 254: ...ditions do not meet device operating requirements Event Alarms and Fault Alarms Based on the impacts on the system alarms are classified into the following types Event alarms Event alarms record the events that occur during normal system operating Event alarms do not affect system operating Fault alarms Fault alarms are generated for faults that affect normal system operating Viewing Alarms You ca...

Страница 255: ...ely 8 6 1 Alarm Syntax A standard alarm consists of five fields separated by commas The content of each field is the string after each colon The alarm attributes are described as follows Time Time when an alarm is generated for example Time Thu Apr 3 10 06 04 2009 Sensor Name of the sensor that generates an alarm for example Sensor Power Temp Event Details about an alarm for example Event high tem...

Страница 256: ... the CLI of the management software 9 4 Logging In to the Remote Virtual Console This topic describes how to log in to the Appliance remote desktop over the iBMC WebUI 9 5 Disabling RAID Boot Options When the N2000H V3 is equipped with dual RAID controller cards to avoid a failure to display the boot option for installing the OS due to insufficient BIOS space you are advised to disable the other R...

Страница 257: ...the IP Address in the BIOS Step 1 Restart the Appliance 1 Click on the menu bar on the remote virtual console For details about how to log in to the remote virtual console see 7 4 Logging In to the Remote Virtual Console 2 Select Reset The system displays Are you sure to perform this operation 3 Click Yes The Appliance restarts 4 Press Delete repeatedly when the screen shown in the following figur...

Страница 258: ...et the BIOS password Step 2 Choose Advanced IPMI iBMC Configuration and press Enter The IPMI iBMC Configuration screen is displayed Step 3 Select iBMC Configuration and press Enter The iBMC Configuration screen is displayed showing information about the IP address of the iBMC network port See Figure 7 2 Figure 9 2 iBMC Configuration Step 4 Select IP Address in IPV4 configuration and press Enter On...

Страница 259: ...ration for the iBMC management network port in the same way Step 6 Press F10 to save settings and exit End 9 2 Logging In to the iBMC WebUI This topic describes how to log in to the iBMC WebUI Scenarios Use the WebUI to quickly and easily monitor manage and configure devices Log in to the iBMC WebUI Prerequisites Conditions No special condition is required for this operation Data The following dat...

Страница 260: ...ss Enter Then enter a user name and password to log in as shown in Figure 7 4 Figure 9 4 iBMC home page End 9 3 Accessing the CLI of the iBMC Management Software This topic describes how to access the CLI of the management software Scenarios You can log into the iBMC CLI to manage and monitor the device There are ways to access the CLI of the management software choose the way based on actual site...

Страница 261: ... client communications tool that supports the SSH protocol b Connect the network interface of the configuration terminal to the management interface of the Appliance c Log in by using the user name password and IP address of the management network interface Logging In Through the Telnet To log in to iBMC over Telnet is insecure By default iBMC does not support Telnet login If you need to log in to...

Страница 262: ... the user name and password for logging in to the iBMC The default user name is root and the default password is Huawei12 Procedure Step 1 Log in to the iBMC WebUI For details see 7 2 Logging In to the iBMC WebUI Step 2 In the navigation tree choose Remote The Remote page is displayed as shown in Figure 7 5 Figure 9 5 Remote page Step 3 Click Remote Virtual Console The real time operation console ...

Страница 263: ... V3 supports the following configurations with dual RAID controller cards LSISAS3108 controller card on the mainboard standard LSISAS3108 controller card in a PCIe slot and SoftRAID LSISAS3008 controller card on the mainboard standard LSISAS3008 controller card in a PCIe slot and SoftRAID The RAID controller card boot options are enabled by default To configure the system to boot from a RAID contr...

Страница 264: ...ainboard and standard LSISAS3108 controller card in a PCIe slot are the same a In the power on self test POST phase of the Appliance restart process press Ctrl R to open the BIOS configuration screen Figure 9 7 POST screen b Select the boot option for the LSISAS3108 controller card on the mainboard or standard LSISAS3108 controller card in a PCIe slot and press Enter See Figure 7 8 Figure 9 8 Sele...

Страница 265: ... 10 Figure 9 10 Setting parameters on the Ctrl Mgmt screen e Press Ctrl S to save the settings and press ESC to exit Disable the boot option for an LSISAS3008 controller card The methods for disabling the boot options for the LSISAS3008 controller card on the mainboard and standard LSISAS3008 controller card in a PCIe slot are the same a In the POST phase during the Appliance restart process press...

Страница 266: ... Figure 9 11 POST screen b Select the boot option for the LSISAS3008 controller card on the mainboard or standard LSISAS3008 controller card in a PCIe slot and press Enter See Figure 7 12 Figure 9 12 Selecting a RAID controller card on the mainboard c Select Boot Support Then press the or key to change the value to Enabled OS only See Figure 7 13 ...

Страница 267: ... 258 Figure 9 13 Setting Boot Support d Press ESC to save the settings and exit Disable the boot option for SoftRAID a Restart the Appliance When the screen shown in Figure 7 14 is displayed press Del to start the BIOS Setup Utility Figure 9 14 Screen displayed after a Appliance restarts b Choose Advanced PCH SATA Configuration See Figure 7 15 ...

Страница 268: ...11 06 Huawei Proprietary and Confidential Copyright Huawei Technologies Co Ltd 259 Figure 9 15 Choosing PCH SATA Configuration c Press Enter to open the PCH SATA Configuration screen Set SATA Controller to Disabled See Figure 7 16 Figure 9 16 Setting SATA Controller ...

Страница 269: ...nfidential Copyright Huawei Technologies Co Ltd 260 d Press Esc to return to the Advanced screen and choose PCH sSATA Configuration See Figure 7 17 Figure 9 17 Choosing PCH sSATA Configuration e Press Enter to open the PCH sSATA Configuration screen Set sSATA Controller to Disabled See Figure 7 18 ...

Страница 270: ...r Guide 9 Common Operations Issue 04 2018 11 06 Huawei Proprietary and Confidential Copyright Huawei Technologies Co Ltd 261 Figure 9 18 Setting sSATA Controller f Press Esc to exit and then press F10 to save the settings End ...

Страница 271: ...o upgrade firmware of the N2000H V3 Upgrading Firmware 10 1 Upgrading Firmware Since the hardware platform of the N2000H V3 appliance solution uses Huawei 5288 V3 follow instructions in the Huawei N2000H V3 firmware upgrade guide to upgrade firmware such as iBMC BIOS and CPLD Click the following link to read the guide https support huawei com enterprise en servers 5288 v3 pid 21497444 category ins...

Страница 272: ... the limits for a Class A digital product pursuant to Part 15 of the FCC Rules These limits are designed to provide reasonable protection against harmful interference when the product is operated in a commercial environment This product generates uses and radiates radio frequency energy If it is not installed and used in accordance with the instructions it may cause harmful interference to radio c...

Страница 273: ...ctric products that are exported to the USA must pass the UL certification 11 4 RoHS The product passes the Restriction of Hazardous Substances RoHS certification and the contents of hazardous substances in the product comply with SJ T 11363 2006 Requirements for concentration limits for certain hazardous substances in electronic information products 11 5 WEEE This product passes the Waste Electri...

Страница 274: ...which case users will be requested to correct the interference by taking protective measures 11 7 C Tick The product passes the C TICK certification In Australia electromagnetic compatibility EMC is monitored by the Australian Communications Authority ACA In Australian EMC system products are divided into three classes The providers must register in the ACA and apply for a C TICK label before they...

Страница 275: ...rty applications The Statement about the installation of third party applications on N2000H V3 producat The N2000H V3 product would be used separately as a single NAS product 1 It s not recommended to install any other third party applications on N2000H V3 because it could have an impact on the lifecycle of the OS disk 128GB SATADOM 2 N2000H V3 do not claim any compatibility with any other third p...

Страница 276: ...upport through the regional offices secondary technical support system telephone technical support remote technical support and onsite technical support A 4 Ways to Contact Huawei Huawei Technologies Co Ltd provides customers with comprehensive technical support and service For any assistance contact our local office or company headquarters A 1 Preparations For Contacting Huawei To better solve th...

Страница 277: ...e documents before you contact Huawei for technical support A 3 How to Obtain Help from Website Huawei provides users with timely and efficient technical support through the regional offices secondary technical support system telephone technical support remote technical support and onsite technical support Contents of the Huawei technical support system are as follows Huawei headquarters technical...

Страница 278: ...ed to insert or remove a blade in or out of a slot F Appliance A special computer that provides various services for clients over a network K KVM Keyboard video and mouse A switch that provides public video keyboard and mouse for all Appliance blades mezz module A card connected to the mainboard through the connector level to the mainboard It is used on a device which has high requirement for spac...

Страница 279: ...redundancy performance hot swap In a running system insertion or removal of a blade or component does not affect normal running of the system redundanc y The ability of a system to keep functioning normally in the event of a device failure by having a backup device automatically replace the faulty one S SEL System event log A non volatile storage area and associated interfaces for storing system p...

Отзывы: