background image


Copyright © Huawei Technologies Co., Ltd. 2011. 

All rights reserved. 

No part of this document may be reproduced or transmitted in 
any form or by any means without prior written consent of 
Huawei Technologies Co., Ltd. 
The product described in this manual may include copyrighted 
software of Huawei Technologies Co., Ltd and possible licensors. 
Customers shall not in any manner reproduce, distribute, 
modify, decompile, disassemble, decrypt, extract, reverse 
engineer, lease, assign, or sublicense the said software, unless 
such restrictions are prohibited by applicable laws or such 
actions are approved by respective copyright holders under 
licenses. 

Trademarks and Permissions 

, and 

  are trademarks or 

registered trademarks of Huawei Technologies Co., Ltd. 
Other trademarks, product, service and company names 
mentioned are the property of their respective owners. 

Notice 

Some features of the product and its accessories described 
herein rely on the software installed, capacities and settings of 
local network, and may not be activated or may be limited by 
local network operators or network service providers. Thus the 
descriptions herein may not exactly match the product or its 
accessories you purchase. 

Содержание G6609

Страница 1: ...GSM Mobile Phone HUAWEI G6609 User Guide ...

Страница 2: ...oftware unless such restrictions are prohibited by applicable laws or such actions are approved by respective copyright holders under licenses Trademarks and Permissions and are trademarks or registered trademarks of Huawei Technologies Co Ltd Other trademarks product service and company names mentioned are the property of their respective owners Notice Some features of the product and its accesso...

Страница 3: ...OSE ARE MADE IN RELATION TO THE ACCURACY RELIABILITY OR CONTENTS OF THIS MANUAL TO THE MAXIMUM EXTENT PERMITTED BY APPLICABLE LAW IN NO CASE SHALL HUAWEI TECHNOLOGIES CO LTD BE LIABLE FOR ANY SPECIAL INCIDENTAL INDIRECT OR CONSEQUENTIAL DAMAGES OR LOST PROFITS BUSINESS REVENUE DATA GOODWILL OR ANTICIPATED SAVINGS Import and Export Regulations Customers shall comply with all applicable export or im...

Страница 4: ... Icons 7 2 Getting Started 8 Phone Lock 8 PIN and PUK 8 Automatically Switching Between Profiles 9 File Management 9 Other Applications 9 3 Voice Services 11 Making a Call 11 Answering a Call 12 4 Text Input 13 Changing the Text Input Mode 13 Using the FN Key 13 Entering Words 14 Entering Digits 14 Entering Symbols 14 ...

Страница 5: ...g an Email Account 17 Creating and Sending an Email 18 7 Contacts 18 Creating a Contact 18 Searching for a Contact 19 Setting a Speed Dial Number 19 8 Multimedia 19 Camera 20 Media Player 21 Sound Recorder 22 FM Radio 22 Photo Editor 23 Ebook Reader 23 9 Connectivity 25 USB 25 Bluetooth 25 10 Warnings and Precautions 27 ...

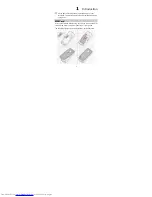
Страница 6: ...nly for your reference The actual appearance and display depends on your phone SIM Card Insert your SIM card before using your phone Remove the SIM card and the battery only after powering off your phone The following figures show the installation of the SIM card ...

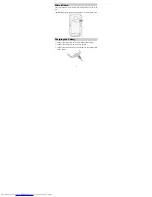
Страница 7: ...p to 16 GB The following figure shows the installation of the microSD card Charging the Battery 1 Connect the larger end of the USB cable to the charger 2 Connect the charger to an AC power socket 3 Connect the smaller end of the USB cable to the charger jack on the phone ...

Страница 8: ...yed in animation When the charging icon becomes static it indicates that the battery is fully charged 5 Disconnect the charger from the phone 6 Disconnect the charger from the AC power socket Your Phone The following figure shows the appearance of your phone and it is for your reference only ...

Страница 9: ...dset jack 9 FN key 2 Charger USB port 10 Keypad locked key 3 Earpiece 11 End Power key 4 Screen 12 Email key 5 Navigation keys 13 Right soft key 6 Left soft key 14 Confirm key 7 Camera key 15 Volume Scroll key ...

Страница 10: ...ll z Return to the standby mode z Access the main menu in standby mode z Select the option displayed in the lower left corner of the screen Select the option displayed in the lower right corner of the screen Access Camera Access Email Confirm a selection Access functions assigned to the navigation keys in standby mode To customize navigation keys as the shortcuts to different functions select Menu...

Страница 11: ... the keyboard in standby mode by pressing and holding the lower part of the key for about 3s z Move the cursor to the next line in text input mode by pressing the upper part of the key z Enter the key in standby mode z Enter the A a letter in text input mode z Enter the key in standby mode z Enter the Q q letter in text input mode z Enter digits letters and icons z Call the voicemail in standby mo...

Страница 12: ...ected General profile Meeting profile Outdoor profile Silent profile The Bluetooth function is enabled The earphone is plugged in Missed call s A new text message is received A new multimedia message is received A new email is received An alarm is activated A microSD card is inserted into the phone ...

Страница 13: ...g of four to eight digits Do remember your phone code If you forget it please contact the service center PIN and PUK The personal identification number PIN protects your SIM card from unauthorized use The PIN unblocking key PUK can unlock the blocked PIN Both the PIN and the PUK are delivered with the SIM card For details contact your service provider If you enter wrong PINs for a specified number...

Страница 14: ...e to save the settings File Management The File manager manages the multimedia files saved in the phone memory or on the microSD card Through the File manager you can view the sizes and creation dates of ebooks images photos videos and audios and open the multimedia files Other Applications z Calendar to view dates and set events z Tasks to view and add tasks z Alarm to set alarms z World clock to...

Страница 15: ...10 z Stopwatch to time a process z Ebook reader to read ebooks z Java to download and install java applications z Games to play games ...

Страница 16: ... make an international call enter the international long distance code country code or region code area code and phone number in sequence z To call an extension number enter the phone number P or W and extension number in sequence 2 Press to dial the number 3 Press to end the call ...

Страница 17: ...you to choose whether to dial the extension number z During a call you can press and to adjust the volume z If your phone supports two SIM cards and if the dual SIM mode is enabled select the SIM card you want to use according to the prompt on the screen Answering a Call When there is an incoming call you can do as follows z Press or to answer the call z Press or to reject the call z If the any ke...

Страница 18: ...aracter on the left of the cursor Press and hold for about 3s to clear all the characters z Press to enter a space z Press the upper part of to move the cursor to the next line z Press the lower part of to switch to the upper case or the lower case Using the FN Key Press the upper part of and then press a key labeled with the number or symbol to enter the corresponding number or symbol labeled in ...

Страница 19: ...enter a word press the keys according to the spelling sequence of the word Entering Digits z In 123 text input mode you can directly press a number key labeled with the desired digit z In any text input mode except 123 press the upper part of and then press the key labeled with the desired digit Entering Symbols 1 Press to display the symbol list 2 Press to scroll to the desired symbol 3 Press to ...

Страница 20: ...15 In any text input mode press the upper part of and then press the keys labeled with the commonly used symbols to enter the symbols ...

Страница 21: ...ur phone may support two SIM cards and if the dual SIM mode is enabled select the SIM card you want to use according to the prompt on the screen Creating and Sending a Text Message 1 Select Menu Messaging Write message 2 Edit the text message 3 Press to add the recipient s You can enter the phone number of the recipient s or add the recipient s through Phonebook 4 Press to send the message Creatin...

Страница 22: ...e availability of the email service and the method of subscribing to the service z Open emails with caution Objects in emails may contain viruses that can damage your phone such as malicious software Creating an Email Account For the details about the settings of the email account contact your email service provider If the email account you need has been configured by default you can enter your us...

Страница 23: ...g emails you need to create and an email account 1 Select Menu Email and then your desired email account 2 Select Options Write Email 3 Select To to add the email address of a recipient 4 Select Subject to edit the email subject 5 Select Content to edit the text contents of the email 6 After editing the email Select Options Send to send the email 7 Contacts Creating a Contact 1 Select Menu Contact...

Страница 24: ...Searching for a Contact 1 Select Menu Contacts 2 Enter the contact name or the first several letters of a contact name 3 Press to scroll to the desired contact Setting a Speed Dial Number 1 Select Menu Contacts 2 Select Options Contacts settings Speed dial 3 Set Status to On 4 Select Set numbers select a number and then assign it to a phone number 8 Multimedia ...

Страница 25: ...s or to view the photo album 6 After taking the picture press to delete forward or edit the picture Recording a video To record a video you can do as follows 1 Select Menu Media Camera 2 Press switch to the recorder mode 3 Press to start recording a video clip During the recording you can do as follows z Press to zoom in z Press to zoom out z Press or to pause or continue 4 Press to stop recording...

Страница 26: ... the playlist to which you want to add audio or video files 3 Select Options Open and then Options Add to select an audio or video file 4 Select Add marked to add the selected audio or video file to the playlist Playing an Audio or Video File 1 Select Menu Media Media player Playlists and then the playlist to which you want to add audio or video files 2 Select Options Open and then select the audi...

Страница 27: ...lay to play the saved audio clip FM Radio The headset cable functions as an antenna as well To ensure good reception of radio programs do not disconnect the headset from the phone or severely bend the headset cable 1 Connect a compatible headset to the phone 2 Select Menu Media FM radio 3 On the FM radio screen you can do as follows z Press to record the program and then press Stop to stop recordi...

Страница 28: ...Ebook Reader Your phone supports ebooks in txt formats You should store ebooks in the Ebook folder in the phone memory or on the microSD card If you open an ebook in another folder the phone automatically moves the ebook to the Ebook folder so that you can find the ebook easily when reading next time 1 Select Menu Tools Ebook reader to display the bookshelf 2 Select an ebook 3 Press Options for fo...

Страница 29: ...24 4 Press Back to exit the ebook ...

Страница 30: ...etooth you can synchronize data between a PC and your phone exchange data with other Bluetooth devices and use a Bluetooth headset You can configure Bluetooth related settings only after enabling the Bluetooth function Select Menu Settings Connectivity Bluetooth Power and then select On to enable the Bluetooth function Using a Bluetooth Headset No Bluetooth headset is delivered in the product pack...

Страница 31: ...d you can use the headset Transferring Data Select My device Search new device to search for available Bluetooth devices and then pair the phone with the desired device After pairing you can transfer data between the phone and the Bluetooth device When a Bluetooth device sets up a connection with the phone for the first time you need to enter a pairing password for authentication ...

Страница 32: ...e facilities Do not use your device when using the device is prohibited z Pacemaker manufacturers recommend that a minimum distance of 15 cm be maintained between a device and a pacemaker to prevent potential interference with the pacemaker If you are using a pacemaker use the device on the opposite side of the pacemaker and do not carry the device in your front pocket Potentially Explosive Atmosp...

Страница 33: ...icles such as grain dust or metal powders Ask the manufacturers of vehicles using liquefied petroleum gas such as propane or butane whether this device can be safely used in their vicinity Traffic Security Observe local laws and regulations while using the device In addition if using the device while driving a vehicle comply with the following guidelines z Concentrate on driving Your first respons...

Страница 34: ...r ear or at a distance of 1 5 cm from your body Ensure that the device accessories such as a device case and a device holster are not composed of metal components Keep your device 1 5 cm away from your body to meet the requirement earlier mentioned z On a stormy day with thunder do not use your device when it is being charged to prevent any danger caused by lightning z When you are on a call do no...

Страница 35: ...ous as it may present a choking hazard Ensure that small children are kept away from the device and accessories Accessories Use the accessories delivered only by the manufacturer Using accessories of other manufacturers or vendors with this device model may invalidate any approval or warranty applicable to the device result in the non operation of the device and cause danger Battery and Charger z ...

Страница 36: ...the electrolyte touches your skin or splashes into your eyes wash your eyes with clean water immediately and consult a doctor z If there is a case of battery deformation color change or abnormal heating while you charge or store the battery remove the battery immediately and stop using it Otherwise it may lead to battery leakage overheating explosion or fire z If the power cable is damaged for exa...

Страница 37: ...orage media such as magnetic cards and floppy disks near the device Radiation from the device may erase the information stored on them z Do not leave your device battery and charger in a place with an extreme high or low temperature Otherwise they may not function properly and may lead to a fire or an explosion When the temperature is lower than 0 C performance of the battery is affected z Do not ...

Страница 38: ...w power radio transmitter and receiver As recommended by international guidelines the device is designed not to exceed the limits for exposure to radio waves These guidelines were developed by the independent scientific organization International Commission on Non Ionizing Radiation Protection ICNIRP and include safety measures designed to ensure safety for all users regardless of age and health T...

Страница 39: ...e may not cause harmful interference and This device must accept any interference received including interference that may cause undesired operation This mobile device meets guidelines for exposure to radio waves Your mobile device is a radio transmitter and receiver It is designed not to exceed the limits for exposure to radio waves recommended by international guidelines This equipment has been ...

Страница 40: ...aration between the equipment and receiver Connect the equipment into an outlet on a circuit different from that to which the receiver is connected Consult the dealer or an experienced radio TV technician for help CAUTION Any changes or modifications not expressly approved by the grantee of this device could void the user s authority to operate the equipment Body worn operations are restricted to ...

Страница 41: ...ential requirements and other relevant provisions of Directive 1999 5 EC For the declaration of conformity visit the Web site www huaweidevice com certification Notice Observe the national local regulations in the location where the device is to be used This device may be restricted for use in some or all member states of the European Union EU Version 01 NO X ...

Отзывы: