background image


15


3.


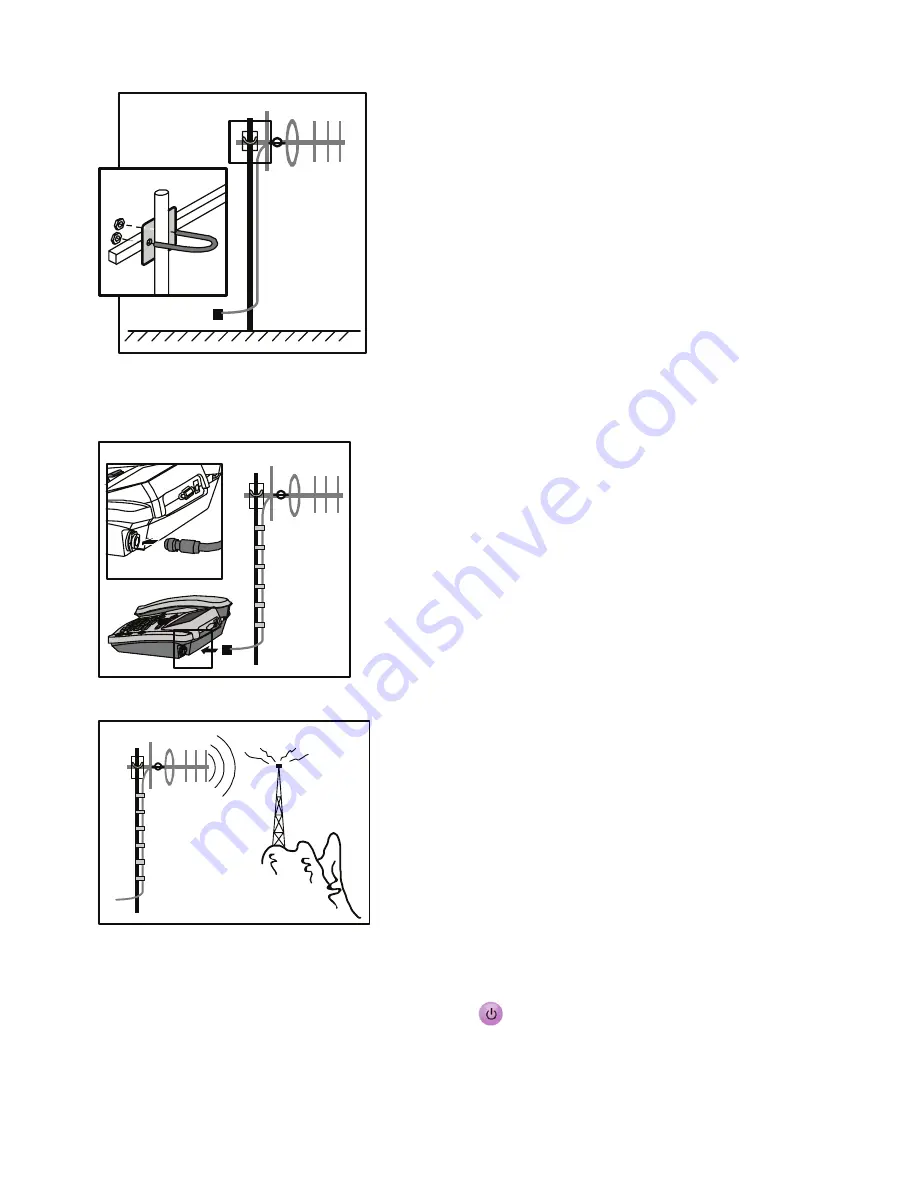
To fasten the antenna, use a band to bind the feeder with the mast every one meter. 
Make sure that the mast is vertical to the ground. 

4.


Connect the feeder plug to the antenna jack on the Main unit. 


5.


Adjust the direction of the antenna for stronger signal strength. 


Checking the Signal Strength 

1.


After installing the antenna, press and hold 

  to power your FWT on. Wait until the 

signal strength icon appears or you can hear the dialing tone when you lift the handset. 

Содержание ETS2258

Страница 1: ...HUAWEI ETS2258 Fixed Wireless Terminal User Guide HUAWEI TECHNOLOGIES CO LTD ...

Страница 2: ...Wonderful Communication Mobile Life Welcome to HUAWEI ETS2258 Fixed Wireless Terminal HUAWEI ETS2258 Fixed Wireless Terminal User Guide ...

Страница 3: ...rks of Huawei Technologies Co Ltd All other trademarks and trade names mentioned in this manual are the property of their respective holders Notice The information in this manual is subject to change without notice Every effort has been made in the preparation of this manual to ensure accuracy of the contents but all statements information and recommendations in this manual do not constitute the w...

Страница 4: ...re Battery 10 Installing the Antenna 12 Connecting the FWT to a PC 16 Placing the FWT 16 Validating 17 4 Calling Operations 18 Powering the FWT On or Off 18 Making a Call 18 Answering a Call 19 Operations During a Call 19 Locking the Keypad 19 5 Text Entry 21 Text Input Mode 21 Entering Letters 21 6 Messages 23 Writing and Sending a Message 23 Viewing a Message 23 Deleting a Message 24 Voice Mail ...

Страница 5: ...30 Shortcut Key Settings 30 Profile Settings 31 Security Settings 31 Supplementary Services 33 Setting Data Services 35 9 FM Radio Optional 36 Switching the Radio On Off 36 Searching for a Channel 36 Setting a Frequency 37 Adding a Channel 37 Deleting a Channel 37 10 Fun Utility 38 11 Menu Commands 39 12 Maintenance and Troubleshooting 41 Maintenance 41 Troubleshooting 41 13 Specifications 43 ...

Страница 6: ... automatic gates and other automatic control devices If you are using an electronic medical device consult the device manufacturer and confirm whether the radio waves affect the operation of the electronic device Hospital Pay attention to the following points in hospitals or health care facilities y Do not take your FWT into the operating room OR intensive care unit ICU or coronary care unit CCU y...

Страница 7: ...ese objects and hurt you when you are using the FWT y Do not place the FWT in the area over the air bag or in the air bag deployment area Otherwise the FWT may hurt you owing to the strong force when the air bag inflates y In raining and lightning disconnect the power adapter from external power supply and power off the FWT In this case if the outdoor antenna is used do not touch the FWT and anten...

Страница 8: ...se FWT may be spoiled Dispose of used batteries according to the instructions y Dispose of the battery according to local laws or regulations Power Adapter y Use AC power as specified for the power adapter Any violation of this rule may result in fire or malfunction of the power adapter y Do not short circuit the power adapter Short circuiting the power adapter may cause fire or malfunction of the...

Страница 9: ...disconnect the USB cable Otherwise the FWT or PC may fail y When disconnecting the USB cable disconnect it from the PC first Environmental Protection Please abide by the local laws in proposing of the package materials of your FWT consumed batteries and used FWT and try to recycle them Please observe the national local regulations in the location where product is to be used This product may be res...

Страница 10: ...tificate of Quality 1 Antenna and Feeder Optional The FWT can work with an indoor antenna or an outdoor antenna There are two kinds of outdoor antennas the outdoor omni directional antenna and the outdoor directional antenna To select an appropriate antenna consult your local dealer The following table lists the antenna and the feeder Item Quantity Feeder Indoor antenna 1 None Outdoor directional ...

Страница 11: ... coming 4 Scroll key z Up key In the standby mode press it to access the Calendar screen during a call press it to increase the volume z Down key In the standby mode press it to enable the radio or alarm clock during a call press it to decrease the volume z Left key In the standby mode press it to view the CallHistory z Right key In the standby mode press it to access the Write message screen 5 Ri...

Страница 12: ...ree mode press it to cancel the dialing z During a call in the handfree mode press it to end the current call 9 Call Redial key z Press it to make or answer a call z In the standby mode press it to view the Dialed Calls 10 key z In the standby mode press and hold it to lock the FWT z Press it to switch between input methods and so on 11 key z In the standby mode press and hold it repeatedly to act...

Страница 13: ... connect to the battery cord 7 Coiled cord jack on the main unit To connect to the handset coiled cord 8 Coiled cord To connect to the handset to the Main unit 9 Coiled cord jack on handset To connect to the handset coiled cord 10 Handset To make a call or answer a call by lifting it 11 Antenna jack To connect to the indoor antenna or the outdoor antenna 12 DB9 serial port To maintain the FWT and ...

Страница 14: ...hat there is a new voice message Indicates that there is an outgoing call or an ongoing call Indicates that the alarm clock is activated Indicates the battery power level The more the bars the higher the power level Indicates that the FWT is powered by the power adapter Indicates that the FWT is in handfree mode Indicates that the network is not available ...

Страница 15: ...s Installing the Power Adapter or the Spare Battery Note y The FWT can be powered by the power adapter or the spare battery y If the FWT is connected to the outdoor antenna disconnect the outdoor antenna before replacing the spare battery y If the FWT is connected to the power adapter and the spare battery is inserted the FWT is powered by the power adapter and meanwhile the spare battery is charg...

Страница 16: ... power socket Installing the Spare Battery Press and hold to power off your FWT and then disconnect the FWT from the power socket Then install the spare battery as shown in the following figure When installing the spare battery make sure that the battery cord plug matches the battery jack Do not insert reversely Removing the Spare Battery Press and hold to power off your FWT and then disconnect th...

Страница 17: ...tallation consult your service provider Installing the Indoor Antenna Power off your FWT disconnect the FWT from the power socket or remove the battery Then connect the indoor antenna to the antenna jack on the Main unit Make sure that the antenna is stably connected to the antenna jack Installing the Outdoor Antenna The outdoor antenna comprises of the outdoor directional antenna and the outdoor ...

Страница 18: ...service provider y Keep the outdoor antenna away from the television antenna y If the feeder is led from outdoor to indoor you need to adopt a waterproof angle The vertical distance between the lowest point of the waterproof angle and the intake vent should be no less than 100 mm to avoid water inpouring Installing the Outdoor Omni directional Antenna 1 Install the omni directional antenna at suit...

Страница 19: ...er plug to the antenna jack on the Main unit Installing the Outdoor Directional Antenna 1 Install the directional antenna at suitable sites such as an attic or a hill It is required that there is no obstacle in the radius of 50 meters from the installation site Fasten the antenna mast firmly 2 Snap the fasten clip to the antenna mast and tighten the screw ...

Страница 20: ...ound 4 Connect the feeder plug to the antenna jack on the Main unit 5 Adjust the direction of the antenna for stronger signal strength Checking the Signal Strength 1 After installing the antenna press and hold to power your FWT on Wait until the signal strength icon appears or you can hear the dialing tone when you lift the handset ...

Страница 21: ... a PC The FWT can be connected to a PC to provide data services Data services include Internet surfing and faxing To use data services you need to purchase the data service suite and connect the FWT to a PC as show in the following figure Connect the USB end of the serial cable to PC and the other end to the serial port of the FWT Fasten the captive screw to ensure reliable connection Caution To a...

Страница 22: ...ith 3 mm end left out 7 7cm 3 Snap the hooks to the nails Validating After installing the FWT you can make a call to check whether it is correctly installed 1 Press and hold to power on your FWT After connecting the FWT to the power socket the icon appears indicating that the FWT is powered normally 2 Lift the handset In the standby mode the signal strength icon appears normally 3 If you are able ...

Страница 23: ...ialed Calls List 1 In the standby mode press to access the Dialed Calls screen 2 Press the to scroll up or down the dialed calls 3 Find the desired one and press to dial Making a Call from the Phone Book 1 In the phone book search for the contact to dial 2 Press to dial Speed Dialing a Call The speed dial function allows you to dial a phone number by pressing one number key You can only set the sp...

Страница 24: ... key to increase the volume or press the down left key to decrease the volume Operations During a Call During a call press to select the following options y Save Number Enter a phone number and related information Then save the contact to the phone book y Phone Book Access the Phone Book screen y Messages Access the Messages screen y Third Party Call Call a third party to join in the current call ...

Страница 25: ...preset time when the FWT is in the standby mode the keypad is automatically locked 1 Select Menu Settings Phone Settings Keyguard 2 Press the to select y Off Deactivate the keyguard function y 30 Seconds 2 Minutes or 5 Minutes Set the FWT to lock automatically if there is no operation beyond 30 seconds 2 minutes or 5 minutes Unlocking the Keypad Press and then press the key to unlock the keypad ...

Страница 26: ... once to delete the letter on the left of the cursor Press and hold for over two seconds to delete all letters Entering Letters Smart English Input In the eZiEn input mode follow the steps described below to enter English 1 According to the word to enter press the corresponding number keys once and the FWT makes out candidate words 2 Press the or the key to select the word 3 Press the right key to...

Страница 27: ...the same key as the previous one you can enter the letter only after the cursor appears again or after you move the cursor to the next space Press the 1 key to enter punctuations Press the 0 key once to enter a space and twice to enter 0 Press the key to display the symbol list Entering Numbers Do the following to enter numbers y In the 123 input mode press number keys labeled with desired digits ...

Страница 28: ...ok 3 The message received party finishing writing the message press for the following operations y Send Save Send the message and save it to the outbox y Send Send the message y Save Save the message to the draft 4 You can insert up to 10 recipients Do the following y Enter the phone number directly y Select Search Search Phone Book to insert a contact from the phone book y Select Search Search Gr...

Страница 29: ...ard Delete messages saved in the UIM card Applicable only if a UIM card is available y Phone Delete messages saved in the FWT y All Delete messages saved in both the FWT and the UIM card 3 Press Yes to delete and press No to cancel Voice Mail Calling the Voice Mail Center 1 Select Menu Messages Voice Mail Options 2 Select Call Voice Mail Center and press Select to call the voice mail center Settin...

Страница 30: ...tion Select Menu Messages Message Settings Auto Save to set the auto save function You can select y Send And Save Activate the auto save function Messages are automatically saved after being sent Messages sent successfully are saved to the outbox Messages that are failed to send are saved to the draft y Send Only Deactivate the auto save function Setting the Auto Delete Function Select Menu Messag...

Страница 31: ...d Delivery Select Menu Messages Message Settings Deferred Delivery to set the message sending delay Immediate After 12 Hours After 1 Day or After 3 Days Setting the Callback Number Select Menu Messages Message Settings Callback Number to set whether to enable the Callback Number function y On Enable the Callback Number function Enter a number and press OK to save y Off Disable the Callback Number ...

Страница 32: ... to save the contact or press Back to cancel Searching for a Contact 1 Select Menu Phone Book Search 2 Enter the name and press OK 3 Press the to scroll up or down the contacts 4 Press View to view the details of the contact Note If you do not enter a name you can press OK to display the contacts Press the number key labeled with the initial letter of the contact The contacts names beginning with ...

Страница 33: ...e you can copy one or all contacts from the FWT to the UIM card and from the UIM card to the FWT Copying a Contact 1 Search for a contact to copy 2 Press Options and select Copy To UIM or Copy To Phone If the contact is saved in UIM card select Copy To Phone to copy it to the FWT If the contact is saved in FWT select Copy To UIM to copy it to the UIM card 3 Press Yes to copy the contact or press N...

Страница 34: ...f the group members y Rename Rename the group y Delete All Delete all contacts of the group Memory Status Your FWT can save up to 500 contacts The number of contacts that can be saved in the UIM card is determined by its capacity Viewing the Memory Status Select Menu Phone Book Memory Status to view the memory status Saving My FWT Number 1 Select Menu Phone Book My Phone Num 2 Press Edit to edit t...

Страница 35: ... dialing is too short an incomplete number may be dialed before you key in the whole number 2 Select Menu Settings Call Settings Auto Dial 3 Select one of the following options Off After 3 Seconds After 4 Seconds After 5 Seconds After 6 Seconds After 7 Seconds After 8 Seconds and After 9 Seconds Shortcut Key Settings The FWT provides shortcut keys for your convenience Note In the standby mode the ...

Страница 36: ...ate the profile Note In the standby mode press and hold the key to activate the quiet mode Press and hold the key again to restore the FWT to the previous mode Editing a Profile 1 In the standby mode select Menu Profiles 2 Press the to scroll up or down the profiles General Outdoor and Quiet 3 Press Select and select Edit to edit a profile You can set the following items y Volume Adjust the volume...

Страница 37: ... details consult your service provider Note y When the PIN code is blocked you can only make emergency calls y If you enter wrong PIN codes three times consecutively the FWT prompts you to enter the correct PUK code If you enter wrong PUK code several times consult your service provider for the correct PUK code y If you enter wrong PUK codes 10 times consecutively the UIM card is invalidated Conta...

Страница 38: ...vacy Call Waiting The call waiting function is network dependent 1 Select Menu Settings Call Settings Call Waiting 2 Select the corresponding options in the following table to enable or disable this function To Do Enable the call waiting function Select On and press The FWT dials the number 42 automatically Disable the call waiting function Select Off and press The FWT dials the number 420 automat...

Страница 39: ... call forwarding busy function Select Off and press The FWT dials the number 900 automatically Enable the call forwarding no answer function 3 Select On and press 4 Enter the forwarded to number xxx and press The FWT dials the number 92 xxx automatically Disable the call forwarding no answer function 1 Select Off and press 2 The FWT dials the number 920 automatically Enable the call forwarding no ...

Страница 40: ...35 Setting Data Services The FWT supports data services Data services include Internet surfing and faxing For details see HUAWEI ETS2258 Fixed Wireless Terminal Data Service User Manual ...

Страница 41: ...u can lift the handset and keep the coiled cord straight for a better effect Switching the Radio Off 1 In the standby mode select Menu FM Radio 2 Press Options and select Switch Off 3 Press Select to switch the radio off and return to the home screen Searching for a Channel Auto Tuning 1 In the standby mode select Menu FM Radio 2 Press Options and select Auto Tuning 3 The FWT searches the availabl...

Страница 42: ...decimal the cursor moves to the right of the decimal automatically if you enter 2 digits before the decimal press the right key to move the cursor to the right of the decimal 4 Press Save and returns to the main interface of radio press Clear to clear the settings and return to the broadcasting screen press the left right key to move the cursor to clear the settings Adding a Channel 1 After search...

Страница 43: ...ce y Everyday The alarm clock rings once every day y Custom The alarm clock rings on the specified days Note y When the alarm clock rings press Stop to turn off the alarm clock Alternatively press Snooze to snooze the alarm clock for five minutes y If you do not turn off the alarm clock in 45 seconds the alarm clock automatically snoozes After five minutes the alarm clock rings again It alerts aut...

Страница 44: ... calls received calls and all calls You can view or reset the duration z The call duration recorded by the FWT may differ from that in the call detail record CDR of your service provider The difference is determined by factors such as the network functioning and the round up settings Delete All You can delete all missed calls received calls or dialed calls If the intelligent network charging funct...

Страница 45: ... Command Profiles See Profile Settings on page31 Settings Display You can set backlight contrast date format time format and banner You can set the backlight to off 10 seconds 20 seconds 30 seconds or always on You can press the left right key to increase or decrease the contrast You can set the date format to yyyy mm dd dd mm yyyy or mm dd yyyy You can set the time format to 12 hour or 24 hour Yo...

Страница 46: ...ery is installed 2 The battery level is low Connect the FWT to the power adapter The display screen does not turn on after the FWT is powered on the FWT is connected to the power adapter 1 The voltage output of the power adapter does not meet the requirement of the FWT Check whether the AC input is normal and the power adapter is the approved one 2 The external voltage of the power adapter is low ...

Страница 47: ...annot answer the call by pressing Do not enable the PC fax function while the network supports it To answer an incoming call disable the PC fax function After the FWT is powered off there is no display sometimes while sometimes there is power supply icon and blinking battery icon No information on the display screen is a normal status of FWT after power off The power supply icon and a blinking bat...

Страница 48: ...Horizontal or wall mounting Input voltage AC 90 V 264 V DC 12 V Spare battery Type NI MH Capacity 3 6 V 1000 mAh Maximum transmitter power 23 dBm Typical conversation power consumption 1 2 W Typical stand by power consumption 40 mW Ambient temperature 10 to 55 Storage temperature 20 to 70 Relative humidity 5 to 95 ...

Отзывы: