


Huawei Technologies Proprietary
49
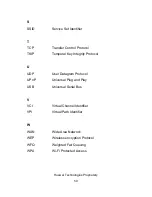
L
LAN Local
Area
Network
M
MAC
Media Access Control
N
NAT
Network Address Translation
P
PPP
Point to Point Protocol
PPPoA
PPP over ATM
PPPoE
PPP over Ethernet
PSTN
Public switched telephone network
PVC
Permanent Virtual Connection
Q
QoS
Quality of Service
R
RIP
Routing Information Protocol
Содержание EchoLife HG550
Страница 1: ...EchoLife HG550 Home Gateway User Manual ...