background image

User Manual 
EchoLife HG510 Home Gateway 

Chapter 3  Configuration Guide 


Huawei Technologies Proprietary 

3-24 

1)  Enter the VPI/VCI values. The actual parameter is provided 

by your ISPs,you can contact them to get the detailed 
information.. 

2)  Click<Next> to go to next step. 

II. 

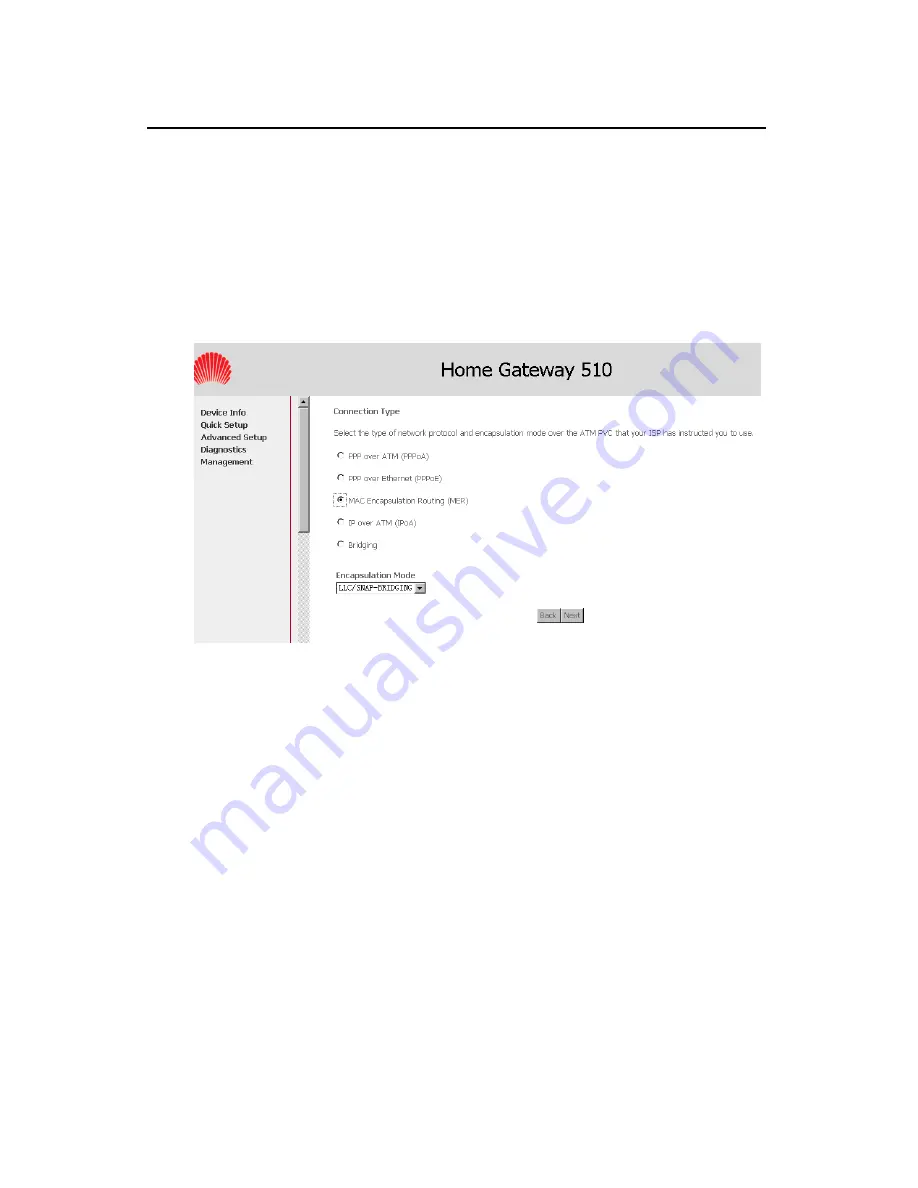
Configure Connection Type and Encapsulation Mode 


Figure 3-21 

Quick Setup – Connection Type and Encapsulation 

Mode 

1)  Select “MAC Encapsulation Routing ” and the 

“Encapsulation Mode”. The actual parameter is provided by 
your ISPs,you can contact them to get the detailed 
information.. 

2)  Click<Next> to go to next step. 

Содержание EchoLife HG510

Страница 1: ...EchoLife HG510 Home Gateway User Manual ...

Страница 2: ...Huawei Technologies Proprietary HUAWEI EchoLife HG510 Home Gateway User Manual V100R001 ...

Страница 3: ...Ltd provides customers with comprehensive technical support and service Please feel free to contact our local office or company headquarters Huawei Technologies Co Ltd Address Administration Building Huawei Technologies Co Ltd Bantian Longgang District Shenzhen P R China Postal Code 518129 Website http www huawei com Email support huawei com ...

Страница 4: ...WEI are trademarks of Huawei Technologies Co Ltd All other trademarks and trade names mentioned in this manual are the property of their respective holders Notice The information in this manual is subject to change without notice Every effort has been made in the preparation of this manual to ensure accuracy of the contents but all statements information and recommendations in this manual do not c...

Страница 5: ...sisting you in data configurations and typical applications EchoLife HG510 Home Gateway Quick Quide It will guide you to install HG510 quickly Organization The manual introduces the system structure hardware description configuration guide of the HG510 There are four chapters in the manual Chapter 1 System Overview profiles the system characteristics main functions system structure external interf...

Страница 6: ...ice configuration of the HG510 step by step Chapter 4 Appendix includes two parts It list the default setting and collects the abbreviations and acronyms used in this manual Intended Audience The manual is intended for the following readers z Technical marketing specialists z Installation engineers and technicians z Operation and maintenance personnel Conventions The manual uses the following conv...

Страница 7: ...r example pop up the New User window Multi level menus are separated by forward slashes For example File Create Folder III Symbols Eye catching symbols are also used in this manual to highlight the points worthy of special attention during the operation They are defined as follows Caution Warning Danger Means reader be extremely careful during the operation Note Comment Tip Knowhow Thought Means a...

Страница 8: ...rietary Environmental Protection This product has been designed to comply with the requirements on environmental protection For the proper storage use and disposal of this product national laws and regulations must be observed ...

Страница 9: ... HG510 2 3 Chapter 3 Configuration Guide 3 1 3 1 Preparing Configuration 3 1 3 2 Establishing the Connection 3 1 3 3 Configuring the HG510 3 3 3 3 1 Configuring PPPoE 3 4 3 3 2 Configuring IPoA 3 11 3 3 3 Configuring Bridge 3 17 3 3 4 Configuring MER 3 22 3 3 5 Configuring PPPoA 3 26 3 4 Advanced Setup 3 28 3 4 1 Configuring WAN 3 28 3 4 2 Configuring LAN 3 29 3 4 3 Configuring NAT 3 29 3 4 4 Conf...

Страница 10: ...ng DSL 3 42 3 5 Configuring Diagnostics 3 42 3 6 Management 3 43 3 6 1 Configuring Backing up Updating Resetting HG510 Settings 3 44 3 6 2 Viewing System Log 3 46 3 6 3 Configuring SNMP Agent 3 48 3 6 4 Configuring Access Control 3 48 3 6 5 Updating Software 3 51 3 6 6 Save Reboot 3 52 Chapter 4 Appendix 4 1 ...

Страница 11: ...net access z 10 100Base T Ethernet router to provide Internet connectivity to all computers on your LAN z Network Address Translation NAT and IP filtering functions to provide firewall protection for your computers z Network configuration through DHCP z Configuration program you access through an HTML browser 1 2 System Requirements In order to use the HG510 ADSL Ethernet router you need to have t...

Страница 12: ...G510 Home Gateway Chapter 1 System Overview Huawei Technologies Proprietary 1 2 z For system configuration using the supplied web based program a web browser such as Internet Explorer V5 0 or later or Netscape V4 7 or later ...

Страница 13: ...his manual the HG510 shall arrive with the following Item Quantity HG510 1 Power adapter 1 Network cable 1 Phone cable 1 Splitter 1 Qualitication Card 1 EchoLife HG510 Home Gateway Quick Quide 1 Note Each carton is deliered with one EchoLife HG510 Home Gateway User Manual 2 1 Front Panel The front panel provides LEDs that indicate the status of the HG510 ...

Страница 14: ...lished and active Off No ADSL link ADSL ACT Green Flashes during ADSL data transfer On No data transfer LAN1 4 Green On The LAN link is established and active Off No LAN link Flashes during data transfer PWR Green On The device is powered on Off The device is powered off 2 2 Rear Panel The rear panel provides ports for the HG510 to receive send data and get power supply Table 2 2 lists ports funct...

Страница 15: ... LAN1 4 RJ 45 connector connects the device to your computer s Ethernet port or to the uplink port on your LAN s hub using the cable provided 2 3 Connecting the HG510 You need to connect the HG510 to the phone jack the power outlet and your computer or network Caution Before cable connection turn off power of your computer s LAN hub switch if applicable and the HG510 Figure 2 1illustrates the cabl...

Страница 16: ...DC Power in Reset Switch Power DC IN Figure 2 1 Cable connection Follow the steps listed below to install it Stage Description See in 1 Connect the ADSL line 2 3 I 2 Connect the Ethernet cable II 3 Attach the power adapter III 4 Turn on the HG510 and power up your computer and LAN devices IV 5 Configure the HG510 through the Web interface V 6 Save the configuration and reboot VI ...

Страница 17: ...itter has three ports z LINE connects to the wall jack z PHONE connects to the phone sets z MODEM connects the ADSL port of the HG510 Plug one end of the twisted pair ADSL cable into the ADSL port on the rear panel of the HG510 and insert the other end into the MODEM port of the external splitter Caution Although you use the same type of cable The ADSL and PHONE ports are not interchangeable Do no...

Страница 18: ... HG510 and power up computers and LAN devices Press the Power switch on the rear panel of the device down Turn on and boot up your computer s and any LAN devices such as hubs or switches V Configure the HG510 through the Web interface The detailed steps are described in Chapter 3 Configuration Guide It will help you configure the HG510 to meet your need VI Save the configurations and Reboot To mak...

Страница 19: ... HG510 and computer with a cross over straight through Ethernet cable z Power on the HG510 z The default IP of the HG510 is 192 168 1 1 3 2 Establishing the Connection Enter the IP address default is 192 168 1 1 of the HG510 from the Web Browser 1 In the dialog box displayed as shown in Figure 3 1 enter the user name and password By default the user name and password are admin ...

Страница 20: ... Gateway Chapter 3 Configuration Guide Huawei Technologies Proprietary 3 2 Figure 3 1 Authentication 2 Then click OK If the authentication passes the home page Device Info Summary will be displayed on the browser Refer to Figure 3 2 ...

Страница 21: ...rough a Web Browser Network configuration need to be planned and decided before starting the configuration procedure Quick Setup allows system administrator to select the appropriate operation mode and configure the corresponding settings step by step to create a connection The following five operation modes are supported z PPP over Ethernet PPPoE z IP over ATM IPoA z Bridging z MAC Encapsulation ...

Страница 22: ... and follow the steps below to create a PPPoE connection Follow the steps listed below to configure Stage Description See in 1 Configure ATM PVC 3 3 1 I 2 Select Connection type and encapsulation mode 3 3 1 II 3 Configure PPP username and password 3 3 1 III 4 Enable IGMP multicast and WAN service 3 3 1 IV 5 Configure LAN Service 3 3 1 V 6 WAN setup summary 3 3 1 VI ...

Страница 23: ... Guide Huawei Technologies Proprietary 3 5 I Configure ATM PVC Figure 3 3 Quick Setup ATM PVC Configuration 1 Enter the VPI VCI values The actual parameter is provided by your ISPs you can contact them to get the detailed information 2 Click Next to go to next step ...

Страница 24: ...uawei Technologies Proprietary 3 6 II Select Connection Type and Encapsulation Mode Figure 3 4 Quick Setup Connection Type and Encapsulation Mode 1 Select Connection type PPP over Ethernet PPPoE and select the appropriate Encapsulation Mode 2 Click Next to go to next step ...

Страница 25: ... ISP you can contact them to get the detailed information The Dial on demand with idle timeout timer function if checked a new setup parameter Inactivity Timeout minutes 1 4320 will appear for the HG510 to tear down the PPP link automatically if there is no outgoing packet for the programmed period of time The HG510 sets up PPPoE connection automatically when the PPPoE connection is not set up and...

Страница 26: ...guration Guide Huawei Technologies Proprietary 3 8 Click Next to go to next step IV Enable IGMP Multicast and WAN service Figure 3 6 Quick Setup IGMP Multicast WAN service 1 Check Enable Disable IGMP Multicast and WAN Service 2 Click Next to go to next step ...

Страница 27: ...etup Device Setup 1 Enter the IP LAN IP default 192 168 1 1 address and Subnet Mask default 255 255 255 0 2 Select Disable Enable DHCP Server if enable DHCP Server configure the DHCP server parameters If select Configure the second IP Address and Subnet Mask for LAN interface configure related settings for that mode 3 Click Next to go to next step ...

Страница 28: ...is by default enabled and is not showing on the page to prevent it from being disabled VI WAN Setup Summery Figure 3 8 Quick Setup WAN Setup Summary The last page gives a summary of previous steps Make sure that the settings match the settings provided by ISP and then Click Save Reboot to complete the configuration procedure ...

Страница 29: ...left frame and follow the steps below to create a IPoA connection Follow the steps listed below to configure Stage Description See in 1 Configure ATM PVC 3 3 2 I 2 Select Connection type 3 3 2 II 3 3 2 II 3 Configure WAN IP settings 3 3 2 III 4 Enable NAT IGMP Multicast and WAN service 3 3 2 IV 5 Configure LAN Service 3 3 2 V 6 WAN setup Summary 3 3 2 VI ...

Страница 30: ...Guide Huawei Technologies Proprietary 3 12 I Configure ATM PVC Figure 3 9 Quick Setup ATM PVC Configuration 1 Enter the VPI VCI values The actual parameter is provided by your ISPs you can contact them to get the detailed information 2 Click Next to go to next step ...

Страница 31: ... Proprietary 3 13 II Select Connection Type Figure 3 10 Quick Setup Connection Type and Encapsulation Mode 1 Select IP over ATM IPoA and the Encapsulation Mode The actual parameter is provided by your ISPs you can contact them to get the detailed information 2 Click Next to go to next step ...

Страница 32: ...3 14 III Configure WAN IP Settings Figure 3 11 Quick Setup WAN IP Settings 1 Obtain the WAN IP Subnet Mask Default Gateway and DNS Server automatically or set them manually The actual parameter is provided by your ISPs you can contact them to get the detailed information 2 Click Next to go to next step ...

Страница 33: ...ry 3 15 IV Enable NAT IGMP Multicast and WAN Service Figure 3 12 Quick Setup IPoA NAT IGMP Multicast WAN service 1 Check Enable Disable NAT and Firewall functions 2 Use Advanced Setup Firewall to assign filter rules 3 Check Enable Disable IGMP Multicast and WAN Service 4 Click Next to go to next step ...

Страница 34: ...Setup Device Setup 1 Enter the IP LAN IP default 192 168 1 1 address and Subnet Mask default 255 255 255 0 2 Select Disable Enable DHCP Server if enable DHCP Server configure the DHCP server parameters If select Configure the second IP Address and Subnet Mask for LAN interface configure related settings for that mode 3 Click Next to go to next step ...

Страница 35: ...y of previous steps Make sure that the settings match the settings provided by ISPs and then Click Save Reboot to complete the configuration procedure 3 3 3 Configuring Bridge Click Quick Setup in the left frame and follow the steps below to create a Bridging connection Follow the steps listed below to configure Stage Description See in 1 Configure ATM PVC 3 3 3 I 2 Select Connection type 3 3 3 II...

Страница 36: ... See in 3 Configure WAN service 3 3 3 III 4 Configure IP Address 3 3 3 IV 5 WAN setup Summary 3 3 3 V I Configure ATM PVC Figure 3 15 Quick Setup ATM PVC Configuration 1 Enter the VPI VCI values The actual parameter is provided by your ISPs you can contact them to get the detailed information 2 Click Next to go to next step ...

Страница 37: ...gies Proprietary 3 19 II Select Connection Type Figure 3 16 Quick Setup Connection Type and Encapsulation Mode 1 Select Bridging and the Encapsulation Mode The actual parameter is provided by your ISPs you can contact them to get the detailed information 2 Click Next to go to next step ...

Страница 38: ... 3 Configuration Guide Huawei Technologies Proprietary 3 20 III Configure WAN Service Figure 3 17 Quick Setup WAN Service 1 Enter a service name default setting is br_0_33 and check the box to enable this WAN service 2 Click Next to go to next step ...

Страница 39: ...hapter 3 Configuration Guide Huawei Technologies Proprietary 3 21 IV Configure IP Address Figure 3 18 Quick Setup Device Setup 1 Enter the LAN IP default 192 168 1 1 address and Subnet Mask default 255 255 255 0 2 Click Next to go to next step ...

Страница 40: ... summary of previous steps Make sure that the settings match the settings provided by ISPS and then Click Save Reboot to complete the configuration procedure 3 3 4 Configuring MER Click Quick Setup in the left frame and follow the steps below to create a MAC Encapsulation Routing MER connection Follow the steps listed below to configure Stage Description See in 1 Configure ATM PVC 3 3 4 I ...

Страница 41: ...23 Stage Description See in 2 Configure Connection type and Encapsulation Mode 3 3 4 II 3 Configure WAN IP settings 3 3 4 III 4 Enable NAT IGMP Multicast and WAN service 3 3 4 IV 5 Configure LAN Service 3 3 4 V 6 WAN setup summary 3 3 4 VI I Configure ATM PVC Figure 3 20 Quick Setup ATM PVC Configuration ...

Страница 42: ...an contact them to get the detailed information 2 Click Next to go to next step II Configure Connection Type and Encapsulation Mode Figure 3 21 Quick Setup Connection Type and Encapsulation Mode 1 Select MAC Encapsulation Routing and the Encapsulation Mode The actual parameter is provided by your ISPs you can contact them to get the detailed information 2 Click Next to go to next step ...

Страница 43: ...IP Settings 1 Obtained automatically or set manually the WAN IP Subnet Mask Default Gateway and DNS Server 2 Click Next to go to next step IV Enable NAT IGMP Multicast and WAN service Refer to 3 3 2 IV Enable NAT IGMP Multicast and WAN Service V Configure LAN Service Set device IP LAN IP and Subnet Mask and DHCP related items Refer to 3 3 2 V Configure LAN Service ...

Страница 44: ... WAN Setup Summary 3 3 5 Configuring PPPoA Click Quick Setup in the left frame and follow the steps below to create a PPPoA connection The following setting steps are all the same as PPPoE steps Follow the steps listed below to configure Stage Description See in 1 Configure ATM PVC I 2 Select Connection type II 3 Configure PPP username and password III 4 Enable IGMP Multicast and WAN service IV 5 ...

Страница 45: ...your ISPs you can contact them to get the detailed information Refer to 3 3 1 III Configure PPP Username and Password IV Enable IGMP Multicast and WAN service configuration Refer to 3 3 1 IV Enable IGMP Multicast and WAN service V Configure LAN Service Set device IP LAN IP and Subnet Mask and DHCP related items Refer to 3 3 1 V Configure LAN Service VI WAN Setup Summery The last page gives a summa...

Страница 46: ...tem administrator to configure the following z WAN z LAN z NAT z Security z Routing z DNS z DSL 3 4 1 Configuring WAN Figure 3 23 Advanced Setup WAN This page shows the current existing WAN interfaces in the system You can choose Add Edit or Remove to configure WAN interfaces For details about Add and Edit procedure refer to 3 3 Configuring the HG510 ...

Страница 47: ...tary 3 29 3 4 2 Configuring LAN Figure 3 24 Advanced Setup LAN Enter the IP address and Subnet Mask enable disable DHCP Server Configure the second IP Address and Subnet Mask for LAN interface 3 4 3 Configuring NAT NAT settings include Virtual Servers Port Triggering and DMZ Host function settings ...

Страница 48: ...l port to the internal server with private IP address on the LAN side The internal port is required only if the external port needs to be converted to a different port number used by the server on the LAN side A maximum of 32 entries can be configured Click Add select the service you need for this server then enter the external internal port and protocol rules system will show you default configur...

Страница 49: ...EchoLife HG510 Home Gateway Chapter 3 Configuration Guide Huawei Technologies Proprietary 3 31 Figure 3 26 Advanced Setup NAT Add new Virtual Server II Port Triggering Figure 3 27 Advanced Setup NAT Port Triggering ...

Страница 50: ...tiates a TCP UDP connection to a remote party using the Triggering Ports The Router allows the remote party from the WAN side to establish new connections back to the application on the LAN side using the Open Ports A maximum of 32 entries can be configured Figure 3 28 Advanced Setup NAT Add new Port Triggering Click Add select the application you need then enter the trigger open port and protocol...

Страница 51: ...ts from the WAN that do not belong to any of the applications configured in the Virtual Servers table to the DMZ host computer 1 Enter the computer s IP address and click Save Apply to activate the DMZ host 2 Clear the IP address field and click Save Apply to deactivate the DMZ host 3 4 4 Configuring Security Two functions are supported in Security Outgoing IP Filtering and Incoming IP Filtering ...

Страница 52: ...chnologies Proprietary 3 34 I Outgoing IP Filtering Figure 3 30 Advanced Setup Firewall Outgoing IP Filtering Setup By default all outgoing IP traffic from LAN is allowed but some IP traffic can be blocked by setting up filters Click Add or Remove to configure outgoing IP filters ...

Страница 53: ...dentify the outgoing IP traffic by specifying at least one condition below If multiple conditions are specified all of them take effect II Incoming IP Filtering By default all incoming IP traffic from the WAN is blocked when the firewall is enabled However some IP traffic can be accepted by setting up filters Refer to 3 4 4 I Outgoing IP Filtering and follow the same principle to add a new filter ...

Страница 54: ...e forwarded except those matching with any of the specified rules in the following table BLOCKED means that all MAC layer frames will be blocked except those matching with any of the specified rules in the following table Figure 3 32 Advanced Setup Firewall MAC Filtering Setup Click Add to create a filter to identify the MAC layer frames by specifying at least one condition below If multiple condi...

Страница 55: ...ing Three options related to routing information are included I Default Gateway If Enable Automatic Assigned Default Gateway checkbox is selected this router will accept the first received default gateway assignment from one of the PPPoA PPPoE or MER DHCP enabled PVC s If the checkbox is not selected enter the static default gateway AND OR a WAN interface Click Save Apply to save it ...

Страница 56: ...ration Guide Huawei Technologies Proprietary 3 38 Note To change the Automatic Assigned Default Gateway from unselected to selected You need to reboot the router to get the automatic assigned default gateway Figure 3 34 Advanced Setup Routing Default Gateway ...

Страница 57: ... Static Route Setup Figure 3 35 Advanced Setup Routing Static Route Click Add to create a new Static Route Enter the destination network address subnet mask gateway AND OR available WAN interface and click Save Apply to add the entry to the routing table Figure 3 36 Advanced Setup Routing Add new Static Route ...

Страница 58: ...Routing RIP To activate RIP for the device select the Enabled radio for Global RIP Mode To configure an individual interface select the desired RIP version and operation followed by placing a check in the Enabled checkbox for the interface Click the Save Apply to save the configuration and to start or stop RIP based on the Global RIP mode selected ...

Страница 59: ...le Automatic Assigned DNS checkbox is selected this router will accept the first received DNS assignment from one of the PPPoA PPPoE or MER DHCP enabled PVC s during the connection establishment If the checkbox is not selected enter the primary and optional secondary DNS server IP addresses Click Save to save it You need to reboot the router to make the new configuration effective ...

Страница 60: ...s you to select the DSL modulation support telephone cable pair setting and DSL capability DSL knowledge is required to configure these settings Consult your ISPs and make sure that the settings match the settings provided by it 3 5 Configuring Diagnostics This page allows users to test the Ethernet port connection DSL port connection and connection to the Internet Service Provider ...

Страница 61: ...s to fail click Help to follow the troubleshooting procedure Figure 3 40 Diagnostics 3 6 Management The system administrator can carry out the following functions to manage the configurations events SNMP information user accounts and software update of the HG510 z Settings Backup Update Settings and Reset to Default z System Log z SNMP Agent z Access Control Services IP addresses and Passwords z U...

Страница 62: ...k up update and restore the HG510 settings here The settings can be saved from the HG510 to computer The saved setting file can also be loaded from computer to the HG510 These two functions can help the system administrator to manage large amount of the HG510 efficiently By restoring default settings you can set the HG510 with the factory default configuration Figure 3 41 Management Setting Backup...

Страница 63: ...ies Proprietary 3 45 Click Backup Settings to save the settings to a file on the local computer Figure 3 42 Management Setting Update Click Browse to locate the setting file saved on the Local computer Click Update Settings to apply the settings to the HG510 according to the setting file ...

Страница 64: ...Guide Huawei Technologies Proprietary 3 46 Figure 3 43 Management Setting Restore Default Click Restore Default Settings and then confirm the action 3 6 2 Viewing System Log This allows System Administrator to view the System Log and configure the System Log options ...

Страница 65: ...ng Notice Informational and Debugging The Log Level implies that what log level is applied to the HG510 to keep the log The Display Level just shows the users the log message that they want to know As a result Display Level is just a subset of the retrieved from the total log message which was logged according to the setting of the Log Level If the Mode is set to Remote or Both the log messages ar...

Страница 66: ...agement application to retrieve statistics and status from the HG510 Figure 3 45 Management SNMP Agent Enable or disable the SNMP Agent The detailed functions of the Read Community Set Community System Name System Location System Contact Trap Manager IP are not be described here 3 6 4 Configuring Access Control The Services lists the service daemons including FTP HTTP ICMP SNMP TELNET that can be ...

Страница 67: ...h service FTP HTTP ICMP SNMP TELNET are supported in the HG510 The IP Address Access Control mode if enabled permits access to local management services from IP addresses contained in the Access Control List If the Access Control mode is disabled the system will not validate IP addresses for incoming packets The services are the system applications listed in the Service Control List ...

Страница 68: ...ove to remove the IP address from the ACL Access to your DSL router is controlled through three user accounts admin support and user The user name admin has unrestricted access to change and view configuration of your DSL Router The user name support is used to allow an ISP technician to access your DSL Router for maintenance and to run diagnostics The user name user can access the DSL Router view...

Страница 69: ...anagement Access Control Passwords 3 6 5 Updating Software The new released software can be updated through HTTP Click Browse to locate the new software image file in the computer Then click Update Software to proceed the software update The procedure takes about two minutes do not power off the device during the period ...

Страница 70: ...on Guide Huawei Technologies Proprietary 3 52 Figure 3 49 Management Update Software 3 6 6 Save Reboot Click Save Reboot to reboot the HG510 The HG510 will automatically save the configuration before reboot so that modified settings will take effect after reboot ...

Страница 71: ...User Manual EchoLife HG510 Home Gateway Chapter 3 Configuration Guide Huawei Technologies Proprietary 3 53 Figure 3 50 Management Save Reboot ...

Страница 72: ...r Line ATM Asynchronous Transfer Mode D DHCP Dynamic Host Configuration Protocol DNS Domain Name Server DSLAM Digital Subscriber Line Access Multiplex H HTML Hypertext Markup Language I IP Internet Protocols IPoA Internet Protocols Over ATM ISP Internet Service Provider L LAN Local Area Network M MAC Media Access Control N NIC Network Interface Card ...

Страница 73: ... PPP Point to Point Protocol PPPoA PPP over ATM PPPoE PPP over Ethernet PVC Permanent Virtual Connection R RIP Routing Information Protocol S SNMP Simple Network Management Protocol T TCP Transfer Control Protocol V VCI Virtual Channel Identifier VPI Virtual Path Identifier W WAN Wide Area Network ...

Страница 74: ...Huawei Technologies Co Ltd Administration Building Huawei Technologies Co Ltd Bantian Longgang District Shenzhen P R China Postal Code 518129 Website http www huawei com ...

Отзывы: