

Press and hold for more than 3 seconds to enable or disable the WLAN function.
○
18
Reset button
Press and hold for 2 to 5 seconds to restart the device.
Press and hold for more than 5 seconds to restore the device to its factory settings.
Note:
Restoring the default settings of the Router will override all the previous settings.
○
19
WPS button
After the WPS function is enabled, press and hold this button for more than 2 seconds to
initiate WPS interconnection.
○
20
External antenna port
Connect to an external antenna.
Note:
On: An indicator is on.
Blinking/Blinking at regular intervals: An indicator turns on and off at regular intervals.
Blinking at irregular intervals: An indicator turns on and off at irregular intervals.
Off: An indicator is off.
All indicators except the power indicator are blinking: The device is being upgraded or
is restarting. To avoid damage to the device, do not power off during this process.
Connecting a Device to the Router
Before connecting the device, please read the safety information carefully.
Note:
Power off the Router and remove all cables from the Router in thunderstorms.
Do not use an external antenna or a power adapter that is not a standard component
for the Router or is not certified by Huawei. Huawei is not liable for any problems that
may result from use of such an external antenna or a power adapter.
Selecting the Installation Environment
Obstacles such as concrete and wooden walls will affect the transmission of the network signal.
It is recommended that when you install devices you choose an open space and ensure that
there are no obstructions between the computer and the device.
Keep the device away from equipment that generates strong magnetic and electric fields, for
instance microwaves, refrigerators, and satellite receivers.
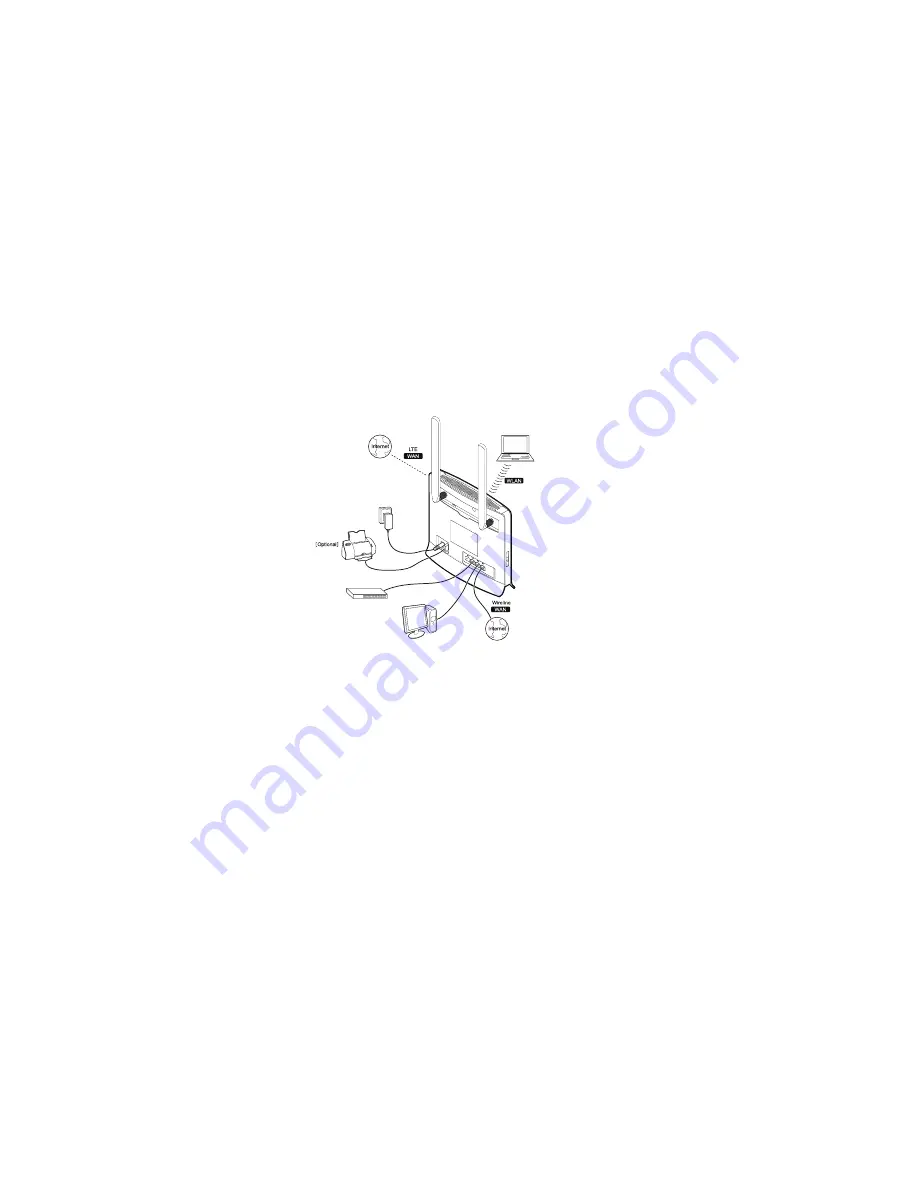
Cable Connection
When connecting, use the cables and adapters that came as a set with the product. When
finished, press the power button to turn on the device.
The connection cable illustration is for reference only.
When the device is in use, you can alter its position or orientation to improve signal reception.
The signal strength light indicates the received signal strength.
Logging In to the Web Management Page
The web-based configuration utility can be used for initial device installation, parameter
configuration, and function management through the browser.
The Windows XP operating system and Internet Explorer 7.0 are used as an example. Ensure
that the device is connected to the computer. Follow these steps to log in to the web
management page:
1.
Connect device cables.
2.
Configure the computer's IP address so that the IP addresses of the computer and the
device are in the same network segment.
Note:
The device's default IP address is 192.168.1.1, the subnet mask is 255.255.255.0, and the
login password is admin. If the device operates in routing mode, it is recommended you
automatically obtain the IP address and DNS server address.
3.
Open the browser, and enter http://192.168.1.1 in the address box.
4.
Enter the user name and password to log in to the web management page. After the
login information is verified, the web management page is loaded.
Version: V100R001_01 Part Number: 3101****


