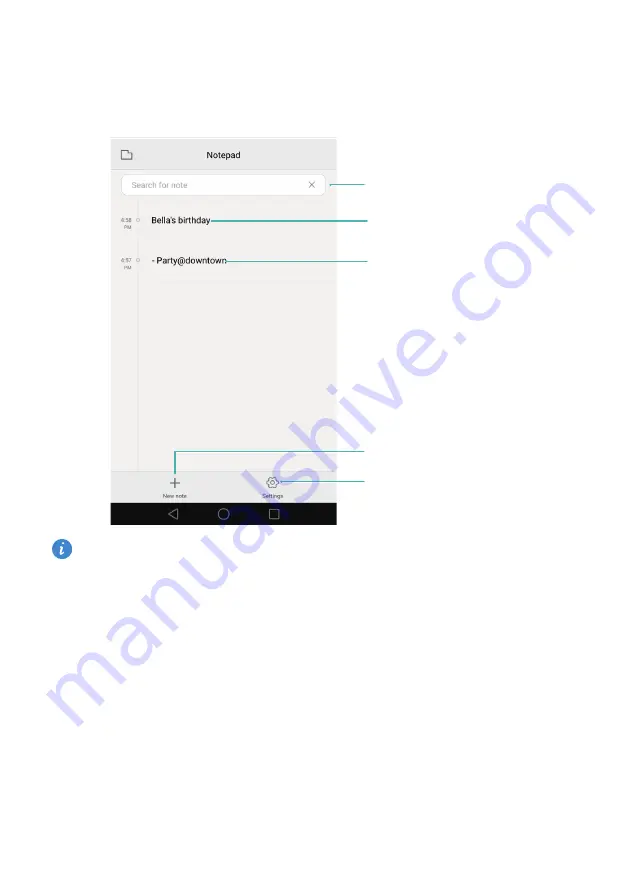
background image

Tools

83

Notepad

Use Notepad to record important information or shopping lists. You can set up reminders 

for each note. 


On the Notepad home screen, pending notes are prefixed with "-" to help you quickly identify 

which notes require your attention.

No status added to note

Pending note

Select display settings

Create a note

Search bar

Содержание Ascend XT

Страница 1: ...User Guide Huawei Ascend XT ...

Страница 2: ...one 6 First Use and Initial Setup Initial setup 7 Connecting to the Internet 7 Installing Applications Sharing applications using a microSD card 8 Uninstalling an application 8 Getting Started Locking and unlocking the screen 9 Touchscreen gestures 10 Status and notification icons 12 Home screen 14 Taking a screenshot 18 Notifications 18 Personalizing your phone 20 Entering text 22 Calls and Conta...

Страница 3: ...oups 39 Messaging and Email Sending a message 41 Replying to a message 42 Searching for messages 43 Deleting threads 43 Managing messages 43 Blocking spam messages 44 Managing common phrases 44 Adding a message signature 45 Adding an email account 45 Sending an email 47 Checking your emails 48 Managing VIP contacts 48 Account settings 49 Camera and gallery Accessing the viewfinder 50 Taking a phot...

Страница 4: ... application to back up and restore data 68 Restoring factory settings 69 File Management Viewing files 70 Sharing files 71 Creating folders 71 Renaming files 71 Copying moving or deleting files 72 Creating or extracting archives 72 Excluding small images 73 Storing private files in a safe 73 Phone Manager Optimizing your system 74 Managing data usage 74 Harassment filter 75 Battery management 75 ...

Страница 5: ...date and time 96 Changing the system language 96 Viewing your phone s specifications 96 Viewing the available storage space 96 Encrypting a microSD card 97 Formatting the microSD card 97 Accessibility Features About your phone s accessibility features 98 TalkBack 98 Magnification gestures 101 Using the power button to end a call 102 Adjusting the screen response time 103 Color correction 103 Appen...

Страница 6: ...can insert 1 nano SIM card and 1 microSD card Tips Your phone only supports nano SIM card Contact your carrier for a new or replacement nano SIM card if needed Only use standard nano SIM card to avoid damaging the SIM card tray Ensure that the card is in the correct position and keep the card tray level when inserting it into your phone Be careful not to hurt yourself or damage your phone when usi...

Страница 7: ... recharge your battery many times but all batteries have a limited lifespan If you notice a significant deterioration in your phone s battery life contact an authorized Huawei service center for a replacement battery The battery is built into the phone and is not removable Do not attempt to remove the battery yourself Your phone may become warm after prolonged use or when exposed to high ambient t...

Страница 8: ...attery level is below 10 A yellow status indicator and a battery icon indicate that the battery level is between 10 and 90 A green status indicator and a battery icon indicate that the battery level is between 90 and 100 A green status indicator and a battery icon indicate that the battery is fully charged and you can unplug the charging cable from your phone If your phone does not respond when yo...

Страница 9: ...our carrier Backing up data to a microSD card You can back up data on your old phone to a microSD card For more information on inserting or removing a microSD card see Inserting a SIM card and microSD card Data that can be backed up contacts messages call log photos audio videos files and applications 1 Open Backup More settings Restore previously backed up data Back up new data ...

Страница 10: ...he backup you want to restore If the backup data is encrypted enter the encryption password when prompted 5 Select the data you want to restore and then touch Start restoration Transferring data between your phone and a computer Transfer the data on your old phone to your computer and then transfer it to your new phone Connect your phone to a computer using a USB cable Swipe down from the status b...

Страница 11: ...mation see Importing contacts from a storage device Bluetooth Enable Bluetooth on both your old and new phones and import your contacts using Bluetooth For more information see Importing contacts using Bluetooth Backup If your old phone supports Backup back up your contacts and restore them to your new phone For more information see Using the Backup application to back up and restore data Computer...

Страница 12: ...ng applications Connecting to a Wi Fi network 1 Swipe down from the status bar to open the notification panel 2 In the Shortcuts tab touch and hold to open the Wi Fi settings screen 3 Turn on the Wi Fi switch Your phone will list available Wi Fi networks 4 Select the Wi Fi network you want to connect to If the Wi Fi network is encrypted enter the password when prompted Using mobile data Before usi...

Страница 13: ...ocess Always read these messages carefully If you wish to proceed with the installation touch Settings and then turn on the Unknown sources switch to allow your phone to install third party applications After you have finished installing the application touch Settings Advanced settings Security and turn off the Unknown sources switch to prevent your phone from installing applications downloaded fr...

Страница 14: ... to reduce power consumption and prevent unintended operations To change the screen sleep time open Settings touch Display Sleep and then select a time Your phone will continue to receive messages notifications and incoming calls when the screen is locked The status indicator will flash green when you receive new notifications When you receive an incoming call the screen will turn on and display t...

Страница 15: ...n Slide your finger in any direction to unlock the screen Touchscreen gestures Use simple touchscreen gestures to perform a variety of tasks such as open applications scroll through lists and zoom images Touch Touch an item once For example touch to select an option or open an application ...

Страница 16: ...ple touch and hold a blank area on the home screen to access the home screen editor Swipe Swipe your fingers on the screen For example in the Notifications tab swipe left or right on a notification to dismiss it Swipe vertically or horizontally to go to other home screens scroll through a document and more Drag Touch and hold an item and then move it to another position For example use this gestur...

Страница 17: ...rier Spread fingers apart Spread two fingers apart on the screen For example spread two fingers apart to zoom in on a picture or web page Pinch fingers together Pinch two fingers together on the screen For example pinch two fingers together to zoom out on an image Signal strength No signal Connected over GPRS Connected over EDGE Connected over HSPA HSPA WCDMA Connected over Long Term Evolution LTE...

Страница 18: ...ry full Missed calls Call in progress New emails New messages Select an input method New voicemail Connected over Wi Fi Wi Fi network available Downloading data Uploading data Upcoming events Phone memory full Synchronizing data Synchronization failed Login or synchronization problem More notifications Portable Wi Fi hotspot enabled Connected to a VPN USB tethering enabled Receiving location data ...

Страница 19: ...lication When entering text touch to close the onscreen keyboard Home Touch to return to the home screen Recent Touch to access the list of recently used applications Status bar Displays notifications and status icons Main screen Displays application icons desktop folders and widgets Screen position indicator Indicates which home screen is displayed Dock Displays frequently used applications Navig...

Страница 20: ...atic screen rotation When you rotate your phone some applications will automatically adjust the screen orientation to make them easier to use This feature also lets you use tilt controlled applications Swipe down from the status bar to open the notification panel and then touch Auto rotate in the Shortcuts tab to enable or disable automatic screen rotation ...

Страница 21: ...me screen for quick access On the home screen touch and hold a blank area to open the home screen editor Touch WIDGETS and select a widget Touch and hold the widget and drag it to a blank area on the home screen You must have enough space on the home screen to add widgets If there is not enough space add another home screen or free up some space ...

Страница 22: ...lication icon or widget you want to remove until is displayed at the top of the screen Drag the unwanted application icon or widget to Creating a folder Create home screen folders to organize your applications by type For example you can create a Games folder that contains all of your game applications On the home screen drag an icon on top of another icon to create a folder containing both applic...

Страница 23: ...om the status bar and open the notification panel to view notifications Swipe left on the notification panel to go to the shortcuts tab Swipe up on the screen or touch Back or Home to close the notification panel Customize shortcut switches Swipe up on the shortcuts tab and then touch Edit Drag the shortcut switch to the desired location for easier access Viewing notifications on the lock screen N...

Страница 24: ...ngs for the notification and status bar Configuring the drop down settings for the notification bar Touch Drag actions Smart selection When you open the notification panel your phone will go to the notifications tab if you have new notifications otherwise it will go to the shortcuts tab Touch Drag actions Determine from drag position Swipe down from the left of the status bar to open to the notifi...

Страница 25: ...cons or widgets to open them Touch and hold an icon to open the home screen editor and add or delete application icons Touch Others to open the application list and view or open applications Touch to add contacts or applications to the home screen Touch Standard home to exit the simple home screen Changing the theme Personalize your phone s home screen using a wide range of themes and wallpapers O...

Страница 26: ...ive Wallpapers Photos or Wallpapers 3 Select an image and then follow the onscreen instructions to set it as the wallpaper Assigning a ringtone to a contact Assign a unique ringtone to each contact so that you can easily tell who is contacting you 1 Open Contacts 2 Select the desired contact and then touch Phone ringtone 3 Select the desired ringtone or music file and then touch ...

Страница 27: ...displayed in messages contacts and the dialer application Entering text Switching text input methods Switch between text input methods as desired 1 On the text input screen swipe down from the status bar to open the notification panel 2 Touch Select input method in the Notifications tab and then select the desired input method If there are no input methods to choose from go to Settings touch Advan...

Страница 28: ...xt Copy text Select text and touch Copy Cut text Select text and touch Cut Paste text Touch and hold where you want to insert the text and then touch Paste Share text Select text and then touch Share to select a sharing method Enter numbers and symbols Enter a comma Touch and hold to open the input options menu Enter a space Touch and hold to choose another input method Backspace Switch to voice i...

Страница 29: ... the list select the contact you want to call 4 Touch to end the call Enabling quick calling Call people quickly even when the screen is switched off 1 Open Dialer 2 Touch Settings Quick calling and then turn on the Quick calling switch Press and hold the volume down button for one second when the screen is off When you hear the alert sound release the volume down button and say the name of the co...

Страница 30: ...ithout a SIM card However you must be in an area with cellular coverage 1 Open Dialer 2 Enter the emergency number for your location in the dialer and then touch The ability to make emergency calls can depend on local regulations and carriers in your area Poor network reception or environmental interference may prevent your call from being connected Never rely solely on your phone for essential co...

Страница 31: ...o activate an international calling or roaming service 1 Open Dialer 2 On the dialer screen touch and hold the 0 key to enter a symbol and then enter the country code area code and phone number 3 Touch Answering or rejecting a call When a call comes in you can press the volume button to mute the ringtone While the screen is locked Drag right to answer the call Drag left to reject the call Touch to...

Страница 32: ...n is unlocked Touch to answer the call Touch to reject the call Touch to reject the call and send an SMS Touch to configure a callback reminder On the dialer screen touch Settings Reject calls with SMS to edit the predefined text messages ...

Страница 33: ... to find out how to use this feature For more information see Making a conference call Adjust the volume Press the volume up button to increase the volume or the volume down button to decrease the volume To end a call using the power button go to Dialer touch Settings and then turn on the Power button ends call switch Mute the call Start a three way call Enable hands free mode Open the dialer End ...

Страница 34: ...hold service and enabled call waiting on your phone For more information on enabling call waiting see Enabling call waiting For details contact your carrier 1 If you receive an incoming call when in another call touch You can then answer the incoming call and hold the other line 2 Touch to switch between the two calls ...

Страница 35: ...ond participant s number The first participant will be placed on hold 3 When the second call is connected touch to start a conference call 4 To add more people to the call repeat steps 2 and 3 5 Touch to end the call Viewing the call log The call log is displayed above the dialer Missed calls are displayed in red Adding a number from the call log Select a number from the call log and save it to yo...

Страница 36: ...one volume and vibration intensity will gradually increase when you receive a call 1 Open Dialer 2 Touch Settings 3 Turn on the Pocket mode switch Your phone will vibrate for incoming calls when it is facing downwards or in your pocket even if incoming call vibrations are disabled Call settings Enabling call forwarding If you are unavailable to take a call you can configure your phone to forward c...

Страница 37: ...y you about important calls or messages 1 Open Settings 2 Touch Do not disturb and turn on the Do not disturb switch 3 Touch Define priority interruptions Whitelist for calls and messages to add contacts to the whitelist When do not disturb mode is enabled your phone will only ring or vibrate when chosen contacts call or message you Your phone will mute ringtones or vibrations for any other calls ...

Страница 38: ...en enter your voicemail number When you receive a voicemail message the icon is displayed in the status bar Dial the voicemail number to retrieve the message Creating a contact The number of contacts you can store on your phone depends on the size of your phone s internal storage The maximum number of SIM card contacts may vary depending on your SIM card s storage capacity 1 Open Contacts 2 Touch ...

Страница 39: ...es and then touch Take photos of multiple cards Switch to Burst mode and follow the onscreen instructions to photograph multiple cards After you have finished scanning or taking photos contact information will automatically be saved to Business cards Importing or exporting contacts Your phone supports vcf contact files VCF is a standard file format for storing contact information including names a...

Страница 40: ...tooth devices 5 Touch Next Your phone will automatically turn on Bluetooth and search for nearby devices 6 Touch the Bluetooth device from which you want to import contacts Once connected your phone will automatically import contacts from the other Bluetooth device Importing contacts using Wi Fi Direct 1 Open Contacts 2 Touch Import Export Import from another phone 3 Select Import via Wi Fi Direct...

Страница 41: ...ectory of your phone s internal storage by default Open Files to view the exported file Exporting contacts to a SIM card 1 Open Contacts 2 Touch Import Export Export to SIM card 3 Select the contacts you want to export and then touch 4 Touch Continue Sharing contacts 1 Open Contacts 2 Touch Import Export Share contact 3 Select the contacts you want to share and then touch 4 Choose your sharing met...

Страница 42: ...ery Alternatively enter the contact s new information and then touch The contact s photo will be displayed when the contact calls you Other contact information such as company name and job title will also be displayed Add multiple numbers for one contact Select a contact from the contact list and then touch Edit Add phone number Merging duplicate contacts When you add contacts to your phone from d...

Страница 43: ...he contacts screen touch Display preferences and then select All contacts 2 On the contact list use one of the following methods to find a contact Swipe the contact list up or down Slide your finger up or down the index on the right hand side of the screen to scroll through your contacts Enter the contact s name initials phone number email address or other contact information in the search bar at ...

Страница 44: ... Contacts 2 Touch and hold the contact you want to add to your favorites and then touch Add to favorites to add the contact to Favorites When viewing contact details touch to add the contact to your favorites Remove contacts from your favorites Touch Favorites on the contacts screen Select the contacts that you wish to remove from your favorites and then touch Contact groups Organize friends and f...

Страница 45: ... add new members to the group 4 Touch You can then Touch Remove members to remove members from the group Touch Delete group to delete the group Touch Rename to edit the group name Sending messages or emails to a group 1 Open Contacts 2 Touch Groups and select which group you want to send a message or email to 3 Touch to send a message or to send an email Deleting a group 1 Open Contacts 2 Touch Gr...

Страница 46: ...ssage threads touch 3 Select the recipient box and enter the contact name or phone number You can also touch to open your contact list and choose a contact or contact group 4 Select the text field and enter your message and then touch If you enter more than three lines of text touch to switch to full screen text entry Touch to add an attachment to your message ...

Страница 47: ...en Messaging 2 In the list of message threads touch a contact name or phone number to view your conversations 3 Select the text field and enter your message and then touch Reply to a message from the notification bar New messages will be displayed in the notification bar Touch the button to compose a reply Swipe left or right to select attachment type Switch to full screen text entry Send Choose r...

Страница 48: ...pen Messaging 2 In the list of message threads touch and hold a thread 3 Select the threads you want to delete and then touch Delete Managing messages Delete unwanted messages forward messages to other contacts copy and paste message content and lock messages or add them to your favorites to prevent them from being deleted by accident 1 Open Messaging 2 In the list of message threads touch a conta...

Страница 49: ...ge Touch Lock to lock the message When you delete messages locked messages will not be affected Blocking spam messages 1 Open Messaging 2 In the list of message threads touch Harassment filter to view blocked messages 3 Touch to configure the spam rules and keywords Blocked messages are not shown in the list of message threads Managing common phrases Create common phrases to save you time when you...

Страница 50: ... touch OK Adding an email account Adding a personal email account When adding an account consult your email service provider if you are unsure about the account settings 1 Open Email 2 Choose an email service provider or touch Others 3 Enter your email address and password and then touch Next Touch Manual setup to configure an email account manually 4 Follow the onscreen instructions to configure ...

Страница 51: ...s and families When adding an account consult your email service provider if you are unsure about the account settings 1 Open Email 2 Touch Exchange 3 Enter your email address user name and password Touch Next 4 Follow the onscreen instructions to configure your account The system will automatically connect to the server and check the server settings Once the account has been set up your Inbox wil...

Страница 52: ...cipients touch Cc Bcc 5 Enter your email subject and main body Touch to add an attachment 6 Touch Your email service provider may place a limit on the size of email attachments If your attachments exceed the limit send the attachments in separate emails Touch Save to save your email as a draft Amy huawei com Recipient Email body Add attachment Send Subject Select recipient from contact list ...

Страница 53: ...lete the email Touch Reply and enter text to compose a quick reply Swipe left or right to read the next or previous email Managing VIP contacts Add important contacts to your VIP list Emails from your VIP contacts will appear in a separate inbox 1 Open Email 2 In your Inbox open the email that you want to read 3 Touch the contact s photo and then select Add to VIP list in the popup menu To change ...

Страница 54: ... Removing an email account 1 Open Email 2 In your Inbox touch Settings 3 Select the account you want to remove 4 Touch Remove account OK After you remove an email account you will no longer be able to send or receive emails using that account Personalizing your email account Display contact pictures choose what to display after deleting an email change your signature set inbox update frequency and...

Страница 55: ... scene you want to capture Let your camera focus automatically or touch the screen to focus on an object 3 Touch If the GPS tag switch was enabled when the photo was taken the photo can be viewed inMap under Gallery Switch flash modes View images or videos Take a photo Apply filter effects Switch between rear and front cameras View more options ...

Страница 56: ...atering food Panorama Use this mode to take wider shots HDR Enhance a photo taken under insufficient or excessive lighting conditions All focus You can re adjust the focal point of photos taken in this mode at a later time Watermark Add various watermarks to your photos Audio note You can record a brief audio clip after you take a photo Audio control Touch and enable this mode under Settings You c...

Страница 57: ...photo 1 On the home screen touch Camera 2 Touch Panorama to switch to panorama shooting mode 3 Touch to start shooting 4 Follow the onscreen instructions and move your phone slowly to capture multiple photos 5 Touch to stop shooting The camera automatically stitches the photos together to create one panoramic photograph Adding watermarks to photos 1 On the home screen touch Camera 2 Touch Watermar...

Страница 58: ... reaches a certain decibel level Object tracking mode 1 On the home screen touch Camera 2 Touch 3 Touch Object tracking to enable object tracking mode 4 Touch an object on the screen Your camera will track and stay focused on this object as you re shooting Object tracking mode and smile capture can t be used at the same time All focus mode 1 On the home screen touch Camera 2 Touch All focus to swi...

Страница 59: ...Focus on the subject for example a PPT poster or screen and then touch to take a photo Your camera will automatically extract the part of the image containing text and adjust its orientation so that it is easier to read Touch the thumbnail to read the text in the image and then touch to edit the image Shooting a video 1 On the home screen touch Camera 2 Swipe left or right to select Video 3 Touch ...

Страница 60: ... is not available in all countries and regions Audio control Take a photo using voice commands Timer Enable this feature to set a self timer Touch to capture Touch the viewfinder to take a photo Capture smiles The camera will automatically take a photo when it detects a smile Object tracking Touch the object you want to focus on The camera will track and focus on the selected object Touch hold shu...

Страница 61: ... by album Playing a slideshow 1 On the home screen touch Gallery 2 Under Photos touch Slideshow 3 Touch the screen to stop the slideshow Editing an image The Gallery application comes with powerful image editing tools that you can use to bring your photos to life For example you can draw graffiti add watermarks or apply a variety of filters 1 Open Gallery 2 Touch an image to view it in full screen...

Страница 62: ...ntuate colors Touch and select the colors that you wish to accentuate Blur an image Touch Drag the slider to adjust the amount of blur Drag the circle to the part of the image that you do not want to blur Adjust image parameters Touch You can adjust the brightness contrast saturation and more to make your image look more vivid Apply facial enhancement effects Touch to apply facial enhancement effe...

Страница 63: ...oughts Hiding photos 1 On the home screen touch Gallery 2 Under Albums touch Hide albums 3 Touch the switch next to the album to hide the photos Not all local albums on the phone s internal storage can be hidden Deleting a photo 1 On the home screen touch Gallery 2 Select the photo you want to delete and then touch Delete Sharing photos and videos You can share your photos or videos in various way...

Страница 64: ...s are saved to the Screenshotsfolder in Gallery You can also swipe down from the status bar to open the notification panel and touch under Shortcuts Scanning a QR code Scanning a QR code using gallery 1 On the home screen touch Gallery 2 Choose a QR code photo 3 Touch the photo Gallery will automatically scan the QR code 4 Touch the QR code link to view more information about the code Scanning a Q...

Страница 65: ...nternet using a Wi Fi access point or hotspot Your personal data and financial information may be at risk if you connect to insecure public Wi Fi networks Connecting to a Wi Fi network 1 Open Settings 2 Touch Wi Fi and then turn on the Wi Fi switch Your phone will list available Wi Fi networks Search manually for Wi Fi networks Touch Scan Your phone will scan again for available Wi Fi networks Add...

Страница 66: ...e is connected to a Wi Fi network it will display the icon in the status bar Your phone will remember Wi Fi networks that you have used before and reconnect to them automatically Connecting to the Wi Fi network with the strongest signal When Wi Fi is enabled your phone will automatically enable or disable Wi Fi and connect to the Wi Fi network with the best signal You may incur additional data cha...

Страница 67: ...monitor the signal strength of nearby public hotspots Sharing your mobile Internet with other devices You can share your phone s mobile Internet with other devices such as phones tablets or computers The following Internet sharing methods can be used Portable Wi Fi hotspot Create a portable Wi Fi hotspot to share your mobile Internet with other devices Bluetooth tethering Share your mobile Interne...

Страница 68: ...ces will require a password to connect to the hotspot If you choose None devices will not require a password to connect to the hotspot Configure a password that is easy to remember The hotspot password is generated randomly by your phone For security reasons choose a password that is not easy to guess and change it regularly Configure the maximum number of connections Touch Maximum connections all...

Страница 69: ...Internet After enabling USB tethering your phone will display the icon in the status bar You can then use the computer to access the Internet You cannot use the mass storage feature when your phone is in USB tethering mode Using Bluetooth tethering to share your mobile Internet Use Bluetooth tethering to turn your phone into a wireless router and share your mobile Internet with other devices Compa...

Страница 70: ...vice you want to pair with is not displayed check that the device is discoverable 3 Select the device you want to pair with and follow the onscreen instructions Sending and receiving files using Bluetooth Check that both devices are paired before attempting to transfer files Send files Touch and hold the file you want to send and touch Share Bluetooth Your device will automatically search for near...

Страница 71: ...i Fi Direct can only be used to transfer data between two Huawei devices Check that both devices support Wi Fi Direct Connecting two devices using Wi Fi Direct Establish a Wi Fi Direct connection to transfer data wirelessly between two devices 1 Open Settings select Wi Fi and then turn on the Wi Fi switch Touch Wi Fi Direct 2 Repeat the above steps on the other device and keep the Wi Fi Direct sea...

Страница 72: ...ure you want to send 2 Touch Share Wi Fi Direct Wait until the receiving device is detected and then select it If the receiving device is not detected check that Wi Fi is enabled 3 A prompt will be displayed on the receiving device Touch Accept to accept the file transfer request Open the notification panel and touch Notifications to monitor the file transfer progress By default received files are...

Страница 73: ...ckup to copy data to your phone s internal storage or a microSD card Features may vary depending on your carrier Backing up data to local storage You can back up your contacts messages call log photos music videos files and applications 1 Open Backup 2 Touch Backup Internal storage Next More settings Restore previously backed up data Back up new data ...

Страница 74: ...ry settings Restore your phone to its factory settings if it crashes or is slow to respond Back up important data on your phone before restoring factory settings For more information see Using the Backup application to back up and restore data Restoring factory settings will erase all personal data from your phone including fingerprints account information downloaded applications and application s...

Страница 75: ...earch results will be displayed below the search bar Sorting your files Use the sort feature to arrange your files by type name size or date 1 Open Files 2 In the Local tab touch Internal storage or SD card 3 Touch and then sort files by type name size or date as desired Creating file shortcuts on the home screen Create a shortcut to frequently used files on the home screen for easy access 1 Open ...

Страница 76: ...share your files Creating folders Create folders and place files inside them to keep your phone organized 1 Open Files 2 In the Local tab touch Internal storage or SD card 3 Touch enter the name of the new folder and then touch Save Renaming files Give your files distinctive names so that you can find them more quickly 1 Open Files 2 In the Local tab touch Internal storage or SD card 3 Touch and h...

Страница 77: ... Touch Delete Creating or extracting archives Combine multiple files into a single zip archive to free up storage space and make your files easier to share 1 Open Files 2 In the Local tab touch Internal storage or SD card 3 Touch and hold the files or folders you want to add to the archive and then touch Compress 4 Choose the archive destination The selected files will be compressed into a zip arc...

Страница 78: ...a later date 1 Open Files 2 In the Categories or Local tab touch Safe 3 Touch Enable and set the safe storage location 4 Follow the onscreen instructions to set a password and security question and then touch Done to open Safe 5 Touch Follow the onscreen instructions to select files and then touch to add them to the safe Remove files from a safe In Safe open the folder which contains the files you...

Страница 79: ...ings 3 Once the data has been cleared touch Finish Managing data usage Phone Manager comes with a data management feature that you can use to monitor data usage and avoid exceeding your monthly allowance Open Phone Manager and then touch Traffic manager You can view detailed data usage statistics or configure the following settings Traffic use ranking View per application data usage Networked apps...

Страница 80: ...lacklist or whitelist keywords and spam settings Touch Notification center and select an application to configure its notification permissions and settings Battery management Phone Manager comes with a battery management feature to help you save power and prevent you from missing important calls and messages Open Phone Manager and then touch remaining You can View detailed battery usage statistics...

Страница 81: ...leting events Add events and set reminders to help you plan ahead Add an event Open Calendar touch and then enter the name start and end time and location of the event Touch to save the event If you add a reminder your phone will send you a reminder at the preset time Delete an event Go to the event that you want to delete and then touch Event Selected day Events on selected day More settings Togg...

Страница 82: ... Touch Local calendar and select the desired calendar For more information on connecting to the Internet see Accessing the Internet Automatically import contacts birthdays Touch Calendars to display and then turn on the Contacts birthdays switch Your phone will automatically import your contacts birthdays and create birthday reminders Viewing global holidays Enable the global holidays option to he...

Страница 83: ... the Alarm tab you can Add an alarm Touch and set the alarm time ringtone repetitions and more Touch to apply Enable or disable an alarm Touch the switch next to an alarm Configure the alarm settings Touch to configure the snooze duration silent mode settings and volume button behavior Delete an alarm Touch and hold the alarm you want to delete and then touch Turn off an alarm Touch Slide to turn ...

Страница 84: ...e and time Touch Date time Delete a city Touch Edit cities Touch the icon next to the city you want to delete and then touch Dual clock display Your phone displays the network time by default Turn on dual clocks to display the local time and home time on the lock screen Touch Date time Dual clocks and then turn on the Dual clocks switch Touch Set home city and then select your home time zone from ...

Страница 85: ...pwatch 1 Open Clock 2 Under Stopwatch touch to start timing While timing touch to count laps Swipe up on the timer in the middle of the screen to view your lap data 3 Touch to pause the stopwatch 4 Touch to resume the stopwatch or touch to clear the stopwatch records Current time zone Home time zone ...

Страница 86: ... around the world Viewing weather information Open Weather You can View detailed weather information Swipe up on the screen to view the weather forecast for the next 24 hours chance of rainfall air quality comfort index wind speed and direction and sunrise sunset times View weather for other cities Swipe left or right on the screen to view the weather forecast for other cities Change temperature u...

Страница 87: ...e your Update interval Your phone will update weather data at the scheduled interval Adding and deleting cities Add multiple cities to the weather application so that you can keep track of the weather in cities of interest to you 1 Open Weather 2 Touch You can then Add a city Touch Select a city from the list or search for the desired city in the search bar You can add a maximum of 10 cities to th...

Страница 88: ...r shopping lists You can set up reminders for each note On the Notepad home screen pending notes are prefixed with to help you quickly identify which notes require your attention No status added to note Pending note Select display settings Create a note Search bar ...

Страница 89: ... a note follow the onscreen instructions to share or delete it or add it to your favorites Deleting a note 1 Open Notepad 2 Touch and hold the note that you want to delete or select multiple notes and then touch 3 Touch Delete Take a photo Save note Edit note Close note Insert image from gallery Add bullet ...

Страница 90: ... in a variety of different scenarios such as meetings interviews or your own voice Recording sound 1 Open Recorder 2 Touch to start recording In order to ensure optimum recording quality place your phone on a flat surface and do not cover the microphone 3 When you are recording touch to pause or to add a tag 4 To end a recording touch Enter a name for the recording file and then touch Save ...

Страница 91: ...ding 1 Open Recorder 2 Touch 3 Select the recording file you wish to play or touch the play button next to the file name Sort by time or name Swipe down to search for recording Play recording Play through earpiece or speakers ...

Страница 92: ...e will return to the mirror once the image has been saved Zoom in Double touch the screen to zoom in Double touch again to revert to the original screen Increase the brightness When you blow on the microphone the mirror will display a steamed up effect Wipe the screen to remove this effect Zoom in or out Change mirror frame Adjust brightness ...

Страница 93: ...hen turn on the Access my location switch 3 Three options are available under Location mode Use GPS Wi Fi and mobile networks Uses GPS and your phone s Internet connection Enable this option for highly accurate positioning Use Wi Fi and mobile networks Only uses your phone s Internet connection Enable this option for reduced power consumption and longer standby times Use GPS only Does not require ...

Страница 94: ... settings Location access Menu Scan settings Turn on the Wi Fi scanning switch Location applications and services will continually scan for Wi Fi networks for more accurate positioning Turn on the Bluetooth scanning switch Location applications and services will search for Bluetooth devices for more accurate positioning Enable location service Select positioning method ...

Страница 95: ...phone will automatically adjust the screen brightness according to the ambient brightness Clear the Automatic brightness check box to manually adjust the brightness Sleep The screen will lock automatically after a period of inactivity to reduce power consumption Select Sleep to adjust the screen off time or disable the automatic screen lock feature Auto rotate screen If this option is enabled your...

Страница 96: ...vibration to change the ringtone You can choose from preset ringtones or a local music file Turn on the switch to enable vibrations when your phone rings Default notification tone Choose a preset ringtone or a local music file as the notification tone for messages emails and other notifications Touch the switches under System to enable or disable dial pad touch tones touch sounds screen lock sound...

Страница 97: ...ord 1 Open Settings 2 Touch Screen lock passwords Password 3 Enter your screen lock password or unlock pattern and then touch None Navigation bar Open Settings and then touch Smart assistance Navigation bar to configure the navigation bar Choose a custom navigation bar layout If you select a navigation bar containing you can touch for fast access to the notification panel Airplane mode Wireless de...

Страница 98: ...de switch When airplane mode is on is displayed in the status bar Using the floating dock The floating dock gives you access to a number of frequently used options and features such as the back key home key and one touch optimization You can move the floating dock around the screen for easy one hand use Open Settings Touch Smart assistance Floating dock and then turn on the Floating dock switch On...

Страница 99: ... PIN each time you turn on your phone or insert the SIM card into another phone Features may vary depending on your network carrier Before you perform the following operations make sure you have received a SIM card PIN from your carrier 1 Open Settings 2 Touch Advanced settings Security and then select the options under Set up SIM card lock to configure the SIM lock settings 3 Turn on the Lock SIM...

Страница 100: ...l account Deleting an account 1 Open Settings 2 Touch Accounts and then select the account type 3 Select the account that you want to delete and then follow the onscreen instructions to delete it Syncing data with your phone Enable the sync feature to keep all of your phone s data up to date and prevent data loss You can sync emails contacts and other data from your old phone or computer The type ...

Страница 101: ...phone s specifications View your phone s specifications in a few simple steps You can view information about your processor memory screen resolution and more Open Settings and touch About phone Swipe up or down on the screen to view information about the processor RAM internal storage screen resolution IMEI and more Viewing the available storage space Check that there is enough space on your phone...

Страница 102: ...ices that do not support microSD card encryption If you forget the microSD card password you will have to clear all data on the card 1 Open Settings 2 Touch Advanced settings Security 3 Touch Set SD card password and follow the onscreen instructions Touch Change SD card password or Clear SD card password to change or remove the microSD card password Formatting the microSD card Format your microSD ...

Страница 103: ... 1 Open Settings 2 Touch Advanced settings Accessibility TalkBack 3 Turn on the TalkBack switch and then touch OK to enable TalkBack The audible tutorial will be started automatically when you enable TalkBack for the first time If you need to play the tutorial again touch to access the settings and then select the tutorial 4 Touch and then select Explore by touch Your phone will not issue audible ...

Страница 104: ...l read out the content of the selected item Open an item Double touch any part of the screen using one finger to confirm your selection from the previous step For example if you want to open Settings two steps are required Touch the Settings icon once using one finger and then touch twice on any part of the screen ...

Страница 105: ...bled 1 Open Settings 2 Touch Advanced settings Accessibility and then turn on the Speak passwords switch Text To Speech TTS output This feature converts text into speech for visually impaired users This feature requires TalkBack to be enabled 1 Open Settings 2 Touch Advanced settings Accessibility Text to speech output 3 Select the desired speech synthesis engine and voice speed Captions In additi...

Страница 106: ...ity Magnification gestures 3 Turn on the Magnification gestures switch Zoom in Touch the screen three times in quick succession to zoom in Touch the screen three times again to zoom back out Magnification gestures will still be enabled when you touch the screen three times Turn off the Magnification gestures switch to disable magnification gestures Browse a magnified area Swipe the screen using tw...

Страница 107: ...ch the screen three times in quick succession and then hold your finger on the screen Keep your finger on the screen and swipe to browse a magnified area Release your finger to zoom back out Using the power button to end a call 1 Open Settings 2 Touch Advanced settings Accessibility and then turn on the Power button ends call switch Once you have enabled this feature press the power button to end ...

Страница 108: ...3 Select the desired delay time Short Medium or Long Color correction Color correction mode adjusts colors to make it easier for color vision impaired users to distinguish between different parts of the screen Enable this mode with caution as it may affect your phone s battery 1 Open Settings 2 Touch Advanced settings Accessibility and then turn on the Color correction switch 3 Touch Correction mo...

Страница 109: ... unauthorized use Set your device screen to lock and create a password or unlock pattern to open it Periodically back up personal information kept on your SIM card memory card or stored in your device memory If you change to a different device be sure to move or delete any personal information on your old device If you are worried about viruses when you receive messages or emails from a stranger y...

Страница 110: ... Use the harassment filter in Phone Manager to block spam calls and messages For more information see Harassment filter App Lock Use the App Lock in Phone Manager to lock applications and prevent unauthorized access The App Lock password is required to open locked applications Managing data usage Use the data management feature in Phone Manager to keep track of your mobile data usage Mobile data w...

Страница 111: ...wei Ascend Ascend and are trademarks or registered trademarks of Huawei Technologies Co Ltd Android is a trademark of Google Inc LTE is a trademark of ETSI The Bluetooth word mark and logos are registered trademarks owned by Bluetooth SIG Inc and any use of such marks by Huawei Technologies Co Ltd is under license Other trademarks product service and company names mentioned may be the property of ...

Страница 112: ...he availability of any content or service Third party service providers provide content and services through network or transmission tools outside of the control of Huawei To the greatest extent permitted by applicable law it is explicitly stated that Huawei shall not compensate or be liable for services provided by third party service providers or the interruption or termination of third party co...

Страница 113: ... SUCH LOSSES ARE FORSEEABLE OR NOT THE MAXIMUM LIABILITY THIS LIMITATION SHALL NOT APPLY TO LIABILITY FOR PERSONAL INJURY TO THE EXTENT APPLICABLE LAW PROHIBITS SUCH A LIMITATION OF HUAWEI ARISING FROM THE USE OF THE PRODUCT DESCRIBED IN THIS MANUAL SHALL BE LIMITED TO THE AMOUNT PAID BY CUSTOMERS FOR THE PURCHASE OF THIS PRODUCT Import and Export Regulations Customers shall comply with all applic...

Страница 114: ...ail address in your country or region Model H1611 V100R001_01 This guide is for reference only The actual product including but not limited to the color size and screen layout may vary All statements information and recommendations in this guide do not constitute a warranty of any kind express or implied ...

Отзывы: