Huawei AR550 Series Скачать руководство пользователя страница 4

3

Installation Procedure

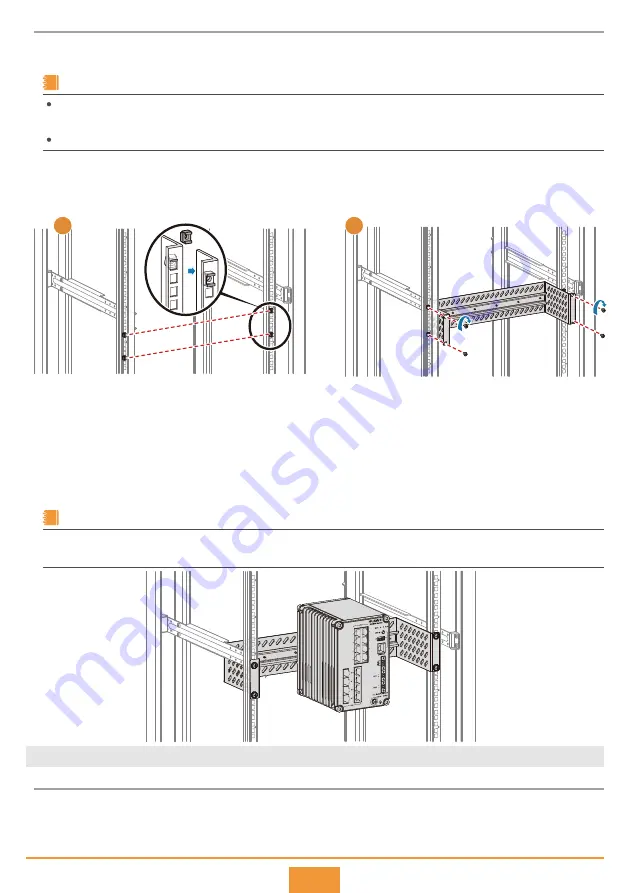
Install two floating nuts on each front mounting rail of the cabinet. Leave four mounting holes between the 

two floating nuts on the same mounting rail. 

Step 1

The length of six adjacent mounting holes may not be 2 U. Observe the scale ticks on the mounting rails when installing floating 

nuts.

You can use a flat-head screwdriver to install floating nuts.

NOTE

Attach the brackets of the 550 horizontal rack-mounting kit on the front mounting rails of the cabinet and 

insert M6 screws in the mounting holes. Use a Phillips screwdriver to tighten the lower M6 screws and then 

the upper ones to fix the rack-mounting kit. 

Step 2

Place the rear panel of the router in front of the DIN rail on the rack-mounting kit and ensure that the DIN rail 

fits in between the fixture near the top of the router and the spring latch near the bottom.

Make the router incline forward with the bottom away from the DIN rail, and place the fixture at the rear of 

the router on the top of the DIN rail.

Slowly push the router toward the DIN rail to make the spring latch at the rear of the router move down. The 

spring latch then bounces back to fix the router on the DIN rail.

Step 3

Step 4

Step 5

If the spring latch is too tight to move down, you can use a flat-head screwdriver to hold down the spring latch during the 

installation.

NOTE

Scenario 3: Using a Vertical Rack-Mounting Bracket to Install an AR550E Router into an F01S200 Cabinet

Installation Procedure

On each front mounting rail, install two floating nuts in the fifth and eighth mounting holes counted from the 

left.

Step 1

×

4

2U

1

2

Содержание AR550 Series

Страница 1: ...HUAWEI TECHNOLOGIES CO LTD Quick Start Guide Issue 14 2018 10 26 Part number 31505671 AR550 Series Industrial Switching Routers ...

Страница 2: ...duction and equipment use WARNING AR550 series industrial switching routers are class A products In a domestic environment these products may cause radio interference in which case the user may be required to take the adequate measures The AR550 has more than one power input Disconnect all power inputs to power off this device 1 Console cable 3 pin connector AR550 8FE D H AR550 24FE D H with the p...

Страница 3: ...cured in position The router is placed near the DIN rail for convenient movement Before You Start Installation Procedure Place the router s real panel in front of the DIN rail and ensure that the DIN rail fits in between the fixture near the top of the router and spring latch near the bottom Make the router incline forward with the bottom away from the DIN rail and place the fixture at the rear of...

Страница 4: ...the DIN rail on the rack mounting kit and ensure that the DIN rail fits in between the fixture near the top of the router and the spring latch near the bottom Make the router incline forward with the bottom away from the DIN rail and place the fixture at the rear of the router on the top of the DIN rail Slowly push the router toward the DIN rail to make the spring latch at the rear of the router m...

Страница 5: ...en the M6 screws on a diagonal line on the vertical rack mounting bracket and then tighten the M6 screws on the other diagonal line Step 2 Step 3 1 4 3 SYS USB SYNC PoE1 PoE2 DC1 DC2 0 1 2 3 4 5 6 7 8 9 10 11 0 1 16 17 12 13 14 15 RESET CONSOLE GE 10GE GE PoE 48V 5A 12V 48V 6A 2 5GE DI PoE2 PoE1 DC2 DC1 6 Connecting the Router Do not connect cables while the power is on Do not power on the router ...

Страница 6: ...lug the end with a larger hole When the router is powered on for the first time connect the console interface to a PC for onsite configuration Ground cable Ethernet cable Ethernet cable Optical fiber Console cable Insert the 2 pin connector in the correct direction and do not insert it reversely External digital input devices Boolean output cable 2 pin DC power cable A combo interface consists of ...

Страница 7: ...meters on the router modify the communication parameters on the PC to ensure that they use the same communication parameters and then set up the connection again If the web page is displayed abnormally the browser version may be too low Upgrade the browser and log in to the web platform using Mozilla Firefox 12 0 or later Google Chrome 23 or later or Internet Explorer 8 0 or later The login page v...

Страница 8: ...re a server SSL policy Step 8 Huawei ssl policy userserver type server Huawei ssl policy userserver pki realm default Apply the SSL policy userserver to the HTTPS server Step 9 Huawei http secure server ssl policy userserver Enable the HTTPS server function on the router Step 10 Huawei http secure server enable This operation will take several minutes please wait Info Succeeded in starting the HTT...

Страница 9: ... or by any means without prior written consent of Huawei Technologies Co Ltd and other Huawei trademarks are trademarks of Huawei Technologies Co Ltd All other trademarks and trade names mentioned in this document are the property of their respective holders Qualification Card PASS Qualification Card 11 Trademarks and Permissions Unique Identifier trade name HUAWEI product name Router model number...

Отзывы: