background image

8

9

Description of Button Operation

Description of Menu Operation

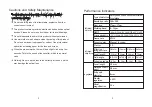
1.Power button: Long press the Power button for power on, and 
shortly press the Power button to enter the menu mode. 
2.Photo button: Short press the photo button to display the camera 
symbol and take photos. Long press the photo button for selection 
the cursor type upward
3. Brightness button: Short press the Brightness button to change the 
brightness by 10 levels (0 ~ 9). Long press the Brightness button for 
selection the cursor type downward.
4. Zoom in button: Short press the Zoom in button, 1x, 2x,4x,8x and 
16x and long press the Zoom in button to extract the cursor calibra-
tion upward.
5. Color palette button: Short press the Palette button, rainbow, hot 
metal, white heat, black heat, yellow saturation and bird watching 
mode. Long press the Color Palette button to extract the cursor 
calibration downward.

3. Cursor switch: Press the Up button or Down button for selection, 
press the Power button to confirm and return to the main menu.
4. Cursor type: 7 kinds of differentiation lines. Press the Up button or 
Down button for selection, press the Power button to confirm and 
return to the main menu.
5. Extract cursor calibration: 10m, 30m, 60m, 100m, 300m, 600m, 
user-defined. Press the Up button or Down button for selection, 
press the Power button to confirm and return to the main menu.
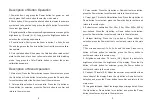
6. Hotspot tracking: Press the Up button or Down button for 
selection, press the Power button to confirm and return to the main 
menu.
7. Zoom in and zoom out: 1x, 2x ,4x, 8x and 16x times. Press the Up 
button or Down button for selection, press the Power button to 
confirm and return to the main menu.
8. Brightness selection: 10 levels (0-9). Adjust the detector’s 
brightness other than the brightness of the display. Press the Up 
button or Down button for selection, press the Power button to 
confirm and return to the main menu.
9. Contrast: 10 levels (0-9). Adjust the detector’s contrast other than 
the contrast of the display. Press the Up button or Down button for 
selection, and press the Power button to confirm and return to the 
main menu.
10. Image detail mode: Adjust the image edge or image detail. Press 
the Up button or Down button for selection, and press the Power 
button to confirm and return to the main menu.

1. Main menu: Press the Power button to open the main menu, press 
the Up button or Down button for selection, press the Power button 
for confirmation, select the Exit item to exit the main menu.
2. Color palette selection: 6-color palette. Press the Up button or 
Down button for selection, press the Power button to confirm and 
return to the main menu.
Содержание HT-C8

Страница 1: ... October 7 2022 Dongguan Xintai Instrument Co Ltd Add Building F No 13 16 Hongye Industrial Zone Tangxia community Tangxia Town Dongguan City Postcode 523710 Tel 86 769 82612006 Fax 86 769 82612005 Website www hti meter com https hti instrument com www xintest en alibaba com ...

Страница 2: ...d detector and high quality optical lens as the core in combination with a convenient and fast operating system compact shape design fully functional expansion spare parts long service life ruggedness and durability suitable for various environ ments It has built an infrared thermal imaging tool with clear imaging simple operation and easiness to carry This product is used for field animal observa...

Страница 3: ...ight click every few seconds This is the sound of lens shutter which is a normal case Warning Do not use the lens to look directly at the sun which may damage the optical lens Performance Indicators Type of detector Resolution ratio 384 288 8 14μm 60Hz Manual focusing 1 0 Φ8 2mm Φ9 6mm Φ8 2mm Φ12mm 25mm 35mm 54mm 75mm 3 0m 1 5m 5 0m 0 3m 14 9 11 2 10 7 8 0 5 0 3 7 6 9 5 2 40mk 50Hz F 1 300K TFPA 2...

Страница 4: ...p distance 25mm 35mm 54mm 75mm 1667m 2333m 3600m 5000m 3176m 4412m 3500m 5400m 7500m 2501m 1471m Infrared objective Character Wild boar Vehicle Character Wild boar Vehicle 2059m 416m 583m 900m 1250m 367m 515m 875m 794m 1350m 1103m 1875m 626m 16G BMP Built in storage image format Type c Export picture and battery charging function USB interface Interface 1W Removable rechargeable lithium battery 18...

Страница 5: ...eye mask Diaptor control knob Photograph Up button Zoom in Left button Color palette Right button Power Menu button Adjustable focus lens Infrared thermal image sensor Battery compartment Brightness Down button USB Type C interface ...

Страница 6: ...m 60m 100m 300m 600m user defined Press the Up button or Down button for selection press the Power button to confirm and return to the main menu 6 Hotspot tracking Press the Up button or Down button for selection press the Power button to confirm and return to the main menu 7 Zoom in and zoom out 1x 2x 4x 8x and 16x times Press the Up button or Down button for selection press the Power button to c...

Страница 7: ...py the upgrading file of uconfig bin to the SD card of the device and then disconnect the USB Press the Up button or Down button to the Firmware Upgrade option Press the Power button for confirmation The display of YES on the display screen indicates successful upgrading If it is not successful please repeat the upgrading steps After upgrading is ok connect the device 15 Eyepiece visibility adjust...

Страница 8: ...an appropriate palette can better display the details of the target object For rainbow the hot metal palette focuses on displaying colors which is very suitable for high thermal contrast and is used to improve the color contrast between high and low temperatures However the white hot palette provides uniform linear colors 1 Open the battery cover Unscrew the battery cover counterclock wise 2 Insta...

Страница 9: ...e quality 2 If you want the image edge to be clearer and more stereoscopic then select the image edge before selecting the corresponding value on the image detail value to make the image edge clear 3 If you want the overall image quality to be clearer select details and then select the corresponding value on the image detail value to make the overall image quality clear 1 Before use for the first ...

Страница 10: ...6 17 Under any of the following circumstances the product will not be covered by the warranty 1 The original of valid warranty certificate fails to be presented 2 Damage caused by product installation not meeting product requirements and relevant specifications 3 The user s improper use of the product improper storage unauthorized disassembly unauthorized maintenance and other reasons 4 Damaged ca...

Отзывы: