


VDPLT1_v2
VELLEMAN
4
4.
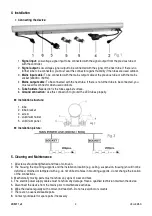
Installation
•
Connecting the device:
1.
Signal input:
Low voltage signal input to be connected with the signal output from the previous tube or
with the controller.
2.
Signal output:
Low voltage signal output to be connected with the signal of the next tube. If there is no
further tube to be connected, you must seal this connector against humidity if the tubes are used outdoor.
3.
Mains input cable:
To be connected with the mains output cable of the previous tube or with the mains
socket (230VAC / 50Hz).
4.
Mains output cable:
To be connected with the next tube. If there is no further tube to be connected, you
must seal this connector when used outdoors.
5.
Tube holders:
Needed to fix the tubes against surface.
6.
Ground connection:
Use this connection to ground the LED tubes properly.
•
•
•
•
Installation structure:
1.
tube
2.
tube bracket
3.
screw
4.
aluminium holder
5.
aluminium panel
•
•
•
•
Installation picture:
5. Cleaning and Maintenance
1. All screws should be tightened and free of corrosion.
2. The housing, the mounting supports and the installation location (e.g. ceiling, suspension, trussing) should not be
deformed, modified or tampered with e.g. do not drill extra holes in mounting supports, do not change the location
of the connections …
3. Mechanically moving parts must not show any signs of wear and tear.
4. The electric power supply cables must not show any damage. Have a qualified technician maintain the device.
5. Disconnect the device from the mains prior to maintenance activities.
6. Wipe the device regularly with a moist, lint-free cloth. Do not use alcohol or solvents.
7. There are no user-serviceable parts.
8. Contact your dealer for spare parts if necessary.
Содержание VDPLT1
Страница 2: ...VDPLT1_v2 VELLEMAN 2...


