5.4.1
Picture in Picture
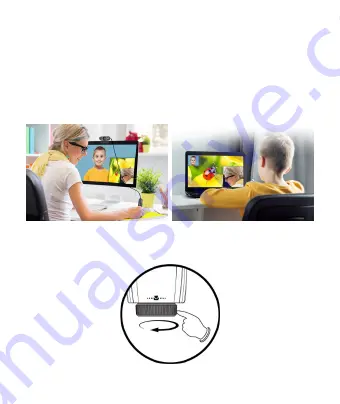
The picture-in-picture function helps you to display the auxiliary objectives with you
at the same time. Follow up the steps below to execute this excellent feature.
(1) Connect WR1 and w600 with provided USB cable first.
(2) Plug w600 into USB port of your computer.
(3) Start up your video call.
(4) Your screen will be shown as below image. The w600 is displayed as main
image(1
st
) while WR1 is displayed on the corner side(2
nd
).
(5) Press the button on WR1 to switch the screen display of w600 and WR1.
*Note: The picture-in-picture display differs from various of video calling software.
5.4.2
Macro
WR1 is useful to shot the objective in near distance. Simply adjust the focus ring of
WR1 until the objective clearly showed on screen.
Содержание w600 Kit
Страница 1: ...w600 Kit Webcam 網路攝影機 网络摄像头 User Manual 使用說明手冊 使用说明手册 ...
Страница 2: ...w600 Kit Webcam User Manual ...
Страница 14: ......
Страница 15: ......
Страница 16: ......
Страница 17: ......
Страница 18: ...w600 Kit 網路攝影機 使用說明手冊 ...
Страница 22: ...2 產品概要 w600 編號 項目 編號 項目 1 鏡頭 5 麥克風 2 三腳架孔 6 LED 指示燈 3 底座支架 7 智能降噪模式切換開關 一般 會議模式 私人 模式 4 USB 線 8 A V 端口 for WR1 ...
Страница 23: ... WR1 編號 項目 編號 項目 1 鏡頭 4 按鍵 切換子母畫面 2 Micro USB 端口 連接 w600 5 手動調焦環 3 LED 指示燈 ...
Страница 31: ......
Страница 32: ......
Страница 33: ......
Страница 34: ......
Страница 35: ...w600 Kit 网络摄像头 使用说明手册 ...
Страница 39: ...2 产品概要 w600 编号 项目 编号 项目 1 镜头 5 麦克风 2 三脚架孔 6 LED 指示灯 3 底座支架 7 智能降噪模式切换开关 一般 会议模式 私人模式 4 USB 线 8 A V 端口 for WR1 ...
Страница 40: ... WR1 编号 项目 编号 项目 1 镜头 4 按键 切换子母画面 2 Micro USB 端口 连接 w600 5 手动调焦环 3 LED 指示灯 ...
Страница 48: ......
Страница 49: ......
Страница 50: ......
Страница 51: ......


