22
Upgrading and Servicing Guide
10
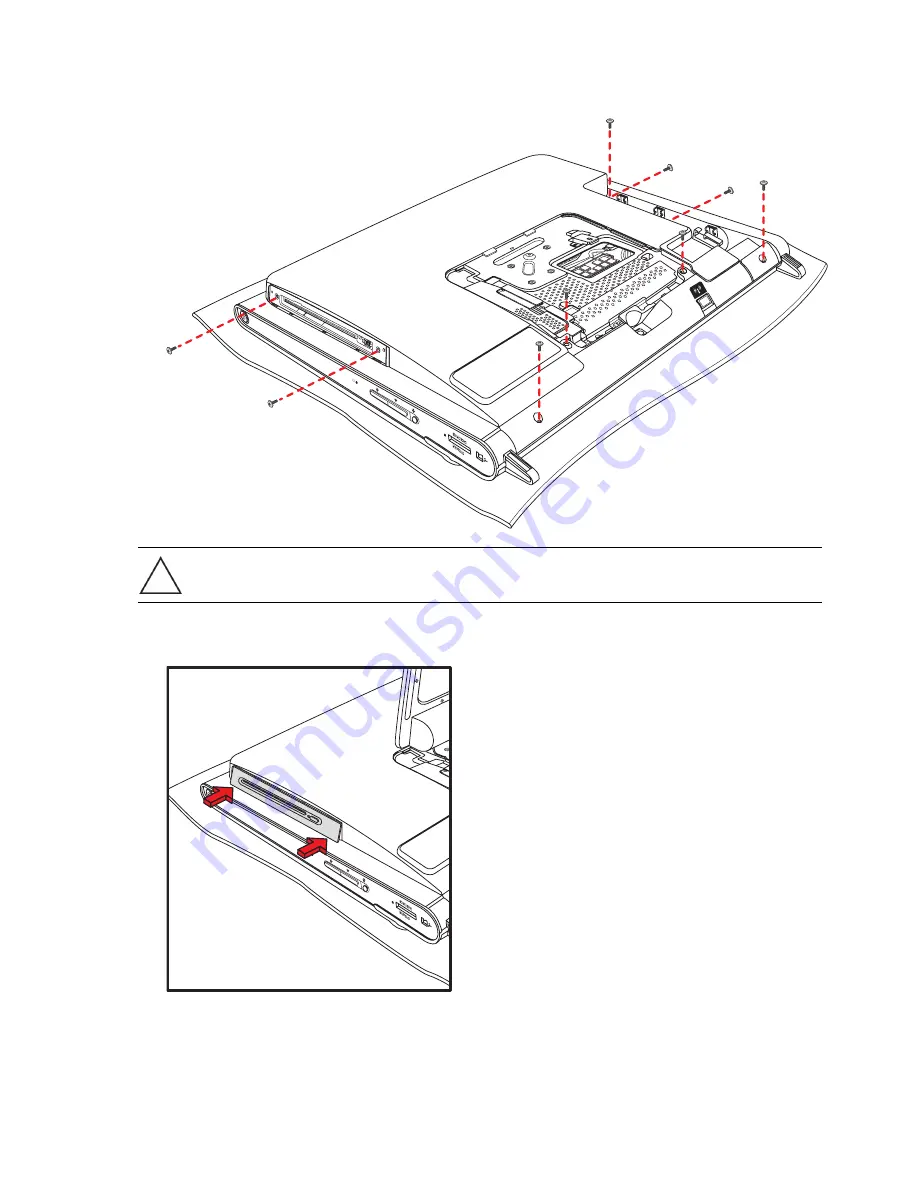
Replace the nine screws that secure the back cover to the computer. Four of the screws are located
along the bottom edge of the back cover, two are located on the sides of the optical drive, and three
are located in the connector area.
11
Replace the optical disc drive cover by aligning the tabs on the bottom edge of the optical drive cover
with the hole on the computer, and then snapping the top edge into place.
12
Follow the steps in “Closing the HP TouchSmart PC” on page 23.
CAUTION: You must replace the screws on each side of the optical disc drive to ensure that the
drive slot is aligned properly with the back cover.
Содержание TouchSmart IQ506
Страница 1: ...升級與維護手冊 Upgrading and Servicing Guide ...
Страница 2: ......
Страница 3: ...升級與維護手冊 ...
Страница 6: ...iv 升級與維護手冊 ...
Страница 10: ...4 升級與維護手冊 5 用您的手指伸進外蓋 A 左下角的間隔 然後輕拉拆卸接頭外蓋 6 拔除所有連接在 HP TouchSmart PC 背部的連接線 A ...
Страница 15: ...升級與維護手冊 9 3 從記憶體插槽中拿起記憶體模組 請記住配對插槽在接頭邊緣的位置 4 將記憶體模組存放在防靜電包裝袋中 ...
Страница 20: ...14 升級與維護手冊 5 從記憶體外蓋區的內側下緣掀起背板 將雙手置於背板底部拿起背板 然後往上轉動到最大角度 6 將背板拿離電腦 ...
Страница 21: ...升級與維護手冊 15 7 拆卸將光碟機固定到機殼的螺絲 然後將光碟機推向電腦中央以免阻礙硬碟拆卸 您不需拆卸光碟機 連接線 8 取下將硬碟架固定到機殼的螺絲 ...
Страница 22: ...16 升級與維護手冊 9 將硬碟架往電腦上方推動 然後將架子從電腦主體拉開 10 按下連接線閂鎖 以將電源線與資料連接線從硬碟上拔除 ...
Страница 23: ...升級與維護手冊 17 11 拆下將硬碟固定到硬碟架的四顆螺絲 接著將硬碟從硬碟架中推出 ...
Страница 24: ...18 升級與維護手冊 安裝硬碟 1 如有需要 請拆卸硬碟機 請參閱第 12 頁的 拆卸硬碟 2 將硬碟推進硬碟架 然後裝回四顆螺絲 3 將電源線和資料連接線接到硬碟 ...
Страница 25: ...升級與維護手冊 19 4 筆直放下硬碟架 將架上的四個鉤對齊機殼背面的四個孔 然後將硬碟架推向電腦底端直到進入機殼 托架裡 5 裝回將硬碟架固定到機殼的螺絲 ...
Страница 26: ...20 升級與維護手冊 6 將光碟機鉤與機殼上的孔對齊 然後把光碟機推向電腦的外緣 7 裝回將光碟機固定到機殼的螺絲 ...
Страница 27: ...升級與維護手冊 21 8 裝回背板 將背板上方的鉤與電腦上方的孔對齊 背板上的螺絲孔應該與電腦背部的螺絲孔對齊 9 按下上方 側邊以及下緣 將蓋板卡進定位 ...
Страница 30: ...24 升級與維護手冊 3 裝回將記憶體外蓋固定在電腦上的螺絲 4 稍微將電腦底座推至鎖定的位置之後 A 用一隻手扶著避免開鎖之後底座彈回 然後以另一隻手打 開電腦底座上的鎖 B A B ...
Страница 31: ...升級與維護手冊 25 5 裝回鍵盤與滑鼠接收器 6 請將電腦直立放置在平坦表面上 底座則置於安全與開放的位置 ...
Страница 33: ...Upgrading and Servicing Guide ...
Страница 36: ...iv Upgrading and Servicing Guide ...
Страница 63: ......


