Installation
75
In
st
al
la
ti
o
n
Step 6: Connect SCSI and Power Cables
1. Attach an LVD SCSI cable to SCSI port A or B, on one or both BCCs. (Sample
topologies appear in Chapter 1.)
2. Attach the other end of each SCSI cable to a host bus adapter. (See
bus configuration options in Chapter 3.)
3. Attach an LVD terminator to any empty SCSI port that is on a BCC
with a cable attached.
The terminators can be found in bags tethered to the BCC locking
thumbscrew(s).
4. Plug a power cord into the AC receptacle of each power supply.
5. Attach the other end of each power cord to a preinstalled PDU/PDRU.
Choose outlets according to the following guidelines:
—
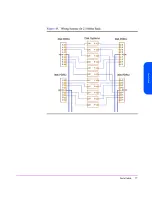
Redundancy. To extend the redundancy of the product, attach each cord to
a different PDU. This is represented in
Figure 44
and
Figure 45
by the
absence of duplicate letters in each disk system.
—
Reliability. To avoid cascading faults for a group of disk systems that are
plugged into the same PDU, distribute redundant power cords to as many
different combinations of PDUs as possible. This is represented in
Figure 44
and
Figure 45
by the least number of duplicate pairs of letters
among all disk systems. Cascading faults occur when a backup PDU is
overloaded with power surges after the primary PDU fails.
—
Serviceability. Choose PDU locations that prevent power cords from
interfering with the removal and replacement of serviceable components.
Also leave a 6-inch service loop to allow for the rotation of PDRUs.
The letters A, B, C, D, E and F in the following diagrams represent independent
PDUs or PDU banks. The absence of duplicate letters in individual disk systems
indicates the products are using redundant PDUs. The minimal number of
duplicate letter pairs indicates the disk systems are protected against cascading
faults.
Содержание StorageWorks 2300 - Disk System
Страница 1: ...hp StorageWorks disk system 2300 Edition E0902 user s guide ...
Страница 10: ...10 ...
Страница 14: ...14 Product Description ...
Страница 35: ...Installation 35 Installation 2 ...
Страница 40: ...40 Installation ...
Страница 41: ...Installation 41 Installation ...
Страница 48: ...48 Installation ...
Страница 58: ...58 Installation ...
Страница 59: ...Installation 59 Installation 4 Install clipnuts as shown in Figure 28 ...
Страница 62: ...62 Installation 9 Tightenthe storagedeviceretention M5 screwsthrough the retention bracket see Figure 31 ...
Страница 76: ...76 Installation ...
Страница 77: ...Installation 77 Installation ...
Страница 83: ...Configuration 83 Configuration 3 ...
Страница 86: ...86 Configuration ...
Страница 94: ...94 Configuration ...
Страница 95: ...Troubleshooting 95 Troubleshooting 4 ...
Страница 108: ...108 Removal and Replacement ...
Страница 132: ......
Страница 134: ......
Страница 140: ......
Страница 150: ...150 Reference E VCCI Statement Japan Harmonics Conformance Japan F BCIQ EMC Statement Taiwan ...
Страница 151: ...Reference 151 Reference G Declaration of Conformity ...
Страница 158: ...158 ...

