


Operating the Autoloader
Operator’s Panel Overview
The Operator’s Panel has four LEDs, four buttons, and a
2-line by 16-character LCD screen. It provides everything
you need to monitor autoloader status and to control all
of its functions.
The display defaults to the Home screen. The Home
screen consists of the autoloader status on the top line
and the current cartridge inventory on the second line.
If the tape drive does not have a cartridge loaded, the
top line displays <
Drive type
> or
Drive empty
,
depending upon the type of autoloader (as shown).
If the tape drive has a cartridge loaded, the top line
displays
Drive ready
or
Drive loaded
, depending upon
the type of autoloader (as shown). The cartridge
currently loaded in the drive is indicated by an
alternating black block and the slot number.
This display can also indicate that the specified
cartridge is being loaded, unloaded, imported, or
exported. The autoloader status line indicates the
current operation.
Importing cartridges
Load tapes into the autoloader by using the Import
command from the front panel and inserting the data
cartridge into the mailslot.
Exporting cartridges
Unload tapes from the autoloader by using the Export
command from the front panel. The selected tape
will automatically eject.
Unpacking the autoloader
After removing the accessories package, lift the
autoloader and padding out of the box and place it on
a work surface, top facing up. Carefully remove the
shipping padding from the left and right sides of the
autoloader and then the bag. Save the packing
materials to move or ship the autoloader in the future.
1
1.
Mounting bracket
2.
Mounting rail
Install the autoloader by
1)
Installing a mounting
bracket to each side of the autoloader, and
2)
Installing the mounting rails to the selected rack
location. Slide the autoloader onto the rails and secure
the mounting brackets to the rack. (See detailed
installation instructions in the User and Service Guide.)
Select a location that has adequate clearance for
ventilation, minimal dust and debris, and has an
appropriate power source.
For standalone autoloaders, select a location that is flat,
sturdy, and level. Do not place the autoloader on its
side or stack items on top of the autoloader.
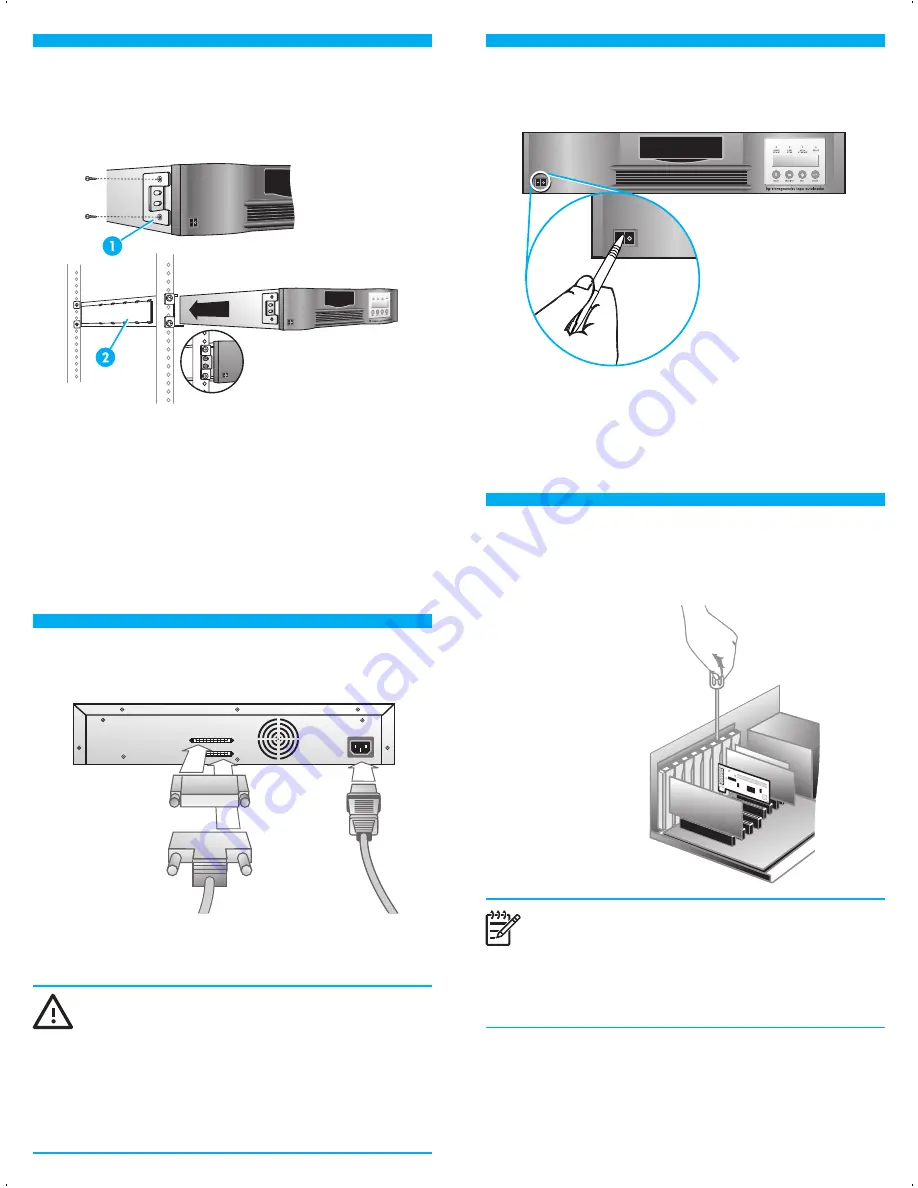
Make sure all devices on the SCSI bus are powered off.
Attach the SCSI cable, terminator, and power cord as
shown.
WARNING:
This product can ONLY be used with an HP
approved power cord for your specific geographic region.
Use of a non-HP approved power cord may result in: 1) not
meeting individual country specific safety requirements;
2) insufficient conductor ampacity that could result in
overheating with potential personal injury and/or property
damage; and 3) an unapproved power cord could fracture
resulting in the internal contacts being exposed, which
potentially could subject the user to a shock hazard. HP
disclaims all liability in the event a non-HP approved power
cord is used.
Install a SCSI host bus adapter, software, and
compatible driver on the host computer.
Install the HP Library & Tape Tools diagnostic
utility available at
www.hp.com/support/TapeTools
to
verify installation, upgrade firmware, and to aid in
troubleshooting.
NOTE:
It is important to connect to a SCSI HBA
that supports your autoloader's optimum
performance. Some models also require an HBA
that supports LUN scanning. Please refer to the
user manual for detailed recommendations and
more information about SCSI IDs.
Plug the autoloader power cable into a properly
grounded outlet. Power on the autoloader by pressing
the power button on the front panel. Power on the host
and all attached devices.
Front overview
Rear overview
Choosing a location
2
Connecting the autoloader
4
Preparing the host and
verifying the connection
6
Installing the autoloader in a
rack
(optional)
3
Powering on the autoloader
5
Internal overview
Loading cartridges
Load tapes from the autoloader slots into the drive by
using the Load Cartridge command from the front
panel.
Unloading cartridges
Unload tapes from the drive to the autoloader slots
using the Unload Cartridge command from the front
panel.
Cleaning the drive
Clean the drive when the Clean Drive LED is
illuminated. Use the Clean Drive command from the
front panel to import a cleaning cartridge into the
autoloader and begin the cleaning operation.
Only model specific cleaning cartridges can be used.
All other cleaning cartridges will be rejected by the
autoloader.
Ordering media
To prolong the life of the
drive, use HP storage
media that is specific to
your tape autoloader
model. To determine
your model and
cartridge type, refer to
the HP StorageWorks 1/8 Tape Autoloader User and
Service Guide found on the Documentation CD that
came with your tape autoloader. To learn more about,
or to purchase HP media, visit
www.hp.com/go/storagemedia
Register your autoloader
Register your autoloader online at:
www.register.hp.com
.
HP customers who register join a select group to receive
technical support updates and special HP offers.
1.
Mailslot
2.
Front panel LED’s
3.
Power switch
4.
Front panel LCD display
5.
Control keys
1.
68-pin SCSI connector
2.
Fan vent
3.
Power connector
1.
Drive
2.
Cartridge carriers
Harrier_AF204-96002v6.qxd 11/5/05 9:02 PM Page 2


