background image

23 

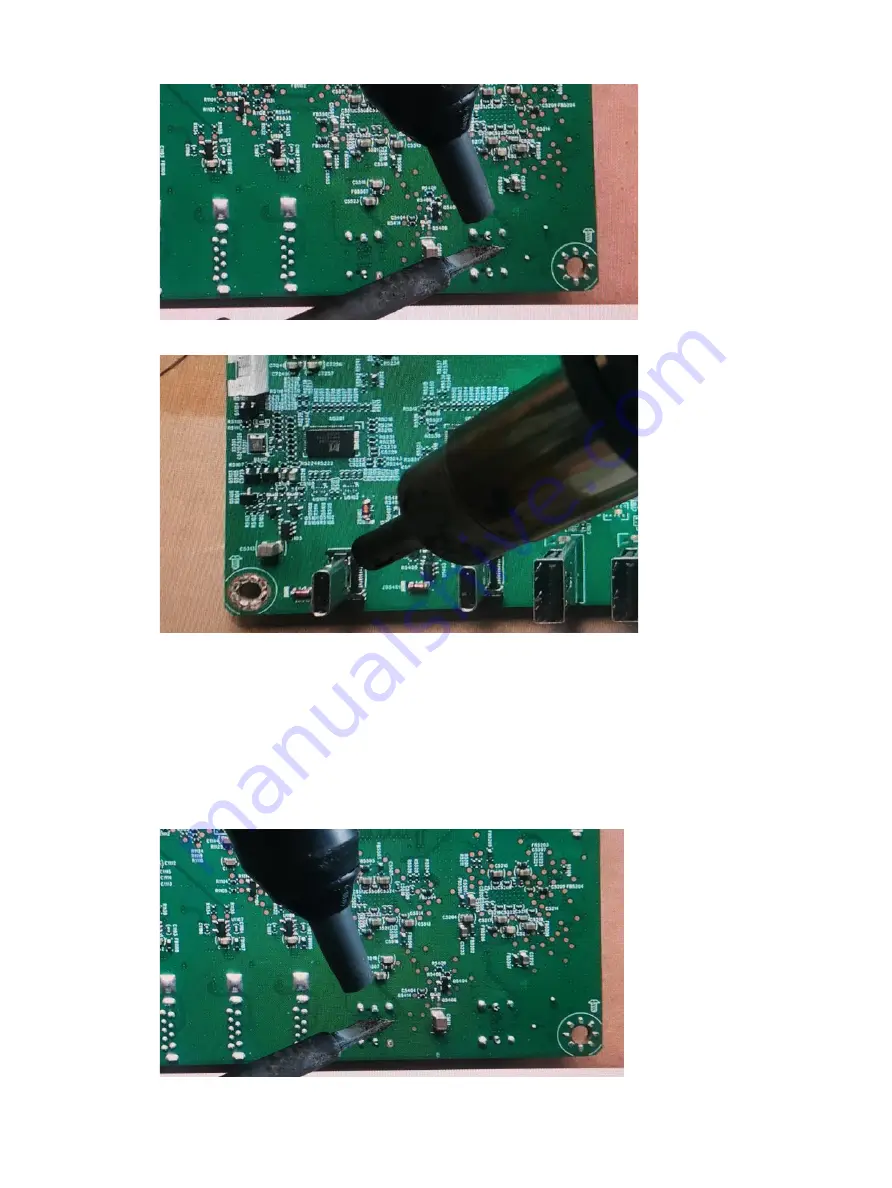
2) Use a hot air gun to melt the solder on the pins.

3) Lift the USB Type-C connector from the circuit board.

4) Place the new component on the circuit board. Be sure that it matches the circuit board footprint.

5) Solder the new component.

USB Type-C 2 connector CN5401 

Repair the USB Type-C connector: 

1) Use a soldering iron and a de-soldering pump to remove as much solder as possible from the pin.

2) Use a hot air gun to melt the solder on the pins.

Содержание S430c

Страница 1: ...Maintenance and Service Guide S430c model SUMMARY This guide provides information about spare parts removal and replacement of parts diagnostic tests problem troubleshooting and more ...

Страница 2: ... States and other countries The information contained herein is subject to change without notice The only warranties for HP products and services are set forth in the express warranty statements accompanying such products and services Nothing herein should be construed as constituting an additional warranty HP shall not be liable for technical or editorial errors or omissions contained herein Firs...

Страница 3: ...the serial number and product number 7 3 Illustrated parts catalog 8 How to order parts 9 4 Removal and replacement procedures 11 Preparation for disassembly 11 Rear Cover 12 Power board 16 Connector repair 16 For Main Board 16 For USB Board 17 For Main Board 19 Phone Jack connector CN601 19 HDMI connector CN501 19 DP connector CN551 20 DC Power Jack connector CN701 21 For USB Board 22 USB 3 0A co...

Страница 4: ...ical components are sensitive to electrostatic discharge ESD Follow ESD safety procedures while handling these parts Some products contain more than one battery Do not disassemble or expose a battery to high temperatures such as throwing into fire or the battery may explode Refer to government requirements for battery recycling or disposal This information provides general service information for ...

Страница 5: ...e is a legal requirement by the EU European Union for the global electronics industry sold in the EU and other countries Any electrical and electronics products launched in the market after June 2006 should meet this RoHS requirement Products launched in the market before June 2006 are not required to be compliant with RoHS parts If the original parts are not RoHS complaint the replacement parts c...

Страница 6: ...ort Alternate Mode DP Alt Mode Dynamic power delivery up to 110 W distributed between USB Type C port 1 and USB Type C port 2 USB 3 0 hub with two USB Type C ports that connect to a computer upstream and four USB ports that connect to USB devices downstream USB cable provided to connect the monitor s USB hub to the USB port on the computer Audio out headphone jack Plug and Play capability if suppo...

Страница 7: ...u 3 Function buttons Use these buttons to navigate through the OSD menu based on the indicators above thebuttons that are activated while the OSD menu is open NOTE The function buttons are located under the front bezel edge of the monitor below the power light 4 Power button Turns the monitor on or off 5 Power light White The monitor is powered on Amber The monitor is in a reduced power state beca...

Страница 8: ...to a source device such as a computer 5 Power connector Connects the power cord 6 Power light White The monitor is connected to power or powered on 7 USB Type C 1 port with DP Alt Mode USB upstream data maximum power delivery up to 65 W and minimum power delivery of 45 W Connects a USB Type C cable to a source device such as a computer or game console This USB Type C port can function as a Display...

Страница 9: ... ports 4 downstream Connect USB cables to peripheral devices such as a keyboard mouse or USB hard drive and provide data transfer NOTE The U B Type C port can also function as a USB port when connected to a USB Type C port on a source device The USB Type C port can function as a DisplayPort audio video input a USB 3 0 upstream connection or it can be used to deliver up to 65 watts of power to a de...

Страница 10: ...cating the serial number and product number The serial number and product number are located on a label on the rear of the monitor panel You may need these numbers when contacting HP about the monitor model ...

Страница 11: ...1 2 DECO 1 3 PANEL 1 4 MIDDLE FRAME 1 5 POWER LED LENS 1 6 KEY BOARD 1 7 FUNCTION KEY 1 8 MAIN BOARD 1 9 MAIN FRAME 1 10 USB BOARD 1 11 USB SHIELDING 1 12 TYPE C BKT 1 13 POWER GOOD LENS 1 14 USB ESD FINDGER 1 15 REAR COVER 1 16 HP LOGO 1 17 WEBCAM FRONT COVER 1 18 WEBCAM HEAD DISSIPATION 1 19 WEBCAM REAR COVER 1 20 STAND 1 21 HINGE 1 ...

Страница 12: ...distributors RS Component Capacitors RS Components rs online com Connectors by manufacturer Component description Location identifier Component distributor Distributer part number Phone Jack CN601 Contact HP Support Contact HP Support HDMI CN501 Contact HP Support Contact HP Support DP CN551 Contact HP Support Contact HP Support DC Power Jack CN701 Contact HP Support Contact HP Support TYPE C 1 CN...

Страница 13: ... External Power Supplies are available for purchase from the following EU distributor EET https www eetgroup com en eu NOTE HP continually improves and changes product parts For complete and current information about supported parts for your product go to https partsurfer hp com Search aspx select your country or region and then follow the on screen instructions Internal and External Power Supplie...

Страница 14: ...ce information and precautions sections in the Getting started chapter of this guide 2 Clean the room for disassembly 3 Identify the disassembly area 4 Check the position that the monitors are to be placed along with the number of monitors Prepare the area for material flow according to the disassembly layout 5 Be sure to have the following equipment and materials Press fixture Working table Screw...

Страница 15: ...epare the monitor for disassembly See Preparation for disassembly on page 11 Remove the Rear Cover 1 Remove three screw and remove the stand assy from the rear case 2 Pull rear cover edge from front view Use finger to pull Rear cover edge form Left Right and Top side ...

Страница 16: ... Use disassembly tool to open all the latches along the edge of the Rear Cover bottom 4 Disassemble Rear Cover 5 Remove the key board 6 Unscrew 9 screws to remove the mainframe and disconnect the connectors ...

Страница 17: ...14 7 Take off the mylar and remove the screws to remove the main boards 8 Remove 5 screws to remove the hinge 9 Remove the screws to disassemble the middle frame and Panel ...

Страница 18: ...15 10 Remove the camera module 11 Disassemble all the boards from housing 12 Disconnect all the wires from the board ...

Страница 19: ...re includes Phone Jack HDMI DisplayPort and DC Power Jack connectors The connectors are on the Main Board board part number CBPRMEDH0Q3 The connector identifiers are as follows Connector Location Phone Jack CN601 HDMI CN501 DP CN551 DC Power Jack CN701 Main Board CN601 CN501 CN551 CN701 ...

Страница 20: ...mber CBPCMEDH0Q4 The connector identifiers are as follows Connector Location TYPE C 1 CN5101 TYPE C 2 CN5401 USB CN1101 USB CN1102 USB CN1103 USB CN1104 Before repairing connectors follow these steps Prepare the monitor for disassembly See Preparation for disassembly on page 11 Board USB Board CN5101 CN5401 CN1101 CN1104 CN1103 ...

Страница 21: ... may cause damage Work quickly to avoid overheating the circuit board as soon as you confirm the steady soldering condition Keep the soldering iron tip clean and well tinned and when replacing parts A close inspection of the circuit board revealed look in good condition After repaired must connect source to each port to check Main board function is ordinary Note The requirement of professional rep...

Страница 22: ...2 Lift the Phone Jack connector from the circuit board 3 Place the new component on the circuit board Be sure that it matches the circuit board footprint 4 Solder the new component HDMI connector CN501 Repair the HDMI connector 1 Use a soldering iron and a de soldering pump to remove as much solder as possible from the pin 2 Use a hot air gun to melt the solder on the pins ...

Страница 23: ...e circuit board Be sure that it matches the circuit board footprint 5 Solder the new component DP connector CN551 Repair the DP connector 1 Use a soldering iron and a de soldering pump to remove as much solder as possible from the pin 2 Use a hot air gun to melt the solder on the pins ...

Страница 24: ...e new component DC Power Jack connector CN701 Repair the DC Power Jack connector 1 Use a soldering iron and a de soldering pump to remove as much solder as possible from the pin 2 Lift the DC Power Jack connector from the circuit board 3 Place the new component on the circuit board Be sure that it matches the circuit board footprint 4 Solder the new component ...

Страница 25: ...ossible from the pin 2 Lift the USB connector from the circuit board 3 Place the new component on the circuit board Be sure that it matches the circuit board footprint 4 Solder the new component USB Type C 1 connector CN5101 Repair the USB Type C connector 1 Use a soldering iron and a de soldering pump to remove as much solder as possible from the pin ...

Страница 26: ...new component on the circuit board Be sure that it matches the circuit board footprint 5 Solder the new component USB Type C 2 connector CN5401 Repair the USB Type C connector 1 Use a soldering iron and a de soldering pump to remove as much solder as possible from the pin 2 Use a hot air gun to melt the solder on the pins ...

Страница 27: ...24 3 Lift the USB Type C connector from the circuit board 4 Place the new component on the circuit board Be sure that it matches the circuit board footprint 5 Solder the new component ...

Страница 28: ... Function test Te st item Operating description Tool used HDMI test Confirm whether image displays and sound plays correctly on the monitor Computer or DVD player DP test Confirm whether image displays and sound plays correctly on the monitor Computer or DVD player Audio test Change volume and balance to confirm whether volume is smooth and loud enough Speaker Table 4 1 Function test Test item Ope...

Страница 29: ...ction Image on monitor displays in low contrast and low saturation There are no solid blacks Only dark grays appear The Video Level setting in the OSD menu is not set appropriately for your monitor configuration In the OSD menu select Image and then select Video Level Change the setting to Limited Range 64 940 Image on monitor displays blacks and whites in low detail and high contrast Colors appea...

Страница 30: ...rts 8 parts ordering 9 power board removal 16 precautions 1 preparation for disassembly 11 RC removal 12 rear components 5 removal power board 16 RC 12 removal and replacement procedures 11 returning to customer 2 RoHS 2002 95 EC requirements 2 safety information 1 serial number location 7 service information 1 spare parts 8 support and troubleshooting 25 troubleshooting 25 ...

Отзывы: