background image


Hardware options installation  23 

Hardware options installation 

Introduction 

If more than one option is being installed, read the installation instructions for all the hardware options and 
identify similar steps to streamline the installation process.   


WARNING:

  To reduce the risk of personal injury from hot surfaces, allow the drives and the 

internal system components to cool before touching them. 


CAUTION:

  To prevent damage to electrical components, properly ground the server before 

beginning any installation procedure. Improper grounding can cause electrostatic discharge. 


Drive option 

The server blade supports up to two SAS, SATA, or solid state drives. The mixing of SAS hard drives with SAS 
solid state drives is supported within the server, but limits the RAID configuration to two separate RAID 0 

volumes. Mixing of other drives types is not supported. 


CAUTION:

  To prevent improper cooling and thermal damage, do not operate the server blade 

or the enclosure unless all drive and device bays are populated with either a component or a 

blank. 


To install the component: 

1.


Remove the drive blank. 


Содержание ProLiant BL420c

Страница 1: ...s for the person who installs administers and troubleshoots servers and storage systems HP assumes you are qualified in the servicing of computer equipment and trained in recognizing hazards in products with hazardous energy levels Part Number 661809 001 June 2012 Edition 1 ...

Страница 2: ...ucts and services Nothing herein should be construed as constituting an additional warranty HP shall not be liable for technical or editorial errors or omissions contained herein Microsoft and Windows are U S registered trademarks of Microsoft Corporation Intel and Xeon are trademarks of Intel Corporation in the United States and other countries Bluetooth is a trademark owned by its proprietor and...

Страница 3: ...t panel drive cage assembly 15 Remove the DIMM baffle 16 Setup 18 Overview 18 Installing an HP BladeSystem c Class enclosure 18 Installing server blade options 18 Installing interconnect modules 18 Interconnect bay numbering and device mapping 19 Connecting to the network 20 Installing a server blade 21 Completing the configuration 22 Hardware options installation 23 Introduction 23 Drive option 2...

Страница 4: ... Smart Update Manager 56 HP ROM Based Setup Utility 56 Using RBSU 56 Auto configuration process 57 Boot options 57 Configuring AMP modes 58 Re entering the server serial number and product ID 58 Utilities and features 58 Array Configuration Utility 58 Option ROM Configuration for Arrays 59 ROMPaq utility 60 Automatic Server Recovery 60 USB support 60 Redundant ROM support 61 Keeping the system cur...

Страница 5: ... 69 Laser compliance 69 Battery replacement notice 70 Taiwan battery recycling notice 70 Acoustics statement for Germany Geräuschemission 70 Electrostatic discharge 72 Preventing electrostatic discharge 72 Grounding methods to prevent electrostatic discharge 72 Specifications 73 Environmental specifications 73 Server blade specifications 73 Support and other resources 74 Before you contact HP 74 H...

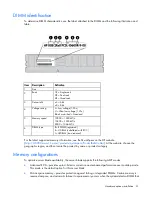
Страница 6: ...rive bay 1 2 Hard drive bay 2 3 Serial label pull tab 4 HP c Class Blade SUV connector behind the serial label pull tab 5 Server blade release lever 6 Server blade release button The SUV connector and the HP c Class Blade SUV Cable are used for some server blade configuration and diagnostic procedures ...

Страница 7: ...stem is powered on Flashing Green System is waiting to power on Power On Standby button is pressed Solid Amber System is in standby Power On Standby Button service is initialized Off and the Health Status LED bar is off The system has no power Off and the Health Status LED bar is flashing green The Power On Standby Button service is being initialized 3 UID LED Solid Blue Identified Flashing Blue A...

Страница 8: ...s Flashing green The drive is rebuilding or performing a RAID migration stripe size migration capacity expansion or logical drive extension or is erasing Flashing amber green The drive is a member of one or more logical drives and predicts the drive will fail Flashing amber The drive is not configured and predicts the drive will fail Solid amber The drive has failed Off The drive is not configured...

Страница 9: ...s locked S3 Off Reserved S4 Off Reserved S5 Off Off Power on password is enabled On Power on password is disabled S6 Off Off No function On ROM reads system configuration as invalid S7 Reserved S8 Reserved S9 Reserved S10 Reserved S11 Reserved S12 Reserved To access redundant ROM set S1 S5 and S6 to on When the system maintenance switch position 6 is set to the On position the system is prepared t...

Страница 10: ...e numbered sequentially 1 through 6 for each processor The supported AMP modes use the alpha assignments for population order and the slot numbers designate the DIMM slot ID for spare replacement Tool locations Item Description 1 T 15 Torx screwdriver 2 DIMM tool ...

Страница 11: ...ion 1 Server blade For connecting to the SUV connector on the server blade front panel 2 Video For connecting a video monitor 3 USB For connecting up to two USB devices 4 Serial For trained personnel to connect a null modem serial cable and perform advanced diagnostic procedures ...

Страница 12: ...upgrade or maintenance procedures perform a backup of critical server data and programs IMPORTANT When the server blade is in standby mode auxiliary power is still being provided to the system Depending on the Onboard Administrator configuration use one of the following methods to power down the server blade Press and release the Power On Standby button This method initiates a controlled shutdown ...

Страница 13: ...select Momentary Press For an emergency shutdown select Press and Hold Before proceeding verify the server blade is in standby mode by observing that the system power LED is amber Remove the server blade To remove the component 1 Identify the proper server blade 2 Power down the server blade on page 12 3 Remove the server blade 4 Place the server blade on a flat level work surface WARNING To reduc...

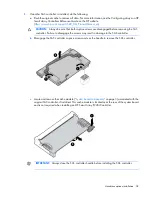
Страница 14: ...el forward until it clicks into place Remove the SAS controller 1 Power down the server blade on page 12 2 Remove the server blade on page 13 3 Remove the access panel on page 14 4 Disconnect the capacitor pack cabling if connected FBWC capacitor pack cabling on page 46 CAUTION Always remove the SAS controller before removing the drive cage CAUTION Always be sure that both captive screws are disen...

Страница 15: ...properly seat the SAS controller press firmly in the areas indicated on the SAS controller Remove the front panel drive cage assembly 1 Power down the server blade on page 12 2 Remove the server blade on page 13 3 Remove the access panel on page 14 4 Disconnect the capacitor pack cabling if connected FBWC capacitor pack cabling on page 46 5 Remove the SAS controller on page 14 CAUTION Always remov...

Страница 16: ...e 1 Power down the server blade on page 12 2 Remove the server blade on page 13 3 Remove the access panel on page 14 4 Disconnect the capacitor pack cabling if connected FBWC capacitor pack cabling on page 46 5 Remove the SAS controller on page 14 6 Remove one or more DIMM baffles ...

Страница 17: ...Operations 17 o Processor 1 DIMM baffle left side o Processor 2 DIMM baffle right side ...

Страница 18: ... BladeSystem c Class enclosure The most current documentation for server blades and other HP BladeSystem components is available at the HP website http www hp com go bladesystem documentation Documentation is also available in the following locations Documentation CD that ships with the enclosure HP website http www hp com go bizsupport Installing server blade options Before installing and initial...

Страница 19: ...nding to the FlexibleLOM or mezzanine signals Server blade signal Interconnect bay Interconnect bay labels FlexibleLOM 1 and 2 Mezzanine 1 3 and 4 Mezzanine 2 5 and 6 7 and 8 For detailed port mapping information see the HP BladeSystem enclosure installation poster or the HP BladeSystem enclosure setup and installation guide on the HP website http www hp com go bladesystem documentation ...

Страница 20: ...ezzanine 1 2 Four port cards connect to bay 2 Mezzanine 2 3 and 4 Four port cards Ports 1 and 3 connect to bay 3 Ports 2 and 4 connect to bay 4 Connecting to the network To connect the HP BladeSystem to a network each enclosure must be configured with network interconnect devices to manage signals between the server blades and the external network ...

Страница 21: ...nt improper cooling and thermal damage do not operate the server blade enclosure unless all bays are populated with either a component or a blank For the best possible HP BladeSystem and Virtual Connect experience and to prevent a future reboot HP requires updating the Onboard Administrator and Virtual Connect to the correct version before installing an HP ProLiant Gen8 server blade The version in...

Страница 22: ... 2 Remove the enclosure connector cover 3 Install the server blade Completing the configuration To complete the server blade and HP BladeSystem configuration see the overview card that ships with the enclosure ...

Страница 23: ...nts properly ground the server before beginning any installation procedure Improper grounding can cause electrostatic discharge Drive option The server blade supports up to two SAS SATA or solid state drives The mixing of SAS hard drives with SAS solid state drives is supported within the server but limits the RAID configuration to two separate RAID 0 volumes Mixing of other drives types is not su...

Страница 24: ...number CAUTION The heatsink thermal interface media is not reusable and must be replaced if the heatsink is removed from the processor after it has been installed CAUTION To prevent possible server blade overheating always populate processor socket 2 with a processor and a heatsink or a processor socket cover and a heatsink blank IMPORTANT Processor socket 1 must be populated at all times or the s...

Страница 25: ...Disconnect the capacitor pack cabling if connected FBWC capacitor pack cabling on page 46 6 Remove the SAS controller on page 14 7 Remove the heatsink blank Retain the heatsink blank for future use 8 Open each of the processor locking levers in the order indicated and then open the processor retaining bracket ...

Страница 26: ...ion guides on either side of the processor THE PINS ON THE SYSTEM BOARD ARE VERY FRAGILE AND EASILY DAMAGED CAUTION THE PINS ON THE SYSTEM BOARD ARE VERY FRAGILE AND EASILY DAMAGED To avoid damage to the system board do not touch the processor or the processor socket contacts 11 Close the processor retaining bracket When the processor is installed properly inside the processor retaining bracket th...

Страница 27: ... Press and hold the processor retaining bracket in place and then close each processor locking lever Press only in the area indicated on the processor retaining bracket 13 Remove the thermal interface protective cover from the heatsink CAUTION To avoid damage to the system board processor socket and screws do not overtighten the heatsink screws Use the wrench supplied with the system to reduce the...

Страница 28: ...onfigurations and relatively low power consumption but are limited in capacity RDIMMs offer larger capacities than UDIMMs and include address parity protection LRDIMMs support higher densities than single and dual rank RDIMMs and higher speeds than quad rank RDIMMs This support enables you to install more high capacity DIMMs resulting in higher system capacities and higher bandwidth All types are ...

Страница 29: ...troduced for Gen8 servers authenticates and unlocks certain features available only on HP Qualified memory and verifies whether installed memory has passed HP qualification and test processes Qualified memory is performance tuned for HP ProLiant and BladeSystem servers and provides future enhanced support through HP Active Health and manageability software Certain performance features are unique w...

Страница 30: ...ith only one rank accessible at a time A quad rank DIMM is effectively two dual rank DIMMs on the same module Only one rank is accessible at a time The server blade memory control subsystem selects the proper rank within the DIMM when writing to or reading from the DIMM Dual and quad rank DIMMs provide the greatest capacity with the existing memory technology For example if current DRAM technology...

Страница 31: ...educed For the latest supported memory information see the QuickSpecs on the HP website http h18000 www1 hp com products quickspecs ProductBulletin html At the website choose the geographic region and then locate the product by name or product category Memory configurations To optimize server blade availability the server blade supports the following AMP modes Advanced ECC provides up to 4 bit err...

Страница 32: ...nced ECC memory is the default memory protection mode for this server blade Standard ECC can correct single bit memory errors and detect multi bit memory errors When multi bit errors are detected using Standard ECC the error is signaled to the server blade and causes the server blade to halt Advanced ECC protects the server blade against some multi bit memory errors Advanced ECC can correct both s...

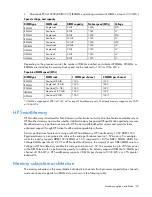
Страница 33: ...forth For DIMM spare replacement install the DIMMs per slot number as instructed by the system software For detailed memory configuration rules and guidelines use the Online DDR3 Memory Configuration Tool on the HP website http www hp com go ddr3memory configurator DIMM speeds are supported as indicated in the following table Populated slots per channel Rank Speeds supported MT s 1 Single or dual ...

Страница 34: ...he following order LRDIMM Sequentially in alphabetical order A through F RDIMM Sequentially in alphabetical order A through F UDIMM A through C sequentially in alphabetical order Do not populate DIMM slots D through F After installing the DIMMs use RBSU to configure Advanced ECC online spare or lockstep memory support Installing a DIMM CAUTION To avoid damage to the hard drives memory and other sy...

Страница 35: ...zzanine cards on Mezzanine 1 connector or Mezzanine 2 connector Install Type B mezzanine cards on Mezzanine 2 connector Optional mezzanine cards enable network connectivity or provide Fibre Channel support For mezzanine card locations see the system board components on page 8 When installing a mezzanine option on mezzanine connector 2 processor 2 must be installed For mezzanine card mapping see th...

Страница 36: ...Hardware options installation 36 4 Remove the mezzanine assembly from the server blade 5 Align the mezzanine card with the guide pins on the mezzanine assembly ...

Страница 37: ... mezzanine assembly on the system board 8 Press down firmly on the mezzanine assembly handles and then close the mezzanine assembly latch 9 Install the access panel on page 14 10 Install the server blade Installing a server blade on page 21 SAS controller option 1 Power down the server blade on page 12 2 Remove the server blade on page 13 3 Remove the access panel on page 14 4 Disconnect the capac...

Страница 38: ...gaged before removing the SAS controller Failure to disengage the screws may result in damage to the SAS controller b Disengage the SAS controller captive screws and use the handle to remove the SAS controller c Locate and remove the cache module System board components on page 8 associated with the original SAS controller if installed This cache module is located near the rear of the system board...

Страница 39: ...ions installation 39 6 Close the SAS controller handle and then install the SAS controller To properly seat the SAS controller press firmly in the areas indicated on the SAS controller 7 Install the capacitor pack ...

Страница 40: ...ss panel on page 14 10 Install the server blade Installing a server blade on page 21 FBWC capacitor pack option To install the component 1 Power down the server blade on page 12 2 Remove the server blade on page 13 3 Remove the access panel on page 14 4 Install the FBWC capacitor pack o FBWC capacitor pack for a mezzanine option ...

Страница 41: ...ck for the cache module or the SAS controller option 5 Route the FBWC capacitor pack cable The DIMM baffles may be removed to route the cables if necessary o Route the cable along the Processor 2 DIMM baffle and connect the cable to the mezzanine option ...

Страница 42: ...ng a server blade on page 21 HP Trusted Platform Module option Use these instructions to install and enable a TPM on a supported server blade This procedure includes three sections 1 Installing the Trusted Platform Module board on page 43 2 Retaining the recovery key password on page 44 3 Enabling the Trusted Platform Module on page 45 Enabling the TPM requires accessing RBSU HP ROM Based Setup Ut...

Страница 43: ...ure the integrity of the system data When using BitLocker always retain the recovery key password The recovery key password is required to enter Recovery Mode after BitLocker detects a possible compromise of system integrity HP is not liable for blocked data access caused by improper TPM use For operating instructions see the encryption technology feature documentation provided by the operating sy...

Страница 44: ... SAS controller on page 15 15 Install the access panel on page 14 16 Install the server blade Installing a server blade on page 21 17 Power up the server blade on page 12 Retaining the recovery key password The recovery key password is generated during BitLocker setup and can be saved and printed after BitLocker is enabled When using BitLocker always retain the recovery key password The recovery k...

Страница 45: ...lect Enable and then press the Enter key to modify the TPM Functionality setting 6 Press the Esc key to exit the current menu or press the F10 key to exit RBSU 7 Reboot the server blade 8 Enable the TPM in the OS For OS specific instructions see the OS documentation CAUTION When a TPM is installed and enabled on the server blade data access is locked if you fail to follow the proper procedures for...

Страница 46: ...on about product features specifications options configurations and compatibility see the QuickSpecs on the HP website http h18000 www1 hp com products quickspecs ProductBulletin html At the website choose the geographic region and then locate the product by name or product category FBWC capacitor pack cabling Cache module option Mezzanine option ...

Страница 47: ... SUV cable to connect a monitor and any of the following USB devices USB hub USB keyboard USB mouse USB CD DVD ROM drive Numerous configurations are possible This section offers two possible configurations For more information see USB support on page 60 Accessing a server blade with local KVM For this configuration a USB hub is not necessary To connect additional devices use a USB hub CAUTION Befo...

Страница 48: ...configuring a server blade or loading software updates and patches from a USB CD DVD ROM Use a USB hub when connecting a USB CD ROM drive to the server blade The USB hub provides additional connections 1 Open the serial label pull tab and connect the HP c Class Blade SUV cable to the server blade 2 Connect the video connector to a monitor 3 Connect a USB hub to one USB connector 4 Connect the foll...

Страница 49: ...Cabling 49 o USB mouse Item Description 1 Monitor 2 USB CD DVD ROM drive 3 USB keyboard 4 USB hub 5 USB mouse 6 HP c Class Blade SUV Cable ...

Страница 50: ...rman http www hp com support ProLiant_TSG_v1_gr Japanese http www hp com support ProLiant_TSG_v1_jp Simplified Chinese http www hp com support ProLiant_TSG_v1_sc The HP ProLiant Gen8 Troubleshooting Guide Volume II Error Messages provides a list of error messages and information to assist with interpreting and resolving error messages on ProLiant servers and server blades To view the guide select ...

Страница 51: ...ine and Offline Option ROM Configuration for Arrays on page 59 Offline ROMPaq utility on page 60 Offline Server QuickSpecs For more information about product features specifications options configurations and compatibility see the QuickSpecs on the HP website http h18000 www1 hp com products quickspecs ProductBulletin html At the website choose the geographic region and then locate the product by ...

Страница 52: ...nformation about iLO features which may require an iLO Advanced Pack or iLO Advanced for BladeSystem license see the iLO documentation on the Documentation CD or on the HP website http www hp com go ilo docs Active Health System HP Active Health System provides the following features Combined diagnostics tools scanners Always on continuous monitoring for increased stability and shorter downtimes R...

Страница 53: ...s on page 54 Intelligent Provisioning Several packaging changes have taken place with HP ProLiant Gen8 servers SmartStart CDs and the Smart Update Firmware DVD will no longer ship with these new server blades Instead the deployment capability is embedded in the server blade as part of HP iLO Management Engine s Intelligent Provisioning Intelligent Provisioning is an essential single server deploym...

Страница 54: ...ade see the HP website http www hp com go supportos If a significant change occurs between data gathering intervals the survey function marks the previous information and overwrites the survey data files to reflect the latest changes in the configuration Survey functionality is installed with every Intelligent Provisioning assisted HP Insight Diagnostics installation or it can be installed through...

Страница 55: ...information on the Insight Remote Support Advanced software see the HP website http www hp com go insightremotesupport The HP Insight Remote Support software release notes detail the specific prerequisites supported hardware and associated operating systems The release notes are available on the HP website http www hp com go insightremotesupport docs Scripting Toolkit The Scripting Toolkit is a se...

Страница 56: ...s software and firmware on Windows and Linux operating systems Performs local or remote one to many online deployment Deploys firmware and software together Supports offline and online deployment Deploys necessary component updates only Downloads the latest components from Web Enables direct update of BMC firmware HP iLO For more information about HP SUM and to access the HP Smart Update Manager U...

Страница 57: ...r up sequence the system ROM automatically configures the entire system without needing any intervention During this process the ORCA utility in most cases automatically configures the array to a default setting based on the number of drives connected to the server NOTE If the boot drive is not empty or has been written to in the past ORCA does not automatically configure the array You must run OR...

Страница 58: ... serial number and product ID After you replace the system board you must re enter the server blade serial number and the product ID 1 During the server blade startup sequence press the F9 key to access RBSU 2 Select the Advanced Options menu 3 Select Service Options 4 Select Serial Number The following warning appears Warning The serial number should ONLY be modified by qualified service personne...

Страница 59: ...ethods If an optional controller is not installed press F10 during boot If an optional controller is installed when the system recognizes the controller during POST press F5 For optimum performance the minimum display settings are 1024 768 resolution and 16 bit color Servers running Microsoft operating systems require one of the following supported browsers Internet Explorer 6 0 or later Mozilla F...

Страница 60: ...cess the server specific page enter the following web address into the browser http www hp com support servername For example http www hp com support dl360g6 Automatic Server Recovery ASR is a feature that causes the system to restart when a catastrophic operating system error occurs such as a blue screen ABEND does not apply to HP ProLiant DL980 Servers or panic A system fail safe timer the ASR t...

Страница 61: ...ivers IMPORTANT Always perform a backup before installing or updating device drivers The server blade includes new hardware that may not have driver support on all OS installation media If you are installing an Intelligent Provisioning supported OS use Intelligent Provisioning on page 53 and its Configure and Install feature to install the OS and latest supported drivers If you do not use Intellig...

Страница 62: ...nd firmware from HP VCA compares installed software versions on the node with updates available in the VCRM managed repository Administrators configure VCA to point to a repository managed by VCRM For more information about version control tools see the HP Systems Insight Manager User Guide the HP Version Control Agent User Guide and the HP Version Control Repository User Guide on the HP website h...

Страница 63: ...140 F Do not disassemble crush puncture short external contacts or dispose of in fire or water Replace only with the spare designated for this product To remove the component 1 Power down the server blade on page 12 2 Remove the server blade on page 13 3 Remove the access panel on page 14 4 Disconnect the capacitor pack cabling if connected FBWC capacitor pack cabling on page 46 5 Remove the SAS c...

Страница 64: ...Battery replacement 64 For more information about battery replacement or proper disposal contact an authorized reseller or an authorized service provider ...

Страница 65: ... to bear a label indicating the interference potential of the device as well as additional operating instructions for the user FCC rating label The FCC rating label on the device shows the classification A or B of the equipment Class B devices have an FCC logo or ID on the label Class A devices do not have an FCC logo or ID on the label After you determine the class of the device refer to the corr...

Страница 66: ...cause harmful interference and 2 this device must accept any interference received including interference that may cause undesired operation For questions regarding this product contact us by mail or telephone Hewlett Packard Company P O Box 692000 Mail Stop 530113 Houston Texas 77269 2000 1 800 HP INVENT 1 800 474 6836 For continuous quality improvement calls may be recorded or monitored For ques...

Страница 67: ...ided by HP Compliance with these directives implies conformity to applicable harmonized European standards European Norms that are listed in the EU Declaration of Conformity issued by HP for this product or product family and available in English only either within the product documentation or at the following HP website http www hp eu certificates type the product number in the search field The c...

Страница 68: ...lectrical and electronic equipment The separate collection and recycling of your waste equipment at the time of disposal will help to conserve natural resources and ensure that it is recycled in a manner that protects human health and the environment For more information about where you can drop off your waste equipment for recycling please contact your local city office your household waste dispo...

Страница 69: ...n optical storage device that is CD or DVD drive and or fiber optic transceiver Each of these devices contains a laser that is classified as a Class 1 Laser Product in accordance with US FDA regulations and the IEC 60825 1 The product does not emit hazardous laser radiation Each laser product complies with 21 CFR 1040 10 and 1040 11 except for deviations pursuant to Laser Notice No 50 dated June 2...

Страница 70: ...line battery pack A risk of fire and burns exists if the battery pack is not properly handled To reduce the risk of personal injury Do not attempt to recharge the battery Do not expose the battery to temperatures higher than 60 C 140 F Do not disassemble crush puncture short external contacts or dispose of in fire or water Batteries battery packs and accumulators should not be disposed of together...

Страница 71: ...Regulatory compliance notices 71 Nach ISO 7779 1999 Typprüfung ...

Страница 72: ...tic sensitive component or assembly Grounding methods to prevent electrostatic discharge Several methods are used for grounding Use one or more of the following methods when handling or installing electrostatic sensitive parts Use a wrist strap connected by a ground cord to a grounded workstation or computer chassis Wrist straps are flexible straps with a minimum of 1 megohm 10 percent resistance ...

Страница 73: ...ng of 1 C per 304 8 m 1 8 F per 1 000 ft up to 3048 m 10 000 ft applies No direct sunlight is allowed The maximum permissible rate of change is 10 C hr 18 F hr The type and number of options installed may reduce the upper temperature and humidity limits Operating with a fan fault or above 30 C 86 F may reduce system performance Storage maximum humidity of 95 is based on a maximum temperature of 45...

Страница 74: ...Product identification number Applicable error messages Add on boards or hardware Third party hardware or software Operating system type and revision level HP contact information For United States and worldwide contact information see the Contact HP website http www hp com go assistance In the United States To contact HP by phone call 1 800 334 5144 For continuous quality improvement calls may be ...

Страница 75: ...selfrepair Réparation par le client CSR Les produits HP comportent de nombreuses pièces CSR Customer Self Repair réparation par le client afin de minimiser les délais de réparation et faciliter le remplacement des pièces défectueuses Si pendant la période de diagnostic HP ou ses partenaires ou mainteneurs agréés détermine que la réparation peut être effectuée à l aide d une pièce CSR HP vous l env...

Страница 76: ...ento di costo solo in alcune zone In caso di necessità si può richiedere l assistenza telefonica di un addetto del centro di supporto tecnico HP Nel materiale fornito con una parte di ricambio CSR HP specifica se il cliente deve restituire dei componenti Qualora sia richiesta la resa ad HP del componente difettoso lo si deve spedire ad HP entro un determinato periodo di tempo generalmente cinque 5...

Страница 77: ...o socios de servicio de HP identifica que una reparación puede llevarse a cabo mediante el uso de un componente CSR HP le enviará dicho componente directamente para que realice su sustitución Los componentes CSR se clasifican en dos categorías Obligatorio componentes para los que la reparación por parte del usuario es obligatoria Si solicita a HP que realice la sustitución de estos componentes ten...

Страница 78: ...n in de geïllustreerde onderdelencatalogus aangemerkt met Nee Afhankelijk van de leverbaarheid en de locatie worden CSR onderdelen verzonden voor levering op de eerstvolgende werkdag Levering op dezelfde dag of binnen vier uur kan tegen meerkosten worden aangeboden indien dit mogelijk is gezien de locatie Indien assistentie gewenst is belt u een HP Service Partner om via de telefoon technische ond...

Страница 79: ...horas pode ser feita mediante uma taxa adicional Se precisar de auxílio entre em contato com o Centro de suporte técnico da HP para que um técnico o ajude por telefone A HP especifica nos materiais fornecidos com a peça CSR de reposição se a peça com defeito deve ser devolvida à HP Nos casos em que isso for necessário é preciso enviar a peça com defeito à HP dentro do período determinado normalmen...

Страница 80: ...Support and other resources 80 ...

Страница 81: ...Support and other resources 81 ...

Страница 82: ...DM Advanced Data Mirroring AMP Advanced Memory Protection ASR Automatic Server Recovery FBWC flash backed write cache iLO Integrated Lights Out IML Integrated Management Log LRDIMM Load Reduced dual in line memory module LV DIMM Low voltage DIMM ORCA Option ROM Configuration for Arrays POST Power On Self Test ...

Страница 83: ...t RBSU ROM Based Setup Utility RDIMM registered dual in line memory module SAS serial attached SCSI SATA serial ATA SIM Systems Insight Manager UDIMM unregistered dual in line memory module UID unit identification USB universal serial bus VCA Version Control Agent ...

Страница 84: ...oviding documentation that meets your needs To help us improve the documentation send any errors suggestions or comments to Documentation Feedback mailto docsfeedback hp com Include the document title and part number version number or the URL when submitting your feedback ...

Страница 85: ...ication 6 configuration of system 22 51 connecting to the network 20 connectors 6 contact information 74 contacting HP 74 CSR customer self repair 74 customer self repair CSR 74 D Declaration of Conformity 66 default settings 32 device mapping 19 diagnosing problems 50 diagnostic tools 51 54 60 diagnostics utility 54 DIMM baffles 16 DIMM identification 31 DIMM installation guidelines 33 DIMM popul...

Страница 86: ...Update Manager overview 51 56 HP technical support 74 HP website 74 HP contacting 74 I identification number 65 iLO Integrated Lights Out 12 51 52 53 IML Integrated Management Log 51 53 Insight Diagnostics 54 61 installation enclosure 18 installation server blade 21 installation server options 23 installing hardware 23 installing memory 34 installing server blade options 23 installing server optio...

Страница 87: ...ecovery key 44 redundant ROM 61 regulatory compliance identification numbers 65 regulatory compliance notices 65 67 70 release button 6 removing the access panel 14 removing the server blade 13 required information 74 resources 74 ROM redundancy 61 ROM Based Setup Utility RBSU 45 56 ROMPaq utility 51 60 61 S safety considerations 61 safety information 61 SAS controller 14 15 37 SAS controller opti...

Страница 88: ...ule 42 43 44 45 troubleshooting 50 troubleshooting resources 50 troubleshooting firmware upgrade utility 50 Trusted Platform Module TPM 42 43 44 45 U Ukraine notice 69 updating the system ROM 61 USB connectors 11 USB devices 47 USB support 60 utilities 51 58 utilities deployment 51 55 56 V Version Control Agent VCA 62 Version Control Repository Manager VCRM 62 video connector 11 video connector ca...

Отзывы: