background image

Preparation for disassembly

See 

Routine care, SATA drive guidelines, and disassembly preparation on page 7

 for initial safety procedures.

1.

Remove/disengage any security devices that prohibit opening the computer.

2.

Remove all removable media, such as a USB flash drive, from the computer.

3.

Turn off the computer properly through the operating system, then turn off any external devices.

4.

Disconnect the power cord from the AC outlet and disconnect any external devices.

IMPORTANT:

Regardless of the power-on state, voltage is always present on the system board as long 

as the system is plugged into an active AC outlet. To prevent damage to internal components, you must 
disconnect the power cord from the power source before opening the computer.

5.

If the computer is on a stand, remove the computer from the stand.

WARNING!

Beware of sharp edges inside the chassis.

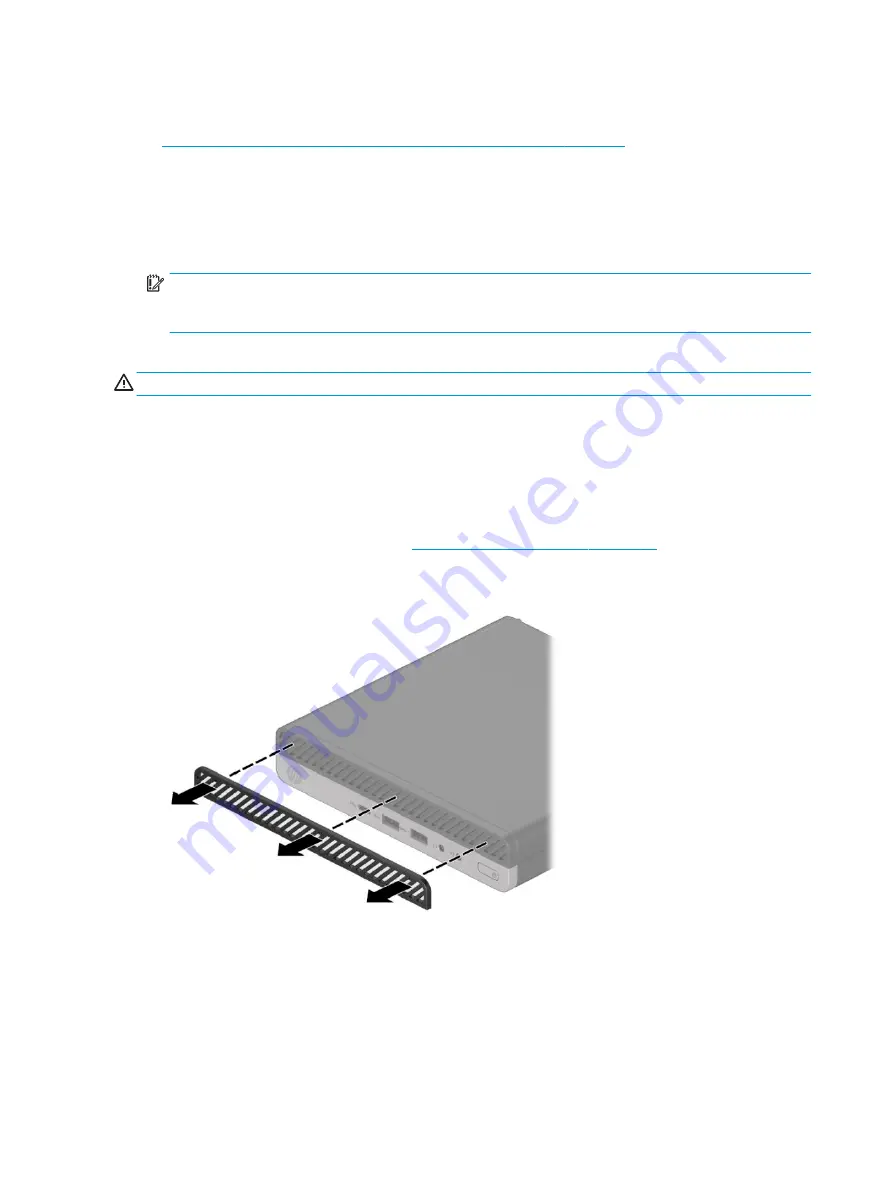
Front bezel dust filter

Some models are equipped with an optional front bezel dust filter. You must periodically clean the dust filter


so that the dust collected on the filter does not impede air flow through the computer.

To remove, clean, and replace the dust filter:

1.

Prepare the computer for disassembly (

Preparation for disassembly on page 14

).

2.

To remove the dust filter, use your fingers to separate the filter from the front bezel at the tab locations 
shown below.

3.

Use a soft brush or cloth to clean dust from the filter. If heavily soiled, rinse the filter clean with water.

To install the front bezel dust filter, reverse the removal procedure.

14

Chapter 4   Removal and replacement procedures

Содержание ProDesk 600 G4

Страница 1: ...Maintenance and Service Guide HP ProDesk 600 G4 Desktop Mini ...

Страница 2: ...n May 2018 Document Part Number L21500 001 Product notice This user guide describes features that are common to most models Some features may not be available on your computer Not all features are available in all editions of Windows This computer may require upgraded and or separately purchased hardware drivers and or software to take full advantage of Windows functionality Go to http www microso...

Страница 3: ... another hard surface such as an adjoining optional printer or a soft surface such as pillows or rugs or clothing to block airflow Also do not allow the AC adapter to contact the skin or a soft surface such as pillows or rugs or clothing during operation The device and the AC adapter comply with the user accessible surface temperature limits defined by the International Standard for Safety of Info...

Страница 4: ...iv Safety warning notice ...

Страница 5: ...mage to equipment 8 Personal grounding methods and equipment 8 Grounding the work area 8 Recommended materials and equipment 9 Operating guidelines 9 Routine care 10 General cleaning safety precautions 10 Cleaning the computer case 10 Cleaning the keyboard 10 Cleaning the monitor 11 Cleaning the mouse 11 Service considerations 11 Tools and software requirements 11 Screws 11 Hard Drives 12 Lithium ...

Страница 6: ...r configuration 40 5 Computer Setup F10 Utility 41 Computer Setup F10 Utilities 41 Using Computer Setup F10 Utilities 41 Computer Setup Main 43 Computer Setup Security 45 Computer Setup Advanced 48 Computer Setup UEFI Drivers 52 Recovering the Configuration Settings 52 6 Troubleshooting without diagnostics 53 Safety and comfort 53 Before you call for technical support 53 Helpful hints 54 Solving g...

Страница 7: ... Downloading HP Hardware Diagnostics Windows by product name or number select products only 89 Installing HP PC Hardware Diagnostics Windows 89 Using HP PC Hardware Diagnostics UEFI 89 Starting HP PC Hardware Diagnostics UEFI 90 Downloading HP PC Hardware Diagnostics UEFI to a USB flash drive 90 Downloading the latest HP PC Hardware Diagnostics UEFI version 90 Downloading HP PC Hardware Diagnostic...

Страница 8: ...Appendix B Statement of memory volatility 95 Nonvolatile memory usage 97 Questions and answers 99 Using HP Sure Start select models only 100 Appendix C Specifications 101 Index 102 viii ...

Страница 9: ...Gen 2 Type C port 5 Audio out headphone Audio in microphone combo jack 2 USB 3 1 Gen 2 port 6 Main storage LED 3 USB 3 1 Gen 1 charging port 7 Dual state power button 4 Headphone jack When the computer is on the USB port connects a USB device provides high speed data transfer and even when the computer is off charges products such as a cell phone camera activity tracker or smartwatch NOTE The main...

Страница 10: ...playPort HDMI VGA USB Type C or serial port 3 Security cable slot 9 USB 3 1 Gen 1 ports 2 4 External antenna connector optional 10 RJ 45 network jack status lights 5 Padlock loop 11 Power connector 6 Dual Mode DisplayPort 2 Serial number location Each computer has a unique serial number and a product ID number that are located on the exterior of the computer Keep these numbers available for use wh...

Страница 11: ... computer go to http partsurfer hp com select your country or region and then follow the on screen instructions Computer major components Item Description 1 Access panel 2 Front bezel 3 Front bezel dust filter for use only in 35 W models 4 Speaker 5 Hood sensor 6 Option boards HDMI option board DisplayPort option board Computer major components 3 ...

Страница 12: ... mm 500 GB 7200 rpm 7 mm 500 GB 7200 rpm OPAL2 self encrypting drive SED 7 mm 500 GB 5400 rpm FIPS 7 mm 500 GB 5400 rpm hybrid SSD 7 mm Solid state drives 2 5 inch SATA 3 TLC 512 GB FIPS 140 2 512 GB OPAL 2 self encrypting drive SED 512 GB 256 GB FIPS 140 2 256 GB OPAL 2 self encrypting drive SED 256 GB 10 Hard drive cage 11 Hard drive cable 12 WLAN modules Intel 9560 802 11ac 2x2 with Bluetooth M...

Страница 13: ...essor Intel i3 8100T processor Intel Pentium G5400T processor Intel Celeron G4900T processor 17 System board includes replacement thermal material 18 Antenna cable wireless 19 Stand Miscellaneous parts Description AC adapter 65 W nPFC Sleeve Kits I O sleeve Hard drive sleeve Optical drive sleeve VESA sleeve HP speaker phone security sleeve Quick release EPS bracket PC mounting bracket B300 Antenna...

Страница 14: ...ireless keyboard and mouse Slim PCR USB Brazil and Latin America Smart card slim CCID USB Anti microbial slim Grey slim USB Collaboration USB Collaboration wireless Wireless premium Health care wired USB Premium wireless keyboard and mouse Mouse USB optical USB laser USB USB premium USB antimicrobial USB PS2 washable USB hardened USB heath care wired Power cord 6 Chapter 2 Illustrated parts catalo...

Страница 15: ...e may function normally for a while but it has been degraded in the internal layers reducing its life expectancy Networks built into many integrated circuits provide some protection but in many cases the discharge contains enough power to alter device parameters or melt silicon junctions Generating static The following table shows that Different activities generate different amounts of static elec...

Страница 16: ...t snugly into the banana plug connector on the grounding mat or workstation Heel straps Toe straps Boot straps can be used at standing workstations and are compatible with most types of shoes or boots On conductive floors or dissipative floor mats use them on both feet with a maximum of one megohm 10 resistance between the operator and ground Static Shielding Protection Levels Method Voltage Antis...

Страница 17: ...nd cold Operate the computer on a sturdy level surface Leave a 10 2 cm 4 inch clearance on all vented sides of the computer and above the monitor to permit the required airflow Never restrict the airflow into the computer by blocking any vents or air intakes Do not place the keyboard with the keyboard feet down directly against the front of the desktop unit as this also restricts airflow Occasiona...

Страница 18: ...uted with water Rinse well by wiping it with a cloth or swab dampened with clear water For stubborn stains use isopropyl rubbing alcohol No rinsing is needed as the alcohol will evaporate quickly and not leave a residue After cleaning always wipe the unit with a clean lint free cloth Occasionally clean the air vents on the computer Lint and other foreign matter can block the vents and limit the ai...

Страница 19: ...f Clean the mouse ball by first removing the retaining plate and the ball from the housing Pull out any debris from the ball socket and wipe the ball with a clean dry cloth before reassembly To clean the mouse body follow the procedures in Cleaning the computer case on page 10 Service considerations Listed below are some of the considerations that you should keep in mind during the disassembly and...

Страница 20: ...t comes with the computer provides power to the real time clock and has a minimum lifetime of about three years See the appropriate removal and replacement chapter for the chassis you are working on in this guide for instructions on the replacement procedures WARNING This computer contains a lithium battery There is a risk of fire and chemical burn if the battery is handled improperly Do not disas...

Страница 21: ...s Do not disable the power cord grounding plug The grounding plug is an important safety feature Plug the power cord into a grounded earthed AC outlet that is easily accessible at all times To reduce the risk of serious injury read the Safety Comfort Guide The Safety Comfort Guide also provides important electrical and mechanical safety information The Safety Comfort Guide is available on the web ...

Страница 22: ...the power cord from the power source before opening the computer 5 If the computer is on a stand remove the computer from the stand WARNING Beware of sharp edges inside the chassis Front bezel dust filter Some models are equipped with an optional front bezel dust filter You must periodically clean the dust filter so that the dust collected on the filter does not impede air flow through the compute...

Страница 23: ...sen the thumbscrew on the rear of the computer 1 and then slide the panel forward and lift it off the computer 2 NOTE If necessary a Torx T15 or flat bladed screwdriver can be used to loosen the thumbscrew NOTE Your computer model may look slightly different from the illustration in this section Some models have vent holes on the access panel Access panel 15 ...

Страница 24: ...s panel on page 15 3 Position the top cover upside down so you can access the inside of the bezel 4 Remove the two Phillips screws 1 that secure the bezel to the access panel 5 Simultaneously press the two top tabs not the four bottom tabs to disengage the bezel 2 6 Rotate the top of the bezel downward 3 and then remove it from the access panel 4 To install the front bezel reverse the removal proc...

Страница 25: ...ly Preparation for disassembly on page 14 2 Remove the access panel Access panel on page 15 3 Lift the rubber cover from the hood sensor 1 4 Disconnect the cable from the system board and then lift the hood sensor out of the computer 2 To install the hood sensor reverse the removal procedure Hood sensor 17 ...

Страница 26: ...Remove the access panel Access panel on page 15 3 Disconnect the speaker cable from the system board connector 1 4 From the front of the computer remove the Phillips screw that secures the speaker to the chassis 2 5 Remove the insulator and tape from the top and inside of the speaker 3 6 Lift the speaker straight up and out of the bracket on the inside of the chassis 4 To install the speaker rever...

Страница 27: ...t you can transfer the data to the new hard drive 1 Prepare the computer for disassembly Preparation for disassembly on page 14 2 Remove the access panel Access panel on page 15 3 Rotate the hard drive latch up 1 to disengage the hard drive from the cage Then slide the drive toward the rear of the chassis until it stops and then lift the hard drive up and out of the cage 2 Hard drive 19 ...

Страница 28: ...14 2 Remove the access panel Access panel on page 15 3 Remove the hard drive Hard drive on page 19 4 Disconnect the cable from the system board 1 5 Remove the two Torx T15 screws that secure the connector to the drive cage 2 6 Lift the hard drive connector out of the computer 3 To install the hard drive connector reverse the removal procedure 20 Chapter 4 Removal and replacement procedures ...

Страница 29: ...rd drive on page 19 4 Lift the connector latch on the system board 1 and then disconnect the hard drive cable using the pull tab on the cable 2 5 Remove the two Torx T15 screws 3 that secure the hard drive cage to the chassis 6 Slide the hard drive cage back and then lift it out of the chassis 4 To install the drive cage reverse the removal procedure Drive cage 21 ...

Страница 30: ...nel Access panel on page 15 3 In models with a hard drive remove the hard drive Hard drive on page 19 and drive cage Drive cage on page 21 4 Locate the M 2 SSD on the system board 5 Remove the screw 1 securing the SSD to the system board and then pull the SSD from the socket on the system board 2 To replace the solid state drive module reverse the removal procedures 22 Chapter 4 Removal and replac...

Страница 31: ...page 19 and drive cage Drive cage on page 21 4 Locate the WLAN module on the system board 5 Disconnect both antenna cables 1 from the WLAN module NOTE You may need to use a small tool such as a pair of tweezers or needle nose pliers to disconnect and connect the antenna cables 6 Remove the screw 2 securing the WLAN module to the system board 7 Grasp the WLAN module 3 by the sides and pull it out o...

Страница 32: ...ic electricity can damage the electronic components of the computer or optional equipment Before beginning these procedures ensure that you are discharged of static electricity by briefly touching a grounded metal object NOTE The lifetime of the lithium battery can be extended by plugging the computer into a live AC wall socket The lithium battery is only used when the computer is NOT connected to...

Страница 33: ...placement battery into position positive side up The battery holder automatically secures the battery in the proper position 7 Reassemble the computer 8 Reset the date and time your passwords and any special system setups using Computer Setup Battery 25 ...

Страница 34: ... board 1 Prepare the computer for disassembly Preparation for disassembly on page 14 2 Remove the access panel Access panel on page 15 3 In models with a hard drive remove the hard drive Hard drive on page 19 and drive cage Drive cage on page 21 4 Remove the two Phillips screws 1 that secure the board to the system board 5 Lift to disengage the board from the system board connector and then remove...

Страница 35: ... Maximum Memory 32 GB Supported 2 Gbit 4 Gbit 8 Gbit and 16 Gbit non ECC memory technologies single sided and double sided memory modules NOTE The system does not operate properly if you install unsupported memory modules Memory modules constructed with x8 and x16 DDR devices are supported memory modules constructed with x4 SDRAM are not supported HP offers upgrade memory for this computer and adv...

Страница 36: ...slowest memory module in the system IMPORTANT You must disconnect the power cord and wait approximately 30 seconds for the power to drain before adding or removing memory modules Regardless of the power on state voltage is always supplied to the memory modules as long as the computer is plugged into an active AC outlet Adding or removing memory modules while voltage is present may cause irreparabl...

Страница 37: ...nstall a memory module 4 Locate the memory module locations 1 and 2 on the system board 5 To remove a memory module press outward on the two latches on each side of the memory module 1 and then pull the memory module 2 out of the slot The computer automatically recognizes the new memory when you turn on the computer Memory modules 29 ...

Страница 38: ... panel on page 15 3 Disconnect the fan cable from the system board 1 4 Remove the fan cable from the clips on the side of the heat sink 2 5 Lift fan up to about 30 45 degrees 3 and then pull it away from the heat sink 4 To install the fan reverse the removal procedure 30 Chapter 4 Removal and replacement procedures ...

Страница 39: ...k 1 Prepare the computer for disassembly Preparation for disassembly on page 14 2 Remove the access panel Access panel on page 15 3 Remove the fan Fan on page 30 4 Disconnect the fan cable from the system board 1 5 Loosen the three captive Torx screws 2 that secure the heat sink to the computer 6 Remove the heat sink from the computer 3 CAUTION Be sure the loosen the screws in the order indicated ...

Страница 40: ...32 Chapter 4 Removal and replacement procedures ...

Страница 41: ...otate the microprocessor retainer to its fully open position 3 8 Lift the processor straight up to remove it 4 CAUTION Do NOT handle the pins in the processor socket These pins are very fragile and handling them could cause irreparable damage Once pins are damaged it may be necessary to replace the system board Reverse the removal procedure to install a new processor NOTE After installing a new pr...

Страница 42: ... replacing the system board make sure the following components are removed from the defective system board and installed on the replacement system board as applicable Memory modules Memory modules on page 27 M 2 solid state drive M 2 PCIe solid state drive SSD on page 22 Processor Processor on page 33 WLAN module WLAN module on page 23 Expansion connector board Expansion connector board on page 26...

Страница 43: ... the computer 8 Lift the front of the system board 1 and then pull it out of the computer 2 To install the system board reverse the removal procedures When replacing a system board be sure to install a thermal pad to service the graphics processor on the system board 1 at the location on the chassis as shown by callout 2 in the following image System board 35 ...

Страница 44: ...y press Ctrl A to initiate edit mode 6 Edit the fields listed If the feature byte has data or is not editable then it was not cleared and cannot be edited System ID Setup Page Setup Field Name Comment Label Product Name Enter the Model name number or marketing name Flexbuild Serial Number Enter the Serial Number of Unit Support SKU Number Enter the SKU or Product Number including Localization Code...

Страница 45: ...ck Processor SPKR White Speaker DIMM3 Black Secondary memory WLAN Black WLAN module DIMM1 Black Primary memory BAT Black RTC battery HDDFAN Black Hard drive fan SSD Black Solid state module PSWD Black Password header and jumper P60 SATA White Hard drive CMOS Yellow CMOS reset button P72 COMM_DP Black Expansion board connector System board 37 ...

Страница 46: ...module on page 23 9 Remove the system board System board on page 34 10 Remove the antenna cables from their routing paths along the interior sides of the computer chassis 1 11 On the rear of the computer remove the antenna cover by pressing on the tab on the top of the cover 2 and then rotating the top of the cover downward and off the computer 3 NOTE One end of the antenna cover is slightly longe...

Страница 47: ...15 Rotate and remove the antenna 3 and then pull the cable out of the front of the chassis 4 Reverse the removal procedure to install the WLAN antennas and cables Internal WLAN antenna cables 39 ...

Страница 48: ... up and place the computer in the optional stand NOTE To stabilize the computer in a tower orientation HP recommends the use of the optional tower stand 3 Reconnect the AC power cord and any external devices then turn on the computer NOTE Ensure at least 10 2 centimeters 4 inches of space on all sides of the computer remains clear and free of obstructions 4 Lock any security devices that were dise...

Страница 49: ...Secure Boot power management virtualization support and language and keyboard type used in Setup and POST Replicate the system setup by saving system configuration information on a USB device and restoring it on one or more computers Enable or disable DriveLock security or securely erase a hard drive when supported by drive Using Computer Setup F10 Utilities Computer Setup can be accessed only by ...

Страница 50: ...anced and Main menus to those previously saved by Save Custom Defaults select Apply Custom Defaults and Exit If no custom defaults have been saved then factory defaults are used NOTE Settings in the Security menu are not modified by Apply Defaults Those values are reset by Restore Security Settings to Factory Defaults at the bottom of the Security menu NOTE Not all settings shown in the following ...

Страница 51: ...e Firmware System BIOS version ME Firmware version Intel only Video BIOS version Reference code version Super I O Firmware version USB Type C controller s firmware version Service Born on date Serial number SKU number UUID Universally Unique Identifier Asset tracking number Feature byte Build ID Product family System board ID System board CT number Communication Integrated MAC Address System Diagn...

Страница 52: ...lect to enter the minimum BIOS version that can be rolled back to Unrestricted rollback to older BIOS Restricted rollback to older BIOS Allow BIOS updates using a network BIOS Update Preferences Allows the administrator to select the source of network updates www hp com or another network server and allows configuration of a periodic check for updates including policies for Check for updates and p...

Страница 53: ... the Fast Boot option NOTE If the password is set it is required to change Computer Setup options update the BIOS and make changes to certain plug and play settings under Windows Change BIOS Administrator Password This selection is active only if a BIOS administrator password is set Lets you change the BIOS administrator password You must know the current password to be able to change it Create PO...

Страница 54: ... sequence is entered by the local user This can result in a system that is unable to boot after inputting the manual recovery key sequence Sure Start BIOS Settings Protection This setting requires setting the BIOS Administrator password Default is disabled Sure Start Secure Boot Keys Protection Default is enabled Enhanced HP Firmware Runtime Intrusion Prevention and Detection Enables monitoring of...

Страница 55: ...R gets changed the user will be prompted to restore the MBR Default is disabled The MBR contains information needed to successfully boot from a disk and to access the data stored on the disk Master Boot Record Security may prevent unintentional or malicious changes to the MBR such as those caused by some viruses or by the incorrect use of certain disk utilities It also allows you to recover the la...

Страница 56: ...artup Menu or F10 for Computer Setup Fast Boot Default is enabled CD ROM Boot Default is enabled USB Storage Boot Default is enabled Network PXE Boot Default is enabled After Power Loss Default is Power Off Power off causes the computer to remain powered off when power is restored Power on causes the computer to power on automatically as soon as power is restored Previous state causes the computer...

Страница 57: ... you delete any previously loaded custom boot keys Clearing keys will disable secure boot Default is disabled Reset Secure Boot keys to factory defaults Default is disabled Enable MS UEFI CA key Disabling this setting alters the Secure Boot key list to further restrict the allowed software components Set this option to disable to support Device Guard System Options Turbo boost Intel Turbo Boost Te...

Страница 58: ...e Default is Boot to Network Dust Filter Select to enable the Dust Filter replacement reminder which can be set for 15 30 60 90 120 or 180 days The reminder will show during POST after the reminder timer has expired Video Memory Size Use this option to manage graphics memory allocation The value you choose is allocated permanently to graphics and is unavailable to the operating system Audio Device...

Страница 59: ...cessor Default is enabled Extended Idle Power States enable disable Allows certain operating systems to decrease the processors power consumption when the processor is idle Default is enabled S5 Maximum Power Savings enable disable Enabling this feature reduces the power of the system as much as possible in the S5 state Power is removed from the wake up circuitry the expansion slots and any manage...

Страница 60: ...rform the Save to Removable Media command with the Computer Setup F10 Utility before Restore is needed See Computer Setup Main on page 43 in the Computer Setup File table The Save to Removable Media option creates a file named HPSETUP TXT on an inserted USB flash media device This file can be edited to change the settings on Restore An asterisk marks the selected option for a setting NOTE It is re...

Страница 61: ...d The flashing lights are error codes that will help you diagnose the problem Refer to POST error messages and diagnostic front panel LEDs and audible codes on page 78 for more information If the screen is blank plug the monitor into a different video port on the computer if one is available Or replace the monitor with a monitor that you know is functioning properly If you are working on a network...

Страница 62: ...e green monitor light is on Check the Power LED on the front of the computer to see if it is flashing red The flashing lights are error codes that will help you diagnose the problem Refer to POST error messages and diagnostic front panel LEDs and audible codes on page 78 for more information Turn up the brightness and contrast controls of the monitor if the monitor is dim Press and hold any key If...

Страница 63: ... is always applied to the system board To reduce the risk of personal injury from electrical shock and or hot surfaces be sure to disconnect the power cord from the wall outlet and allow the internal system components to cool before touching Cannot access the Computer Setup F10 Utility when booting the computer Cause Solution The Computer Setup F10 Utility is set to fast boot causing the F10 acces...

Страница 64: ...owered on and that the speakers volume control is set correctly 3 Use the system volume control available in the operating system to make sure the speakers are not muted or to increase the volume Cannot remove computer cover or access panel Cause Solution Smart Cover Lock featured on some computers is locked Unlock the Smart Cover Lock using Computer Setup In case of forgotten password power loss ...

Страница 65: ...he current application or consult the documentation that came with the application for suggestions on how to improve performance by adjusting parameters in the application 2 Add more memory 3 Upgrade the graphics solution Cause unknown Restart the computer Computer powered off automatically and the Power LED flashes red four times and then white two times Cause Solution Processor thermal protectio...

Страница 66: ...supply 6 Replace the system board Solving power problems Common causes and solutions for power problems are listed in the following table Power supply shuts down intermittently Cause Solution If equipped with a voltage selector voltage selector switch on rear of computer chassis some models not switched to correct line voltage 115V or 230V Select the proper AC voltage using the selector switch Pow...

Страница 67: ...or there is a problem with a file In Windows 10 type file in the taskbar search box and then select File Explorer from the list of applications In the left column expand This PC right click on a drive select Properties and then select the Tools tab Under Error checking click Check Drive not found identified Cause Solution Cable could be loose Check cable connections The system may not have automat...

Страница 68: ...ptions and ensure the bootable hard drive is listed immediately under the Hard Drive entry Computer will not boot from hard drive Cause Solution The device is attached to a SATA port that has been hidden in Computer Setup 1 Check SATA cable connections 2 Run the Computer Setup utility and ensure Device Available is selected for the device s SATA port in Advanced Port Options Boot order is not corr...

Страница 69: ...mentation included with your card to see if it writable Refer to the previous section for a list of compatible cards Media card is locked Locking the media card is a safety feature that prevents writing to and deleting from an SD Memory Stick PRO card If using an SD card make sure that the lock tab located on the right of the SD card is not in the locked position If using a Memory Stick PRO card m...

Страница 70: ... on the monitor and check that the monitor light is on Bad monitor Try a different monitor The cable connections are not correct Check the cable connection from the monitor to the computer and to the electrical outlet You may have a screen blanking utility installed or energy saver features are enabled Press any key or click the mouse button and type your password if set System ROM is corrupted sy...

Страница 71: ...een and the power LED flashes Red six times once every second followed by a two second pause and the computer beeps six times Beeps stop after fifth iteration but LEDs continue flashing Cause Solution Pre video graphics error For systems with a graphics card 1 Reseat the graphics card if applicable Power on the system 2 Replace the graphics card if applicable 3 Replace the system board For systems...

Страница 72: ...correctly adjusted 1 Be sure the monitor cable is securely connected to the computer 2 In a two monitor system or if another monitor is in close proximity be sure the monitors are not interfering with each other s electromagnetic field by moving them apart 3 Fluorescent lights or fans may be too close to the monitor Monitor needs to be degaussed Degauss the monitor Refer to the documentation that ...

Страница 73: ...ng an analog VGA input connection only Cause Solution Flat panel monitor s internal digital conversion circuits may be unable to correctly interpret the output synchronization of the graphics card 1 Select the monitor s Auto Adjustment option in the monitor s on screen display menu 2 Manually synchronize the Clock and Clock Phase on screen display functions To download a SoftPaq that will assist y...

Страница 74: ...audio jack output is the green receptacle Headphones or devices connected to the line out connector mute the internal speaker Turn on and use headphones or external speakers if connected or disconnect headphones or external speakers Computer is in Sleep state Press the power button to resume from Sleep state CAUTION When attempting to resume from Sleep state do not hold down the power button for m...

Страница 75: ...t audio over the DisplayPort connection if applicable so multiple audio devices may be listed in Device Manager Make sure the correct device is being used To access Device Manager in Windows 10 type device manager in the taskbar search box and then select Device Manager from the list of applications Some applications can select which audio output device is used Make sure the application has select...

Страница 76: ...memory may be overloaded Reset the printer by turning it off for one minute then turn it back on Printer will not print Cause Solution The printer may be out of paper Check the paper tray and refill it if it is empty Solving keyboard and mouse problems If you encounter keyboard or mouse problems see the documentation that came with the equipment and to the common causes and solutions listed in the...

Страница 77: ...ow keys to scroll to and select the power icon at the top right on the menu and then press Enter 3 Use the arrow keys to select Shut Down and then press Enter 4 After the shutdown is complete plug the mouse connector into the back of the computer or the keyboard and restart Program in use has stopped responding to commands Shut down the computer using the keyboard then restart the computer Mouse m...

Страница 78: ... then turn on the computer to integrate the device with the computer system When the system advised you of changes to the configuration you did not accept them Reboot the computer and follow the instructions for accepting the changes A plug and play board may not automatically configure when added if the default configuration conflicts with other devices Use Windows Device Manager to deselect the ...

Страница 79: ... network controller in the operating system using Device Manager To access Device Manager in Windows 10 type device manager in the taskbar search box and then select Device Manager from the list of applications Incorrect network driver Check the network controller documentation for the correct driver or obtain the latest driver from the manufacturer s Web site Network status link light never flash...

Страница 80: ... cable and device at the other end are operating correctly The network controller is defective Contact an authorized service provider Diagnostics passes but the computer does not communicate with the network Cause Solution Network drivers are not loaded or driver parameters do not match current configuration Make sure the network drivers are loaded and that the driver parameters match the configur...

Страница 81: ... your NIC System setup utility reports unprogrammed EEPROM Cause Solution Unprogrammed EEPROM Contact an authorized service provider Solving memory problems If you encounter memory problems some common causes and solutions are listed in the following table CAUTION Power may still be supplied to the DIMMs when the computer is turned off depending on the Management Engine ME settings To avoid damage...

Страница 82: ...ause Solution The memory modules may not be installed correctly Check that the memory modules have been installed correctly and that proper modules are used Integrated graphics may use system memory No action required Insufficient memory error during operation Cause Solution Too many Terminate and Stay Resident programs TSRs are installed Delete any TSRs that you do not need You have run out of me...

Страница 83: ...emovable Media Boot is disabled in the Computer Setup utility Run the Computer Setup utility and enable booting to removable media in Advanced Boot Options Ensure USB is enabled in Storage Boot Order The computer boots to DOS after making a bootable flash drive Cause Solution Flash drive is bootable Install the flash drive only after the operating system boots Flash drive is defective Try a differ...

Страница 84: ... click the Delete button 4 Select the Cookies and website data check box and click the Delete button Cannot automatically launch Internet programs Cause Solution You must log on to your ISP before some programs will start Log on to your ISP and launch the desired program Solving software problems Most software problems occur as a result of the following The application was not installed or configu...

Страница 85: ... Microsoft certified for your version of Windows Verify that the software is certified by Microsoft for your version of Windows see program packaging for this information Configuration files are corrupt If possible save all data close all programs and restart the computer Solving software problems 77 ...

Страница 86: ...chedule reconfigure the computer to the Full Boot Every x Days mode using Computer Setup NOTE For more information on Computer Setup see Computer Setup F10 Utility on page 41 POST numeric codes and text messages This section covers those POST errors that have numeric codes associated with them The section also includes some text messages that may be encountered during POST NOTE The computer will b...

Страница 87: ...g POST execution of the Management Engine ME BIOS Extensions option ROM 1 Reboot the computer 2 Unplug the power cord re seat the memory modules and reboot the computer 3 If the memory configuration was recently changed unplug the power cord restore the original memory configuration and reboot the computer 4 If the error persists replace the system board 00C PMM Deallocation Error during MEBx Clea...

Страница 88: ... the system board 2E3 Incompatible Memory Module in Memory Socket s X X A memory module in memory socket identified in the error message is missing critical SPD information or is incompatible with the chipset 1 Verify proper memory module type 2 Try another memory socket 3 Replace with a supported module 2E4 DIMM Configuration Warning The current memory configuration is not optimized Rearrange the...

Страница 89: ...urity and resetting CMOS on page 85 3 Replace the hard disk drive 3F2 Hard Disk 2 Error Hard disk 2 error 1 Check and or replace cables 2 Clear CMOS See Password security and resetting CMOS on page 85 3 Replace the hard disk drive 400 Serial Port A Address Conflict Detected Both external and internal serial ports are assigned to the same resources 1 Remove any serial port expansion cards 2 Clear C...

Страница 90: ...ed a wireless module installed in the system that is not supported and has been disabled Replace with a supported module 800 Keyboard Error Keyboard failure 1 Reconnect keyboard with computer turned off 2 Check connector for bent or missing pins 3 Ensure that none of the keys are depressed 4 Replace keyboard 801 Keyboard or System Unit Error Keyboard failure 1 Reconnect the keyboard with computer ...

Страница 91: ...pply fan 910 Filter Warning Airflow filter is dirty Replace the airflow filter Interpreting system validation diagnostic front panel LEDs and audible codes During the system validation phase that occurs at system startup the BIOS validates the functionality of the following subsystems and conditions AC adapter System board power Processor failure BIOS corruption Memory failure Graphics failure Sys...

Страница 92: ... embedded controller is checking or recovering the boot block Hardware 3 2 The embedded controller has timed out waiting for BIOS to return from memory initialization 3 3 The embedded controller has timed out waiting for BIOS to return from graphics initialization 3 4 The system board displays a power failure crowbar 3 5 The processor is not detected 3 6 The processor does not support an enabled f...

Страница 93: ...OS button with power removed will reset the BIOS settings to factory defaults It may be useful to back up the BIOS settings or save them as custom defaults before resetting them in case they are needed later Back up can be performed in Computer Setup or using the BiosConfigUtility tool available from www hp com See Computer Setup F10 Utility on page 41 for information on backing up the BIOS settin...

Страница 94: ...ischarged of static electricity by briefly touching a grounded metal object See the Safety Regulatory Information guide for more information 3 Remove the access panel 4 Locate the header and jumper NOTE The password jumper is green so that it can be easily identified For assistance locating the password jumper and other system board components see the system board components image at System board ...

Страница 95: ...tatic electricity by briefly touching a grounded metal object See the Safety Regulatory Information guide for more information 3 Remove the access panel CAUTION Pushing the CMOS button will reset CMOS values to factory defaults It is important to back up the computer CMOS settings before resetting them in case they are needed later Back up is easily done through Computer Setup See Computer Setup F...

Страница 96: ...ics Windows select More and then select Run as administrator or To access HP PC Hardware Diagnostics Windows from HP Support Assistant a Type support in the taskbar search box and then select the HP Support Assistant app or Select the question mark icon in the taskbar b Select Troubleshooting and fixes c Select Diagnostics and then select HP PC Hardware Diagnostics Windows 2 When the tool opens se...

Страница 97: ... it to the computer desktop or To run the tool from a USB flash drive download it to a USB flash drive 4 Select Run Installing HP PC Hardware Diagnostics Windows To install HP PC Hardware Diagnostics Windows follow these steps Navigate to the folder on your computer or the flash drive where the exe file was downloaded double click the exe file and then follow the on screen instructions Using HP PC...

Страница 98: ...PC Hardware Diagnostics UEFI download instructions are provided in English only and you must use a Windows computer to download and create the HP UEFI support environment because only exe files are provided Downloading the latest HP PC Hardware Diagnostics UEFI version To download the latest HP PC Hardware Diagnostics UEFI version to a USB flash drive 1 Go to http www hp com go techcenter pcdiags ...

Страница 99: ...follow these steps 1 Go to http www hp com support 2 Select Get software and drivers enter the product name or number select your computer and then select your operating system 3 In the Diagnostics section follow the on screen instructions to select and download the Remote UEFI version for the product Customizing Remote HP PC Hardware Diagnostics UEFI settings Using the Remote HP PC Hardware Diagn...

Страница 100: ...3 Make your customization selections 4 Select Main and then Save Changes and Exit to save your settings Your changes take effect when the computer restarts 92 Chapter 9 Using HP PC Hardware Diagnostics ...

Страница 101: ...dited agency responsible for evaluation in the country where the power cord set will be installed 2 The power cord set must have a minimum current capacity of 10A 7A Japan only and a nominal voltage rating of 125 or 250 volts AC as required by each country s power system 3 The diameter of the wire must be a minimum of 0 75 mm2 or 18AWG and the length of the cord must be between 1 8 m 6 feet and 3 ...

Страница 102: ... fittings appliance coupler and wall plug must bear the certification mark of the agency responsible for evaluation in the country where it will be used 2 The flexible cord must be Type SVT or equivalent No 18 AWG 3 conductor The wall plug must be a two pole grounding type with a NEMA 5 15P 15A 125V or NEMA 6 15P 15A 250V configuration 3 Appliance coupler flexible cord and wall plug must bear a T ...

Страница 103: ... keyboard base before beginning steps in this chapter Current BIOS steps 1 Follow steps a through l below to restore the nonvolatile memory that can contain personal data Restoring or reprogramming nonvolatile memory that does not store personal data is neither necessary nor recommended a Turn on or restart the computer and then press esc while the Press the ESC key for Startup Menu message is dis...

Страница 104: ...or fingerprint reader one or two prompts will appear one to clear the TPM and the other to Reset Fingerprint Sensor press or tap F1 to accept or F2 to reject l Remove all power and system batteries for at least 24 hours 2 Complete one of the following Remove and retain the storage drive or Clear the drive contents by using a third party utility designed to erase data from an SSD or Clear the conte...

Страница 105: ... EEPROM 64 KBytes not customer accessible No Yes Stores NIC configuration and NIC firmware NIC EEPROM is programmed using a utility from the NIC vendor that can be run from DOS A utility is required to write data to this memory and is available from the NIC vendor Writing data to this ROM in an inappropriate manner will render the NIC non functional DIMM Serial Presence Detect SPD configuration da...

Страница 106: ...sing this utility Bluetooth flash select products only 2 Mbit No Yes Stores Bluetooth configuration and firmware Bluetooth flash is programmed at the factory Tools for writing data to this memory are not publicly available but can be obtained from the silicon vendor A utility is required for writing data to this memory and is made available through newer versions of the driver whenever the flash r...

Страница 107: ...ic system diagnostics The UEFI BIOS provides functionality beyond that of the legacy BIOS In addition the UEFI BIOS works to initialize the computer s hardware before loading and executing the OS the run time environment allows the loading and execution of software programs from storage devices to provide more functionality such as advanced hardware diagnostics with the ability to display more det...

Страница 108: ...t Keys a Turn on or restart the computer and then press esc while the Press the ESC key for Startup Menu message is displayed at the bottom of the screen b Select the Security menu select Secure Boot Configuration and then follow the on screen instructions c At the Secure Boot Configuration window select Secure Boot select Clear Secure Boot Keys and then follow the on screen instructions to contin...

Страница 109: ... 66 C Relative Humidity noncondensing Operating 5 90 5 90 Nonoperating 38 7 C max wet bulb 5 90 5 90 Maximum Altitude unpressurized Operating 16 404 ft 5000 m Nonoperating 50 000 ft 15 240 m Power Supply Standard efficiency 65W 89 efficient Operating voltage range 90 264 VAC Rated voltage range 100 240 VAC Rated line frequency 50 60 Hz Operating line frequency 47 63 Hz Rated input current 65W 1 6A...

Страница 110: ...r codes 78 83 messages 78 expansion connector board removal and replacement 26 F F10 Setup access problem 55 fan illustrated 5 removal and replacement 30 flash drive problems 75 flashing LEDs 83 front bezel illustrated 3 removal and replacement 16 front bezel dust filter illustrated 3 removal and replacement 14 front panel components 1 G general problems 55 grounding methods 8 H hard drive install...

Страница 111: ...0 Internet access 75 keyboard 68 Media Card Reader 61 memory 73 monitor 62 mouse 68 network 71 power 58 printer 67 software 76 processors illustrated 5 product ID location 2 R rear panel components 2 Remote HP PC Hardware Diagnostics UEFI settings customizing 91 using 91 removal and replacement drive cage 21 expansion connector board 26 fan 30 front bezel 16 front bezel dust filter 14 hard drive c...

Страница 112: ...e control 9 thumbscrew 2 tools servicing 11 Torx T15 screwdriver 11 tower conversion 40 U USB ports 2 USB SuperSpeed port 1 2 USB SuperSpeed port with HP Sleep and Charge 1 USB Type C SuperSpeed port with HP Sleep and Charge 1 V ventilation proper 9 W WLAN antennas removal and replacement 38 WLAN module installation 23 removal 23 104 Index ...

Отзывы: