background image

6.

Tighten the hard drive cover screw 

(3)

.

7.

Replace the battery.

8.

Reconnect external power and external devices.

9.

Turn on the computer.

Adding or replacing memory modules

The computer has two memory module slots. The capacity of the computer can be upgraded by
adding a memory module to the vacant expansion memory module slot or by upgrading the existing
memory module in the primary memory module slot.

WARNING!

To reduce the risk of electric shock and damage to the equipment, unplug the power

cord and remove all batteries before installing a memory module.

CAUTION:

Electrostatic discharge (ESD) can damage electronic components. Before beginning

any procedure, ensure that you are discharged of static electricity by touching a grounded metal
object.

NOTE:

To use a dual-channel configuration when adding a second memory module, be sure that

both memory modules are identical.

To add or replace a memory module:

Adding or replacing memory modules

25

Содержание Presario CQ57-200

Страница 1: ...Getting Started Compaq Notebook ...

Страница 2: ...le for technical or editorial errors or omissions contained herein First Edition March 2011 Document Part Number 638580 001 Product notice This guide describes features that are common to most models Some features may not be available on your computer Software terms By installing copying downloading or otherwise using any software product preinstalled on this computer you agree to be bound by the ...

Страница 3: ...other hard surface such as an adjoining optional printer or a soft surface such as pillows or rugs or clothing to block airflow Also do not allow the AC adapter to come into contact with the skin or a soft surface such as pillows or rugs or clothing during operation The computer and the AC adapter comply with the user accessible surface temperature limits defined by the International Standard for ...

Страница 4: ...iv Safety warning notice ...

Страница 5: ... Connecting to a wireless network 13 Connecting to an existing WLAN 14 Setting up a new WLAN network 14 Configuring a wireless router 15 Protecting your WLAN 15 4 Keyboard and pointing devices 16 Using the keyboard 16 Using the action keys 16 Using pointing devices 17 Setting pointing device preferences 17 Using the TouchPad 17 Turning the TouchPad off and on 18 Navigating 18 Selecting 19 Using To...

Страница 6: ...1 Creating restore media 31 Performing a system restore 32 Restoring using the dedicated recovery partition select models only 32 Restoring using the restore media 33 Changing the computer boot order 33 Backing up and recovering your information 33 Using Windows Backup and Restore 34 Using Windows system restore points 35 When to create restore points 35 Create a system restore point 35 Restore to...

Страница 7: ...P Notebook Reference Guide Get to know your computer Learn about your computer features Refer to Getting to know your computer on page 4 and Keyboard and pointing devices on page 16 for additional information Create recovery discs Recover the operating system and software to factory settings in case of system instability or failure For instructions refer to Backup and recovery on page 30 Find inst...

Страница 8: ...de Select Start Help and Support User Guides or Select Start All Programs HP HP Documentation Power management features How to maximize battery life How to use the multimedia features of the computer How to protect the computer How to care for the computer How to update the software Help and Support To access Help and Support select Start Help and Support NOTE For country or region specific suppor...

Страница 9: ...s HP HP Documentation View Warranty Information or Go to http www hp com go orderdocuments Warranty information You may find the expressly provided HP Limited Warranty applicable to your product located with the electronic guides on your computer and or on the CD DVD provided in the box Some countries regions may provide a printed HP Limited Warranty in the box In countries regions where the warra...

Страница 10: ...chPad light Amber The TouchPad is off Off The TouchPad is on 2 TouchPad on off button Turns the TouchPad on and off Quickly double tap the TouchPad on off button to turn the TouchPad on and off 3 TouchPad zone Moves the pointer and selects or activates items on the screen 4 Chapter 2 Getting to know your computer ...

Страница 11: ...chPad light Amber The TouchPad is off Off The TouchPad is on 2 Caps lock light White Caps lock is on Off Caps lock is off 3 Power light White The computer is on Blinking white The computer is in the Sleep state Off The computer is off 4 Wireless light White An integrated wireless device such as a wireless local area network WLAN device and or a Bluetooth device is on Amber All wireless devices are...

Страница 12: ...Sleep When the computer is in Hibernation press the button briefly to exit Hibernation If the computer has stopped responding and Windows shutdown procedures are ineffective press and hold the power button for at least 5 seconds to turn off the computer To learn more about your power settings select Start Control Panel System and Security Power Options or refer to the HP Notebook Reference Guide 6...

Страница 13: ...n with the fn key 2 fn key Displays system information when pressed in combination with the esc key 3 Windows logo key Displays the Windows Start menu 4 Windows applications key Displays a shortcut menu for items beneath the pointer 5 Action keys Execute frequently used system functions Top 7 ...

Страница 14: ...4 Power connector Connects an AC adapter 5 AC adapter light White The computer is connected to external power and the battery is fully charged Amber A battery is charging 6 Security cable slot Attaches an optional security cable to the computer NOTE The security cable is designed to act as a deterrent but it may not prevent the computer from being mishandled or stolen 8 Chapter 2 Getting to know y...

Страница 15: ...tional computer headset microphone stereo array microphone or monaural microphone 7 Audio out headphone jack Connects optional powered stereo speakers headphones earbuds a headset or television audio WARNING To reduce the risk of personal injury adjust the volume before putting on headphones earbuds or a headset For additional safety information refer to the Regulatory Safety and Environmental Not...

Страница 16: ...s sound 5 Internal display switch Turns off the display and initiates Sleep if the display is closed while the power is on NOTE The internal display switch is not visible from the outside of the computer The antennas are not visible from the outside of the computer For optimal transmission keep the areas immediately around the antennas free from obstructions To see wireless regulatory notices refe...

Страница 17: ...ts 5 Enable airflow to cool internal components NOTE The computer fan starts up automatically to cool internal components and prevent overheating It is normal for the internal fan to cycle on and off during routine operation 4 Hard drive bay Holds the hard drive 5 Memory module compartment Contains the memory module slots Bottom 11 ...

Страница 18: ...port one or both of the following types of Internet access Wireless For mobile Internet access you can use a wireless connection Refer to Connecting to an existing WLAN on page 14 or Setting up a new WLAN network on page 14 Wired You can access the Internet by connecting to a wired network For information on connecting to a wired network refer to the HP Notebook Reference Guide 12 Chapter 3 Networ...

Страница 19: ...ructions Windows Connect to the Internet Wizard You can use the Windows Connect to the Internet Wizard to connect to the Internet in any of these situations You already have an account with an ISP You do not have an Internet account and want to select an ISP from the list provided within the wizard The list of ISP providers is not available in all regions You have selected an unlisted ISP and the ...

Страница 20: ...ther DSL or cable 1 and high speed Internet service purchased from an Internet service provider ISP A wireless router purchased separately 2 Your new wireless computer 3 NOTE Some modems have a built in wireless router Check with your ISP to determine what type of modem you have The illustration shows an example of a completed WLAN network installation that is connected to the Internet As your net...

Страница 21: ...ork Then follow the on screen instructions NOTE It is recommended that you initially connect your new wireless computer to the router by using the network cable provided with the router When the computer successfully connects to the Internet you can disconnect the cable and then access the Internet through your wireless network Protecting your WLAN When you set up a WLAN or access an existing WLAN...

Страница 22: ... Description Help and Support Opens Help and Support Help and Support provides tutorials answers to questions and product updates Screen brightness down Decreases the screen brightness level Screen brightness up Increases the screen brightness level Switch screen image Switches the screen image among display devices connected to the system For example if a monitor is connected to the computer this...

Страница 23: ...To establish a wireless connection a wireless network must be set up Using pointing devices NOTE In addition to the pointing devices included with your computer you can use an external USB mouse purchased separately by connecting it to one of the USB ports on the computer Setting pointing device preferences Use Mouse Properties in Windows to customize settings for pointing devices such as button c...

Страница 24: ...d on quickly double tap the TouchPad on off button NOTE The TouchPad light is off when the TouchPad is on Navigating To move the pointer slide one finger across the TouchPad in the direction you want the pointer to go 18 Chapter 4 Keyboard and pointing devices ...

Страница 25: ...all programs To view the demonstration of a gesture 1 Right click the Synaptics icon in the notification area at the far right of the taskbar and then click TouchPad Properties 2 Click a gesture to activate the demonstration To turn the gestures on and off 1 Right click the Synaptics icon in the notification area at the far right of the taskbar and then click TouchPad Properties 2 Select the gestu...

Страница 26: ...lling speed is controlled by finger speed NOTE Two finger scrolling is enabled at the factory Pinching Zooming Pinching allows you to zoom in or out on images or text Zoom in by placing two fingers together on the TouchPad and then moving them apart Zoom out by placing two fingers apart on the TouchPad and then moving them together NOTE Pinching zooming is enabled at the factory 20 Chapter 4 Keybo...

Страница 27: ...nd drivers Cleaning your computer Inserting or removing the battery NOTE For additional information on using the battery refer to the HP Notebook Reference Guide To insert the battery Insert the battery 1 into the battery bay and then pivot the battery 2 downward until it is seated To remove the battery Inserting or removing the battery 21 ...

Страница 28: ...on To prevent loss of information save your work and initiate Hibernation or shut down the computer through Windows before removing the battery 1 Slide the battery release latch 1 to release the battery 2 Tilt the battery 2 to remove it and then lift it out of the battery bay 3 22 Chapter 5 Maintenance ...

Страница 29: ...or in Hibernation turn the computer on by pressing the power button Then shut down the computer through the operating system Removing the hard drive 1 Save your work and shut down the computer 2 Disconnect all external devices connected to the computer 3 Unplug the power cord from the AC outlet and remove the battery 4 Loosen the hard drive cover screw 1 5 Remove the hard drive cover 2 6 Disconnec...

Страница 30: ...ard drive 1 Insert the hard drive 1 into the hard drive bay 2 Replace the 4 hard drive screws 2 3 Connect the hard drive cable 3 to the computer 4 Align the tabs on the hard drive cover 1 with the notches on the computer 5 Close the cover 2 24 Chapter 5 Maintenance ...

Страница 31: ... the primary memory module slot WARNING To reduce the risk of electric shock and damage to the equipment unplug the power cord and remove all batteries before installing a memory module CAUTION Electrostatic discharge ESD can damage electronic components Before beginning any procedure ensure that you are discharged of static electricity by touching a grounded metal object NOTE To use a dual channe...

Страница 32: ...r button Then shut down the computer through the operating system 1 Save your work and shut down the computer 2 Disconnect all external devices connected to the computer 3 Unplug the power cord from the AC outlet and remove the battery 4 Loosen the memory module compartment cover screw 1 5 Remove the memory module compartment cover 2 6 If you are replacing a memory module remove the existing memor...

Страница 33: ...e it in an electrostatic safe container 7 Insert a new memory module CAUTION To prevent damage to the memory module hold the memory module by the edges only Do not touch the components on the memory module a Align the notched edge 1 of the memory module with the tab in the memory module slot b With the memory module at a 45 degree angle from the surface of the memory module compartment press the m...

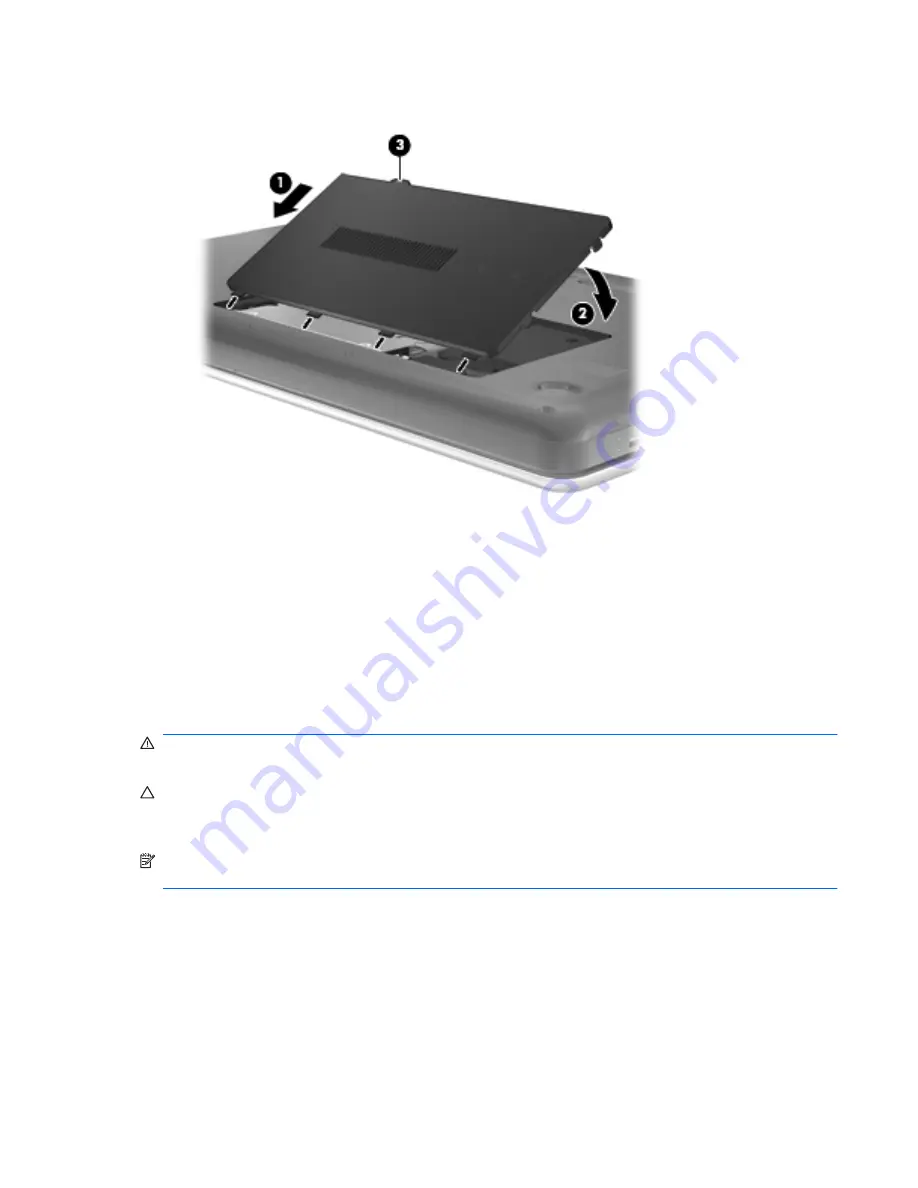
Страница 34: ...n clips snap into place CAUTION To prevent damage to the memory module be sure that you do not bend the memory module 8 Align the tabs on the memory module compartment cover 1 with the notches on the computer 9 Close the cover 2 10 Tighten the memory module compartment cover screw 3 11 Replace the battery 28 Chapter 5 Maintenance ...

Страница 35: ...quires additional cleaning use premoistened antistatic wipes or an antistatic screen cleaner Cleaning the TouchPad and keyboard Dirt and grease on the TouchPad can cause the pointer to jump around on the screen To avoid this clean the TouchPad with a damp cloth and wash your hands frequently when using the computer WARNING To reduce the risk of electric shock or damage to internal components do no...

Страница 36: ... help you safeguard your information and restore it if ever needed This chapter provides information on the following topics Creating a set of recovery discs or a recovery flash drive Recovery Manager software feature Performing a system restore from the partition recovery discs or a recovery flash drive Backing up your information Recovering a program or driver 30 Chapter 6 Backup and recovery ...

Страница 37: ...discs or the flash drive after setting up the computer for the first time NOTE HP Recovery Manager allows the creation of only one set of recovery discs or one recovery flash drive Handle these discs or the flash drive carefully and keep them in a safe place NOTE If your computer does not include an integrated optical drive you can use an optional external optical drive purchased separately to cre...

Страница 38: ...ng Recovery Manager Recovery Manager restores only software that was preinstalled at the factory Software not provided with this computer must be downloaded from the manufacturer s Web site or reinstalled from the disc provided by the manufacturer Restoring using the dedicated recovery partition select models only When using the dedicated recovery partition there is an option to back up pictures m...

Страница 39: ...ptions 3 Select Internal CD DVD ROM Drive from the boot options window To change the boot order for a recovery flash drive 1 Insert the flash drive into a USB port 2 Restart the computer 3 Press esc while the computer is restarting and then press f9 for boot options 4 Select the flash drive from the boot options window Backing up and recovering your information It is very important to back up your...

Страница 40: ...r preferences To create a screen shot 1 Display the screen you want to save 2 Copy the screen image To copy only the active window press alt fn prt sc To copy the entire screen press fn prt sc 3 Open a word processing document and then select Edit Paste The screen image is added to the document 4 Save and print the document Using Windows Backup and Restore Guidelines Be sure that the computer is c...

Страница 41: ...ly whenever the computer is functioning optimally NOTE If you revert to a restore point and then change your mind you can reverse the restoration Create a system restore point 1 Select Start Control Panel System and Security System 2 In the left pane click System Protection 3 Click the System Protection tab 4 Follow the on screen instructions Restore to a previous date and time To revert to a rest...

Страница 42: ...http www hp com go contactHP NOTE For worldwide support click Contact HP worldwide on the left side of the page or go to http welcome hp com country us en wwcontact_us html Here you can Chat online with an HP technician NOTE When technical support chat is not available in a particular language it is available in English E mail HP Customer Support Find HP Customer Support worldwide telephone number...

Страница 43: ...eed the Product Key to update or troubleshoot the operating system The Microsoft Certificate of Authenticity is located on the bottom of the computer Regulatory label Provides regulatory information about the computer The regulatory label is affixed inside the battery bay Wireless certification label or labels select models only Provide information about optional wireless devices and the approval ...

Страница 44: ...8 Specifications Input power Operating environment 38 Chapter 8 Specifications ...

Страница 45: ... power source it should be powered only with an AC adapter or a DC power source supplied and approved by HP for use with this computer The computer can operate on DC power within the following specifications Input power Rating Operating voltage and current 18 5 V dc 3 5 A 65 W or 19 0 V dc 4 74 A 90 W NOTE This product is designed for IT power systems in Norway with phase to phase voltage not exce...

Страница 46: ... C 41 F to 95 F Nonoperating 20 C to 60 C 4 F to 140 F Relative humidity noncondensing Operating 10 to 90 10 to 90 Nonoperating 5 to 95 5 to 95 Maximum altitude unpressurized Operating 15 m to 3 048 m 50 ft to 10 000 ft Nonoperating 15 m to 12 192 m 50 ft to 40 000 ft 40 Chapter 8 Specifications ...

Страница 47: ... Digital Media Slot identifying 9 display image switching 16 display switch internal 10 drive light 9 E esc key identifying 7 external monitor port 9 F f11 32 fn key identifying 7 H hard drive installing 24 removing 23 hard drive bay identifying 11 HDMI port identifying 9 headphone audio out jack identifying 9 Help and Support action key 16 I input power 39 integrated webcam light identifying 10 i...

Страница 48: ...estore points 35 RJ 45 network jack identifying 9 S screen brightness keys 16 screen image switching 16 scrolling TouchPad gesture 20 security cable slot identifying 8 serial number 37 serial number computer 37 setup of WLAN 14 slots Digital Media 9 security cable 8 supported discs 31 system recovery 32 system restore points 35 T TouchPad buttons 5 using 17 TouchPad gestures pinching 20 scrolling ...

Страница 49: ......

Отзывы: