background image

3.

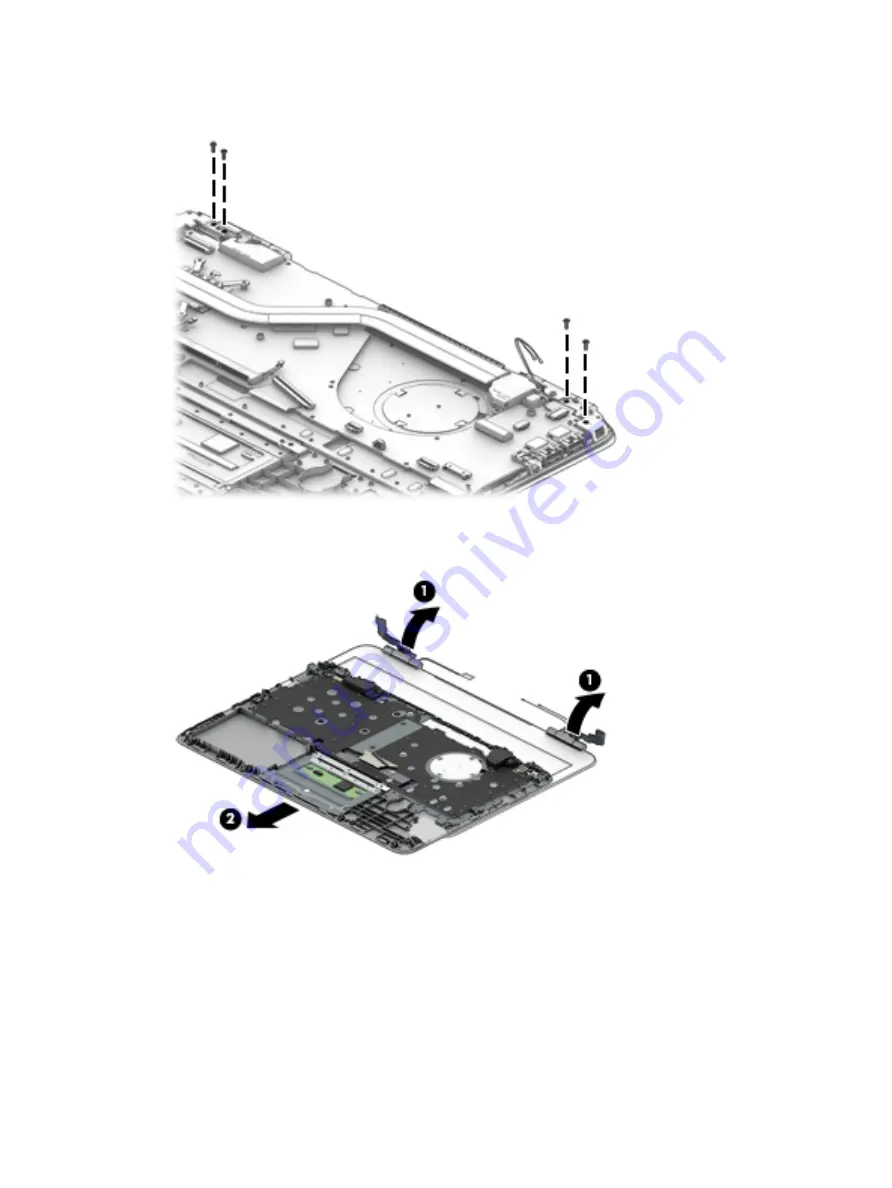
Remove the four Phillips PM2.5×5.7 screws that secure the display assembly to the keyboard/top cover.

4.

Release the display hinges (1) by swinging them up and back.

5.

Slide the keyboard/top cover (2) forward and separate it from the display assembly.

6.

If it is necessary to replace the display bezel:

a.

Flex the inside edges of the top edge (1), left (2) and right edges, and bottom edge (3) of 
the display bezel until the bezel disengages from the display back cover.

42

Chapter 5   Removal and replacement procedures

Содержание pavilion Series

Страница 1: ...HP Pavilion Notebook PC model numbers 14 av001 through 14 av099 Maintenance and Service Guide IMPORTANT This document is intended for HP authorized service providers only ...

Страница 2: ...your computer Not all features are available in all editions of Windows 10 This computer may require upgraded and or separately purchased hardware drivers and or software to take full advantage of Windows 10 functionality See http www microsoft com for details The information contained herein is subject to change without notice The only warranties for HP products and services are set forth in the ...

Страница 3: ...w another hard surface such as an adjoining optional printer or a soft surface such as pillows or rugs or clothing to block airflow Also do not allow the AC adapter to contact the skin or a soft surface such as pillows or rugs or clothing during operation The device and the AC adapter comply with the user accessible surface temperature limits defined by the International Standard for Safety of Inf...

Страница 4: ...iv Safety warning notice ...

Страница 5: ...omponents 13 Display components 16 Miscellaneous parts 18 4 Removal and replacement procedures preliminary requirements 19 Tools required 19 Service considerations 19 Plastic parts 19 Cables and connectors 19 Drive handling 20 Grounding guidelines 21 Electrostatic discharge damage 21 Packaging and transporting guidelines 22 Workstation guidelines 22 Equipment guidelines 23 5 Removal and replacemen...

Страница 6: ...vice 52 8 Specifications 54 Computer specifications 54 9 Backing up restoring and recovering 56 Creating recovery media and backups 56 Creating HP Recovery media select products only 56 Using Windows tools 57 Restore and recovery 58 Recovering using HP Recovery Manager 58 What you need to know before you get started 58 Using the HP Recovery partition select products only 59 Using HP Recovery media...

Страница 7: ...11 Recycling 64 Index 65 vii ...

Страница 8: ...viii ...

Страница 9: ...tion FHD liquid crystal display LCD BrightView 1920 1080 UWVA eDP 1 4 slim flat 3 0 mm typical brightness 250 nits 14 0 in high definition HD LCD BrightView 1366 768 SVA eDP 1 4 slim flat 3 0 mm typical brightness 220 nits Memory Two SODIMM slots non accessible non upgradeable Support for DDR4 2133 dual channel Support for up to 16 0 GB maximum system memory in the following configurations 16384 M...

Страница 10: ...Ethernet USB 2 0 port USB 3 0 port Keyboard pointing devices Textured island style non backlit keyboard TouchPad requirements ClickPad with image sensor Multitouch gestures enabled Support for Windows modern trackpad gestures Taps enabled as default Power requirements Support for 45 W HP Smart AC adapter RC 4 5 mm slim Support for a C5 receptacle 1 0 m 3 2 ft 3 wire conductor power cord Support fo...

Страница 11: ...app A list displays all the devices installed on your computer For information about system hardware components and the system BIOS version number press fn esc select products only Locating software To find out what software is installed on your computer Select the Start button and then select All apps or Right click the Start button and then select Programs and Features Locating hardware 3 ...

Страница 12: ...ows Hello To use your webcam Type camera in the taskbar search box and then select Camera The antennas are not visible from the outside of the computer For optimal transmission keep the areas immediately around the antennas free from obstructions For wireless regulatory notices see the section of the Regulatory Safety and Environmental Notices that applies to your country or region To access this ...

Страница 13: ...efly to exit Hibernation CAUTION Pressing and holding down the power button results in the loss of unsaved information If the computer has stopped responding and shutdown procedures are ineffective press and hold the power button down for at least 5 seconds to turn off the computer To learn more about your power settings see your power options Type power in the taskbar search box and then select P...

Страница 14: ...n when pressed in combination with the fn key 2 fn key Displays system information when pressed in combination with the esc key 3 Windows key Opens the Start menu NOTE Pressing the Windows key again will close the Start menu 6 Chapter 2 External component identification ...

Страница 15: ...puter shuts off power to the display and other unneeded components Off The computer is off or in Hibernation Hibernation is a power saving state that uses the least amount of power 2 Caps lock light On Caps lock is on which switches the key input to all capital letters 3 Mute light Amber Computer sound is off Off Computer sound is on Lights 7 ...

Страница 16: ...finger gestures to move the pointer or activate items on the screen 2 Left TouchPad button Functions like the left button on an external mouse 3 Right TouchPad button Functions like the right button on an external mouse 8 Chapter 2 External component identification ...

Страница 17: ...able Also connects WARNING To reduce the risk of personal injury adjust the volume before putting on headphones earbuds or a headset For additional safety information refer to the Regulatory Safety and Environmental Notices To access this guide Select the Start button select All apps select HP Help and Support and then select HP Documentation NOTE When a device is connected to the jack the compute...

Страница 18: ...ision any compatible digital or audio component or a high speed HDMI device 4 RJ 45 network jack status lights Connects a network cable White The network is connected Amber Activity is occurring on the network 5 Power connector Connects an AC adapter 6 AC adapter and battery light White The AC adapter is connected and the battery is fully charged Blinking white The AC adapter is disconnected and t...

Страница 19: ...ts 2 Enable airflow to cool internal components NOTE The computer fan starts up automatically to cool internal components and prevent overheating It is normal for the internal fan to cycle on and off during routine operation Bottom 11 ...

Страница 20: ...ments drivers and support for the computer 2 Serial number s n This is an alphanumeric identifier that is unique to each product 3 Part number Product number p n This number provides specific information about the product s hardware components The part number helps a service technician to determine what components and parts are needed 4 Warranty period This number describes the duration of the war...

Страница 21: ...Computer major components Computer major components 13 ...

Страница 22: ...60260 001 11 Realtek RTL8723BE 802 11b g n 1 1 WiFi Bluetooth 4 0 Combo Adapter 855106 855 12 TouchPad cable includes double sided adhesive 856203 001 13 System board includes processor and replacement thermal material Equipped with an AMD A10 8700P 1 80 GHz turbo up to 3 20 GHz processor 1600 MHz FSB 2 0 MB L2 cache quad core 15 W an AMD Radeon R6 Graphics subsystem with UMA video memory and the ...

Страница 23: ...n cardinal red finish 856198 001 In modern gold finish 856197 001 In natural silver finish 856196 001 Rubber Kit not illustrated includes bottom cover rubber foot strip and screw covers In cardinal red finish 856218 001 In modern gold finish 856217 001 In natural silver finish 856216 001 Computer major components 15 ...

Страница 24: ...d adhesive 846006 003 3 Display panel 14 0 in FHD LCD BrightView 1920 1080 UWVA eDP slim flat 3 0 mm display panel 847660 001 14 0 in HD LCD BrightView 1366 768 SVA eDP slim flat 3 0 mm display panel 847664 001 4 Display hinges 2 856207 001 Display hinge caps 2 not illustrated 856211 001 16 Chapter 3 Illustrated parts catalog ...

Страница 25: ...s and transceivers 856192 001 6 Display panel cable includes webcam microphone module cable adhesive support strip and double sided adhesive 856200 001 7 Back cover In cardinal red finish 856195 001 In modern gold finish 856194 001 In natural silver finish 856193 001 Display components 17 ...

Страница 26: ...50 HP external DVD RW DL SuperMulti Drive 747080 001 HP HDMI to VGA adapter 701943 001 Power cord C5 receptacle 1 0 m 3 2 ft 3 wire conductor For use in Argentina 401300 007 For use in Italy 213352 008 For use in North America 213349 009 Screw Kit 856219 001 18 Chapter 3 Illustrated parts catalog ...

Страница 27: ...ing excessive force during disassembly and reassembly can damage plastic parts Use care when handling the plastic parts Apply pressure only at the points designated in the maintenance instructions Cables and connectors CAUTION When servicing the computer be sure that cables are placed in their proper locations during the reassembly process Improper cable placement can damage the computer Cables mu...

Страница 28: ...e drive or optical drive be sure that a diskette or disc is not in the drive and be sure that the optical drive tray is closed Handle drives on surfaces covered with at least one inch of shock proof foam Avoid dropping drives from any height onto any surface Avoid exposing an internal hard drive to products that have magnetic fields such as monitors or speakers Avoid exposing an internal hard driv...

Страница 29: ...ve these precautions Keep components in their electrostatic safe containers until you are ready to install them Before touching an electronic component discharge static electricity by using the guidelines described in this section Avoid touching pins leads and circuitry Handle electronic components as little as possible If you remove a component place it in an electrostatic safe container The foll...

Страница 30: ...er materials are selected to avoid static charging When grounding is not possible use an ionizer to dissipate electric charges Workstation guidelines Follow these grounding workstation guidelines Cover the workstation with approved static shielding material Use a wrist strap connected to a properly grounded work surface and use properly grounded tools and equipment Use conductive field service too...

Страница 31: ... resistance between the operator and ground To be effective the conductive must be worn in contact with the skin The following grounding equipment is recommended to prevent electrostatic damage Antistatic tape Antistatic smocks aprons and sleeve protectors Conductive bins and other assembly or soldering aids Nonconductive foam Conductive computerop workstations with ground cords of one megohm resi...

Страница 32: ...cover Description Spare part number In cardinal red finish 856198 001 In modern gold finish 856197 001 In natural silver finish 856196 001 Before disassembling the computer follow these steps 1 Turn off the computer If you are unsure whether the computer is off or in Hibernation turn the computer on and then shut it down through the operating system 2 Disconnect the power from the computer by unpl...

Страница 33: ... 5 7 screws that secure the bottom cover to the computer 6 Insert a case utility tool 1 or similar plastic flat edged tool between the bottom cover and the computer 7 Release the bottom cover front edge 2 and swing it up and back until it releases 8 Remove the bottom cover 3 Reverse this procedure to install the bottom cover Component replacement procedures 25 ...

Страница 34: ...erating system 2 Disconnect the power from the computer by unplugging the power cord from the computer 3 Disconnect all external devices from the computer 4 Remove the bottom cover see Bottom cover on page 24 Remove the battery 1 Disconnect the battery cable 1 from the system board 2 Remove the six Phillips M2 0 5 7 screws 2 that secure the battery to the keyboard top cover 3 Remove the battery 3 ...

Страница 35: ... and then shut it down through the operating system 2 Disconnect the power from the computer by unplugging the power cord from the computer 3 Disconnect all external devices from the computer 4 Remove the bottom cover see Bottom cover on page 24 5 Disconnect the battery cable from the system board see Battery on page 26 Remove the hard drive 1 Release the zero insertion force ZIF connector 1 to wh...

Страница 36: ... are unsure whether the computer is off or in Hibernation turn the computer on and then shut it down through the operating system 2 Disconnect the power from the computer by unplugging the power cord from the computer 3 Disconnect all external devices from the computer 4 Remove the bottom cover see Bottom cover on page 24 5 Disconnect the battery cable from the system board see Battery on page 26 ...

Страница 37: ...ing message remove the module to restore device functionality and then contact technical support Before removing the WLAN module follow these steps 1 Turn off the computer If you are unsure whether the computer is off or in Hibernation turn the computer on and then shut it down through the operating system 2 Disconnect the power from the computer by unplugging the power cord from the computer 3 Di...

Страница 38: ...he WLAN module to the computer The WLAN module tilts up 3 Remove the WLAN module 3 by pulling the module away from the slot at an angle NOTE If the WLAN antenna cables are not connected to the WLAN module terminal the protective sleeves should be installed on the antenna connectors as shown in the following illustration Reverse this procedure to install the WLAN module 30 Chapter 5 Removal and rep...

Страница 39: ...t all external devices from the computer 4 Remove the bottom cover see Bottom cover on page 24 5 Remove the battery see Battery on page 26 Remove the card reader board 1 Release the ZIF connector 1 to which the card reader board cable is connected and then disconnect the card reader board cable from the system board 2 Detach the card reader board cable 2 from the keyboard top cover The card reader...

Страница 40: ...5 Remove the card reader board 6 Reverse this procedure to install the card reader board 32 Chapter 5 Removal and replacement procedures ...

Страница 41: ...er by unplugging the power cord from the computer 3 Disconnect all external devices from the computer 4 Remove the bottom cover see Bottom cover on page 24 5 Remove the battery see Battery on page 26 6 Remove the WLAN module see WLAN module on page 29 Remove the fan 1 Disconnect the fan cable 1 from the system board 2 Remove the three Phillips PM2 0 5 7 screws 2 that secure the fan to the keyboard...

Страница 42: ...stem with UMA memory and a non Windows operating system 860262 001 Before removing the system board follow these steps 1 Turn off the computer If you are unsure whether the computer is off or in Hibernation turn the computer on and then shut it down through the operating system 2 Disconnect the power from the computer by unplugging the power cord from the computer 3 Disconnect all external devices...

Страница 43: ...tem board to the keyboard top cover 3 Release the system board 1 by lifting the front edge and swinging it up and back until it rests upside down behind the computer 4 Disconnect the power connector cable 2 from the system board Component replacement procedures 35 ...

Страница 44: ...ough the operating system 2 Disconnect the power from the computer by unplugging the power cord from the computer 3 Disconnect all external devices from the computer 4 Remove the bottom cover see Bottom cover on page 24 and then remove the following components a Battery see Battery on page 26 b WLAN module see WLAN module on page 29 c Fan see Fan on page 33 d System board see System board on page ...

Страница 45: ...cleaned from the surfaces of the heat sink and the system board each time the heat sink is removed Thermal material is used on the processor 1 and the heat sink section 2 that services it Reverse this procedure to install the heat sink Component replacement procedures 37 ...

Страница 46: ...power cord from the computer 3 Disconnect all external devices from the computer 4 Remove the bottom cover see Bottom cover on page 24 and then remove the following components a Battery see Battery on page 26 b WLAN module see WLAN module on page 29 c Fan see Fan on page 33 d System board see System board on page 34 Remove the TouchPad cable Release the ZIF connector 1 to which the TouchPad cable ...

Страница 47: ...the computer 4 Remove the bottom cover see Bottom cover on page 24 and then remove the following components a Battery see Battery on page 26 b WLAN module see WLAN module on page 29 c Fan see Fan on page 33 d System board see System board on page 34 Remove the speakers 1 Release the display panel cable from the routing channel 1 built into the left speaker 2 Release the wireless antenna cables fro...

Страница 48: ...m 2 Disconnect the power from the computer by unplugging the power cord from the computer 3 Disconnect all external devices from the computer 4 Remove the bottom cover see Bottom cover on page 24 and then remove the following components a Battery see Battery on page 26 b WLAN module see WLAN module on page 29 c Fan see Fan on page 33 d System board see System board on page 34 Remove the power conn...

Страница 49: ...cord from the computer 3 Disconnect all external devices from the computer 4 Remove the bottom cover see Bottom cover on page 24 5 Disconnect the battery cable from the system board see Battery on page 26 Remove the display assembly 1 Release the ZIF connector 1 to which the display panel cable is connected and then disconnect the display panel cable from the system board 2 Disconnect the WLAN ant...

Страница 50: ... up and back 5 Slide the keyboard top cover 2 forward and separate it from the display assembly 6 If it is necessary to replace the display bezel a Flex the inside edges of the top edge 1 left 2 and right edges and bottom edge 3 of the display bezel until the bezel disengages from the display back cover 42 Chapter 5 Removal and replacement procedures ...

Страница 51: ...emove the display bezel 4 The display bezel is available using spare part number 856199 001 7 If it is necessary to replace the display panel a Remove the display bezel Component replacement procedures 43 ...

Страница 52: ...gn objects Failure to follow this caution can result in damage to the display panel c Lift the top edge of the display panel 1 and swing it up and forward until it rests upside down in front of the display back cover d Release the adhesive strip 2 that secures the display panel cable connector to the display panel e Disconnect the display panel cable 3 from the display panel 44 Chapter 5 Removal a...

Страница 53: ...t 3 0 mm display panel 8 If it is necessary to replace the display panel cable NOTE The display panel cable includes the webcam microphone module cable a Remove the display bezel b Remove the display panel c Disconnect the display panel cable 1 from the webcam microphone module d Release the display panel cable from the routing clips 2 and channels built into the top right and bottom edges of the ...

Страница 54: ... microphone module a Remove the display bezel b Remove the display panel c Detach the webcam microphone module 1 from the display back cover The webcam microphone module is secured to the display back cover with double sided adhesive d Disconnect the webcam microphone module cable 2 from the webcam microphone module 46 Chapter 5 Removal and replacement procedures ...

Страница 55: ...ecessary to replace the display hinges a Remove the display bezel b Remove the display panel c Remove the two Phillips PM2 0 2 9 screws 1 that secure the display hinges to the display back cover d Remove the six Phillips PM2 5 3 2 screws 2 that secure the display hinges to the display back cover Component replacement procedures 47 ...

Страница 56: ... and transceivers a Remove the display bezel b Remove the display panel c Detach the antenna transceivers 1 from the display back cover The antenna transceivers are attached to the display back cover with double sided adhesive d Release the antenna cables from the routing clips 2 and channels built into the top left and bottom edges of the display back cover 48 Chapter 5 Removal and replacement pr...

Страница 57: ...e Remove the antenna cables 3 The antenna are available using spare part number 856192 001 Reverse this procedure to reassemble and install the display assembly Component replacement procedures 49 ...

Страница 58: ... the HP website Most BIOS updates on the HP website are packaged in compressed files called SoftPaqs Some download packages contain a file named Readme txt which contains information regarding installing and troubleshooting the file Determining the BIOS version To decide whether you need to update Setup Utility BIOS first determine the BIOS version on your computer To reveal the BIOS version infor...

Страница 59: ...ntify the most recent BIOS update and compare it to the BIOS version currently installed on your computer If the update is more recent than your BIOS version make a note of the date name or other identifier You may need this information to locate the update later after it has been downloaded to your hard drive b Follow the on screen instructions to download your selection to the hard drive Make a ...

Страница 60: ...cted USB drive NOTE To download the HP PC Hardware Diagnostics UEFI tool to a USB drive see Downloading HP PC Hardware Diagnostics UEFI to a USB device on page 52 b Hard drive c BIOS 3 When the diagnostic tool opens select the type of diagnostic test you want to run and then follow the on screen instructions NOTE If you need to stop a diagnostic test press esc Downloading HP PC Hardware Diagnostic...

Страница 61: ...t HP automatically detect your product 4 Select your computer and then select your operating system 5 In the Diagnostic section follow the on screen instructions to select and download the UEFI version you want Downloading HP PC Hardware Diagnostics UEFI to a USB device 53 ...

Страница 62: ...86 cm 13 30 in Depth 22 43 cm 8 83 in Height 1 95 cm 0 77 in Weight equipped with a hard drive 1 78 kg 3 92 lbs Weight equipped with a solid state drive 1 71 kg 3 77 lbs Input power Operating voltage and current 5 V dc 2 A 12 V dc 3 A 15 V dc 3 A 45 W USB C 5 V dc 3 A 9 V dc 3 A 10 V dc 3 75 A 12 V dc 3 75 A 15 V dc 3 A 20 V dc 2 25 A 45 W USB C 5 V dc 3 A 9 V dc 3 A 10 V dc 5 0 A 12 V dc 5 0 A 15...

Страница 63: ...essurized Operating 15 m to 3 048 m 50 ft to 10 000 ft Non operating 15 m to 12 192 m 50 ft to 40 000 ft NOTE Applicable product safety standards specify thermal limits for plastic surfaces The device operates well within this range of temperatures Computer specifications 55 ...

Страница 64: ...HP Recovery partition on the computer The backup can be used to reinstall the original operating system in cases where the hard drive is corrupted or has been replaced For information on creating recovery media see Creating HP Recovery media select products only on page 56 For information on the recovery options that are available using the recovery media see Using Windows tools on page 57 Use Win...

Страница 65: ...urchased separately to create recovery discs If you use an external optical drive it must be connected directly to a USB port on the computer the drive cannot be connected to a USB port on an external device such as a USB hub If you cannot create DVD media yourself you can obtain recovery discs for your computer from HP See the Worldwide Telephone Numbers booklet included with the computer You can...

Страница 66: ... recovery partition to reclaim hard drive space HP Recovery Manager offers the Remove Recovery Partition option For more information see Removing the HP Recovery partition select products only on page 61 Recovering using HP Recovery Manager HP Recovery Manager software allows you to recover the computer to its original factory state by using the HP Recovery media that you either created or that yo...

Страница 67: ...e is still working To start HP Recovery Manager from the HP Recovery partition IMPORTANT For a tablet with a detachable keyboard connect the keyboard to the keyboard dock before beginning these steps select products only 1 Type recovery in the taskbar search box select Recovery Manager and then select HP Recovery Environment or For computers or tablets with keyboards attached press f11 while the c...

Страница 68: ...rd dock before beginning these steps 1 Insert the HP Recovery media 2 Access BIOS For computers or tablets with keyboards attached Turn on or restart the computer or tablet quickly press esc and then press f9 for boot options For tablets without keyboards Turn on or restart the tablet and then quickly hold down the volume down button then select f9 or Turn on or restart the tablet and then quickly...

Страница 69: ...m the HP Recovery partition So before you remove the Recovery partition create HP Recovery media see Creating HP Recovery media select products only on page 56 NOTE The Remove Recovery Partition option is only available on products that support this function Follow these steps to remove the HP Recovery partition 1 Type recovery in the taskbar search box and then select HP Recovery Manager 2 Select...

Страница 70: ...ed by an acceptable accredited agency responsible for evaluation in the country or region where the power cord set will be used The power cord sets must have a minimum current capacity of 10 amps and a nominal voltage rating of 125 or 250 V AC as required by the power system of each country or region The appliance coupler must meet the mechanical configuration of an EN 60 320 IEC 320 Standard Shee...

Страница 71: ...ord and wall plug must bear a T mark and registration number in accordance with the Japanese Dentori Law The flexible cord must be Type VCT or VCTF 3 conductor 1 00 mm conductor size The wall plug must be a two pole grounding type with a Japanese Industrial Standard C8303 7 A 125 V configuration 4 The flexible cord must be Type RVV 3 conductor 0 75 mm conductor size Power cord set fittings applian...

Страница 72: ...in general household waste Follow the local laws and regulations in your area for battery disposal HP encourages customers to recycle used electronic hardware HP original print cartridges and rechargeable batteries For more information about recycling programs see the HP Web site at http www hp com recycle 64 Chapter 11 Recycling ...

Страница 73: ...val 42 spare part number 16 43 display components 4 16 display panel product description 1 removal 43 spare part numbers 16 45 display panel cable removal 45 spare part number 17 46 drive light 10 DVD RW DL SuperMulti Drive spare part number 18 E esc key 6 Ethernet product description 2 F fan removal 33 spare part number 14 33 fn key 6 foot removal 24 spare part numbers 24 G graphics product descr...

Страница 74: ...scription 1 product description audio 1 2 chipset 1 display panel 1 Ethernet 2 external media cards 2 graphics 1 hard drive 1 keyboard 2 memory 1 microphone 1 2 operating system 2 pointing device 2 ports 2 power requirements 2 processors 1 product name 1 security 2 serviceability 2 video 1 2 wireless 2 product name 1 R recover options 58 recovery discs 57 59 HP Recovery Manager 58 media 59 startin...

Страница 75: ...ebcam microphone module removal 46 spare part number 16 47 Windows system restore point 56 57 Windows key 6 Windows tools using 57 wireless antenna 4 removal 48 spare part number 17 49 wireless product description 2 WLAN antenna 4 removal 48 spare part number 17 49 WLAN module removal 29 spare part number 14 29 Index 67 ...

Отзывы: