background image

10

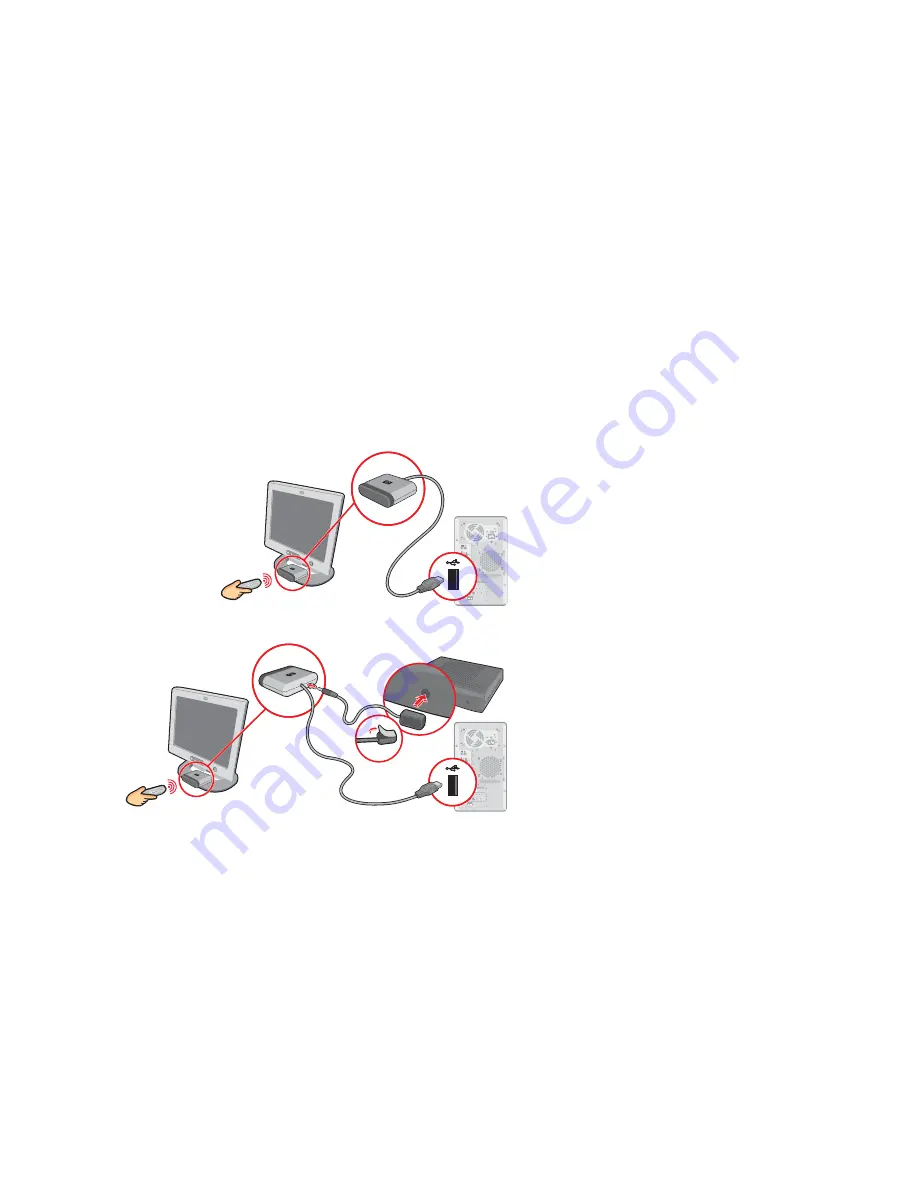
Connecting the Remote Sensor

The remote sensor is a small device that connects to
the PC and allows the remote control to work with the
Media Center program.

If you have a cable TV set-top box, satellite, or other
set-top box that controls your TV signal, connect the
remote sensor control cable to the remote sensor and
position the end of it over the remote receiver on your
cable box. For information on using the control cable
in an existing setup, see “Optional Connections.”

1

Plug the remote sensor cable into a USB connector
on the back of the PC.

2

Place the remote sensor so that you can easily point
at it with the remote control. (An ideal spot would be
on top of the monitor or desk.)

3

If needed, plug the remote sensor control cable into
the back of the remote sensor. Position the end of the
control cable over the remote IR receiver window on
your cable TV set-top box. Remove the paper from
the backing tape on the end of the cable. Press the
end of the cable into place over the IR window on
your box.

Remote Sensor

Connect remote control
receiver to computer

If you use a cable or satellite
set-top box, pass the signal
through the remote sensor

Locate IR window

on set-top box.

Adhere to IR window.

Remove

backing tape

Cable or satellite set-top box

Remote
sensor
control
cable

Содержание Pavilion Media Center m200

Страница 1: ...i hp media center pc hardware user s guide ...

Страница 2: ...or written consent of HP Hewlett Packard Company Home Products Division P O Box 4010 Cupertino CA 95015 4010 USA Hewlett Packard Company 2002 All rights reserved Hewlett Packard is a registered trademark of Hewlett Packard Company in the United States of America and other countries regions This product incorporates copyright protection technology that is protected by method claims of certain U S p...

Страница 3: ...computer near an AC outlet The AC power cord is your PC s main AC disconnecting device and must be easily accessible at all times For your safety the power cord provided with your system has a grounded plug Always use the power cord with a properly grounded wall outlet to avoid the risk of electrical shock To reduce the possibility of an electric shock from the telephone network plug your computer...

Страница 4: ...are properly set up to maintain your comfort and productivity Refer to Working in Comfort in the Help and Support Center for important ergonomic information Just click Start Help and Support My HP Pavilion PC and then click Working in Comfort You can find important ergonomic information on the Internet Just type http www hp com ergo into your Web browser address box and then press Enter on the key...

Страница 5: ...re provides HP Help over the telephone Review the following pages to learn more about each of these types of help HP Utility Programs HP provides special utility programs in the hp pavilion pc tools folder that display support information and initiate application or system recovery To find these programs click Start choose All Programs choose Hewlett Packard choose hp pavilion pc tools and select ...

Страница 6: ...ur Web browser address box and press Enter on your keyboard 3 Select your country region from the drop down list and click the arrow to the right of the list scroll down to see the box 4 Click the support link HP Customer Care You can get help over the telephone from HP See the Support Guide included with the computer documentation for the terms of your HP warranty coverage for license information...

Страница 7: ...Volume 20 Microphone 20 Headphones 20 Starting My PC 21 Starting the PC for the First Time 21 Selecting an ISP 22 HP Desktop 23 Enabling TV Out Image 24 Opening Media Center 25 Software Programs 26 Turning Off the PC 28 Manual Standby Mode 29 Manual Hibernation Mode 30 Automatic Standby or Hibernation Mode 31 Using the PC Hardware 33 Keyboard 33 Keyboard Functions 34 Mouse 37 Remote Control 38 Rem...

Страница 8: ...viii ...

Страница 9: ...werful 3 D graphics capability It is simple and easy to use It allows you to assemble your music videos and pictures and to enjoy them with a click of the remote control The built in TV capabilities include a Television Program Guide which gets updated over the Internet And whether you are recording TV programs or sharing a digital photo album you can do all your entertaining using the powerful re...

Страница 10: ...ll help you get started using your new PC right away 1 Read Safety Information at the beginning of this book 2 Identify the items included with your computer Refer to information shown in Inventory 3 Follow the setup poster to connect your computer Refer to Setting Up My PC 4 Read Starting My PC to learn how to turn on your PC and what to do next 5 Read the remaining sections of this guide for inf...

Страница 11: ... type http www myhpclub com into your Web browser address box and then press Enter on the keyboard Microsoft Windows XP Media Center program lets you use a remote control to watch or record TV programs view video play music and movies and view slide shows with music Microsoft and HP provide printed books in the computer box about the program The Media Center program also includes Help topics about...

Страница 12: ...mote control 2 AA batteries for remote control 10 Coaxial cable S video to composite video adapter Composite video cable Remote sensor control cable Remote sensor Media Center Components Inventory PC and Main Components 2 1 Speaker System Components not included with all models n For 5 1 speaker system installation refer to Connecting Your Speakers ...

Страница 13: ...ramming guide Coaxial cable splitter S video cable s to connect your TV if it requires s video Audio Y cable to connect to a stereo system Connect the modem to the telephone line and connect a network cable not provided if one is needed Turn on the monitor the PC and then turn on the speaker system Follow the onscreen instructions including selecting an ISP using Easy Internet Sign up Set up the M...

Страница 14: ... dvd cd writer plus Front of PC 1st Optical CD or DVD RW R drive Eject button Front ports IEEE 1394 6 pin USB 2 0 6 In 1 memory card reader Mode buttons 2nd Optical CD or DVD RW R drive Eject button Diskette floppy drive Eject button On button with power indicator light Hard disk activity indicator light ...

Страница 15: ...rd connector PS 2 Keyboard PS 2 Mouse Serial port Parallel port USB 2 0 Universal Serial Bus ports Remote Sensor uses USB LAN Ethernet TV Out s video VGA Monitor DB 15 Modem Line In RJ 11 IEEE 1394 6 pin Line out 2 Line out 1 Line in Microphone Line out 3 or Digital out Power LED Left audio in Right audio in S VID IN s video TV in Setting Up ...

Страница 16: ...s not included with the PC Refer to the documentation that came with your monitor Connecting the Printer or Scanner Connect peripheral devices to the PC one at a time The printer or scanner is not included with the PC Refer to the documentation that came with your device ...

Страница 17: ...using the modem even if the PC is turned off Connecting to the Internet Through a Network Port LAN The network interface adapter also called a network interface card or NIC connects to an Ethernet 10BaseT or Fast Ethernet 100BaseT network hub Connect this adapter in your PC to your LAN local area network hub or any broadband connection 1 Plug a network cable into the Ethernet RJ 45 port on the bac...

Страница 18: ...of the PC 2 Place the remote sensor so that you can easily point at it with the remote control An ideal spot would be on top of the monitor or desk 3 If needed plug the remote sensor control cable into the back of the remote sensor Position the end of the control cable over the remote IR receiver window on your cable TV set top box Remove the paper from the backing tape on the end of the cable Pre...

Страница 19: ... into the S VID IN connector on the back of the PC use an s video cable not provided or use the s video to composite video adapter cable and the composite video cable Plug the other end of the cable into your set top box VCR or other device that is providing the signal source for the TV You can also plug audio cables not provided from your set top box or VCR into the Audio in right red connector a...

Страница 20: ...this adapter to an s video connector and then attach a composite video cable to the adapter One composite video cable 6 feet Use this cable to connect a composite video connector on the back of the PC such as COMP for the TV out signal to your TV You may need other or additional cables depending on your TV and your TV signal source For example when your TV has an s video connector you may want to ...

Страница 21: ...nector or the COMP composite video connector an the back of the PC Choose the cable type your TV needs 2 Plug the other end of the cable into the TV IN connector on your TV 3 Turn on the TV and select the TV IN video source refer to the documentation for your TV set 4 Be sure to enable the image for the TV see Enabling TV Out Image Connections ...

Страница 22: ...Setup This section describes how to connect the PC to an existing setup for your TV signal source Wall to VCR to TV using coaxial cable Remove the coaxial cable at the input to the VCR and connect it to the input of a coaxial cable signal splitter not included available at electronics stores Connect two coaxial cables to the splitter outputs Connect one of these cables to the input of the VCR and ...

Страница 23: ...op Box or Satellite Box to VCR to TV Using Coaxial Cable Remove the coaxial cable at the input to the VCR and connect it to the input of a coaxial cable signal splitter not included available at electronics stores Connect two coaxial cables to the splitter outputs Connect one of these cables to the input of the VCR and the other one to the TV connector on the back of the PC Be sure to connect the ...

Страница 24: ...n additional s video cable to a second output on the set top box or satellite box Plug the other end of the cable into the S VID IN connector on the back of the PC Or Using composite video cable connect an additional composite video cable to a second output on the set top box or satellite box Connect the other end of the cable to the s video to composite video adapter cable connect the adapter to ...

Страница 25: ...Line in blue connects to an analog audio device for sound input to the PC Line out 1 lime green connects to an active stereo or multi channel speaker system such as the 2 1 speaker system refer to 2 1 Speaker System to set up the speakers Line out 1 lime green for front speakers Line out 2 black for rear speakers and Line out 3 orange for center and subwoofer speakers connect to an active multi ch...

Страница 26: ... or front of the subwoofer and allow for ventilation to reach the rear of the subwoofer Do not place the subwoofer by the computer monitor to avoid interference place the subwoofer 10 inches or more away from the monitor 4 Refer to the setup poster for connecting the 2 1 speaker system 5 You can test the speaker system Click Start All Programs Creative Sound Blaster Audigy and then click AudioHQ D...

Страница 27: ... from the drop down menu Click Apply and then click OK 2 Select speakers for DVD Audio in the Media Center Open Media Center see Opening Media Center Select Settings TV DVD DVD and Audio wait for the properties window to open On the iviaudio tab click 6 speaker mode 5 1 channel select Apply and then select OK 3 Select speakers in AudioHQ Speaker setting Click Start All Programs Creative Sound Blas...

Страница 28: ...ook for the headphones connector on the right side of the control tower If the control tower displays HP the headphones are enabled the sound to the speakers and the subwoofer is muted Push and hold the On button on the control tower for several seconds to enable sound from the speakers Press the On button briefly to enable the headphones Adjusting the Volume Adjust the volume for the speaker soun...

Страница 29: ...he setup poster steps you are ready to turn on the computer 1 Press the Power button on the monitor 2 Press the On button on the front of the PC 3 Follow the onscreen instructions for the initial Microsoft Windows setup 4 When you see the Register with HP screen enter your information completing all of the required boxes Then click Next to go to the next screen n Read Safety Information at the beg...

Страница 30: ...es Easy Internet Sign up helps you sign up for a new Internet account set up an existing account or configure Internet access using a LAN local area network cable modem or DSL digital subscriber line Open Easy Internet Sign up Double click the easy Internet sign up icon on the desktop Or Click Start on the taskbar choose All Programs and click easy Internet sign up The Easy Internet Sign up screen...

Страница 31: ...a Center by clicking Start on the taskbar All Programs Accessories Media Center and then click Media Center again Select programs or documents Open the Help and Support Center Start a search Run a program Open the Control Panel to view or change settings Access the Log Off button to end your current computer session and to switch between users Access the Turn Off Computer button to turn off the co...

Страница 32: ...TV is connected to the PC See Connecting the TV Turn on the TV 2 If you have Media Center open close it 3 Right click an empty part of the PC desktop and click Properties 4 Click Settings tab 5 Click the Advanced button 6 Click nView tab 7 Click the Clone option 8 Click the Detect Displays button You will see two images view windows appear in nView 9 Click the OK button ...

Страница 33: ...n on the front of the PC Or Click the Media Center icon on the desktop Or Click Start on the taskbar choose All Programs Accessories Media Center and then click Media Center again To find Help in Media Center press F1 on the keyboard or move the mouse to show the Media Center navigation bar and click Help the button To learn more about Media Center refer to the printed books about Media Center inc...

Страница 34: ... special offers from HP just press the HP button on the keyboard or enter the address in your Internet Web browser GameChannel is a Web site where you can play cool 3 D games from WildTangent It provides the best online game console available today and the games are updated all the time ArcSoft ShowBiz lets you transfer and edit full motion video from a variety of sources You choose video clips ar...

Страница 35: ...at are available on your PC and on the Web You can click Start Quicken On Your Computer to use the New User Edition program that is available on your PC If you have existing Quicken files that you want to use purchase Quicken Deluxe from the Quicken Web site Symantec NAV2002 is the Symantec Norton AntiVirus program that scans for viruses and protects your PC by removing them Symantec offers free v...

Страница 36: ...ff the PC by using the following steps 1 Close any open software programs To close programs click X in the upper right corner of each window 2 Click Start on the taskbar 3 Click Turn Off Computer at the bottom of the menu 4 Click Turn Off 5 Turn off the monitor w Before turning off the PC remove media from all drives CD DVD diskette and the 6 In 1 memory card reader Media left in a drive may cause...

Страница 37: ... menu 3 Click Stand By When you want to use the computer again to make the screen display reappear just as you left it do one of the following On the front of the PC briefly press the On button On the keyboard press the Esc key or the Standby button On the remote control press and hold the Standby button for 1 or 2 seconds and then when the screen display appears press the Start button If the comp...

Страница 38: ...ves everything that is in computer memory to the hard disk turns off the monitor and the hard disk and then turns itself off 4 When you want to use the computer again press the On button on the front of the PC The PC returns everything programs folders and documents to the screen If the computer does not work properly when you wake it from hibernation restart the PC n When you press Shift the Stan...

Страница 39: ...r standby or hibernation In the Power Schemes box select a power scheme from the drop down list Choose the timers To turn on auto standby for the computer click a time such as After 20 mins in the System standby list To turn on auto hibernate click a time such as After 1 hour in the System hibernates list 7 Click OK Automatic Standby or Hibernation Mode n If both standby and hibernation timers are...

Страница 40: ...32 ...

Страница 41: ...epend on the software program you are using C Arrow keys are controls for up down right and left You can use these keys instead of the mouse to move the cursor in a Web site in a document or in a game D Numeric keys are locked when the Num Lock LED light emitting diode on the keyboard is lit When locked the numeric keys are the number keys and arithmetic function keys found on a basic calculator W...

Страница 42: ...eo Keyboard Functions Access buttons Log off or switch users Put PC into or out of standby power saving mode Connect to HP Web site Open HP Picture Tool Kit Open My Video folder Open Help and Support Center Open My Music folder ...

Страница 43: ...s and Other Hardware if it is present 4 Double click Keyboard 7 Choose the button capability from the drop down list Enter the Display label and Address information For a Web site enter the complete Web site URL in the Address box 8 Click OK 9On the Buttons tab click Apply 10Repeat steps 6 through 9 for other buttons 11Click OK when you are finished Internet buttons back lit display Open your Inte...

Страница 44: ...eject1 eject2 stop prev next play pause rec volume Control speaker volume Mute speaker sound n The Volume knob can continue to be turned even after maximum sound has been reached Open or close optical drive trays Control active optical drive ...

Страница 45: ...tcut for the item Changing for left handed use You can change the configuration of the primary and secondary mouse buttons for left handed use Refer to Reverse your mouse buttons in the onscreen Help and Support Center Scrolling Use the wheel button in the middle of the mouse to scroll or select items You can use the scrolling mouse to scroll to autoscroll or to pan To scroll 1 Click the left mous...

Страница 46: ... movies or video To use the remote control simply point it at the remote sensor and press the Start button Use the remote control at a maximum distance of 26 feet from the remote sensor and at a maximum of 22 5 degrees 45 degrees total off center of the remote sensor n Refer to the Media Center books included in the computer box for information on using Media Center and the remote control Start ...

Страница 47: ... Install the remote control batteries 1 Slide the battery cover off the back of the remote control 2 Insert the two AA batteries provided 3 Replace the battery cover n Use alkaline batteries in the remote control ...

Страница 48: ...ume increases and decreases computer sound 헀 Clear deletes selection and works as the backspace button does on a keyboard 헁 TV opens My TV window 헂 Pictures opens My Pictures window 헃 Video opens My Videos window 헄 Play plays selected media 헅 Stop stops media currently playing or recording 헆 FWD Fast forward moves media forward Skip moves media forward for example one music track or one DVD chapte...

Страница 49: ... the Eject button for the drive on the keyboard 3 Holding on to the disc edges only gently place the disc in the tray with the label facing up Your PC comes with one or two of the following optical drives CD RW DVD ROM DVD RW R combo DVD CD RW A CD RW drive may be labeled cd writer plus A DVD RW R drive may be labeled dvd writer The combo drive may be labeled dvd cd writer plus Handling a CD or DV...

Страница 50: ...D RW discs do not work in the DVD RW drive When you insert a disc into the dvd writer drive the computer automatically detects the type of disc If you insert a software program or data CD or DVD it is available for use If you insert a music CD a program opens so you can play the CD If you insert a DVD movie a program opens so you can play the DVD If you insert a blank recordable disc DVD RW DVD R ...

Страница 51: ...es to your blank CD Opening the RecordNow program RecordNow is a program that copies and creates CDs and DVDs using your cd writer or dvd writer drives 1 Click Start on the taskbar 2 Choose All Programs 3 Click RecordNow 4 Click RecordNow again For information about recording onto CDs refer to the Help menu in the RecordNow program Diskette Floppy Drive The diskette floppy disk drive can read and ...

Страница 52: ...u can access the media contents You can copy files from or to the media 4 When you are done check that the light on the drive is not lit indicating that the PC is not writing to the media and then remove the media In use light Memory Stick CompactFlash I CompactFlash II or Microdrive SmartMedia MultiMediaCard or Secure Digital SD n You can place media in one or more of the card reader slots and ac...

Страница 53: ...inology associated with personal computers and with the safety practices and regulatory compliance required for using and modifying electronic equipment HP recommends that you use an antistatic wrist strap and a conductive foam pad when working on the computer w Always disconnect the modem cord from the telephone system and then disconnect the PC from the power source before removing your computer...

Страница 54: ...r side panel in the same manner Note that the screws on this panel detach and are loose from the panel 4 Gently lay the computer on its side Skip this step if replacing an optical drive Replacing the Side Panels 1 To replace the side panel align the notches on the panel with the holes on the chassis slide the side panel forward until it locks in place and then tighten the thumbscrews on the side p...

Страница 55: ...s in the PC Chassis Fan duct Expansion Add In cards slots 1st optical drive bay 2nd optical drive bay Memory sockets 6 In 1 memory card reader Drive cage with 3 drives top to bottom Hard disk drive Diskette floppy drive Power supply ...

Страница 56: ...ct push down the two tabs You can push with your fingers or a pen 2 Rotate the fan duct down and out to remove it from the chassis Replacing the Fan Duct 1 To replace the fan duct hold the fan duct at a 45 degree angle and align the bottom of the duct with the slot on the fan holder 2 Rotate the fan duct into position Make sure it is securely locked ...

Страница 57: ...oth side panels See page 46 2 To release the front panel locate the three small tabs on each side of the chassis Press each tab away from the center of the chassis Press the top pair the middle pair the bottom pair and then remove the panel Reverse this step to replace the front panel 3 Remove the fan duct See page 48 Release tab 3 each side ...

Страница 58: ... back of the drive remove the two screws on both optical drives and push both drives part way out through the front of the computer 1 Locate the two screws on the optical drive and remove them Push the drive partway out through the front of the computer 2 Remove the cables attached to the back of the drive you want to replace Make note of each connection and the plug orientation before disconnecti...

Страница 59: ...oom to attach the cables 2 Connect the cables to the back of the drive 3 Push the drive all the way in align the screw holes and insert the screws 4 Replace the fan duct see page 48 the front panel see page 49 and the side panels see page 46 Example drive with Cable Select jumper installed your drive may vary n A jumper is a small plastic connector or wire which electrically connects two pins in o...

Страница 60: ...e cage Make note of each connection and the plug orientation before disconnecting the cables 3 If you do not have a 6 In 1 memory card reader skip to step 5 If you have a 6 In 1 memory card reader continue with step 4 4 Remove the two screws that secure the 6 In 1 memory card reader in the drive cage From the front of the chassis push the reader into the drive cage 5 Push down on the drive cage re...

Страница 61: ...53 Upgrading ...

Страница 62: ...e cage The screws for the 6 In 1 memory card reader are replaced when the drive cage is replaced 5 Replace the drive cage See page 53 Removing and replacing the preinstalled hard drive You must remove the hard drive from the chassis if you want to replace it with a higher capacity drive or if you want to safeguard your data when sending the computer out to be repaired 1 Remove the drive cage See p...

Страница 63: ...ace the drive cage See page 53 5 Attach the power cable to the back of the drive 6 Attach the connector marked Master on the IDE ribbon cable to the back of the preinstalled hard drive After the preinstalled hard drive connection is attached twist the remaining part of the cable marked Slave on that same IDE ribbon cable and connect it to the second hard drive 7 If necessary connect the IDE cable ...

Страница 64: ...on which model you have n 256 MB memory configurations vary depending on your computer model 256 MB and 512 MB DIMM memory modules are not compatible with all computer models DIMMs DIMMs must be 168 pin unbuffered SDRAM synchronous dynamic random access memory compliant with the Intel PC SDRAM Unbuffered DIMM Specification The PC comes with one or more memory modules but you can replace existing m...

Страница 65: ...to eject the module n Avoid touching the memory chips or the gold contacts on the module Installing a memory module 1 Push down the two retaining clips on the ends of the memory socket 2 Holding the new memory module by its top edge or side edges only remove it from the antistatic packaging 3 Position the memory module in alignment with the socket the one or two small notches on the lower edge of ...

Страница 66: ...t and push straight down Make sure the card is properly seated 2 Attach the screw to secure the card you have replaced 3 Connect any internal cables to the card w Be careful of the sharp edges on the expansion slot cover w Do not overload the PC by installing add in cards that draw excessive current The chassis is designed to provide 2 amps average of 5 V power for each board or card in the chassi...

Страница 67: ...he diskette drive makes a noise 4 The computer makes one beep indicating it is operating properly If the computer doesn t go through the previous procedure check the following 1 The power cord and all cables are securely plugged into the computer 2 The power cord is plugged into a grounded outlet Check to see whether the outlet works by plugging another item into it 3 The monitor is connected to t...

Страница 68: ...e Standby button on the keyboard or the Standby button on the remote control Try restarting the computer as follows 1 Click Start on the taskbar 2 Click Turn Off Computer 3 Click Restart If the computer shows no response to mouse or keyboard actions reset the computer 1 Press and hold the On button until the computer turns off 2 Wait a few seconds and turn the computer back on A software program s...

Страница 69: ...nd the computer power cord The computer doesn t make any sound Press the Mute button on the keyboard to see if the Mute feature is turned on Use the keyboard controls to increase the volume Click the Volume icon on the taskbar Increase the volume and make sure the Mute box is not checked If your speakers have a power button check whether it is turned on and whether the power supply is connected to...

Страница 70: ...even though the computer and monitor seem to work If the PC beeps repeatedly or if nothing happens when you press keys it s possible that the keyboard is connected improperly USB keyboards only Make sure the keyboard is firmly connected to the USB port on the back or front of the computer Try unplugging and replugging the keyboard cable PS 2 keyboards only Check that the cable connector pins are s...

Страница 71: ...t If the light on the front of the monitor is lit the monitor is getting power The monitor doesn t work even though the computer appears to The mouse doesn t work even though everything else does If nothing happens when you move the mouse it s possible that the mouse is connected improperly USB mouse only Make sure the mouse is firmly connected to the USB port Try unplugging and replugging the mou...

Страница 72: ...and screw on the cover The computer might have stopped Reset the computer by pressing and holding the computer On button until the computer turns off approximately 5 seconds Then turn the computer back on USB Hub Power Exceeded error Change the USB power support under Global Preferences on the Buttons tab of the Control Panel Keyboard settings I cannot remove a CD or DVD You cannot remove a CD or ...

Страница 73: ... files Fast Recovering only the necessary software components the recovery process is shorter and faster from the hard drive Recovery CDs HP PCs with Windows XP feature a recovery partition included on the hard disk drive thus eliminating the need for recovery CDs that may get lost or damaged If you have concerns completing a recovery procedure in Using Application Recovery and System Recovery con...

Страница 74: ...PC Takes up about 5 GB of hard disk space reducing the total amount of space available for your use Replaces the need for system and application recovery CDs w Before using the HP System Recovery or Application Recovery programs use system restore n The system recovery image is in a partition area of the hard drive this disk space is not available for your use Use the following procedures to View ...

Страница 75: ...or Remove Programs if it is present 4 Click the program and then click the Change Remove button 5 Click OK when the confirmation window opens 6 Repeat steps 4 and 5 for each program you want to remove 7 Click Close To use the Disk Cleanup utility 1 Click Start 2 Choose All Programs 3 Choose Accessories 4 Choose System Tools 5 Click Disk Cleanup Wait for the calculations to complete 6 Select the fi...

Страница 76: ...s choose Hewlett Packard choose hp pavilion pc tools and click hp application recovery The recovery box opens 3 Click Application Installation or Driver Installation and then click Next 4 Select the driver or application program to install and then click Install 5 Follow the onscreen instructions w Do not skip the last step You must restart the computer when you are finished recovering application...

Страница 77: ... of the following If the computer responds click Start choose All Programs choose Hewlett Packard choose hp pavilion pc tools and click hp pc system recovery Continue with step 3 If the computer does not respond press and hold the On button until the computer turns off Continue with step 5 3 Wait until the System Recovery box appears asking Do you really want to start HP PC System Recovery 4 Click...

Страница 78: ...or installed on the PC Because of this you also lose a special code that Microsoft includes in the files of recorded TV programs Without the code Media Center will not play TV programs previously recorded to disk or copied to DVD or to other media w When you replace the hard disk drive you can no longer play any previously recorded TV programs ...

Страница 79: ...eyboard buttons not working 61 keyboard not working 62 new device not working 60 no sound 61 not working 59 60 computer continued opening chassis 46 part of PC not working 60 resources 3 restarting from standby 60 setting up iv turning off 28 turning on 21 using PC hardware 33 won t turn on 59 working on safely 45 configure special keyboard buttons 35 connecting audio cables 11 cables to TV 12 hea...

Страница 80: ...ing 6 In 1 memory card reader 54 CD drive 51 diskette drive 54 DVD drive 51 installing continued dvd cd writer plus combo drive 51 hard disk drive 52 installing batteries in remote control 39 Internet buttons 35 Internet connecting to 9 Internet Service Provider selecting 22 inventory 4 K keyboard Internet buttons 35 keys 33 not working 62 special buttons 34 keyboard buttons not working 61 L LAN c...

Страница 81: ...power management 31 setup poster 3 side panels removing and replacing 46 signal source connecting 11 software 26 27 solving problems See troubleshooting speakers connecting 18 testing 18 standby mode 60 automatic 31 manual 29 Start menu 23 support from HP 3 system recovery using 69 system tray 23 T telephone line connecting to Internet 9 television cables to PC 12 connecting PC to existing setup 1...

Страница 82: ...74 ...

Отзывы: