HP Net PC 20 Скачать руководство пользователя страница 160

154

hp media center pc user’s guide

Playing Digital Videos 

After you organize your videos in the My Videos or 
Shared Video folder in Windows Explorer, open 
Media Center to watch your videos.

1

Press the Start button 

 on the remote 

control.

2

Select 

My Videos

.

3

Select 

My Videos 

or 

Shared Video

. The 

right side of the window shows small images 
of your video files and folder icons, if you’ve 
organized your videos into folders.

4

Move through and select your video or 
video folder. You may need to use the scroll 
arrows at the bottom of the window to 
display all videos.

5

Press the OK button on the remote control. 
The selected video plays in full screen mode, 
or the folder opens displaying a list of video 
files. Use the mouse to resize the window if 
you want to watch your video while doing 
something else on your desktop.

6

When the video is finished, select 

Restart


and then press OK to replay the video, or 
select 

Done

 and press Done to close the file 

and return to the My Videos window.
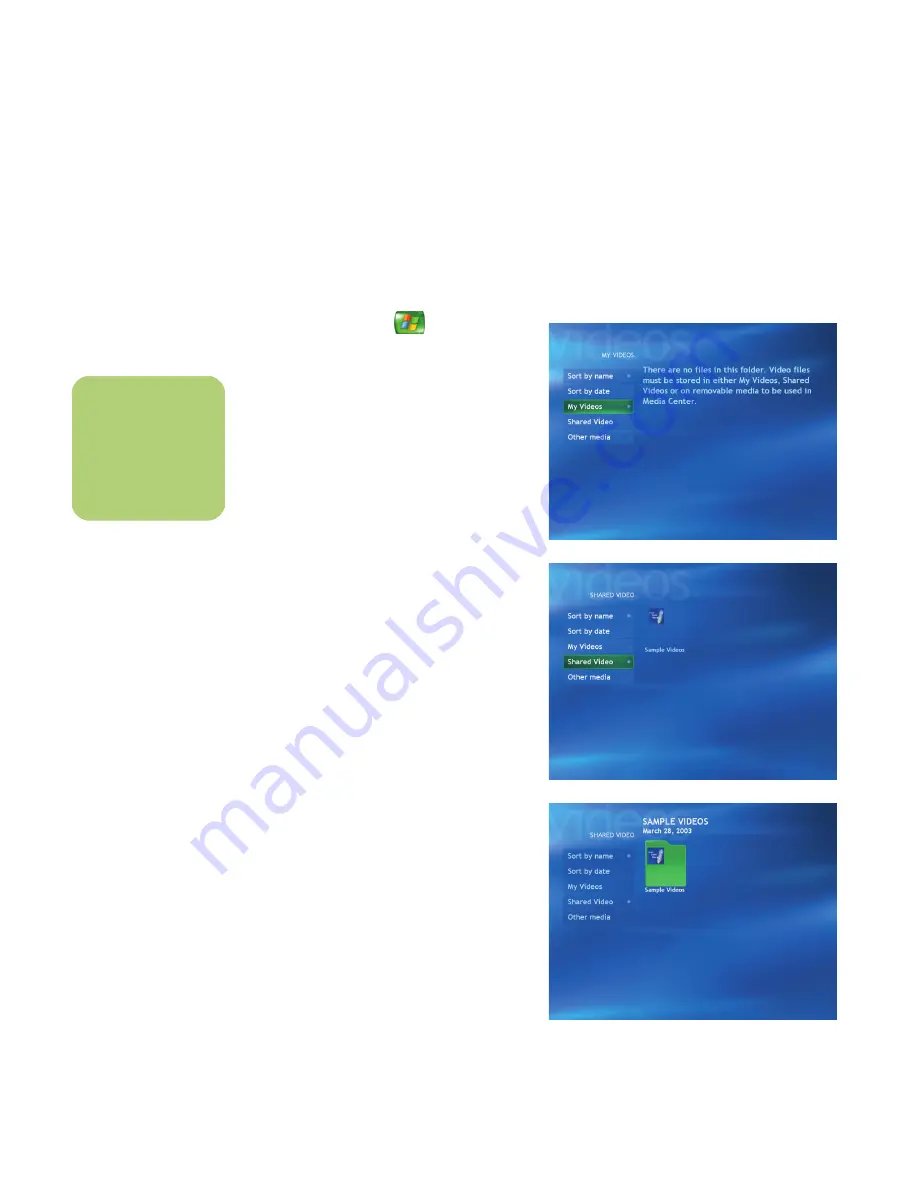
My Videos folder

n

If you do not have 
any videos displayed, 
this message 
appears.

Shared Video folder

Sample Videos folder

Содержание Net PC 20

Страница 1: ...HP Media Center PC User s Guide ...

Страница 2: ...pyright All rights are reserved No part of this document may be photocopied reproduced or translated to another language without the prior written consent of HP Hewlett Packard Company P O Box 4010 Cupertino CA 95015 4010 USA 2003 Hewlett Packard Development Company L P All rights reserved Hewlett Packard is a registered trademark of Hewlett Packard Company in the United States of America and othe...

Страница 3: ...Between the Box and the VCR or TV 24 Enabling TV Out Image for nVidia Graphics Card 26 Enabling TV Out Image for ATI Graphics Card 26 Connecting the Speakers 27 Speaker Systems 27 2 1 Klipsch Speaker System 29 2 1 Altec Lansing Speaker System 30 5 1 Speaker System 31 Adjusting the Volume 34 Using the Microphone 35 Using the Headphones 35 Resolving Sound Issues 35 Starting My PC 37 Starting the PC ...

Страница 4: ...Files in My Music 132 Playing a Song 133 Setting Up an Automatic Disc Jockey 133 Finding and Playing an Album 134 Creating a Playlist 135 Selecting a Visualization 136 My Pictures 137 What Can I Do in My Pictures 137 Using Supported File Types for My Pictures 138 Using Remote Control in My Pictures 139 Organizing Your Pictures 140 Viewing Your Pictures in Media Center 141 Viewing Pictures as a Sli...

Страница 5: ...he Front Panel 185 Accessing the Optical Drives 186 Removing the Optical Drive 187 Installing a New Optical Drive 188 Replacing and Adding Drives 189 Adding Memory 193 Removing Add In Cards 195 Replacing Add In Cards 195 Installing an HP Camera Docking Station 196 Application and System Recovery 199 Using Application Recovery and System Recovery 199 Application Recovery 204 System Recovery 205 Tro...

Страница 6: ...vi HP Media Center PC User s Guide ...

Страница 7: ... and easy to use It allows you to assemble your music videos and pictures and to enjoy them with a click of the remote control The built in TV capabilities include an Electronic Program Guide which gets updated over the Internet Whether you are recording TV programs or sharing a digital photo album you can do all your entertaining using the powerful remote control You will find yourself quickly at...

Страница 8: ... line before unplugging your computer from the AC power outlet Your system is provided with a voltage select switch for use in a 115 VAC or 230 VAC power system The voltage select switch has been pre set to the correct voltage setting for use in the particular country region where it was initially sold Changing the voltage select switch to the incorrect position can damage your PC and void any imp...

Страница 9: ...guide for information about using your PC Safety and Comfort Follow the steps in the setup poster to set up the computer After assembling but before using the computer make sure the computer and your work area are properly set up to maintain your comfort and productivity Refer to Safety Comfort Guide for important ergonomic information Just click Start choose All Programs PC Help Tools and then cl...

Страница 10: ...r Help for using and troubleshooting the Media Center program Windows Media Player Help for using the Windows Media Player program Online Information and technical support for your PC is available at the HP Web site Press the HP button on your keyboard or type http www hp com into your Web browser address box and then press Enter on the keyboard Select your country region from the drop down list a...

Страница 11: ...r HP Web Site and HP Support 1 Connect to the Internet Open your Web browser or press Connect on your keyboard 2 Type http www hp com into your Web browser address box and press Enter on your keyboard 3 Select your country region from the drop down list and click the arrow to the right of the list scroll down to see the box 4 Click the support link HP Customer Care You can get help over the teleph...

Страница 12: ...nta ct ing HP Cust omer Sup port Center it s import ant toh ave t he f ollow ing info rmatio n handy Please take amoment t o write dow n yo ur pr oduct inform atio n fo r fut ure refe re nce Product Name ____________________________________ Model _________________________________________ System or Product ________________________________________ Serial __________________________________________ Pu...

Страница 13: ... Lansing set of 2 1 Speakers If your PC came with 5 1 speakers refer to Connecting the Speakers on page 27 A 2 1 Klipsch Subwoofer power cord attached B 2 1 Klipsch Speakers C 2 1 Klipsch Speaker cables D 2 1 Altec Lansing Subwoofer E 2 1 Altec Lansing Speakers speaker cables are attached D B C A E F ...

Страница 14: ... PC on page 9 Remote control has two AA alkaline batteries installed Remote Sensor is properly plugged into a USB connector on your PC and is placed where you can point the remote control at it Remote Sensor control cable emitter is securely plugged into the remote sensor and attached to your cable or satellite set top box if present PC has a properly configured and working Internet connection PC ...

Страница 15: ...to a stereo system FM radio antenna cable PC Installation checklist Connect the keyboard mouse and remote sensor Connect the monitor not included and the optional TV not included Connect the speakers Connect the TV antenna cable or satellite signal source Connect the FM radio antenna cable Connect the camera docking station not included and digital camera not included Connect the modem to the tele...

Страница 16: ... DVD RW R drive Eject button C Media Center Shortcut buttons see following page for more information D 7 In 1 memory card reader Some PCs come with a 6 In 1 card reader E Diskette floppy drive F On button with power indicator light G Hard disk activity indicator light H Front connector ports see following page for more information A B C D E F G H ...

Страница 17: ... TV window where you can watch and record TV programs Opens the Program Guide where you can search for a TV program to watch or record Opens the My Music Window in Media Center where you can listen to your music CDs Opens the My Pictures window in Media Center where you can browse your picture files and play a slide show Opens the My Videos window in Media Center where you can play back your video...

Страница 18: ...onnector B Composite video Input_2 connector yellow C Left Audio Input_2 connector white D Right Audio Input_2 connector red E FireWire IEEE 1394 connector F 2 USB 2 0 ports G Headphone Audio Out connector green H Microphone connector pink n Location and number of connectors may vary by model A B C D E F G H ...

Страница 19: ... connector M Audio Line Out N Modem Line In RJ 11 O Digital Audio Out select models only P Audio Line In Q A VGA monitor DB 15 port R S video TV Out S LCD DVI connector select models only T Audio in right U Audio in left V S video In W TV RF In antenna Cable connector X FM In radio antenna connector select models only Y Slot for 5 1 Sound Card select models only See the following pages for more in...

Страница 20: ...hat came with your monitor Switching Display Devices When you connect more than one display device CRT monitor flat panel monitor TV etc to the PC you can quickly change where the PC desktop appears by pressing Alt F5 Each time you press the Alt F5 key combination the PC display appears on the next device If Alt F5 does not work restart the PC and try again ...

Страница 21: ...e PC Refer to the documentation that came with your device Connecting to the Internet Through a Modem Connection Connect the telephone line to the modem which is inside the computer 1 Plug the modem cable provided in the computer box into the computer modem connector on the back of the PC 2 Plug the other end to your telephone line wall jack connector ...

Страница 22: ...Ethernet 10BaseT or Fast Ethernet 100BaseT network hub Connect this adapter in your PC to your LAN local area network hub or any broadband connection 1 Plug a network cable into the Ethernet RJ 45 port on the back of the PC 2 Plug the other end of the network cable into a 10BaseT or 100BaseT port on the network hub The green LED light emitting diode indicates a valid connection ...

Страница 23: ...r other set top box that controls your TV signal connect the remote sensor control cable emitter A into the back of the remote sensor 2 Remove the paper from the backing tape on the end of the cable B and then press the end of the cable over the remote IR receiver window on your cable TV set top box C 3 Plug the remote sensor cable into a USB connector D on the back of the PC 4 Place the remote se...

Страница 24: ...e PC use an S video cable not provided or use the S video to composite video adapter cable and the composite video cable Plug the other end of the cable into your set top box VCR or other device that is providing the signal source for the TV You can also plug audio cables not provided from your set top box or VCR into the Audio in right red A connector and the Audio in left white B connector on th...

Страница 25: ... then attach a composite video cable to the adapter One composite video cable 6 feet C Use this cable to connect a composite video connector on the back of the PC such as COMP for the TV out signal to your TV You may need other or additional cables depending on your TV and your TV signal source For example when your TV has an S video connector you may want to use an S video cable to connect the TV...

Страница 26: ...ideo to composite video adapter cable Choose the cable type you TV needs 2 Plug the other end of the cable into the TV IN Video In or Video Input connector on your TV 3 Turn on the TV and select the TV IN video source refer to the documentation for your TV set 4 Be sure to enable the image for the TV see Using Media Center Help on page 45 n Location and number of connectors may vary by model S VID...

Страница 27: ...tores Connect two coaxial cables to the splitter outputs Connect one of these cables to the input of the VCR and the other one to the TV connector on the back of the PC Not shown in diagram To view your images from your TV use an S video In or a composite video In cable to connect the TV to the PC To view your images from your monitor use a monitor cable to connect the fast forward to the PC A B D...

Страница 28: ... of these cables to the input of the VCR and the other one to the TV connector on the back of the PC Be sure to connect the remote sensor control cable emitter and position it on your set top box or satellite box This allows the PC to change the channel on the box See Connecting the Remote Sensor on page 17 Not shown in diagram To view your images from your TV use an S video In or a composite vide...

Страница 29: ...G H J K N M L C C D A B E F G H D C C C C Add the PC with a splitter Existing Setup A Wall B Cable C Coaxial Cable D Set top box satellite In E Set top box satellite Out F VCR In G VCR Out H TV In J Splitter In K Splitter Out L TV in On back of PC ...

Страница 30: ...te box Connect the other end of the cable to the S video to composite video adapter cable connect the adapter to the S VID IN connector on the back of the PC 3 When using a composite video cable you can also plug audio cables not provided from your satellite or set top box or VCR into the Audio in right red and Audio in left white connectors on the back of the PC 4 Be sure to connect the remote se...

Страница 31: ... J Add the PC with a splitter Existing Setup A Wall B Cable C Set top box satellite In D Set top box satellite Out E S video or composite cable F VCR In G VCR Out H TV In J Add an S video or composite cable with adapter K S VID IN on back of PC L Remote sensor control cable ...

Страница 32: ...e FX 5600 8 Click the nView Display Mode from the menu that appears on the left 9 Click Device Settings and then click Select Output Device 10 Select the TV option 11 Click OK Enabling TV Out Image for ATI Graphics Card You must enable the TV out image in order to view Media Center using your TV Skip these steps if you are not using a television 1 Check that the TV is connected to the PC See Conne...

Страница 33: ...ntegrated player for multiple media formats you can use to create various audio formats Sound Blaster Audigy allows you to set up and audition various audio devices Accessing sound programs To learn more about the sound programs click Start choose All Programs Sound Blaster Audigy 2 Documentation and then click Online Manual or Music Creation Guide 2 1 Audio Connectors Use the Line out connector t...

Страница 34: ...tem such as the 5 1 speaker system C Line out lime green connects to an active stereo or multi channel speaker system D Microphone Mic pink connects to a microphone E Line in blue connects to an analog audio device for sound input to the PC F Digital Line out dark orange connects to a digital device such as a stereo system with digital input Setting up digital speaker output 1 Click Start choose A...

Страница 35: ...woofer and allow for ventilation to reach the rear of the subwoofer Do not place the subwoofer by the computer monitor to avoid interference place the subwoofer 10 inches or more away from the monitor 6 Connect the speakers to the subwoofer B 7 Refer to the setup poster for connecting the 2 1 speaker system 8 You can test the speaker system Click Start choose All Programs Creative Sound Blaster Au...

Страница 36: ...e 2 1 speaker system 6 You can test the speaker system Click Start choose All Programs Creative Sound Blaster Audigy 2 and then click Creative Speaker Settings The speaker Settings window opens Select your speakers form the drop down list Click Channel to test the speakers Click Calibrate to adjust the speaker volume settings n Select the signal source for TV in the Media Center program settings n...

Страница 37: ...please refer to the instruction package included with the 5 1 speaker system box To connect the 5 1 speaker system refer to the table listing connector information Connecting 5 1 Speakers If your PC model came with the Altec Lansing Speakers System Model 251 use the following procedure to connect the speakers to a Sound Blaster Audigy Audio Card on the back of the PC Also refer to the setup inform...

Страница 38: ...manager Refer to the correct procedure to configure your multi channel speakers 1 Turn off the PC 2 Connect the three audio cable plugs from the speaker system to the connectors on the back of the PC see the table 3 Turn on the PC 4 Turn on your speaker system 5 Configure the multi channel audio output refer to the next procedure Connect speaker channels plugs To PC back connector Front speakers A...

Страница 39: ... see this tab 5 Select the option describing the number of speakers in your system for example 6 5 1 speaker mode You can click the Speaker Test tab and then click each speaker to test it 6 Click OK Enable Digital Audio Output Optional 1 Follow steps 1 5 of the previous procedure 2 Place a check next to Enable digital audio output The Output digital and analog option is automatically selected n If...

Страница 40: ...er You should perform this procedure if you have Creative SoundBlaster Audigy sound manager or the Multi channel Sound Manager 1 Click Start on the taskbar and then select Media Center 2 Click Settings DVD and then click Audio 3 Select 6 speaker mode 5 1 channel 4 Click Apply and then click OK Adjusting the Volume Adjust the volume for the speaker sound level any of these ways Turn the Volume knob...

Страница 41: ...n the sound to the speakers and the subwoofer is muted For the 5 1 speaker system look for the headphones connector on the right side of the control tower If the control tower displays HP the headphones are enabled the sound to the speakers and the subwoofer is muted Push and hold the On button on the control tower for several seconds to enable sound from the speakers Press the On button briefly t...

Страница 42: ...36 hp media center pc user s guide ...

Страница 43: ...ith an ISP You must have an Internet connection to use some of the Media Center features Easy Internet Sign up helps you sign up for a new Internet account set up an existing account or configure Internet access using a LAN local area network cable modem or DSL digital subscriber line Open Easy Internet Sign up Double click the Easy Internet Sign up icon on the desktop Or Click Start on the taskba...

Страница 44: ...PC Desktop View The Media Center PC desktop has shortcut icons that make it easy to find the things you need To find out more information about a program click its icon n Your Media Center PC desktop may not appear exactly like the one displayed here ...

Страница 45: ...t models only Icon Opens Use it to Windows XP Start menu Find all your software programs turn off the PC open Help and Support and access all the PC utilities and features Help and Support View onscreen help information about your PC select models only Media Center Access all the Media Center features watch and record TV program listen to and record music CDs view your digital pictures watch DVD m...

Страница 46: ...ng the hp dvd writer drive select models create a DVD disc to watch in a home DVD player Microsoft Money 2003 lets you set up an online connection to view stock quotes and news pay recurring bills and monitor deposits HP Picture Toolkit appears within the My Pictures folder and provides easy access to software and services exclusively from HP Greeting Card Creator creates cards to print and share ...

Страница 47: ...se the service from the Web site Using PC Help and Tools The PC Help Tools folder in the All Programs menu contains special utilities for PC owners This folder also contains any onscreen guides included with your PC To see the items in the PC Help Tools folder 1 Click Start on the taskbar 2 Choose All Programs 3 Choose PC Help Tools 4 To view an item or to use it click an item Turning Off the PC T...

Страница 48: ...keyboard press the Esc key or the Standby button On the remote control press and hold the Standby button for 1 or 2 seconds and then when the screen display appears press the Start button Press the Alt F4 buttons on the keyboard to close the Standby program Standby Mode Tips If the computer does not work properly when you wake it from standby reset the PC by pressing and holding the On button on t...

Страница 49: ...e PC saves everything that is in computer memory to the hard disk turns off the monitor and the hard disk and then turns itself off 4 When you want to use the computer again press the On button on the front of the PC The PC returns everything programs folders and documents to the screen If the computer does not work properly when you wake it from hibernation restart the PC n When you press Shift t...

Страница 50: ... tab select the Enable hibernation check box and then click Apply 6 To set the timers for standby or hibernation click the Power Schemes tab In the Power Schemes box select a power scheme from the drop down list Choose the timers To turn on auto standby for the computer click a time such as After 20 mins in the System standby list To turn on auto hibernate click a time such as After 1 hour in the ...

Страница 51: ... Move the mouse to show the Media Center navigation bar and then select the Help icon from any window in Media Center 3 When Media Center Help files appear To open available files select the Contents tab and then click the next to the topic To view text about a topic select the topic The text appears on the right side of the window Select the Index tab and then scroll down the list of topics or ty...

Страница 52: ...46 hp media center pc user s guide ...

Страница 53: ...are program being used F3 opens a search window Other function key operations may depend on the software program you are using Arrow keys are controls for up down right and left You can use these keys instead of the mouse to move the cursor in a Web site in a document or in a game Numeric keys are locked when the Num Lock LED light emitting diode on the keyboard is lit When locked the numeric keys...

Страница 54: ...screen reappears user User Log off or switch between PC users hp HP Links to an HP Web site Help Opens the Help and Support Center photo HP Picture Toolkit Opens an imaging software program Can be reconfigured music Music Starts MusicMatch Jukebox or Windows Media Player Can be reconfigured video Video Opens a video software program Can be reconfigured user hp photo music video ...

Страница 55: ...gram Finance Goes to a popular finance Web site Can be reconfigured to open any Web site or software program Connect Opens your Internet browser Can be reconfigured to open any Web site or software program Search Opens a Web page designed to search the Internet Can be reconfigured to open any Web site or software program Chat Opens an HP related Web site for chatting Can be reconfigured to open an...

Страница 56: ...s lower optical drive tray rec Opens RecordNow program stop Stops media play pause Plays or pauses media prev Rewinds media next Fast forwards media volume knob Controls speaker volume Turns speaker sound on and off n The Volume knob can continue to be turned even after maximum sound has been reached l l eject1 eject2 stop prev next play pause rec volume ...

Страница 57: ...ouse An optical scrolling mouse uses light and an optical sensor instead of a roller ball to sense movement Use the optical mouse on an opaque surface A wireless mouse select models only is an optical mouse that uses a receiver transmitter instead of a connector cable to communicate with your PC A light on the receiver indicates receiver activity Using the mouse buttons Like an ordinary mouse the ...

Страница 58: ...ns You can change the configuration of the primary and secondary mouse buttons for left handed use 1 Click the Start button 2 Click Control Panel 3 Click Printers and Other Hardware if it is present 4 Double click Mouse 5 Check Switch primary and secondary buttons on the Buttons tab 6 Click Apply using the new primary button and then click OK Scrolling Use the wheel button in the middle of the mou...

Страница 59: ...r the document scrolls 3 To stop autoscrolling press the wheel button again Panning 1 Place the cursor in the document Press and hold down the mouse wheel button 2 Slowly move the mouse in the direction you want to scroll The farther you move the pointer from the starting point the faster the document pans 3 To stop panning release the wheel button n Autoscrolling does not work with some software ...

Страница 60: ...mouse C and receiver set is available with select models only For more information about installing your wireless keyboard set refer to the specific wireless keyboard documentation included in the PC box Wireless Receiver A light on the receiver indicates receiver activity A Number lock on B Caps lock on C Scroll lock on D Receiver activity A B C A Wireless receiver B Wireless keyboard C Wireless ...

Страница 61: ...ontrol To use the remote control simply point it at the remote sensor and press the Start button Use the remote control at a maximum distance of 26 feet 8 m from the remote sensor and at a maximum of 22 5 degrees 45 degrees total off center of the remote sensor 3 2 1 6 5 4 9 8 7 0 JKL TV VIDEOS STOP FWD GUIDE SKIP CHANNEL PAGE DVD MENU RECORDED TV MUSIC RADIO PLAY PAUSE REW RECORD REPLAY VOLUME LI...

Страница 62: ...user s guide Install the remote control batteries 1 Slide the battery cover off the back of the remote control 2 Insert the two AA batteries provided 3 Replace the battery cover n Use alkaline batteries in the remote control ...

Страница 63: ... so could scratch the surface of the CD Store CDs at room temperature Inserting a CD or DVD 1 Make sure the computer is on If the PC is in standby mode the On button light flashes press the Esc key on the keyboard to wake the PC 2 To eject the tray press the Eject button A on the drive Or press the Eject button for the drive on the keyboard 3 Holding on to the disc edges only gently place the disc...

Страница 64: ...D movie a program opens so you can play the DVD CD Writer Plus The CD Writer Plus is a CD RW drive It can play music CDs read data CDs run CD based software create or write music and data CDs and copy CDs Using the CD Writer Plus When you insert a disc into the drive the computer automatically detects the type of disc If you insert a software program or data CD it is available for use If you inser...

Страница 65: ...ovided with the drive to copy files to your blank disc DVD CD Writer Plus Combo Drive The DVD CD writer plus is a DVD CD RW drive It can play music CDs read data DVDs and CDs run CD based and DVD based software programs create or write music and data CDs copy CDs and play DVD movies Using the combo drive When you insert a disc into the combo drive the computer automatically detects the type of dis...

Страница 66: ...lp menu in the RecordNow program Diskette Floppy Drive The diskette floppy disk drive can read and write diskettes Using the diskette drive Insert the diskette into the drive until it locks in place Make sure you insert the diskette with the round metal disk face down and the arrow on the top pointing into the drive You can copy files from or to the diskette When you are finished check that the li...

Страница 67: ... share data between other card readers A SmartMedia B In use light indicates data is being read or written C MMC SD MultiMedia Card Secure Digital D CompactFlash I II or Microdrive E MS MS Pro Memory Stick or Memory Stick Pro n Some PCs come with a 6 In 1 card reader n Do not insert or remove memory cards when the In use light is flashing To do so may cause data loss or it may permanently damage t...

Страница 68: ...utomatically detects the media 2 Click Start and then click My Computer 3 Under Devices with Removable Storage right click the correct memory card icon 4 Select Format and then type a label name into the label field For best compatibility select FAT as the File System Settings 5 Click Start 6 Click OK on the Format Complete window and then click Close n Some memory cards have a lock position To vi...

Страница 69: ...se the session and the card can be removed Troubleshooting the memory card reader If you are having problems reading to or writing to a memory card try the following Make sure the read write switch on the memory card if available is set to Write Enabled Make sure the amount of data you want to store is not larger than the capacity of the memory card Make sure the memory card is one of the supporte...

Страница 70: ...slot The light blinks when data is being transferred between the card and the PC 7 In 1 Media Types Compact Flash type I II CF 1 CF II IBM Micro Drive 50 pins Smart Media SM 4 MB to 128 MB 22 pins Multimedia Card MMC 8 MB to 32MB 7 pins Secure Digital SD 32MB to 128MB 7 pins Memory Stick MS 4 MB to 128 MB 10 pins Memory Stick Pro 4 MB to 128 MB 10 pins w Do not click Stop in the Safely Remove Hard...

Страница 71: ...ng station model 8886 and several HP digital cameras which are purchased separately To install the HP camera docking station refer to Installing an HP Camera Docking Station on page 196 n The dock insert clips onto the camera dock base This insert comes with the digital camera tv guide open Sm artMedia Co mpactFlash I II music pictures MMC SD Mem ory St ick videos ...

Страница 72: ...66 hp media center pc user s guide ...

Страница 73: ...sion programs Pause rewind and fast forward TV programs select models only Watch an instant replay Play back your digital videos View your digital pictures or play them as a slide show with music Easily print your photos Browse select and play music CDs files with full screen visualizations Record CD tracks to your media library Play DVD movies Resume playing your DVDs where you left off Access st...

Страница 74: ...ough your pictures watch videos play music and even record TV while using other Windows programs To open Media Center simply point the remote control at the remote sensor and press the Start button Media Center opens in full screen mode Getting the Most out of Media Center It is best to have the following items completed before trying to use Media Center otherwise many of the program features won ...

Страница 75: ...rtcut icon by clicking and dragging the Media Center icon in the Start menu to your desktop When you open Media Center you ll see the Media Center Start menu Use the arrow buttons on the remote control or the keyboard or use the mouse to navigate and select menu options You may need to use the scroll buttons to view all items in some Media Center menus To enter a selection press OK on the remote c...

Страница 76: ...tems in Media Center use the arrow buttons on the remote control and then use the OK button to enter your selection If you have media playing such as music or television it appears in an inset window in the lower left corner To switch from watching your media in the inset window to watching it in full screen mode use the arrows on the remote control to select it and then press OK ...

Страница 77: ...ures or play a slide show print photos M Watch record and play back live TV programs N Play music files or music CDs O Watch DVD movies P Change Media Center program settings Other menus not shown Online Spotlight link to the Media Center Web site for the latest information about your Media Center PC and software Link to an Internet radio Web site MusicMatch Radio MX select models only More Progra...

Страница 78: ...error message may appear You may also see No data available in the Program Guide or you may not be able to get the correct Program Guide To resolve this problem set the location for your PC in the Control Panel first and then in the Media Center Settings window To set the PC location 1 Click Start on the taskbar and then click Control Panel 2 Click Date Time Language and Regional Options if it is ...

Страница 79: ...omplete To complete the setup wizard you need to Be logged on as the administrator For more information go to Microsoft Help Have an Internet connection already set up to download your television service provider s program guide Provide your ZIP Code or postal code Provide the name of your television service provider if you subscribe to either cable or satellite TV Provide the brand of your set to...

Страница 80: ...nteractive test to make sure the remote control is working with the remote sensor Before performing this test Make sure the remote control has two AA alkaline batteries installed Make sure the remote control sensor is plugged into a USB port on the PC Make sure you point the remote control at the remote sensor Make sure the LED on the remote control and the remote sensor blinks when a button is pr...

Страница 81: ...ide you need to connect to the Internet and then select Settings from the Media Center Start menu select TV Guide and then select Get Guide data b Test your connection to the Internet by selecting the Test button To set this up later or change your settings you can select Settings from the Media Center Start menu select General and then select Set up Internet connection n If you choose to manually...

Страница 82: ...s a TV signal If you have a set top box the Media Center remote control needs to work with it c Prepare for set top box setup Make sure Your set top box is turned on Your TV signal is connected to your set top box Your set top box is connected to your computer Your remote sensor control cable is connected properly d Choose a working TV signal to use with Media Center e Select how you change channe...

Страница 83: ...p If your computer isn t connected to the Internet or if Media Center hasn t configured your ISP information in step 2 you will see No data available in the Program Guide To set this up later select Settings from the Media Center Start menu select TV and then select Guide and then Reset Guide lineup ...

Страница 84: ...ia Center window and then open another program by using the Start menu To display the desktop select the Minimize icon by using the arrow buttons on the remote control or by using the mouse You can also resize the window to display Media Center and a part of the desktop To return to Media Center use the mouse to click the Media Center icon on the taskbar Menu bar icon Action Media Center Start ico...

Страница 85: ...imary CD playing program 1 Close Media Center 2 Insert a CD into the drive A message appears asking you what you want Windows to do 3 Select Play Audio CD using Media Center 4 Check the Always do the selected action check box and then click OK Using Shortcut Buttons Remote control You can use the remote control shortcut buttons such as DVD Menu Radio TV Music Pictures and Videos to open specific w...

Страница 86: ...omputer is already turned on The shortcut buttons on the front of the PC are TV Guide Music Pictures and Videos The front of your PC may display text or icons Keyboard The keyboard shortcut buttons do not open the Media Center program Refer to Using the Keyboard on page 47 for more information about your keyboard shortcut keys caps lock l l ...

Страница 87: ...or live TV display Place the computer in and out of standby mode Remote control cannot Navigate the Windows desktop or control other computer programs outside of Media Center Be used as a VCR DVD player or stereo remote control Turn the computer on or off shut down PC Turn a TV that is connected to your computer on or off 3 2 1 6 5 4 9 8 7 0 JKL TV VIDEOS STOP FWD GUIDE SKIP CHANNEL PAGE DVD MENU ...

Страница 88: ...ll Media Center windows Moves to next picture in a slideshow L Live TV is a shortcut to the full screen view of live TV It also moves to the current point in live TV program after pausing live TV M Mute turns computer sound off The word Mute is displayed on the screen when Mute is turned on N Volume increases and decreases sound O More Info displays available information about selected media file ...

Страница 89: ...l screen mode pressing OK switches back to the previous channel watched Press again to toggle back It acts the same way as a Jump button on some TV remote controls Z Recorded TV opens Recorded TV window AA Start opens Media Center to the main Start menu BB Channel Page up and down changes TV channel or moves page up and down depending on available options It also moves to next DVD chapter The name...

Страница 90: ... remote sensor 2 To start Media Center and to open the Media Center Start menu press the Start button 3 If this is your first time using the remote control the Media Center setup wizard opens Follow onscreen instructions to complete the remote control setup steps Or If you have completed the Media Center setup wizard the Media Center Start menu opens Use the arrow keys on the remote control to sel...

Страница 91: ...to Music Opens the My Music window where you can browse and play music CDs and your music files Pictures Opens the My Pictures window where you can search for sort and view pictures and slide shows that are stored in the My Pictures or the Shared Pictures folder in Windows Explorer You can also view your pictures on other media such as a digital camera or a memory card Videos Opens the My Videos w...

Страница 92: ...ith the monitor and sound turned on unless you manually turn them off before the scheduled recording Media Center cannot record TV programs if the computer is turned off Remote control LED and the remote sensor LED Under the Standby button is an LED light emitting diode that blinks when the remote control is sending a signal to the remote sensor The remote sensor displays a red LED when you press ...

Страница 93: ...Stop is pressed while you are watching TV the Media Center pause buffer continues to record in the background Rew Rewinds selected media Press REW again to increase the rewinding speed Moves the video backward Moves live TV program to the beginning of the 30 minute pause buffer Moves the television program guide back 3 hours Pause Pauses selected media Press Pause and then FWD repeatedly to play m...

Страница 94: ...watching live TV press OK to go to the previous channel Press OK again to toggle back to the original channel you were watching Live TV Moves a TV program forward to the end of the pause buffer and resumes playing live TV When you pause a TV program you can use the Live TV button to move forward to live TV Opens Media Center and then begins playing live TV in full screen mode Recorded TV Opens the...

Страница 95: ...or live TV or moves to the next chapter of a DVD movie Mute Turns off the PC sound The word Mute appears in the window when it is turned on Numeric keypad Changes channels and enters text Enters text in the Media Center search feature Each time you press a number key a different character appears When you find the character you want press the Enter button or wait a few seconds Clear Deletes the la...

Страница 96: ...90 hp media center pc user s guide ...

Страница 97: ...TV programs in the Guide Quickly check which TV programs you have scheduled to record Browse for TV programs in Search by title keyword or category Simultaneously watch a recorded program and record a live program Set Media Center to block certain channels Quickly find your favorite television programs by organizing the Television Program Guide by different categories such as movies or sports Also...

Страница 98: ...program information is displayed in the window 3 To watch TV in full screen mode press the Live TV button or select the TV video screen and then press OK 4 To exit full screen mode and return to the previous window press Back on the remote control 5 Press the More Info button to display the following information Channel number Channel station identifier Title of program Time period of program Actu...

Страница 99: ...wind REW To speed up rewinding press REW three times To resume watching the program press Play REW allows you to go back 3 hours in the guide To move backward in live TV by seven seconds press Replay You can repeatedly rewind with the instant replay option but only to the beginning of the pause buffer or recorded program Allows you to go back 12 hours in the guide Live TV To maximize the TV viewin...

Страница 100: ...ecorded portion and begins recording again after a short delay You cannot use time shifting when recording a TV program For example you can t pause a live TV program and then rewind to the beginning of the pause buffer and then begin recording You can record a TV program only from live TV In the illustration below note that the pause buffer time is highlighted in green The pause buffer began recor...

Страница 101: ...e program appears at the bottom of the window Viewing the television program guide 1 Press the Start button on the remote control 2 Select My TV and then select Guide 3 Select a channel and then use the arrow buttons to view up to two weeks of programming for that channel 4 Select a program and then press OK to watch or record the program n The number of channels and calendar days of TV listings d...

Страница 102: ...downloaded from the Internet because there is no Internet connection you will see No data available next to each channel Manually Downloading the Guide 1 Press the Start button on the remote control 2 Select My TV Settings Guide and then select Get Guide data 3 Select Yes The television program guide starts downloading from the Internet This can take up to 30 minutes depending on the amount of dat...

Страница 103: ...ng up an Internet Dial Up Connection To set up your Internet connection to bypass the Internet Service Provider interface use this procedure 1 Click Start on the taskbar and then click Control Panel 2 Click Network and Internet Connections if it is present 3 Double click Network Connections 4 In the Network Tasks area click Create a new connection 5 When the New Connection Wizard opens click Next ...

Страница 104: ...annel 4 Use the numeric keypad on your remote control to enter the name of the missing channel and then select Next 5 Enter the correct channel number and then select Add 6 Repeat steps 3 through 5 to add additional channels 7 Click Done when you ve added all the channels Removing Channels from Your Guide You may want to remove some channels from your Guide to prevent users from having access to t...

Страница 105: ...description and then press OK on the remote control 3 To scroll through search results use the arrow buttons to select a program and then press OK If multiple times for the program are displayed select a time and press OK 4 To begin watching the program in full screen mode select the program and then press OK If the program is not currently playing select Record or Record Series and then press OK ...

Страница 106: ...ttons to scroll through search results and to select a program Then press OK 4 Select the program in the window and then press OK on the remote control to begin watching the program in full screen mode If the program is not currently playing you can select Record or Record Series and then press OK n Recorded TV s Schedules window displays a list of programs scheduled to record in the future beginn...

Страница 107: ...ded select My TV Recorded TV and then select Scheduled The Record icon also appears next to the program in the Guide while you are recording The Record icon disappears when the recording is complete Record icon in taskbar If a program is currently being recorded the Record icon also appears in the taskbar on the desktop If you move your mouse over the icon Media Center displays which program is cu...

Страница 108: ...fore scheduling a recording Important Information About My TV and FM Radio In Media Center FM radio shares the use of the single tuner card with My TV In Media Center you are unable to watch or record TV and listen to FM radio at the same time When Media Center is scheduled to start a recording a warning appears that says FM radio stops when the TV recording starts If you do not select Cancel reco...

Страница 109: ...to go directly to a channel Press the right arrow button in the Guide to select a program that will be broadcast in the future 3 Press the Record button on the remote control The Record icon appears next to the program in Guide Press Record twice to record a series The Record Series icon is displayed to indicate a series Press Record again to cancel the recording 4 To return to the previous window...

Страница 110: ...g from the first letter you type into the text box For a Categories search select the category you want and press OK 3 Use the arrow buttons to scroll through the search results to select the program you want to record select the program and then press OK 4 Select Record or Record Series in the window and then press OK The recording icon for a single program or the recording icon for a series appe...

Страница 111: ... to scroll through choices and enter the recording frequency date start and stop times storage and quality options 5 To set the recording and return to the Settings window select Record in the window and then press OK on the remote control 6 To return to the previous window press Back on the remote control To manually record a program or series from the Guide 1 Press the Start button on the remote...

Страница 112: ...nging Recording Settings or Resolving a Recording Conflict 1 Press the Start button on the remote control select My TV Recorded TV and then select Scheduled 2 To move through the list of scheduled recordings use the arrow buttons select a program you want to change and then and press OK on the remote control 3 You have different options depending on what type of recording you have set Select Recor...

Страница 113: ...d programs by date status or name Clear out all TV program history Opening the Recorded History Window 1 Press the Start button on the remote control select My TV Recorded TV and then select Scheduled 2 Select History to display a list of programs that you have recorded Some of the recorded TV program messages are Canceled means the program was manually canceled Partial means part of the program w...

Страница 114: ...es of programs and check for any recording errors Playing a recorded program To find and play a recorded program 1 Press the Start button on the remote control select My TV and then select Recorded TV 2 To organize all of your previously recorded programs select Sort by date Sort by name or Sort by category 3 To begin watching the program select the recorded program you want to watch and then pres...

Страница 115: ...our Microsoft Recorded TV program file A thumbnail picture of your recorded TV program is displayed by default 5 To view your recorded TV program use the playback controls n To play recorded TV programs in Windows Media Player a PC requires Windows XP operating system Windows Media Player 9 A special Media Center Codec file that may be available through Windows Update for select models only ...

Страница 116: ...ed TV and then select Scheduled 2 Select History Recording error Description of error Redundant Program already exists in Recorded TV library or has been recorded and deleted in the past eight weeks Missed PC was turned off during scheduled recording time Conflict Another program was scheduled to record at the same time Canceled You selected Don t record on the Program Info menu and cancelled the ...

Страница 117: ...the following priority rules 1 A scheduled program that is not a rerun 2 The program that was scheduled first 3 Manual recordings Often Media Center is able to find an alternative date and time for recording one of the programs so that both programs can be recorded If one recording partially overlaps another Media Center records to the end of the first and then begins recording the second After yo...

Страница 118: ...cord in the window and press OK on the remote control Or To remove the entire series from the recording schedule select Series Cancel Series and then press OK Deleting a Recorded Program or Series To free up hard disk space you may need to delete a program or series that has been recorded 1 Press the Start button on the remote control select My TV and then select Recorded TV All the programs you h...

Страница 119: ...s is not selected 6 If desired you can select the Maximum allowed TV rating setting select a rating and then click OK Selecting this setting does not cause an error Setting Movie DVD or TV Ratings Select Models Only 1 Press the Start button on the remote control 2 Select Settings General and then select Parental control 3 Enter your 4 digit code 4 Select Movie DVD ratings or TV Ratings 5 Select Tu...

Страница 120: ... the remote control to display the information bar 2 Select the Teletext button on the information bar The Teletext toolbar will also appear at the bottom of the screen so that you can navigate the Teletext pages For more information about the Teletext toolbar refer to the help menu in Media Center About Teletext Teletext is additional information that is broadcast with a TV signal You can navigat...

Страница 121: ...ed here Make the backup CD now before you need it so that you can use the CD after you perform a system recovery or replace the hard disk drive in your PC If you do not have the backup CD after you perform a system recovery or replace the hard disk drive you will not be able to play any previously recorded TV programs that are broadcaster encrypted The procedures that follow describe how to prepar...

Страница 122: ... Files excluded for all users box put your cursor over the vertical line between File Name and Application in the title bar and then click and drag the line to the right to see the full entries 9 Scroll down the list to see and then click the entry C Documents and Settings All Users DRM 10 Click Remove 11 Click Apply 12 Click OK The Options window closes 13 In the Backup Utility window click the B...

Страница 123: ...e Backup Progress window opens When the process finishes the window displays the message The backup is complete 20 Click Close 21 Close the Backup Utility window Continue with the next procedure Make the Backup CD 1 Click Start on the taskbar choose All Programs CD DVD Recorder if present RecordNow and then click RecordNow again The RecordNow window opens 2 Insert a blank CD 3 Select the Data Proj...

Страница 124: ...up CD 8 Click the backup file name 9 Click Open and then click OK 10 In the Items to restore box click the plus sign for the backup file name The file tree expands Click the C box so a check mark appears Click the System State box so a check mark appears 11 Click Next 12 The Backup or Restore Wizard window shows the message You have created the following restore settings In the window click the Ad...

Страница 125: ...lt Settings Select between 5 and 90 percent The default is set at 75 percent Use the Disk Cleanup Utility Adjust the System Restore settings Delete recorded TV programs from your Recorded TV folder in the Shared Documents folder on your hard disk drive Archive TV programs to a DVD RW or DVD R if your PC has a dvd writer drive You can play archived programs recorded on DVDs only from the PC that yo...

Страница 126: ...ystem Restore settings 1 Click Start on the taskbar 2 Right click My Computer 3 Click Properties 4 Select the System Restore tab 5 Select HP Pavilion C and then click the Settings button 6 Move the Disk space to use slider to a lower setting to save disk space 7 Click OK Delete Recorded TV programs 1 Click Start on the taskbar and then click My Computer 2 Double click Shared Documents and then dou...

Страница 127: ...d TV Storage Space Settings Your recording settings affect how much hard disk space is available for future recordings 80 GB Hard Disk 120 GB Hard Disk n The storage amounts on your PC may vary from the amounts displayed here ...

Страница 128: ...PC comes with preloaded software programs and a partition within the hard disk drive that takes up a certain amount of space on the hard disk drive The partition Houses a backup version of the operating system and the programs included with the PC Takes up about 5 GB of hard disk space reducing the total amount of space available for your use Replaces the need for system and application recovery C...

Страница 129: ...h drive on your PC You may need to scroll the window to the right to see the capacity and the free space sizes To uninstall programs 1 Click Start 2 Click Control Panel 3 Double click Add or Remove Programs if it is present 4 Click the program and then click the Change Remove button 5 Click OK when the confirmation window opens 6 Repeat steps 4 and 5 for each program you want to remove 7 Click Clo...

Страница 130: ...124 hp media center pc user s guide ...

Страница 131: ...re Download album information such as artist name song title length of song album name label year and cover art Play a music playlist with a slide show Copy music tracks from a CD to your Windows Media Library Displays visualizations when playing music CDs Buy music online from the Now Playing page in My Music Your Internet browser opens the Windows Media Web site where you can listen to and buy m...

Страница 132: ... Create a music library by copying tracks from CDs or adding music files from the Internet Organize digital music files by album artist playlist or genre Edit information about music files such as the song title music type or artist name Share music files with others Listen to a radio station on the Internet Play DVD and VCD movies Delete files from your music library n Media Center can find and p...

Страница 133: ...c file formats use Windows Media Player Help and Media Center Help Only supported audio file types are displayed in the My Music window Unsupported files won t play File extension File type cda CD audio wav Windows audio file MP3 M3u Audio files asf asx wax wm wma wmd wmv wvx wmp wmx Windows Media audio files Remote Control button Action Play selected song Go to the next song in an album or playli...

Страница 134: ...tabs on the left c Select the tracks you want to copy by placing a check in the box next to the track d Select Copy Music in the menu bar You can select to copy your music files as MP3 files or as Windows Media Audio files wma 5 Click the Media Library tab to see where your new audio files have been placed You can rename files by right clicking the file selecting Edit and then typing a new name or...

Страница 135: ...ect Add on the menu bar and then select By Searching Computer Click the arrow on the search or drop down list to search a specific drive 4 Click Search Windows Media Player searches the selected drives for all supported audio files and adds them to the Media Library If Windows Media Player does not recognize all of your audio files try copying the files directly into Windows Media Player Refer to ...

Страница 136: ...ic main window 4 Select Copy CD The first time you copy a music CD you must select your copy protection option and then follow any onscreen instructions 5 Select Yes to begin copying tracks to your music library This process may take several minutes depending on the length of your music tracks 6 Click OK n Each time you add music files outside of Windows Media Player you must use the Tools menu to...

Страница 137: ...a Player Library To play a music CD using Media Center If you insert a CD when Media Center is not open a message appears asking what you want to do You can select Windows Media Player as your default audio player If you have another program set as the default audio player Windows opens this program and begins playing the CD 1 Press the Start button on the remote control 2 Insert a CD into the CD ...

Страница 138: ...r options depending on the category you select Or Select Search Use the numeric keypad buttons on the remote control to enter a descriptive word song title or artist name and display a list of all the titles that match your entry 2 Use the arrow keys to select a music file and then press the Play button on the remote control to begin playing that music file n To display CD information such as song...

Страница 139: ...the remote control to play it Setting Up an Automatic Disc Jockey You can select to have Media Center randomly play all the available songs in one genre 1 In the My Music window select Genres The list displays all the genres available in your Media Library 2 Use the arrow buttons to select a genre and then press OK on the remote control 3 Use the arrow buttons to select Shuffle and then press OK o...

Страница 140: ...OK on the remote control After play begins you can also select View Song to view cover art and play one track View Tracks to view a list of all tracks on the album Shuffle to rearrange the play order Repeat to play the album again Buy Music to connect to the Internet find CD information and buy music CDs To go back to Media Center press Start on the remote control Visualize to view a picture while...

Страница 141: ...r 2 Select Media Library 3 Click Playlists in the menu bar and then click New Playlist 4 Type in a name for your playlist and then click OK Your new playlist should appear under the My Playlists area of the Media Player window 5 In the Media Library right click the music file that you want to add to your playlist and then click Add to Playlist 6 Select your playlist from the Add to Playlist window...

Страница 142: ...to display when you play a song 1 Press the Start button on the remote control select My Music 2 Select Settings 3 Select Select Visualizations 4 Select the visualizations you want by placing a check mark next to each one 5 Select Save 6 Select a song visualization option and then select Save ...

Страница 143: ...our photos Browse your pictures straight from the device on which they are stored Media Center recognizes removable media such as a CD a DVD or a memory card Display your photo details such as the file name the folder it is located in on hard drive the date your picture was modified and the resolution Rotate correct color and enable captions for your photos Sort pictures by date or name and print ...

Страница 144: ...nsupported image file types display a generic image icon but cannot be displayed in Media Center Some file types are supported only if appropriate filters and software are installed n If the message Image cannot be displayed appears the file may be corrupted or it may be an unsupported file type You may need to edit your image with a photo editor and save it in a supported file format File extensi...

Страница 145: ...m the My Pictures window select a picture 2 Press OK on the remote once to magnify 150 3 Press OK again to magnify 225 4 Once you have zoomed in you can use the arrow buttons on the remote control to pan around the image 5 Press OK again to return the picture to the original size Remote Control button Action Play button plays slide show with selected pictures Arrow buttons display the next or prev...

Страница 146: ...e your pictures in My Pictures folder on your computer 1 Click Start on the taskbar and then click My Pictures to open the My Pictures folder 2 When the HP Image Zone window appears click Go to My Pictures folder at the top of the window 3 Select the File menu select New and then click Folder Type a name for your personal picture folder n Each user has a separate My Pictures folder that can be ope...

Страница 147: ...small picture image thumbnail and if you ve organized your pictures into folders folder icons Your pictures are displayed just as you organized them in the My Pictures folder in Windows Explorer 3 Use the arrow buttons on the remote control to move through your picture files and folder files and select a picture 4 Press OK to select a picture or folder to view The selected picture opens in full sc...

Страница 148: ...ed in folders you created Media Center plays all files stored in the My Pictures folder To view a slide show with music 1 Select My Music on the Media Center Start menu 2 Select the music you want and then press OK on the remote control If the music doesn t start automatically press the Play button on the remote control 3 To go back to the Media Center Start menu press Start on the remote control ...

Страница 149: ...tings 4 Select the Show caption check box and then press OK 5 Select Save and then press OK Rotating pictures If your picture appears horizontally or vertically and you want to change the orientation you can change it in Media Center 1 Press the Start button on the remote control 2 Select My Pictures 3 Select the picture you want to rotate 4 Press the More Info button on the remote control 5 Selec...

Страница 150: ...st and then press OK 7 After you select the options you want to fix select Save Your picture is displayed with the new settings Printing Your Pictures 1 Press the Start button on the remote control 2 Select My Pictures 3 Select the picture you want to print 4 Press the More Info button on the remote control Select Print and then Print again Or Press the Print button on the remote control You may n...

Страница 151: ...the taskbar and then click My Pictures Select Go to My Pictures folder when the HP Image Zone Window appears Or Locate the files you want to copy Click Start My Computer and then select the drive or removable device where your pictures are located 2 Select the files you want to copy by pressing the Ctrl key and then selecting each picture 3 Select Copy to CD from Windows Explorer in the area Pictu...

Страница 152: ...ote control 2 Select My Pictures 3 Select the picture you want to view 4 To zoom in 150 press the OK button on the remote control To zoom in 225 press OK again 5 To pan across the picture while the picture is magnified press the arrow keys 6 To return the picture to the original size press OK button again ...

Страница 153: ...lick the HP Image Zone icon on your desktop Or Click Start on the taskbar and then click My Pictures The HP Image Zone window opens 2 To choose a different work area as described in the table click a tab or button at the top of the Gallery window A Mode tabs Go to My Pictures button B Control area with Help link C Work area or Gallery showing images on the PC D Selection tray n For more informatio...

Страница 154: ...g the software to add default audio and text For more information see make a multimedia cd in Help HP Instant Share tab A tool for sharing the images with family and friends After you select images on the My Images tab you can post the images to the HP Instant Share Web site and send a link to the images on the Web site by e mail You can also create online albums if you want to organize your image...

Страница 155: ...elect Settings You may need to select the scroll arrows on the Start menu to view Settings 3 Select Pictures 4 Select an option Press the OK button on the remote control to select a specific setting 5 When you have selected all of your picture settings select Save n Use the scroll arrows at the bottom of the picture settings window to view all of the options ...

Страница 156: ...150 hp media center pc user s guide ...

Страница 157: ...nset window in Media Center Browse your videos straight from the device on which they are stored Media Center recognizes removable media from a CD or DVD drive or from a digital video camera Display your video details such as name and date your video file was modified Sort videos by date or name View small image thumbnail and title of video file Scroll through your digital videos and folders by cl...

Страница 158: ... the next select a menu option Play back your videos Use the media play back buttons and the arrow buttons to control the play back of your videos Remote Control button Action Plays video Moves video forward press up to two times to advance faster Moves video forward 30 seconds Moves video backward press twice to rewind faster Moves video back 7 seconds Pauses video resumes paused video Stops vide...

Страница 159: ...ce you have placed all your videos into the My Videos or Shared Video folder you can rename add delete and organize them into folders To organize and store your videos click Start on the taskbar click My Documents and then double click the My Videos folder If you want to share your videos with others place them in the Shared Video folder To do this click Start on the taskbar click My Documents cli...

Страница 160: ...ur video or video folder You may need to use the scroll arrows at the bottom of the window to display all videos 5 Press the OK button on the remote control The selected video plays in full screen mode or the folder opens displaying a list of video files Use the mouse to resize the window if you want to watch your video while doing something else on your desktop 6 When the video is finished select...

Страница 161: ...een Mode 1 On the Media Center Start menu select My Videos 2 On the My Videos menu select My Videos or Shared Video or Other media 3 Select the folder you want and then press OK Select the video file and press OK again Your video plays in full screen mode 4 To exit full screen mode and return to the previous window press Back on the remote control n If your video is playing in full screen mode and...

Страница 162: ...es and folders 3 Select Sort by date or Sort by name Viewing Video Details To display information about the video in Media Center select a video file from the My Videos or Shared Video window and then press the More Info button on the remote control The information includes Video title Video description if available Date the video file was created Date the video file was modified Size of the video...

Страница 163: ...If a Digital Video Device Auto Play window appears click Cancel 5 Click Start on the taskbar and then click Control Panel 6 Click Performance and Maintenance if available and then double click the System icon 7 Click the Hardware tab and then click the Device Manager button 8 Click the plus sign next to imaging devices If the name of the video recorder appears under Imaging devices the device is r...

Страница 164: ...deo camera controls The video is recorded to the hard disk drive 6 To end the recording click Stop 7 When the Save Windows Media window appears type a file name and then click Save to save the video file to My Videos folder The saved video is now ready to be used by other video players or can be recorded to a CD or DVD Refer to Windows Movie Maker Help for more information about capturing editing ...

Страница 165: ...ct the DVD menu items and control the DVD movie playback 4 To stop playing the DVD press Stop on the remote control 5 To change the window size move the mouse and click the Resize button on the taskbar of the DVD window About Playing DVDs When you open Media Center and then insert a DVD into your drive there is a delay of a few seconds before the movie begins playing Even though Media Center suppo...

Страница 166: ... actions and begins playing movie Fast forwards the movie press it again to move forward faster Rewinds the movie press it again to rewind faster Skips to next DVD chapter and begins playing Returns to the previous DVD chapter and begins playing Pauses movie resumes paused movie Stops playing movie and returns to the Stopped menu Moves around in the menu windows Enters selected menu item Mute Turn...

Страница 167: ...select Eject Watching DVD in the inset window or in a resized window While the DVD movie is playing press the Start button on the remote control This opens the Media Center Start menu with the DVD playing in the inset window While the DVD movie is playing move the mouse for the Resize icon to appear Select the Resize icon and then you can manually adjust the window size Playing a DVD movie already...

Страница 168: ...uages available press the OK button on the remote control 5 When you find the one you want use the arrow buttons to select Save in the window and then press OK on the remote control 6 To return to the main Settings window press the Back button Changing DVD Audio To select DVD audio settings for viewing the DVD 1 In the Media Center Start menu select Settings 2 In the Settings window select DVD 3 I...

Страница 169: ...y to play FM radio stations by using your remote control In Radio you can Listen to FM radio stations Listen to Internet radio Set up presets of your favorite radio stations Delete or organize your radio station presets Use the time shifting feature pause rewind and fast forward up to 30 minutes of radio programs n Make sure you connect the FM radio antenna to the back of the PC before selecting a...

Страница 170: ...ter automatically stops radio and begins recording TV Playing FM Radio Stations 1 Connect the FM radio antenna to the back of the PC to the connector labeled FM IN 2 Press the Start button on the remote control 3 Select Radio 4 Enter a radio station number by using the numeric keypad on the remote control or your keyboard Or Select the Seek or buttons for Media Center to find the next playable sta...

Страница 171: ... icon X to delete a preset station Or Select Auto Sort to sort your preset stations in numerical ascending or descending order 5 Select Save to save your changes 6 Select Back to return to the previous window Listening to Internet Radio 1 Connect the FM radio antenna to the connector labeled FM IN on the back of the PC 2 Press the Start button on the remote control 3 Select Radio 4 Select Internet...

Страница 172: ...on Remote Control button Action Moves around in the menu windows Enters selected menu item Mute Turns off sound Pauses radio program up to 30 minutes Skips radio program ahead 7 seconds and then resumes playing Moves radio program back 7 seconds and then resumes playing Adjusts volume ...

Страница 173: ...or movie ratings Set up an Internet connection or your remote control to work with Media Center TV Set up TV signal audio closed captioning Get television program guide or edit guide View TV recording errors set hard disk drive storage space set recording defaults Music Select visualizations to display when playing a song Show song information during visualizations Radio Organize or delete preset ...

Страница 174: ...when telephone calls some in Autoplay Enables autoplay options such as Enhanced Media Center content or HighMAT player if installed Parental control Sets up rating permissions for TV viewing This setting requires the administrator to use a separate 4 digit code This option may not be available with your model Set up Internet connection Opens the Internet Connection wizard This allows you to set up...

Страница 175: ...ange the general recording default settings that affect how and when your programs are recorded 5 Select Set up TV signal to go through the TV Signal configuration wizard This is how you can configure your TV signal to work with Media Center 6 Select Audio to select settings for sound captioning and to select a preferred language 7 Select Guide and then select Edit channels to add or remove channe...

Страница 176: ...Music on page 125 For more information about radio settings refer to Organizing Your Preset Radio Stations on page 165 For more information about DVD settings refer to Playing DVDs in Media Center on page 159 For more information about picture settings refer to Changing Picture Settings for Slide Shows on page 149 ...

Страница 177: ...preset recording quality setting A two hour program recorded at Best quality produces a large file that does not fit on one DVD The following table lists the recording quality and the estimated number of minutes that fit onto one DVD The ArcSoft ShowBiz program shows you the available DVD space ShowBiz displays a message you when you ve selected too many programs or the required space is too large...

Страница 178: ... Click Start choose All Programs Video if present ArcSoft ShowBiz and then click ShowBiz 3 Select the Media tab and then select Recorded TV Shows from the drop down list 4 Select your recorded TV program and drag it to the Storyboard section of the window A message appears telling you that your recorded TV program is in DVR MS format and ShowBiz converts it to MPEG 2 format Click Yes to continue t...

Страница 179: ...pace required changes at the bottom of the window to let you know if your files can fit on a the disc 11 To delete a file just right click it and then select Delete 12 Click the Write Disc tab and then click the Start button to record your programs to DVD or CD 13 When the Save As window appears type in a project name and then click Save ShowBiz records the ShowBiz project file to your hard disk d...

Страница 180: ...iles and Folders button 5 Select your recorded TV programs from the Recorded TV folder Go to My Computer Shared Documents Recorded TV and then select your file Click Add 6 Repeat step 5 until all of your recorded TV programs are selected 7 Click the Burn icon RecordNow records your files to disc 8 Click Done when the recording is complete w The files displayed in the drive window are not recorded ...

Страница 181: ...iles to blank or appendable CD R CD RW DVD R or DVD RW discs in different ways Open a recording program or use the CD Writing Wizard For more information about recording to DVDs and CDS refer to the Creating DVDs and CDs document that came with your Media Center PC Recording with RecordNow Use RecordNow to record data and music files to CDs and DVDs You can put data files on a DVD to store them or...

Страница 182: ... using the CD Writing Wizard 1 Copy your files to a writable CD drive in My Computer by doing one of the following Dragging a file from a Windows Explorer window to the writable CD drive icon Or Selecting Save As from within certain programs and then saving the file to the drive Or Right clicking a file selecting Send To and then selecting the drive 2 When you are ready to record your files to a C...

Страница 183: ...rding during this capture procedure a Click My TV Recorded TV and then click Scheduled b Select any program scheduled for the same time as you are capturing your video and then click Don t Record 3 Close Media Center You can now safely use the analog capture feature in ArcSoft ShowBiz Turn off the PC before connecting your video device E to the front of the PC 4 Click Start click Turn Off Computer...

Страница 184: ...14 Click the Audio Input button and click a selection based on the cable connection you made in step 6 Tuner In for the rear coaxial cable connector Line In_2 for the front audio in connectors 15 Press the play button or otherwise start your VCR or camcorder 16 In the ShowBiz capture window click the red dot record button and type the file name for the video To capture the video from the beginning...

Страница 185: ...sis to turn on the PC 6 Open Media Center and reschedule recording for any TV programs you canceled during this capture procedure 7 From the Media Center start menu click My TV and then click Guide Find the program you canceled and then select it Or If the program is a part of a recorded series click Recorded TV from the Media Center start menu and then click Recording errors Find the program you ...

Страница 186: ...180 hp media center pc user s guide ...

Страница 187: ...s and regulatory compliance required for using and modifying electronic equipment HP recommends that you use an antistatic wrist strap and a conductive foam pad when working on the computer n Read the Safety information at the beginning of this document before performing any of the procedures in this section op en A w Always disconnect the modem cord from the telephone system and then disconnect t...

Страница 188: ... ll stay on the side panel loosely until you tighten them again 2 Pull the panel toward you until it stops Lift the panel off the chassis and set it aside 3 If you are replacing an optical drive remove the other side panel in the same manner Note that the screws on this panel detach and are loose from the panel 4 Gently lay the computer on its side Skip this step if replacing an optical drive ...

Страница 189: ...e panel 2 Repeat for the other side panel if it was removed 3 Reconnect in this order the power cord the modem telephone cable and then all other cables Locating Components in the PC Chassis A Power supply B Fan duct C Expansion Add In cards slots D 1st optical drive bay E 2nd optical drive bay F Hard disk drive G 7 In 1 memory card reader Some PCs come with a 6 in 1 card reader H Diskette floppy ...

Страница 190: ...ct push down the two tabs A You can push with your fingers or a pen 2 Rotate the fan duct B down and out to remove it from the chassis Replacing the Fan Duct 1 To replace the fan duct hold the fan duct at a 45 degree angle and align the bottom of the duct with the slot on the fan holder A B 2 Rotate the fan duct B into position Make sure it is securely locked ...

Страница 191: ...te the three small tabs A attached to the front panel on the side of the chassis Press each tab away from the center of the chassis Press the top the middle and the bottom tab and then gently remove the front panel Replacing the Front Panel 1 To replace the front panel align the bottom of the front panel with the ridge on the bottom of the chassis 2 Guide the three small tabs A on both sides of th...

Страница 192: ...ess the optical drives remove the side panels the front panel and the fan duct 1 Remove both side panels See Removing the Side Panels on page 182 2 Remove the front panel See Removing the Front Panel on page 185 3 Remove the fan duct See Removing the Fan Duct on page 184 C ...

Страница 193: ...removing the top optical drive remove the two screws on both optical drives and then push both drives part way out through the front of the computer 1 Locate the two screws D on the optical drive and remove them Push the drive partway out through the front of the computer 2 Remove the cables attached to the back of the drive you want to replace Make note of each connection and the plug orientation...

Страница 194: ...ve with Cable Select jumper installed Your drive may vary 2 Connect the cables to the back of the drive 3 Push the drive all the way in align the screw holes and insert the screws 4 Replace the fan duct See Replacing the Front Panel on page 185 5 Replace the front panel See Replacing the Front Panel on page 185 6 Replace the side panels See Replacing the Side Panels on page 183 n A jumper is a sma...

Страница 195: ...of the drives that are in the removable drive cage Make note of each connection and the plug orientation before disconnecting the cables 3 If you do not have a 7 In 1 memory card reader skip to step 5 If you have a 7 In 1 memory card reader continue with step 4 4 Remove the two screws F that secure the 7 In 1 memory card reader in the drive cage From the front of the chassis push the reader into t...

Страница 196: ...osition The release tab should latch If you can remove the cage by pulling up on it the track did not properly engage the track guide Repeat the steps to replace the drive cage 4 Push the 7 In 1 memory card reader toward the front of the chassis until the two screw holes align with the drive cage You may have to push down the front of the reader as you slide it out into the front panel Replace the...

Страница 197: ... position See figure in Installing a New Optical Drive on page 188 Removing and replacing the diskette drive or the 7 In 1 memory card reader Some PCs come with a 6 in 1 card reader To ensure that the drive fits properly into the chassis be sure to purchase the replacement drive from HP 1 Remove the drive cage See Removing the drive cage on page 189 2 Remove the two screws that secure the diskette...

Страница 198: ...ration below is an example of a drive with Cable Select jumper installed Your drive may vary 3 Install the two screws 4 Replace the drive cage See Replacing the drive cage on page 190 5 Attach the power cable to the back of the drive 6 Attach the connector marked Master on the IDE ribbon cable to the back of the preinstalled hard drive After the preinstalled hard drive connection is attached twist...

Страница 199: ...n which model you have DIMMs DIMMs must be 168 pin unbuffered SDRAM synchronous dynamic random access memory compliant with the Intel PC SDRAM Unbuffered DIMM Specification The PC comes with one or more memory modules but you can replace existing memory modules with higher capacity ones You can install 64 MB 128 MB 256 MB or 512 MB memory modules in the PC DDR DIMMs DDR DIMMs must be 184 pin unbuf...

Страница 200: ...on the ends of the memory socket 2 Holding the new memory module by its top edge or side edges only remove it from the antistatic packaging 3 Position the memory module in alignment with the socket the one or two small notches on the lower edge of the module fit into the raised bumps in the socket Push straight down on top of the memory module until it is fully seated in the socket The socket reta...

Страница 201: ... into the slot and push straight down Make sure the card is properly seated 2 Attach the screw to secure the card you have replaced 3 Connect any internal cables to the card n Be careful of the sharp edges on the expansion slot cover n Do not overload the PC by installing add in cards that draw excessive current The chassis is designed to provide 2 amps average of 5 V power for each board or card ...

Страница 202: ...ocking station 1 Lift and remove the lid from the top of PC Slightly bend the cover inward to remove it 2 Remove the docking station cover by pressing the two tabs in the back of the cover and lifting up op en n The camera docking station and the digital camera are both sold separately tv gui de op en Sma rtM edi a Co mp ac tF la sh I II mus ic pi ct ur es MM C SD Me mo ry St ic k vi de os tv gui ...

Страница 203: ... of the PC Plug the red and yellow connectors B into a TV if you want to view the camera images on a TV optional Plug the power cord C into a power outlet Refer to the instructions that came with the HP camera docking station 5 Connect the sleeve that came with your HP digital camera to the camera docking station Refer to the instructions that came with the camera docking station tv guide op en Sm...

Страница 204: ...mera into the camera docking station Follow the instructions that came with your camera docking station tv gui de op en Sm artM edi a Com pac tFla sh I II mu sic pic tur es MM C S D Me mo ry Sti ck vid eo s n The dock insert clips onto the camera dock base This insert comes with the digital camera tv gui de op en Sm artM edi a Com pac tFla sh I II mu sic pic tur es MM C S D Me mo ry Sti ck vid eo ...

Страница 205: ...XP feature creates a restore point where it records the PC settings at that time and date You can later return the PC to the settings recorded at the restore point You can create a specific restore point or have the operating system create a restore point For example when you use Add Programs to add a software program the operating system automatically creates a restore point before it adds the so...

Страница 206: ...or Support telephone numbers addresses and Web site information Problem Status Microsoft System Restore Application Recovery Program System Recovery from the hard disk partition System Recovery from the recovery CDs DVDs You installed a new application or device driver 1 An application does not work 1 2 3 A device driver does not work 1 2 PC stops responding or does not work 1 2 3 You replaced the...

Страница 207: ...ou can copy the information of this recovery partition onto CDs or DVDs 4 Then if you would like to make extra space available on your hard drive you can delete the recovery partition using a special software tool 5 Do not delete your hard drive partition unless you have made recovery CDs or DVDs The recovery discs can be used only with the specified PC model The discs are licensed for use only wi...

Страница 208: ...ate than a set of CDs A DVD has more capacity than a CD so there are fewer discs to record and store To use this program your PC must have a CD RW drive DVD Writer drive or other drive that can write to the CDs or DVDs If necessary purchase a Windows XP compatible drive from your local PC or electronics store The number of CDs or DVDs in the recovery set depends on your PC model The program tells ...

Страница 209: ...s CD 5 Follow the onscreen instructions 6 Store the Recovery Tools CD in a safe place System Restore If software on your hard disk drive accidentally gets erased or damaged first use the Microsoft System Restore feature in Windows XP to restore the PC system and program settings System Restore returns the PC settings to a selected restore point without affecting user programs or document files For...

Страница 210: ...er Installation and then click Next 8 Select the driver or application program to install and then click Install 9 Follow the onscreen instructions 10 Repeat steps 8 through 10 to install other drivers or applications 11 When you have finished recovering applications or drivers close the Application Recovery program Then click Start click Turn Off Computer and click Restart to restart the PC w Do ...

Страница 211: ... Tools CD This CD contains utilities that allow you to make changes to your hard disk drive See Using HP Recovery Tools CD on page 203 To start System Recovery if the PC is responding 1 Turn off the PC Disconnect all peripheral devices from the PC except the monitor the keyboard and the mouse Turn on the PC 2 Click Start on the taskbar choose All Programs choose PC Help Tools and click HP PC Syste...

Страница 212: ...them recovery discs are not included with your PC See Creating Recovery CDs DVDs on page 201 Starting System Recovery using recovery discs The recovery discs provide two recovery options Standard Recovery This option recovers factory shipped programs drivers and the operating system without affecting any data files that you may have created since purchasing this PC Some data files may be difficult...

Страница 213: ... For standard recovery press R Click Next to proceed with the System Recovery Click Yes to start the recovery Insert the remaining recovery discs when directed Or For full System Recovery press F Click Yes to perform a full System Recovery Confirm that you want to create a recovery partition Insert the remaining discs when directed Or If your PC hard disk drive is blank or corrupted press R to per...

Страница 214: ...ved or installed on the PC Because of this you also lose a special code that Microsoft includes in the files of recorded TV programs Without the code Media Center cannot play TV programs previously recorded to disk or copied to DVD or to other media For more information about protecting your recorded TV programs refer to Safeguarding Your Recorded TV Programs on page 115 ...

Страница 215: ...turn on at all When you press the On button on the front of the computer the following events should happen a The keyboard indicator lights flash b The light next to the diskette drive flashes c The hard disk spins or the diskette drive makes a noise d The computer makes one beep indicating it is operating properly If the computer doesn t go through the previous procedure check the following a The...

Страница 216: ...oftware driver or the operating system software may be corrupted erased or damaged You can use application recovery or system recovery to reinstall the software Refer to Using Application Recovery and System Recovery on page 199 It s possible that a voltage spike power outage or brownout has occurred Symptoms of voltage spikes include a flickering video display unexpected computer startups and the...

Страница 217: ...ide bars to increase volume If your speakers have a power button check whether it is turned on and whether the power supply is connected to the power source Check the speaker connections Remove the headphone connection Surround sound isn t working Configure the Audigy software for your surround sound speakers a Close all software programs b Click Start on the taskbar c Choose All Programs Creative...

Страница 218: ...e k Click OK when you are finished configuring the keyboard My keyboard doesn t work even though the computer and monitor seem to work If the PC beeps repeatedly or if nothing happens when you press keys it s possible that the keyboard is connected improperly USB keyboards only Make sure the keyboard is firmly connected to the USB port on the back or front of the computer Try unplugging and replug...

Страница 219: ...ging and replugging the mouse cable PS 2 mouse only Check that the cable connector pins are straight Make sure the mouse is connected to the mouse port not to the keyboard port To reconnect these two cables turn the computer off reconnect the cables and then turn the computer back on If the pointer doesn t move on the screen when you move the mouse clean the mouse For an optical mouse wipe the lig...

Страница 220: ...remote control within a 45 degree angle range and less than 26 feet 8 meters away If a pressed key repeats itself or sticks unplug the remote sensor from the USB connector wait one minute and plug the remote sensor back in Try altering the lighting conditions in the room or moving the location of the remote sensor if this continues Press the Enter button on the remote control after changing a chan...

Страница 221: ...al Bus controllers Windows is properly detecting the IR receiver If it is not listed go to the next step 5 Unplug the end of the USB cable on the remote sensor from the PC and plug it into the same USB port 6 Plug the end of the USB cable on the remote sensor into the front USB port on the PC 7 Disconnect all other USB devices leave the remote sensor plugged in and then restart the PC Plug in othe...

Страница 222: ... on the card Make sure the read write switch is set to Write Enabled before attempting to write data to it Make sure the amount of data you are storing has not exceeded the storage limit of the card Make sure the memory card is one of the supported types Compact Flash 1 2 and Microdrive Memory Stick Memory Stick Pro MultiMedia Secure Digital or SmartMedia Make sure the memory card is fully inserte...

Страница 223: ...ck the Hardware tab and then click the Device Manager button 3 Click the plus sign next to Sound video and game controllers 4 Double click the TV tuner device Hauppauge WINTVPVR PCI II Device Or Conenant 2338x Video Capture Device 5 Click the Driver tab and then click the Update Driver button 6 Select Install from a list or a specific location and then click Next 7 Remove the check mark from Searc...

Страница 224: ...ve configured Windows Media Player to automatically download codecs and the correct codec is available then your file should play You must be connected to the Internet to download the codec file My music files don t appear in the Media Library Make sure you use Windows Media Player to add your music files to the Media Library Check that the Windows Media Player setting for Access rights of other a...

Страница 225: ...layback 50 On 37 remote control 82 shortcut buttons 79 C Cable Select jumper defined 188 camera dock 65 camera docking station installing 196 caption display setting 114 CD can t remove from drive 215 handling 57 inserting 57 recording onto 60 cd writer plus drive installing 188 using 58 CD Writing Wizard recording to CD 175 changing lineup of TV shows 169 Media Center settings 167 recording quali...

Страница 226: ...skette 60 189 dvd writer 59 187 188 dvd cd writer plus combo 59 187 DVD ROM 58 187 188 hard disk drive 189 locating 183 optical drives 186 DVD can t remove from drive 215 handling 57 inserting 57 won t play 218 DVD movies changing language 162 size of window 161 sound settings 162 speaker settings 162 DVD movies playing in Media Center 159 in small window 161 with remote control 160 DVD movies sto...

Страница 227: ...buttons 49 Internet connection modem 15 network port 16 setting up 74 97 Internet radio 163 Internet Service Provider selecting 37 K keyboard Internet buttons 49 keys 47 not working 212 shortcut buttons 79 using 47 wireless 54 wireless receiver 54 keyboard buttons access 48 not working 212 special 48 M Media Center configuring TV signal 169 desktop 38 Help 45 navigating 70 opening program 69 throu...

Страница 228: ... copying pictures to CD 145 displaying information about a picture 139 editing pictures 144 organizing pictures 140 panning across 145 printing pictures 144 rotating pictures 143 Shared Pictures folder 140 sorting pictures 142 turning captions on or off 143 types of files it can display 138 using remote control 139 viewing pictures 141 viewing pictures as a slide show 142 viewing slide show with m...

Страница 229: ...necting 15 not working 209 Program Guide see Television Program Guide R radio connecting antenna to PC 163 getting reception 163 Radio window 163 organizing preset radio stations 165 playing FM stations 163 playing radio in Media Center 163 recording radio programs 165 using remote control 166 rebooting See restarting the PC recorded TV 108 deleting shows 120 storage space 121 recording CDs 171 DV...

Страница 230: ... Internet Service Provider 37 setting up Internet connection 74 Television Program Guide 75 television signal 75 settings background color 168 calibration settings 168 for phone call notification 168 for sound 168 general 168 Internet connections 168 parental controls 168 remote control and remote sensor 168 215 TV signal 169 settings for Media Center 167 settings power management 44 setup poster ...

Страница 231: ...turn on 209 radio reception 164 resolving recording conflicts 106 111 unable to get correct TV program guide 72 unexpected startups 209 210 turning off computer 41 turning on computer 37 turning picture captions on or off 142 TV cables 19 changing settings 169 connecting 20 connecting the signal source 18 recording settings 119 searching for shows by category 100 setting up 26 setting up TV signal...

Страница 232: ...n stored on removable media 155 sorting 156 working with home videos 157 video connecting analog VCR or camcorder 177 visualization selecting 136 Visualize option 134 volume adjusting 34 W warnings add in cards overloading PC 195 installing memory module 194 removing memory module 194 using wrong memory type 193 voltage select switch 209 Windows Media Player setting as default player 127 types of ...

Отзывы: