HP L1745 Скачать руководство пользователя страница 44

Product Environmental Notices 

Materials Disposal 

This HP product contains mercury in the fluorescent lamp in the display LCD that might require special 

handling at end-of-life. 

Disposal of this material can be regulated because of environmental considerations. For disposal or 

recycling information, contact the local authorities or the Electronic Industries Alliance (EIA) 

http://www.eiae.org

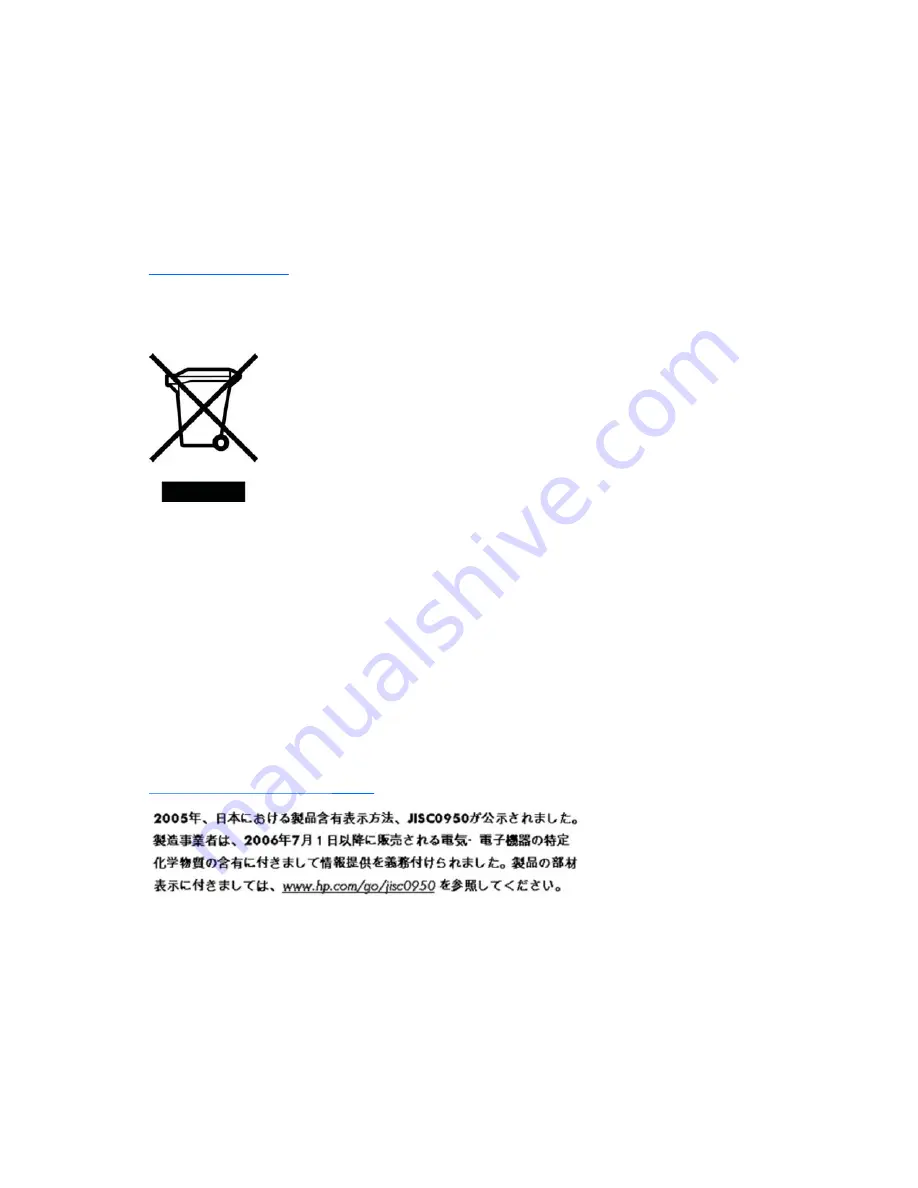
Disposal of Waste Equipment by Users in Private Household in the

European Union 

This symbol on the product or on its packaging indicates that this product must not be disposed of with 

your household waste. Instead, it is your responsibility to dispose of your waste equipment by handing it 

over to a designated collection point for the recycling or waste electrical and electronic equipment. The 

separate collection and recycling of the waste equipment at the time of disposal will help to conserve 

natural resources and ensure that it is recycled in a manner that protects human health and the 

environment. For more information about where you can drop off your waste equipment for recycling, 

please contact the local city office, the household waste disposal service or the shop where you purchased 

the product. 

Restriction of Hazardous Substances (RoHS) 

A Japanese regulatory requirement, defined by specification JIS C 0950, 2005, mandates that 

manufacturers provide Material Content Declarations for certain categories of electronic products offered 

for sale after July 1, 2006. To view the JIS C 0950 material declaration for this product, visit 

http://www.hp.com/go/jisc0950

38  Appendix 

C

   Agency Regulatory Notices 

ENWW 

Содержание L1745

Страница 1: ...HP L1745 17 LCD Monitor User Guide Enhanced for Accessibility ...

Страница 2: ...information in this document is provided as is without warranty of any kind including but not limited to the implied warranties of merchantability and fitness for a particular purpose and is subject to change without notice The warranties for Hewlett Packard products are set forth in the express limited warranty statements accompanying such products Nothing herein should be construed as constituti...

Страница 3: ...ecifications WARNING Text set off in this manner indicates that failure to follow directions could result in bodily harm or loss of life CAUTION Text set off in this manner indicates that failure to follow directions could result in damage to equipment or loss of information NOTE Text set off in this manner provides important supplemental information ENWW iii ...

Страница 4: ...About This Guide ENWW iv ...

Страница 5: ...emoving the Monitor Pedestal Base 11 Mounting the Monitor 12 Locating the Rating Labels 15 4 Operating the Monitor Software and Utilities 16 The Information File 16 The Image Color Matching File 16 Installing the INF and ICM Files 17 Installing from the CD 17 Downloading from the Worldwide Web 17 Using the Auto Adjustment Function 17 Front Panel Controls 19 Adjusting the Monitor Settings 20 Using ...

Страница 6: ... Modes 33 Energy Saver Feature 34 Appendix C Agency Regulatory Notices Federal Communications Commission Notice 35 Modifications 35 Cables 35 Declaration of Conformity for Products Marked with the FCC Logo United States Only 35 Canadian Notice 36 Avis Canadien 36 European Union Regulatory Notice 36 German Ergonomics Notice 37 Japanese Notice 37 Korean Notice 37 Power Cord Set Requirements 37 Japan...

Страница 7: ...og inputs Power cable VGA signal cable DVI D signal cable and USB cable included USB 2 0 hub with one upstream connects to the computer or to a USB hub and two downstream connects to USB devices ports Accepts an optional mounted HP speaker bar Plug and play capability if supported by the system On Screen Display OSD adjustments in English Dutch French German Italian Simplified Chinese and Spanish ...

Страница 8: ...abits for computer users and provides important electrical and mechanical safety information This guide is located on the Web at http www hp com ergo and or on the documentation CD if one is included with the monitor CAUTION For the protection of the monitor as well as the computer connect all power cords for the computer and its peripheral devices such as a monitor printer scanner to some form of...

Страница 9: ... are provided for ventilation These openings must not be blocked or covered Never push objects of any kind into cabinet slots or other openings Do not drop the monitor or place it on an unstable surface Do not allow anything to rest on the power cord Do not walk on the cord Keep the monitor in a well ventilated area away from excessive light heat or moisture Cleaning the Monitor 1 Turn off the mon...

Страница 10: ...tor on page 12 in this chapter Place the base on a desktop or table and push the neck on the base down to its lowest position Slide the monitor all the way onto the base so that the Quick Release mechanism emits an audible click and is locked in place CAUTION Do not touch the surface of the LCD panel Pressure on the panel may cause non uniformity of color or disorientation of the liquid crystals I...

Страница 11: ...ctors and Cables The monitor features one DVI D connector and one VGA connector capable of supporting either digital or analog input The video mode is determined by the connector and video cable used For digital operation use the DVI D signal cable provided For analog operation use the VGA signal cable provided The monitor will automatically determine which inputs have valid video signals The inpu...

Страница 12: ...gnal cable For analog operation connect one end of the VGA signal cable to a VGA connector on the monitor and the other end to the VGA connector on the computer Figure 3 3 Connecting the VGA Signal Cable For digital operation connect one end of the DVI D signal cable to a DVI D connector on the monitor and the other end to the DVI D connector on the computer Figure 3 4 Connecting the DVI D Signal ...

Страница 13: ... the USB hub cable to the USB connector on the rear panel of the computer or to a USB hub and the other end to the upstream USB connector on the monitor Figure 3 5 Connecting the USB Hub Cable ENWW Connecting the Monitor 7 ...

Страница 14: ...g plug is an important safety feature Plug the power cord into a grounded earthed electrical outlet that is easily accessible at all times Disconnect power from the equipment by unplugging the power cord from the electrical outlet For your safety do not place anything on power cords or cables Arrange them so that no one may accidentally step on or trip over them Do not pull on a cord or cable When...

Страница 15: ...monitor s panel forward or backward to set it to a comfortable eye level Figure 3 7 Tilting the Monitor 2 Swivel the monitor to the left or right for the best viewing angle Figure 3 8 Swiveling the Monitor ENWW Adjusting the Monitor 9 ...

Страница 16: ...ure 3 9 Adjusting the Height 4 Pivot the monitor from landscape to portrait orientation viewing to adapt to your application Figure 3 10 Pivoting the Monitor NOTE The monitor pivots from landscape clockwise to portrait orientation To view information on the screen in portrait mode you will need to install the Pivot Pro software included on the software and documentation CD 10 Chapter 3 Setting Up ...

Страница 17: ...ore consecutive hours of non use Mounting Solutions Removing the Monitor Pedestal Base You can remove the monitor panel from the pedestal base to mount the panel on a wall a swing arm or other mounting fixture CAUTION Before beginning to disassemble the monitor be sure the monitor is turned off and the power and signal cables are both disconnected If the monitor has a connected audio cable disconn...

Страница 18: ...o the mounting fixture 1 Remove the monitor panel from the pedestal base Refer to Removing the Monitor Pedestal Base on page 11 in the previous section 2 Remove the HP Quick Release from the monitor base by removing the four screws that secure the HP Quick Release to the base Figure 3 12 Removing the HP Quick Release from the Monitor Base 12 Chapter 3 Setting Up the Monitor ENWW ...

Страница 19: ... Quick Release Figure 3 14 Mounting the Monitor to the Wall Using Quick Release CAUTION The Quick Release is designed to support a maximum of up to 24 lbs 10 9 kg If you are mounting to a wall HP recommends that you consult with a qualified engineering architectural or construction professional to determine the appropriate type and quantity of mounting fasteners required for the application and to...

Страница 20: ... third party mounting solution to the monitor four 4mm 0 7 pitch and 10mm long screws are required not provided with the monitor Longer screws should not be used because they may damage the monitor It is important to verify that the manufacturer s mounting solution is compliant with the VESA standard and is rated to support the weight of the monitor display panel For best performance it is importa...

Страница 21: ...e spare part number product number and serial number You may need these numbers when contacting HP about the monitor model The rating labels are located on the rear panel of the monitor display head Figure 3 16 Locating the Rating Labels ENWW Locating the Rating Labels 15 ...

Страница 22: ...monitor is Microsoft Windows Plug and Play compatible and the monitor will work correctly without installing the INF file Monitor Plug and Play compatibility requires that the computer s graphic card is VESA DDC2b compliant and that the monitor connects directly to the graphics card Plug and Play does not work through separate BNC type connectors or through distribution buffers boxes The Image Col...

Страница 23: ...e Readme file on the CD Downloading from the Worldwide Web To download the latest version of INF and ICM files from the HP monitors support Web site 1 Refer to http www hp com support and select the country region 2 Follow the links for the monitor to the support page and download page 3 Ensure the system meets the requirements 4 Download the software by following the instructions Using the Auto A...

Страница 24: ...D Advanced Main Menu Refer to Adjusting the Monitor Settings on page 20 in this chapter If the result is not satisfactory continue with the procedure 3 Insert the CD in the disc drive The CD menu is displayed 4 Select Open Auto Adjustment Software The setup test pattern is displayed 5 Press the Auto Adjust button on the monitor front panel to produce a stable centered image 6 Press the ESC key or ...

Страница 25: ...menu 3 Minus If OSD is on press to navigate backward through the OSD menu features and decrease adjustment levels If OSD is off press to enable the DVI signal input 4 Plus If OSD is on press to navigate forward through the OSD menu features and increase adjustment levels If OSD is off press to enable the VGA signal input 5 Power Turns the monitor on or off ENWW Front Panel Controls 19 ...

Страница 26: ...ave and Return or Cancel if you don t want to save the setting then select Exit from the Main Menu NOTE If the buttons remain untouched for 10 seconds while displaying a menu new adjustments will be discarded and the settings will revert to previous settings and exit the menu OSD Menu Selections The following tables list the On Screen Display OSD menu selections and their functional descriptions A...

Страница 27: ...0 Auto Adjustment Automatically adjusts the screen image Advanced Menu Changes the Main Menu from Basic to Advanced Exit Exits the OSD menu screen To access the Advanced Main Menu press the Menu button and select Advanced Menu from the Basic Main Menu NOTE After selecting Advanced Menu from the Basic Main Menu the Advanced Main Menu remains the default OSD on subsequent power ups of the monitor un...

Страница 28: ......

Страница 29: ...Off The factory default is On Mode Display Displays the resolution refresh rate and frequency information on the screen each time the OSD Main Menu is accessed Select On Off The factory default is Off DDC CI Support Allows the computer to control some OSD menu features such as brightness contrast and color temperature Set to On Off The factory default is On Sleep Timer Provides the timer adjustmen...

Страница 30: ... 50 OSD Timeout Sets the time duration in seconds that the OSD is visible after the last button is pressed The factory default is 30 seconds Information Selects and displays important information about the monitor Current Settings Provides the current input video mode Recommended Settings Provides the recommended resolution mode and refresh rate for the monitor Serial Number Reports the serial num...

Страница 31: ... on screen display Using the HP Display Assistant Utility HP Display Assistant included on the software and documentation CD is a software utility that guides you through the tuning process with easy to understand instructions and background patterns designed for each monitor control It provides Accurate screen calibration through the use of step by step instruction Wizards to obtain the best over...

Страница 32: ...ates the video cable is not properly connected to the computer OSD Lock The OSD can be enabled or disabled by pressing and holding the Menu button on the front panel for 10 seconds If the OSD is locked the warning message OSD Lock Out is displayed for ten seconds If the OSD is locked press and hold the Menu button for 10 seconds to unlock the OSD If the OSD is unlocked press and hold the Menu butt...

Страница 33: ...cklights off immediately and stays in sleep mode until the next On Time activates or a monitor button is pressed HP Display LiteSaver HP Display LiteSaver is a software application available on the CD that increases monitor life and saves energy It allows you to place the monitor into its low power sleep mode at predefined times by shutting down or reducing power to most internal circuits This hel...

Страница 34: ...Exit Stores the current settings and minimizes HP Display LiteSaver to the System Tray Restores the previous settings and minimizes HP Display LiteSaver to the System Tray HP Display LiteSaver will continue to run Opens the online help file Exits and closes the HP Display LiteSaver It will no longer control the monitor power until it is next run View HP Display LiteSaver Readme on the CD for addit...

Страница 35: ...ile icm file then click the Add button 5 To activate a color profile for the monitor you must set it as the Default Monitor Profile Select sRGB Color Space Profile then click the Set as Default button 6 Click Apply or OK Installing the sRGB ICM File for Microsoft Windows Vista 1 Click Appearance and Personalization icon in the Control Panel 2 Click Personalization 3 Click Display Settings 4 Click ...

Страница 36: ...isplayed on screen Monitor video cable is disconnected Connect the DVI D signal cable to the DVI D connector on the computer or the VGA signal cable to the VGA connector on the computer Be sure that the computer power is off while connecting the video cable Out of Range Set Monitor to 1280 1024 60Hz is displayed on screen HP Display LiteSaver doesn t turn off the monitor screen Video resolution an...

Страница 37: ...or s OSD menu setting for power saving not seem to enter into a low is disabled enable disable controls The control should be set to enable power sleep mode to allow the monitor to enter into low power modes Using the Worldwide Web For the online access to technical support information self solve tools online assistance community forums of IT experts broad mutlivendor knowledge base monitoring and...

Страница 38: ...iagonal 43 2 cm Tilt 5 to 35 Swivel 50 to 50 Maximum Weight Unpacked 17 6 lbs 8 0 kg Dimensions include pedestal base Height 18 9 inches 480 5 mm Depth 10 4 inches 264 mm Width 14 7 inches 373 3 mm Maximum Graphic Resolution 1280 1024 75 Hz analog and digital modes Text Mode 720 400 Dot Pitch 0 264 H 0 264 W mm Horizontal Frequency 30 to 83 kHz Vertical Refresh Rate analog mode 56 to 76 Hz Environ...

Страница 39: ...0 480 37 500 75 000 31 500 VESA 4 720 400 31 469 70 087 28 322 VGA 5 800 600 37 879 60 317 40 000 VESA 6 800 600 48 077 72 188 50 000 VESA 7 800 x 600 46 875 75 000 49 500 VESA 8 832 x 624 49 726 74 551 57 284 Mac 9 1024 768 48 363 60 004 65 000 VESA 10 1024 768 56 476 70 069 75 000 VESA 11 1024 x 768 60 023 75 029 78 750 VESA 12 1152 x 870 68 680 75 060 100 000 Mac 13 1152 x 900 71 710 76 050 105...

Страница 40: ...itor screen is blanked the backlight is turned off and the power light is turned amber When the monitor is in the reduced power state the monitor will utilize less than 2 watts of power There is a brief warm up period before the monitor will return to its normal operating mode Refer to the computer manual for instructions on setting energy saver features sometimes called power management features ...

Страница 41: ...ncrease the separation between the equipment and the receiver Connect the equipment into an outlet on a circuit different from that to which the receiver is connected Consult the dealer or an experienced radio or television technician for help Modifications The FCC requires the user to be notified that any changes or modifications made to this device that are not expressly approved by Hewlett Pack...

Страница 42: ...pean Union Regulatory Notice This product complies with the following EU Directives Low Voltage Directive 2006 95 EC EMC Directive 89 336 EEC Compliance with these directives implies conformity to applicable harmonized European standards European Norms which are listed on the EU Declaration of Conformity issued by Hewlett Packard for this product or product family This compliance is indicated by t...

Страница 43: ...ved for use in that country The power cord must be rated for the product and for the voltage and current marked on the product s electrical ratings label The voltage and current rating of the cord should be greater than the voltage and current rating marked on the product In addition the cross sectional area of the wire must be a minimum of 0 75 mm or 18 AWG and the length of the cord must be betw...

Страница 44: ...ollection point for the recycling or waste electrical and electronic equipment The separate collection and recycling of the waste equipment at the time of disposal will help to conserve natural resources and ensure that it is recycled in a manner that protects human health and the environment For more information about where you can drop off your waste equipment for recycling please contact the lo...

Страница 45: ...ENWW Product Environmental Notices 39 ...

Страница 46: ...pixel is always turned on a bright spot on a dark background or it is always off a dark spot on a bright background The first is the more visible of the two A defective sub pixel dot defect is less visible than a defective whole pixel and is small and only visible on a specific background To locate defective pixels the monitor should be viewed under normal operating conditions in normal operating ...

Отзывы: