background image

17 

2.5 Powering the Camcorder On / Off 

2.5.1  Auto Power On/Off 

If the camcorder is connected to the vehicle power supply, once start 
the car engine, the camcorder will automatically power on and start 
recording. 
Once the vehicle engine shuts down, the camcorder automatically 
saves the recording and turns off the power within 10 seconds. 


2.5.2  Manual Power On/Off 

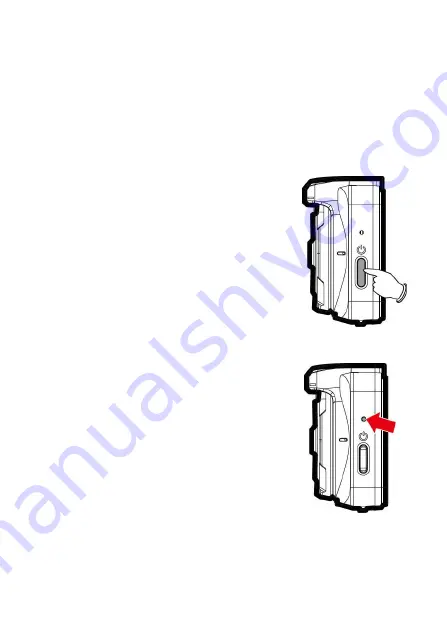
To manually turn on the power, press the 

POWER

 button.   

To turn off, press and hold the 

POWER

 button 

for at least 2 seconds.   


2.5.3  Reset 

Use a pin or paper clip to insert and hold the 
Reset hole for 5 seconds to reset the device. 

Содержание f880x

Страница 1: ...f880x Car Camcorder User Manual ...

Страница 2: ...ion 10 1 1 Features 10 1 2 Package Contents 10 1 3 Product Overview 11 2 Getting Started 12 2 1 Storage Media 12 2 1 1 Insert the Memory Card 12 2 1 2 Remove the Memory Card 12 2 2 Installing in Vehicles 13 2 2 1 Mount to Windshield 13 2 2 2 Adjust the device position 14 2 3 Connecting to Power 15 2 4 LED Indicator 16 2 5 Powering the Camcorder On Off 17 2 5 1 Auto Power On Off 17 2 5 2 Manual Pow...

Страница 3: ...6 FCMD 29 3 4 7 Headlight Warning 30 3 5 Parking Mode 31 3 5 1 Park Recording 31 3 5 2 Motion and Collision Detection 32 3 5 3 Timelapse 32 3 6 Collision Detection 32 3 7 2 GRID FUNCTION CHART 33 3 8 Playback Videos and Photos 33 3 8 1 The Playback Screen 35 3 9 Deleting Files 37 4 Initial set up Pixi Car application 38 5 Using the Pixi Car application 40 5 1 Camera and Wi Fi Setting 41 5 1 1 Wi F...

Страница 4: ...3 6 Adjusting the Settings 47 6 1 Using the Menu 47 6 2 Menu Items 47 7 Connecting to Other Devices 52 7 1 Connecting to the Computer 52 8 Installing the Software 53 9 SuperCar 54 10 Specifications 55 ...

Страница 5: ...ent and or Battery by users in private households in the European Union This symbol on the product or on the packaging indicates that this cannot be disposed of as a household waste You must dispose of your waste equipment and or battery by handling it over to the applicable take back scheme for the recycling of electrical and electronic equipment and or battery For more information about recyclin...

Страница 6: ...ce to radio or television reception which can be determined by turning the equipment off and on the user is encouraged to try to correct the interference by one or more of the following measures Reorient or relocate the receiving antenna Increase the separation between the equipment and receiver Connect the equipment into an outlet on a circuit different from that to which the receiver is connecte...

Страница 7: ...y also can enhance the accuracy of LDWS 2 Make sure that the lens is within the wiping range of the windscreen wiper to ensure a clear view even when it rains 3 Do not touch the lens with your fingers Finger grease may be left on the lens and will result in unclear videos or pictures Clean the lens on a regular basis 4 Do not install the camcorder on a tinted window Doing so may damage the tint fi...

Страница 8: ...ellite signals cannot pass through solid materials except glass Tinted window will also affect the performance of the GPS satellite reception GPS reception performance on each camcorder may differ The camcorder cannot determine the accuracy of the positioning results from different hardware The values displayed in this camcorder such as speed and position may be inaccurate due to the influence of ...

Страница 9: ...our vehicle on the possible effect Pacemaker In order to prevent any potential interference to a pacemaker anyone who uses a pacemaker should be advised that when using this camcorder a minimum distance of 15cm 6 inch should be kept between the camcorder and the pacemaker and never put this camcorder in a chest pocket In case of any doubt of interference switch off the camcorder immediately Medica...

Страница 10: ...9 HP Inc is NOT responsible for the loss of any data content during operation Before you start using the system it is assumed that you agree to the above statement ...

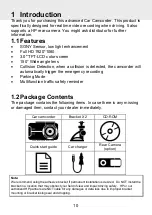
Страница 11: ...gger the emergency recording Parking Mode Multifunction traffic safety reminder 1 2Package Contents The package contains the following items In case there is any missing or damaged item contact your dealer immediately Car camcorder Bracket X 2 CD ROM Quick start guide Car charger Rear Camera option Note We recommend using the adhesive bracket if permanent installation is desired Do NOT install the...

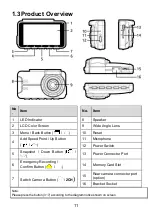
Страница 12: ...set 4 Add Speed Point Up Button 11 Microphone 12 Power Switch 5 Snapshot Down Button 13 Power Connector Port 6 Emergency Recording Confirm Button 14 Memory Card Slot 7 Switch Camera Button 2CH 15 Rear camera connector port option 16 Bracket Socket Note Please press the button 3 7 according to the diagram notice shown on screen ...

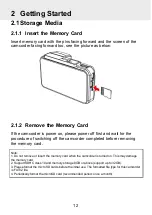
Страница 13: ... and wait for the procedure of switching off the camcorder completed before removing the memory card Note 1 Do not remove or insert the memory card when the camcorder is turned on This may damage the memory card 2 Support SDHC class 10 and memory storage 8GB or above support up to 32GB 3 Please format the micro SD cards before the initial use The formatted file type for this camcorder is FAT32 fil...

Страница 14: ... 1 Push the mount into mount slot on top of device until a click sound is heard 2 Peel off the protective plastic sheet from the adhesive bracket 3 Place and press down the bracket firmly onto your windshield Make sure the base is securely locked in place ...

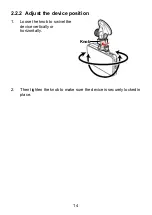
Страница 15: ...14 2 2 2 Adjust the device position 1 Loose the knob to swivel the device vertically or horizontally 2 Then tighten the knob to make sure the device is securely locked in place Knob ...

Страница 16: ...lug the other end of the car charger to the cigarette lighter socket of your vehicle Once the vehicle engine is started the camcorder automatically powers on Car charger input DC 12 24V Note Please take note if the environment temperature reaches 45 C or above the car charger still can supply power to camcorder but it may not charge the battery This is characteristic of Lithium polymer battery and...

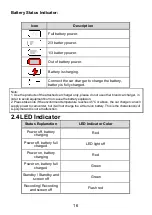
Страница 17: ...r cause the battery explosion 2 Please take note if the environment temperature reaches 45 C or above the car charger can still supply power to camcorder but it will not charge the Lithium ion battery This is the characteristic of Li polymer and is not a malfunction 2 4LED Indicator Status Explanation LED Indicator Color Power off battery charging Red Power off battery full charged LED light off P...

Страница 18: ... start recording Once the vehicle engine shuts down the camcorder automatically saves the recording and turns off the power within 10 seconds 2 5 2 Manual Power On Off To manually turn on the power press the POWER button To turn off press and hold the POWER button for at least 2 seconds 2 5 3 Reset Use a pin or paper clip to insert and hold the Reset hole for 5 seconds to reset the device ...

Страница 19: ...continue operating the menu 2 6 1 Set Time Zone To set the time zone do the following 1 Press the button to enter the OSD menu 2 Press the or button to select Set Time Zone and then press the button for entering function menu 3 Press the or button to set the current time zone and then press the button to complete setting 4 Press the button to return to recording screen Note If satellite positionin...

Страница 20: ...e Time and then press the button for entering function menu 3 Press the or button to adjust the value and then press the button to set the next field 4 Repeat step 3 until the date and time setting is completed Note To ensure the accuracy of the video file time please reset the date and time when the battery power runs out or when not in use over 7 days ...

Страница 21: ...ine start if the camcorder cannot automatically power on off with the car engine please manually connect the power supply with the vehicle power and then power on or manually power off the camcorder and then release the connector with the car power supply 2 It can be configured to save a video file for every 30 seconds 1 or 3 minutes of recording 3 All the videos and photos are saved in the memory...

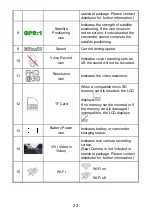
Страница 22: ...ding press the button to enter the OSD menu 4 Add Speed Point Button During video recording press the button to add a speed cam point 5 PIV Picture in Video Button Press to capture video screen shots from the front camera 6 Emergency Recording Button During video recording press the button to enter emergency recording mode 7 Switch Camera Button Press to switch VIV screen Rear Camera is not includ...

Страница 23: ...ording sets as off the sound will not be recorded 11 Resolution icon Indicates the video resolution 12 TF Card When a compatible micro SD memory card is inserted the LCD displays If no memory card is inserted or if the memory card is damaged incompatible the LCD displays 13 Battery Power icon Indicates battery or camcorder charging status 14 VIV Video in Video Indicates rear camera recording scree...

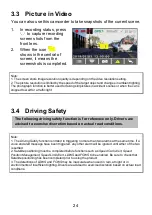
Страница 24: ...mergency video folder will occupy 40 of available memory card capacity For example if you use 8GB memory card about 3 2GB memory space will be saved for emergency files When the emergency video folder is full the oldest emergency file will be automatically deleted by the newest emergency file 3 2 Add Speed Point You may customize speed cam positions in this product 1 When the GPS positioning is co...

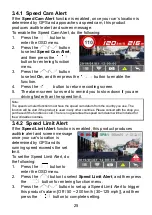
Страница 25: ...ving Safety Note 1 The Driving Safety function is limited to triggering no more than two alarms at the same time If a voice and alert message have been triggered any other alarm will be ignored until either of the two is settled 2 Satellite positioning must be completed before functions such as Speed Cam Alert Speed Position Management Speed Limit Alert LDWS and FCWS to be enabled Be sure to check...

Страница 26: ...ction must have the speed cam datum from the country you use The function will be void if the product is used in any other countries Please consult with the shop you purchased if the function is void There is no guarantee the speed cam datum will be included for the worldwide countries 3 4 2 Speed Limit Alert If the Speed Limit Alert function is enabled this product produces audible alert and scre...

Страница 27: ...fter it has begun recording and repeats the alerts every half hour afterwards To enable the Driver Fatigue Alert do the following 1 Press the button to enter the OSD menu 2 Press the button to select Driver Fatigue Alert and then press the button for entering function menu 3 Press the button to select On and then press the button to enable the function 4 Press the button return to recording screen...

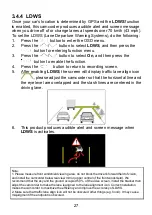
Страница 28: ...e adjust the camcorder so that the horizontal line and the eye level are overlapped and the slash lines are centered in the driving lane 6 This product produces audible alert and screen message when LDWS is activates Note 1 Please measure front windshield viewing area do not block the driver s forward field of vision and install the camcorder below rearview mirror upper central of the front windsh...

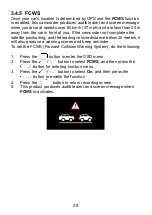
Страница 29: ...ng and the leading vehicle distance below 20 meters it will also produce a warning screen and beep reminder To set the FCWS Forward Collision Warning System do the following 1 Press the button to enter the OSD menu 2 Press the button to select FCWS and then press the button for entering function menu 3 Press the button to select On and then press the button to enable the function 4 Press the butto...

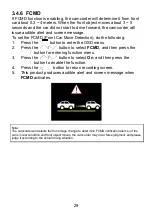
Страница 30: ...SD menu 2 Press the button to select FCMD and then press the button for entering function menu 3 Press the button to select On and then press the button to enable the function 4 Press the button to return recording screen 5 This product produces audible alert and screen message when FCMD activates Note The camcorder will detects the front image change to determine FCMD notification alert so if the...

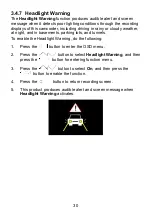
Страница 31: ...nd in basements parking lots and tunnels To enable the Headlight Warning do the following 1 Press the button to enter the OSD menu 2 Press the button to select Headlight Warning and then press the button for entering function menu 3 Press the button to select On and then press the button to enable the function 4 Press the button to return recording screen 5 This product produces audible alert and ...

Страница 32: ...corder is used the battery storage capacity will decrease gradually This is a normal phenomenon for the battery 2 ACC cable is not included in the package Please ask for more information from your distributor 3 5 1 Park Recording In normal recording press and hold Power key for 3 seconds the screen will show message Press OK key to power off or enter Park Recording after 10 sec Please wait for 10 ...

Страница 33: ...ds the screen will show message Press OK to power off or enter Timelapse after 10 sec Please wait for 10 seconds and the camcorder will enter Timelapse automatically The camcorder will turn off the screen temporarily but in timelapse recording status To disable this function press any key to wake up the screen and resume to normal loop recording Note 1 The video file taken in this mode will be sav...

Страница 34: ...g No Item No Item 1 Driving Speed 2 Driving direction Note Driving Speed and Driving Direction are only applicable when satellite positioning of the camcorder is ready otherwise they will be displayed in gray scale only Satellite positioning function is dependent on the model purchased 3 8Playback Videos and Photos 1 If recording is in progress press the button to stop recording and enter the play...

Страница 35: ...34 3 Use the or to select the video or photo you want to playback and press button to confirm your selection ...

Страница 36: ...s button to view next file 6 Playback Pause button Press the button to play or pause the video 7 Lens Switch Button In playback mode press button to switch files with dual lens recording file Rear Camera is optional 8 Stamp print Indicates date and time stamp 9 File Current file total file number 10 TF Card When a compatible micro SD memory card is inserted the LCD displays If no memory card is in...

Страница 37: ...36 ...

Страница 38: ...want to delete and press button to confirm your selection Item Description Delete One Delete the current selected file Delete All Deletes all files in this folder 5 Press the button to confirm deletion Note 1 Deleted files CANNOT be recovered Ensure the files you wish to preserve are backup before deletion 2 If the file is taken by front camera and rear camera at the same time no matter you delete...

Страница 39: ...t to the mobile devices via the App When using for the first time install the Pixi Car App for your mobile device 1 Download Pixi Car App from Google Play or App Store 2 Install the App APP layout and features may be changed subject to different software versions Please refer to Google Play or APP Store for update ...

Страница 40: ...bile device shall be within a maximum of a 5m distance from the camcorder without any buildings in between 2 When the Wi Fi function of the camcorder is ON but not yet connecting with your mobile device or the connection is disconnected the Wi Fi icon on camcorder s screen will be white and you will need to re activate the Wi Fi and re pair with your mobile device 3 After connecting the mobile dev...

Страница 41: ...40 5 Using the Pixi Car application Touch Pixi Car icon to activate the application The main screen will pop up Follow the below instruction to operate this application ...

Страница 42: ...era WiFi Setting 2 Touch WiFi Setting 3 Enter new Wi Fi ID and password and touch Update to re new setting 4 Using the Wi Fi function of your mobile device search for new Wi Fi ID from the list and enter new password The Wi Fi icon on the camcorder s screen will turn to green and your connection has been successfully established ...

Страница 43: ...Collision Detection If Collision Detection is activated this camcorder starts emergency recording once it detects any collision Off Low Sensitivity Normal Sensitivity High Sensitivity Anti flicker Domestic power supply varies by area It is recommended that you should check the Table of voltage and frequency of different countries for the correct setting 50Hz 60Hz EV Setting of exposure value 2 2 D...

Страница 44: ...der will lose control and screen will show Network Streaming Please use Pixi Car app to operate the camcorder Note Camera Preview is subject to car camcorder in recording mode icon Description 1 Start stop recording 2 Snapshot no matter in front camcorder or rear camcorder preview once you touch this icon both of front and rear camcorder will take photo 3 Switch front and rear camcorder preview ...

Страница 45: ...vice 4 Touch icon Camera Playback 5 The files saved in the camcorder will be displayed on your mobile device Camcorder will stop recording for a few seconds until your mobile device finishes reading the saved files from camcorder and screen will show Network Playback 6 Pick up the file that you want to playback delete or download and touch below icon to execute ...

Страница 46: ... on the menu If you do turn it on it means the mobile device itself doesn t support the video decoding It s not the problem of the file We recommend you to install a free app software such as VLC to playback the file 2 Deleted files cannot be recovered Ensure the files have been backed up before deletion 3 Picture and video files could be downloaded to the internal memory of your mobile device Use...

Страница 47: ...ow icon to execute Icon Description 1 Playback 2 Delete Note 1 Deleted files cannot be recovered Ensure the files have been backed up before deletion 2 If you find the downloaded files could not be played or without audio which means the mobile device itself does not support the video decoding It s not the problem of the file We recommend you to install a free App software such as VLC to playback ...

Страница 48: ...nction list Menu option Description Available option Rear Cam Setting select the type of rear camera None 1080p 720p Playback Select the file category that you want to view Video Front camera Video Rear camera Event Front camera Event Rear camera Picture Front camera Picture Rear camera Wi Fi Set up Wi Fi linkage of a mobile phone On Off Satellite Status Displays the current state of the satellite...

Страница 49: ...and a warning message is displayed on the screen Press the button to set the speed limit You can set the off or set speed limit from 50 to 200km h 30 to 125mph Set Time Zone Set the time zone you are in Press the button to set the satellite time You may customize it between GMT 12 00 GMT 14 00 Date Time Set the date and time Press the button to adjust the value and then press the button to set the...

Страница 50: ...cted duration 30 sec 1 min 3 min Parking Mode If one of parking mode is activated the camcorder will enter parking mode 10 seconds after disconnect the external power Park Recording Motion and Collision Detection Timelapse Off Collision Detec If Collision Detection is activated this camcorder starts emergency recording once it detects any collision High Sensitivity Normal Sensitivity Low Sensitivi...

Страница 51: ...D If FCMD function is enabled the camcorder will determine it from front car about 0 3 4 meters When the front object moves about 3 5 seconds and the car did not start to drive forward the camcorder will issue audible alert and screen message On Off File Deletion Delete the file s Video Front camera Video Rear camera Event Front camera Event Rear camera Picture Front camera Picture Rear camera Ant...

Страница 52: ...51 Menu option Description Available option Default The system reverts to the default setting Yes No Firmware Version Indicates the current firmware version ...

Страница 53: ...Power on the camcorder the computer screen will show up the message when the computer detects your camcorder select Open folder to view files or open the Removable Disk then users can save the files to your computer Note 1 This only indicates the camcorder can connect to the computer mini USB cable is not included in standard package 2 Under dual lens mode the recording files will be saved separat...

Страница 54: ...e CD player 2 If the CD does not execute automatically please use Windows File Manager to execute the Install_CD exe file in the CD The following screen will be shown up 3 Press the Menu item to start the installation process according to the instructions on screen ...

Страница 55: ...ayback Duration Total Duration 7 Compass 15 G Sensor 8 Speed Meter Note 1 To display the route on Electronic Map please make sure the internet is connected before starting the video playback 2 Video files of front view camera MOV and GPS G Sensor files NMEA must be stored in the same folder before starting the playback 3 The SuperCar software is only applicable to Windows operating system ...

Страница 56: ...re Up to F1 9 Focus range 1 5m Infinity Satellite System GPS frequency 1559 MHz 1610MHz Video Resolution 1080P 30 fps 1080P 27 5 fps 1080P 30 fps HDR 1080P 27 5 fps HDR 720P 30 fps 720P 27 5 fps Format MOV Still image Photograph Resolution depends on video resolution setting Format DCF JPG Shutter Electronic shutter G Sensor 3 Axis G Force sensor ISO Auto White Balance Auto Microphone Built in Spe...

Страница 57: ...rature 0 45 C Operating Humidity 20 70 RH Storage Temperature 20 70 C Dimensions 87 6 x 29 1 x 53 1 mm Weight Approx 103g Built in IEEE 802 11b g n HT20 Wi Fi chip RTL8188FTV Frequency range 2412 MHz 2472MHz For EU Compliance Wi Fi Channel Ch1 Ch13 For EU Compliance Wi Fi Max output 16 32dBm For EU Compliance ...

Страница 58: ......

Страница 59: ......

Отзывы: