background image

Enabling the monitor head detection warning

This warning is monitored if the monitor head cables are not fully connected. HP recommends ensuring that 

this warning is enabled on systems with an installed monitor head.

1.

Turn on or restart the computer, and when the HP logo appears, press 

f10

 to enter Computer Setup.

2.

Select Advanced, and then select Built-In Devices.

3.

Select Allow No Panel configuration.

4.

Select Main, and then Save Changes and Exit to save your settings.

Your changes take effect when the computer restarts.

Installing a security cable

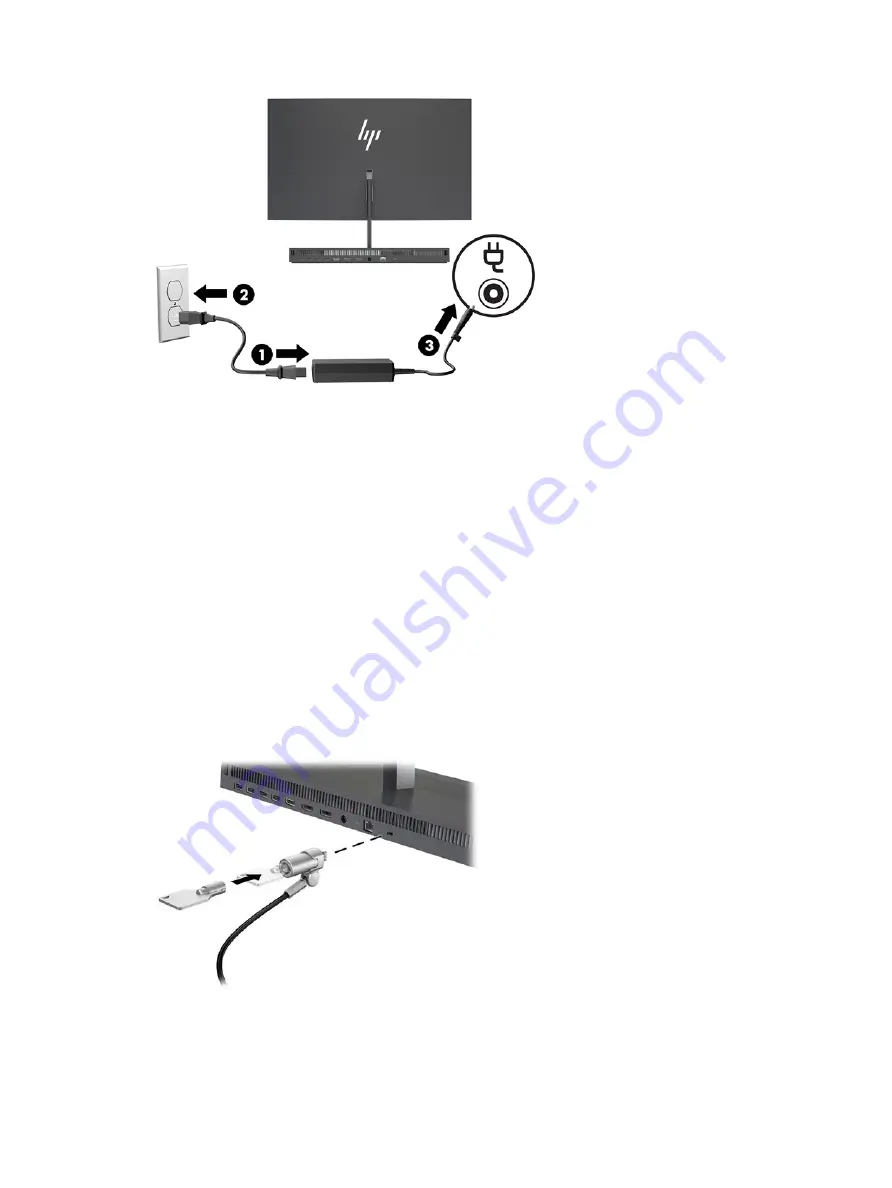
A security cable is a key lock device that has a wire cable attached. Attach one end of the cable to your desk 

(or other stationary object) and the other end of the cable to the security cable slot on the computer base 

unit. Secure the security cable lock with the key.

Enabling the monitor head detection warning

9

Содержание EliteOne 1000 G2

Страница 1: ...Hardware Reference Guide HP EliteOne 1000 G2 All in One Business PCs ...

Страница 2: ...all not be liable for technical or editorial errors or omissions contained herein First Edition June 2018 Document part number L28134 001 Product notice This guide describes features that are common to most models Some features may not be available on your computer Software terms By installing copying downloading or otherwise using any software product preinstalled on this computer you agree to be...

Страница 3: ...TANT Indicates information considered important but not hazard related for example messages related to property damage A notice alerts the user that failure to follow a procedure exactly as described could result in loss of data or in damage to hardware or software Also contains essential information to explain a concept or to complete a task NOTE Contains additional information to emphasize or su...

Страница 4: ...iv About This Book ...

Страница 5: ...urity cable 9 Adjusting the monitor head position 10 Connecting a secondary monitor 11 Using the webcam 12 Webcam operation 12 Setting up Windows Hello 12 Synchronizing the optional wireless keyboard and mouse 13 3 Hardware repair and upgrade 14 Warnings and cautions 14 Additional information 14 Removing and replacing the base unit access covers 15 Removing and replacing the monitor head 17 Locati...

Страница 6: ...ostatic damage 31 Grounding methods 31 Appendix B Computer operating guidelines routine care and shipping preparation 32 Computer operating guidelines and routine care 32 Shipping preparation 33 Appendix C Accessibility 34 Supported assistive technologies 34 Contacting support 34 Index 35 vi ...

Страница 7: ...o to http www hp com support Select Find your product and then follow the on screen instructions Base unit top components Components 1 Power button 5 End call button 2 Call button 6 Speaker mute button 3 Microphone mute button 7 Volume slider 4 Webcam mute button Overview 1 ...

Страница 8: ...harge 2 Audio out headphone Audio in microphone combo jack 4 USB SuperSpeed port with HP Sleep and Charge Base unit rear components Components 1 USB SuperSpeed Plus ports 4 5 Power connector 2 HDMI port 6 RJ 45 network jack 3 DisplayPort Out 7 Security cable slot 4 DisplayPort In 2 Chapter 1 Product features ...

Страница 9: ...sting the screen Webcam components Infrared IR webcam optional Components Front View 1 Webcam light 4 IR webcam 2 IR light 5 Rear webcam adjustment wheel 3 Full High Definition FHD webcam Top view 6 Digital microphones Rear view 7 Webcam light 8 FHD webcam Monitor front components select products only 3 ...

Страница 10: ... and product number locations Each computer has a unique serial number and product ID number that are located on the exterior of the device Keep these numbers available for use when contacting customer service for assistance The computer base unit numbers are located on the underside of the base unit 4 Chapter 1 Product features ...

Страница 11: ...external devices IMPORTANT Regardless of the power on state voltage is always present on the system board as long as the system is plugged into an active AC outlet You must disconnect the power cord and wait approximately 30 seconds for the power to drain to avoid damage to the internal components of the computer 4 To remove the rear access cover to access the monitor head installed in a different...

Страница 12: ...ff the system board 2 6 To remove the rear access cover from the computer press the two release buttons on the rear of the base unit 1 and at the same time rotate the rear of the cover up 2 Then slide the cover back to remove it from the computer 3 7 Turn the cover over Lift the tab on the blank and then slide the blank away from the rear cover to remove it 6 Chapter 2 Setup ...

Страница 13: ...ing it to prevent the monitor head from falling over and being damaged 9 To replace the monitor head hold the bottom of the monitor head from the front with one hand and place the base of the monitor head s neck onto the bracket on the base unit and slide the monitor forward 1 with the other hand Then tighten the two captive screws that secure the monitor head s neck to the base unit 2 IMPORTANT T...

Страница 14: ...own 2 NOTE Be sure that all cables are properly routed to prevent damage when the cover is replaced 12 Reconnect the power cord and any external devices and then turn on the computer Connecting the power supply To connect the power supply connect one end of the power cord to the AC adapter 1 and the other end to a grounded AC outlet 2 and then connect the AC adapter to the DC power connector on th...

Страница 15: ...d and then select Built In Devices 3 Select Allow No Panel configuration 4 Select Main and then Save Changes and Exit to save your settings Your changes take effect when the computer restarts Installing a security cable A security cable is a key lock device that has a wire cable attached Attach one end of the cable to your desk or other stationary object and the other end of the cable to the secur...

Страница 16: ... heads tilt back Only the 23 8 inch and 27 inch monitor heads tilt forward The 34 inch monitor head does not tilt forward Adjust the height of the monitor head to set it to a comfortable eye level NOTE Only the 23 8 inch monitor head has height adjustment The 27 inch and 34 inch monitor heads do not have height adjustment 10 Chapter 2 Setup ...

Страница 17: ... that you are connecting to the computer 2 If your monitor has a DisplayPort port connect a DisplayPort cable directly between the DisplayPort port on the rear of the computer and the DisplayPort port on the monitor If your monitor has an HDMI port connect an HDMI cable directly between the HDMI port on the rear of the computer and the HDMI port on the monitor 3 If your monitor does not have a Dis...

Страница 18: ...lock it To close the webcam press it down until it locks Setting up Windows Hello If the Windows 10 operating system is installed on your computer follow these steps to set up Windows Hello facial recognition 1 Select the Start button select Settings select Accounts and then select Sign in options 2 Under Windows Hello follow the on screen instructions to add both a password and a 4 digit PIN Then...

Страница 19: ...ir 1 Insert the transceiver into a USB port on the computer 2 Place the keyboard within 30 cm of the transceiver Press the connect button on the bottom of the keyboard and then press a key on the keyboard 3 Place the mouse within 30 cm of the transceiver Press the connect button on the bottom of the mouse and then click the mouse NOTE If the mouse and keyboard still do not work synchronize the key...

Страница 20: ...e AC outlet grasp the cord by the plug To reduce the risk of serious injury read the Safety Comfort Guide It describes proper workstation setup and provides guidelines for posture and work habits that increase your comfort and decrease your risk of injury It also provides electrical and mechanical safety information This guide is located on the web at http www hp com ergo IMPORTANT Static electric...

Страница 21: ... must disconnect the power cord and wait approximately 30 seconds for the power to drain to avoid damage to the internal components of the computer 4 To remove the rear access cover press the two release buttons on the rear of the base unit 1 and at the same time rotate the rear of the cover up 2 Then slide the cover back to remove it from the base 3 5 To remove the front access cover after removi...

Страница 22: ...ched to the right side of the cover You can now service the computer components To replace the access covers 1 To replace the front access cover align the cover with the monitor head and then press the cover straight down onto the base unit so that the cover snaps in place 16 Chapter 3 Hardware repair and upgrade ...

Страница 23: ...am If your current monitor has a webcam be sure to remove and save it See Replacing or installing a webcam on page 28 1 Remove all removable media such as USB flash drives from the computer 2 Turn off the computer properly through the operating system and turn off any external devices 3 Disconnect the power cord from the AC outlet and disconnect any external devices IMPORTANT Regardless of the pow...

Страница 24: ...te the rear of the cover up 2 Then slide the cover back to remove it from the base 3 5 Disconnect the two monitor cables attached to the system board by firmly squeezing inward on the two ends of the cable connectors 1 and pulling the cable connectors up and off the system board 2 18 Chapter 3 Hardware repair and upgrade ...

Страница 25: ... to prevent the monitor head from falling over and being damaged 7 To replace the monitor head hold the bottom of the monitor head from the front with one hand and place the base of the monitor head s neck onto the bracket on the base unit and slide the monitor forward 1 with the other hand Then tighten the two captive screws that secure the monitor head s neck to the base unit 2 IMPORTANT The mon...

Страница 26: ...he rear cover into the slots on the rear of the front cover 1 and then press the rear of the rear cover down 2 NOTE Be sure that all cables are properly routed to prevent damage when the cover is replaced 10 Reconnect the power cord and any external devices and then turn on the computer 20 Chapter 3 Hardware repair and upgrade ...

Страница 27: ...buffered non ECC DDR4 2400 MHZ compliant Pins Industry standard 260 pins containing the mandatory Joint Electronic Device Engineering Council JEDEC specification Support Support CAS latency DDR4 2400 MHz 15 15 15 timing Slots 2 Maximum Memory 16 GB per memory slot 32 GB total Supported 4 Gbit and 8 Gbit non ECC memory technologies single sided and double sided SODIMMs Note The system will not oper...

Страница 28: ...e more memory than the other the larger amount should be assigned to channel A In any mode the maximum operational speed is determined by the slowest memory module in the system Installing memory modules There are two memory sockets on the system board To remove or install memory modules 1 Remove all removable media such as USB flash drives from the computer 2 Turn off the computer properly throug...

Страница 29: ...mputer The computer automatically recognizes the additional memory when you turn on the computer Replacing the RTC battery The RTC battery that comes with the computer provides power to the real time clock When replacing the battery use a battery equivalent to the battery originally installed in the computer The computer comes with a 3 volt lithium coin cell battery WARNING The computer contains a...

Страница 30: ...any external devices 3 Disconnect the power cord from the AC outlet and disconnect any external devices IMPORTANT Regardless of the power on state voltage is always present on the system board as long as the system is plugged into an active AC outlet You must disconnect the power cord and wait approximately 30 seconds for the power to drain to avoid damage to the internal components of the compute...

Страница 31: ...m board as long as the system is plugged into an active AC outlet You must disconnect the power cord and wait approximately 30 seconds for the power to drain to avoid damage to the internal components of the computer 4 Remove the base unit rear and front access panels See Removing and replacing the base unit access covers on page 15 5 Pull the release lever at the front of the drive outward 1 Then...

Страница 32: ...d rear access panels See Removing and replacing the base unit access covers on page 15 10 Reconnect the power cord and any external devices and then turn on the computer Removing or installing an M 2 SSD To locate the M 2 SSD on the system board see Locating internal components on page 21 1 Remove all removable media such as USB flash drives from the computer 2 Turn off the computer properly throu...

Страница 33: ...ve the base unit rear and front access panels See Removing and replacing the base unit access covers on page 15 5 The M 2 SSD is located underneath the fan between the monitor head mount and hard drive bay Pull the fan straight up and off the posts on the system board to remove it You do not need to disconnect the fan cables 6 To remove an M 2 SSD remove the screw that secures the SSD to the syste...

Страница 34: ...ss panels See Removing and replacing the base unit access covers on page 15 10 Reconnect the power cord and any external devices and then turn on the computer Replacing or installing a webcam To replace a webcam 1 Remove all removable media such as USB flash drives from the computer 2 Turn off the computer properly through the operating system and turn off any external devices 3 Disconnect the pow...

Страница 35: ...nternal latches 6 Reconnect the power cord and any external devices and then turn on the computer To install a webcam when a webcam blank is installed in the webcam slot on the monitor head 1 Remove all removable media such as USB flash drives from the computer 2 Turn off the computer properly through the operating system and turn off any external devices 3 Disconnect the power cord from the AC ou...

Страница 36: ...move the screws from the webcam blank 1 and then slide the blank back to remove it from the monitor head 2 6 Snap the rear panel onto the monitor head 7 Insert the new webcam into the webcam slot on the monitor head and press the webcam down so that it engages the internal latches 8 Reconnect the power cord and any external devices and then turn on the computer 30 Chapter 3 Hardware repair and upg...

Страница 37: ...ng methods Use one or more of the following methods when handling or installing electrostatic sensitive parts Use a wrist strap connected by a ground cord to a grounded workstation or computer chassis Wrist straps are flexible straps with a minimum of 1 megohm 10 percent resistance in the ground cords To provide proper ground wear the strap snug against the skin Use heelstraps toestraps or bootstr...

Страница 38: ...e enclosure and the same operating guidelines listed above will still apply Keep liquids away from the computer and keyboard Never cover the ventilation slots with any type of material Install or enable power management functions of the operating system or other software including sleep states Turn off the computer before you do any of the following Wipe the exterior of the computer with a soft da...

Страница 39: ...d store all removable media 3 Turn off the computer and external devices 4 Disconnect the power cord from the AC outlet and then from the computer 5 Disconnect the system components and external devices from their power sources and then from the computer NOTE Ensure that all boards are seated properly and secured in the board slots before shipping the computer 6 Pack the system components and exte...

Страница 40: ... For additional information about a particular assistive technology product contact customer support for that product Contacting support We are constantly refining the accessibility of our products and services and welcome feedback from users If you have an issue with a product or would like to tell us about accessibility features that have helped you please contact us at 888 259 5707 Monday throu...

Страница 41: ... guidelines 14 internal components 21 IR webcam components 3 K keyboard synchronizing 13 M M 2 SSD installation 26 removal 26 memory installing 22 locations 22 removing 22 specifications 21 monitor head adjustment 10 front components 3 installing 5 removal 17 replacement 17 mouse synchronizing 13 P power supply connection 8 S secondary monitor connection 11 security cable 9 serial and product numb...

Отзывы: