background image

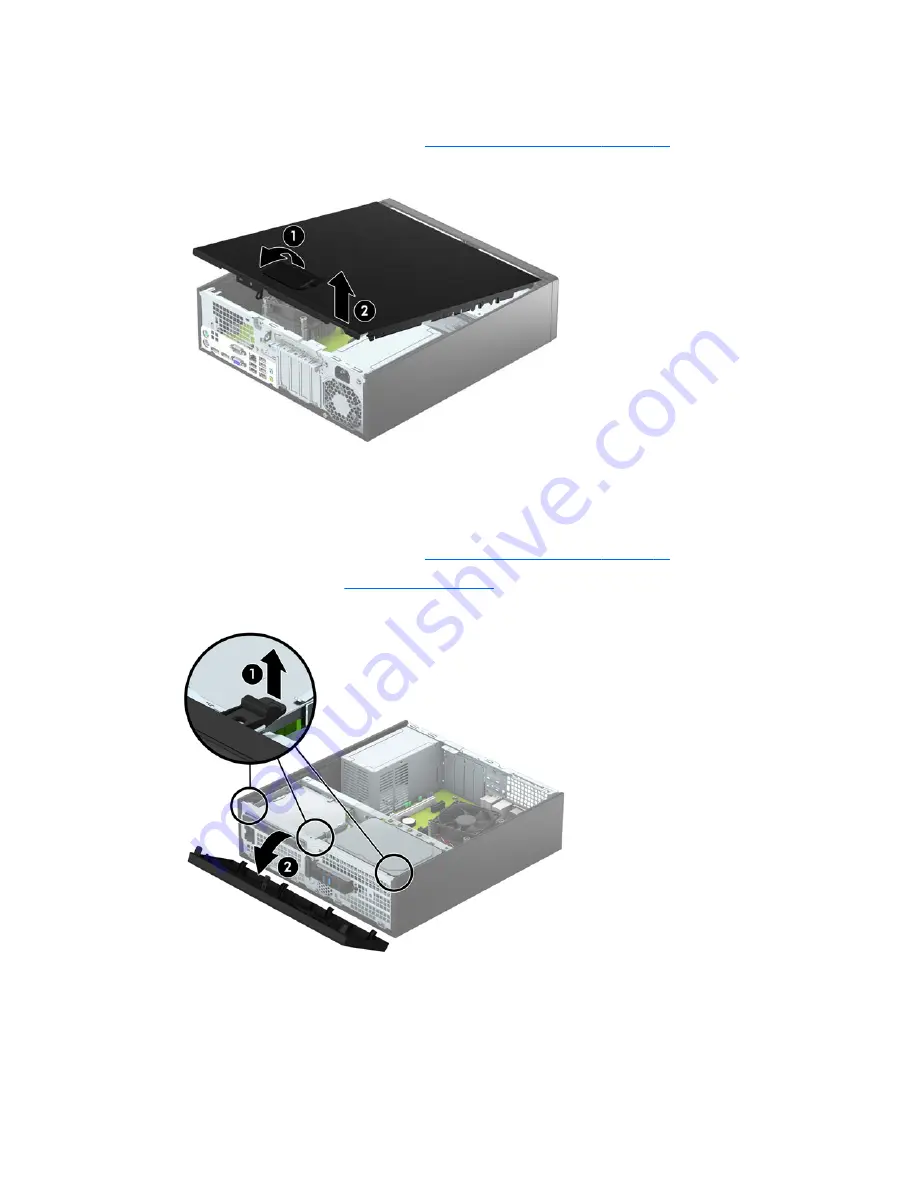
Access panel

1.

Prepare the computer for disassembly (

Preparation for disassembly on page 19

).

2.

Pull up the access panel handle (1), and then lift the panel off the computer (2).

To install the access panel, reverse the removal procedure.

Front bezel

1.

Prepare the computer for disassembly (

Preparation for disassembly on page 19

).

2.

Remove the access panel (

Access panel on page 20

).

3.

Lift up the three tabs on the side of the bezel (1), and then rotate the bezel off the chassis (2).

To install the front bezel, reverse the removal procedure.

20

Chapter 4   Removal and replacement procedures – small form factor (SFF) chassis

Содержание EliteDesk 705 G2 Small Form Factor

Страница 1: ...Maintenance and Service Guide HP EliteDesk 705 G2 Small Form Factor ...

Страница 2: ...dition September 2015 Document Part Number 822866 001 Product notice This user guide describes features that are common to most models Some features may not be available on your computer Not all features are available in all editions of Windows This computer may require upgraded and or separately purchased hardware drivers and or software to take full advantage of Windows functionality Go to http ...

Страница 3: ...w another hard surface such as an adjoining optional printer or a soft surface such as pillows or rugs or clothing to block airflow Also do not allow the AC adapter to contact the skin or a soft surface such as pillows or rugs or clothing during operation The device and the AC adapter comply with the user accessible surface temperature limits defined by the International Standard for Safety of Inf...

Страница 4: ...iv Safety warning notice ...

Страница 5: ...erating static 11 Preventing electrostatic damage to equipment 12 Personal grounding methods and equipment 12 Grounding the work area 12 Recommended materials and equipment 13 Operating guidelines 13 Routine care 14 General cleaning safety precautions 14 Cleaning the Computer Case 14 Cleaning the keyboard 14 Cleaning the monitor 15 Cleaning the mouse 15 Service considerations 15 Power supply fan 1...

Страница 6: ... 32 Installing and Removing Drives 32 Removing a 9 5mm slim optical drive 34 Installing a 9 5mm slim optical drive 35 Removing and replacing a primary 3 5 inch hard drive 36 Removing a secondary 3 5 inch hard drive 39 Installing a secondary 3 5 inch hard drive 40 Removing a 2 5 inch hard drive 42 Installing a 2 5 inch hard drive 43 Drive power cable 46 Small baffle 47 Fan baffle 48 Hood lock 49 Fr...

Страница 7: ...er problems 91 Solving keyboard and mouse problems 92 Solving Hardware Installation Problems 94 Solving Network Problems 95 Solving memory problems 98 Solving CD ROM and DVD problems 100 Solving USB flash drive problems 102 Solving front panel component problems 103 Solving Internet access problems 103 Solving software problems 105 7 POST error messages and diagnostic front panel LEDs and audible ...

Страница 8: ... 1 or Windows 8 123 Creating recovery media and backups 123 Restoring and recovering using Windows tools 124 Using Reset when the system is not responding 124 Recovery using the Windows recovery USB flash drive 125 Recovery using Windows operating system media purchased separately 125 Backing up restoring and recovering in Windows 7 125 Creating recovery media 126 Creating recovery media using HP ...

Страница 9: ...Japanese Power Cord Requirements 136 Country Specific Requirements 137 Appendix C Statement of Volatility 138 Appendix D Specifications 140 SFF Specifications 140 Index 141 ix ...

Страница 10: ...x ...

Страница 11: ...ng on the model For support assistance and to learn more about the hardware and software installed on your computer model run the HP Support Assistant utility NOTE This computer model can be used in a tower orientation or a desktop orientation Standard configuration features 1 ...

Страница 12: ...ne Connector a dialog box will pop up asking if you want to use the connector for a microphone line In device or a headphone You can reconfigure the connector at any time by double clicking the Audio Manager icon in the Windows taskbar NOTE The USB 2 0 Charging Port also provides current to charge a device such as a Smart Phone The charging current is available whenever the power cord is plugged i...

Страница 13: ... feature The wake from S4 feature is also supported on the PS 2 connectors if enabled in BIOS F10 Setup When a device is plugged into the blue Line In Audio Connector a dialog box will pop up asking if you want to use the connector for a line in device or a microphone You can reconfigure the connector at any time by double clicking the Audio Manager icon in the Windows taskbar When a graphics card...

Страница 14: ...ach computer has a unique serial number and a product ID number that are located on the exterior of the computer Keep these numbers available for use when contacting customer service for assistance 4 Chapter 1 Product features ...

Страница 15: ...duct parts For complete and current information on supported parts for your computer go to http partsurfer hp com select your country or region and then follow the on screen instructions Item Description 1 Access panel 2 Front bezel Bezel blank 3 System board includes replacement thermal material Small Form Factor SFF chassis spare parts 5 ...

Страница 16: ...mal material Memory modules PC3 12800 1600 MHz 8 GB 4 GB 2 GB Processors include replacement thermal material AMD A10 8850B 3 9 GHz AMD A10 8750B 3 6 GHz AMD A10 7800B 3 57 GHz AMD A8 8650B 3 2 GHz AMD A8 7600B 3 1 GHz AMD A6 8550B 3 7 GHz AMD A6 8350B 3 5 GHz AMD A4 7300B 3 8 GHz 6 Chapter 2 Illustrated parts catalog ...

Страница 17: ...d lock 4 Front I O assembly 5 Speaker 6 Power switch 7 SATA drive power cable 8 SATA data cable 14 inch 1 straight end 1 angled end 9 Printer port PCI card 10 nVIDIA GT730 Grayling 2 GB DDR3 PCIex8 11 Serial port PCI card Small Form Factor SFF chassis spare parts 7 ...

Страница 18: ...Keyed cable lock Grommet hard drive isolation blue DisplayPort cable USB 3 1 Type Cx1 PCIe x1 card PCIe to M 2 adapter WLAN module caddy card Bluetooth Wireless antenna for use with WLAN modules Adapters 2 5 inch for card reader DisplayPort to HDMI 1 4 DisplayPort to VGA DisplayPort to DVI DVI to VGA DVI I to VGA USB C to USB 3 0 Mouse PS2 optical USB laser USB optical Antimicrobial Washable Wirel...

Страница 19: ...f encrypting drive SED 500 GB 5400 rpm 2 5 inch FIPS 500 GB hybrid SSD 2 5 inch or 2 5 inch 500 GB 5400 rpm 2 5 inch 5 mm 512 GB Solid state Drive SSD 512 GB Solid state Drive SSD M 2 2280SS PCIe 256 GB Solid state Drive SSD self encrypting SED 256 GB Solid state Drive SSD 256 GB Solid state Drive SSD TLC 256 GB Solid state Drive SSD M 2 2280SS PCIe 180 GB Solid state Drive SSD 180 GB Solid state ...

Страница 20: ...rive SSD M 2 2280SS PCIe 120 GB Solid state Drive SSD 120 GB Solid state Drive SSD OPAL2 MLC Optical drives Blu ray BD Writer XL Drive DVD RW drive DVD ROM drive Grommet hard drive isolation blue 10 Chapter 2 Illustrated parts catalog ...

Страница 21: ...e may function normally for a while but it has been degraded in the internal layers reducing its life expectancy Networks built into many integrated circuits provide some protection but in many cases the discharge contains enough power to alter device parameters or melt silicon junctions Generating static The following table shows that Different activities generate different amounts of static elec...

Страница 22: ...t snugly into the banana plug connector on the grounding mat or workstation Heel straps Toe straps Boot straps can be used at standing workstations and are compatible with most types of shoes or boots On conductive floors or dissipative floor mats use them on both feet with a maximum of one megohm 10 resistance between the operator and ground Static Shielding Protection Levels Method Voltage Antis...

Страница 23: ...d cold Operate the computer on a sturdy level surface Leave a 10 2 cm 4 inch clearance on all vented sides of the computer and above the monitor to permit the required airflow Never restrict the airflow into the computer by blocking any vents or air intakes Do not place the keyboard with the keyboard feet down directly against the front of the desktop unit as this also restricts airflow Occasional...

Страница 24: ...uted with water Rinse well by wiping it with a cloth or swab dampened with clear water For stubborn stains use isopropyl rubbing alcohol No rinsing is needed as the alcohol will evaporate quickly and not leave a residue After cleaning always wipe the unit with a clean lint free cloth Occasionally clean the air vents on the computer Lint and other foreign matter can block the vents and limit the ai...

Страница 25: ...ouse ensure that the power to the computer is turned off Clean the mouse ball by first removing the retaining plate and the ball from the housing Pull out any debris from the ball socket and wipe the ball with a clean dry cloth before reassembly To clean the mouse body follow the procedures in Cleaning the Computer Case on page 14 Service considerations Listed below are some of the considerations ...

Страница 26: ...applies to failed drives as well as replacement spares If a drive must be mailed place the drive in a bubble pack mailer or other suitable protective packaging and label the package Fragile Handle With Care Do not remove hard drives from the shipping package for storage Keep hard drives in their protective packaging until they are actually mounted in the computer Avoid dropping drives from any hei...

Страница 27: ...ble as it is fully backwards compatible with the SATA 1 5 Gb s drives Current HP desktop products ship with SATA 6 0 Gb s hard drives SATA data cables are susceptible to damage if overflexed Never crease a SATA data cable and never bend it tighter than a 30 mm 1 18 in radius The SATA data cable is a thin 7 pin cable designed to transmit data for only a single drive SMART ATA drives The Self Monito...

Страница 28: ...arts are moved When folding a flat ribbon cable never fold to a sharp crease Sharp creases may damage the wires Some flat ribbon cables come prefolded Never change the folds on these cables Do not bend any cable sharply A sharp bend can break the internal wires Never bend a SATA data cable tighter than a 30 mm 1 18 in radius Never crease a SATA data cable Do not rely on components like the drive c...

Страница 29: ... computer and any peripheral devices that are connected to it CAUTION Turn off the computer before disconnecting any cables Regardless of the power on state voltage is always present on the system board as long as the system is plugged into an active AC outlet In some systems the cooling fan is on even when the computer is in the Standby or Suspend modes The power cord should always be disconnecte...

Страница 30: ...reverse the removal procedure Front bezel 1 Prepare the computer for disassembly Preparation for disassembly on page 19 2 Remove the access panel Access panel on page 20 3 Lift up the three tabs on the side of the bezel 1 and then rotate the bezel off the chassis 2 To install the front bezel reverse the removal procedure 20 Chapter 4 Removal and replacement procedures small form factor SFF chassis...

Страница 31: ...standard screws located on top of the drive cage Refer to Installing and Removing Drives on page 32 for an illustration of the 6 32 standard screw locations 4 Install the 6 32 security screw through the middle front bezel release tab to secure the front bezel in place 5 Replace the computer access panel 6 If the computer was on a stand replace the stand 7 Reconnect the power cord and any external ...

Страница 32: ...el on page 20 3 To remove the slim optical drive bezel blank press inward on the three retaining tabs that hold the bezel blank in place 1 and then rotate the bezel blank off the front bezel 2 NOTE After removing the slim optical drive bezel blank and installing a slim optical drive you can install an optional bezel trim piece available from HP that surrounds the front of the slim optical drive 22...

Страница 33: ... DDR3L SDRAM Low Power DIMMs The DIMMs must also support CAS latency 11 DDR3 DDR3L 1600 MHz 11 11 11 timing contain the mandatory JEDEC SPD information In addition the computer supports 512 Mbit 1 Gbit and 2 Gbit non ECC memory technologies single sided and double sided DIMMs DIMMs constructed with x8 and x16 DDR devices DIMMs constructed with x4 SDRAM are not supported NOTE The system will not op...

Страница 34: ...configuration 4 GB will run as dual channel and 1 GB will run as single channel In any mode the maximum operational speed is determined by the slowest DIMM in the system Installing DIMMs CAUTION You must disconnect the power cord and wait approximately 30 seconds for the power to drain before adding or removing memory modules Regardless of the power on state voltage is always supplied to the memor...

Страница 35: ...nnel B Refer to Populating DIMM sockets on page 23 for more information 5 Push the module down into the socket ensuring that the module is fully inserted and properly seated Make sure the latches are in the closed position 3 6 Repeat steps 4 and 5 to install any additional modules 7 Replace the access panel 8 If the computer was on a stand replace the stand 9 Reconnect the power cord and turn on t...

Страница 36: ...ocket that is downshifted to a x4 socket NOTE The PCI Express sockets support only low profile cards You can install a PCI Express x1 x4 x8 or x16 expansion card in the PCI Express x16 socket For dual graphics card configurations the first primary card must be installed in the PCI Express x16 socket that is NOT downshifted to a x4 To remove replace or add an expansion card 1 Prepare the computer f...

Страница 37: ...the expansion slot cover or the existing expansion card NOTE Before removing an installed expansion card disconnect any cables that may be attached to the expansion card a If you are installing an expansion card in a vacant socket remove the appropriate expansion slot cover on the back of the chassis Pull the slot cover straight up then away from the inside of the chassis Expansion card 27 ...

Страница 38: ... and carefully rock the card back and forth until the connectors pull free from the socket Pull the expansion card straight up from the socket then away from the inside of the chassis to release it from the chassis frame Be sure not to scrape the card against the other components 6 Store the removed card in anti static packaging 7 If you are not installing a new expansion card install an expansion...

Страница 39: ...OTE When installing an expansion card press firmly on the card so that the whole connector seats properly in the expansion card socket 9 Rotate the slot cover retention latch back in place to secure the expansion card 10 Connect external cables to the installed card if needed Connect internal cables to the system board if needed 11 Replace the computer access panel 12 If the computer was on a stan...

Страница 40: ... inch 5 mm 512 GB Solid state Drive SSD 512 GB Solid state Drive SSD M 2 2280SS PCIe 256 GB Solid state Drive SSD self encrypting SED 256 GB Solid state Drive SSD 256 GB Solid state Drive SSD TLC 256 GB Solid state Drive SSD M 2 2280SS PCIe 180 GB Solid state Drive SSD 180 GB Solid state Drive SSD OPAL2 MLC 128 GB Solid state Drive SSD self encrypting drive SED 128 GB Solid state Drive SSD 128 GB ...

Страница 41: ... black Expansion Card 4 PCI Express x16 Gen 3 X16PCIEXP black Expansion Card 5 Serial Port COMB black Optional Second Serial Port 6 DIMM4 Channel A DIMM4 white Memory Module 7 DIMM3 Channel A DIMM3 black Memory Module 8 DIMM2 Channel B DIMM2 white Memory Module 9 DIMM1 Channel B DIMM1 black Memory Module 10 SATA 3 0 SATA2 light blue Any SATA Device other than the Primary Hard Drive 11 SATA 3 0 SAT...

Страница 42: ... storage devices installed in the computer run Computer Setup Installing and Removing Drives When installing drives follow these guidelines The primary Serial ATA SATA hard drive must be connected to the dark blue primary SATA connector on the system board labeled SATA0 Connect secondary hard drives and optical drives to one of the light blue SATA connectors on the system board labeled SATA1 and S...

Страница 43: ...If you are inserting or removing a drive shut down the operating system properly turn off the computer and unplug the power cord Do not remove a drive while the computer is on or in standby mode Before handling a drive ensure that you are discharged of static electricity While handling a drive avoid touching the connector Handle a drive carefully do not drop it Do not use excessive force when inse...

Страница 44: ... page 20 3 Disconnect the power cable 1 and data cable 2 from the rear of the optical drive push the green release latch on the right rear side of the drive toward the center of the drive 3 and then slide the drive forward and out of the bay through the front bezel 4 CAUTION When removing the cables pull the tab or connector instead of the cable itself to avoid damaging the cable 34 Chapter 4 Remo...

Страница 45: ...ign the small pin on the release latch with the small hole on the side of the drive and press the latch firmly onto the drive 5 Slide the optical drive through the front of the chassis all the way into the bay so that it locks in place 1 and then connect the power cable 2 and data cable 3 to the rear of the drive 6 Connect the opposite end of the data cable to one of the light blue SATA connectors...

Страница 46: ...moved Removing and replacing a primary 3 5 inch hard drive NOTE Before you remove the old hard drive be sure to back up the data from the old hard drive so that you can transfer the data to the new hard drive 1 Prepare the computer for disassembly Preparation for disassembly on page 19 2 Remove the access panel Access panel on page 20 3 Disconnect the power cable 1 and data cable 2 from the back o...

Страница 47: ...drive outward 1 While pulling the release lever out slide the drive back until it stops and then lift the drive up and out of the bay 2 5 To install a hard drive you must transfer the mounting screws from the old hard drive to the new hard drive Drives 37 ...

Страница 48: ...rimary hard drive must be connected to the dark blue connector on the system board labeled SATA0 to avoid any hard drive performance problems 8 Replace the computer access panel 9 If the computer was on a stand replace the stand 10 Reconnect the power cord and any external devices and then turn on the computer 11 Lock any security devices that were disengaged when the access panel was removed 38 C...

Страница 49: ...ts upright position 4 Disconnect the power cable 1 and data cable 2 from the rear of the hard drive Press the latch on the side of the drive cage 3 and then slide the drive out of the drive bay 4 5 If you are installing a new drive refer to Installing a secondary 3 5 inch hard drive on page 40 If you are not installing a new drive rotate the drive cage down and replace the access panel Drives 39 ...

Страница 50: ...TE HP has supplied four extra silver 6 32 mounting screws installed on the chassis next to the primary 3 5 inch hard drive bay Refer to Installing and Removing Drives on page 32 for an illustration of the location of the extra mounting screws When replacing a drive transfer the four mounting screws from the old drive to the new drive 4 Rotate the drive cage to its upright position 40 Chapter 4 Rem...

Страница 51: ...ve connect the other end of the data cable to the dark blue SATA connector on the system board 6 Rotate the drive cage back down to its normal position CAUTION Be careful not to pinch any cables or wires when rotating the drive cage down 7 Replace the computer access panel 8 If the computer was on a stand replace the stand 9 Reconnect the power cord and any external devices and then turn on the co...

Страница 52: ... for disassembly on page 19 2 Remove the access panel Access panel on page 20 3 Rotate the drive cage to its upright position 4 Disconnect the power cable 1 and data cable 2 from the back of the hard drive 42 Chapter 4 Removal and replacement procedures small form factor SFF chassis ...

Страница 53: ...e the drive cage down and replace the access panel Installing a 2 5 inch hard drive 1 Prepare the computer for disassembly Preparation for disassembly on page 19 2 Remove the access panel Access panel on page 20 3 Install four black and blue M3 isolation mounting guide screws two on each side of the drive NOTE M3 metric isolation mounting guide screws can be purchased from HP When replacing a driv...

Страница 54: ...5 Align the mounting screws on the drive with the J slots on the sides of the drive bay Press the drive up into the drive bay then slide it forward until it locks in place 44 Chapter 4 Removal and replacement procedures small form factor SFF chassis ...

Страница 55: ...d of the data cable to one of the light blue SATA connectors on the system board 7 Rotate the drive cage back down to its normal position CAUTION Be careful not to pinch any cables or wires when rotating the drive cage down 8 Replace the computer access panel 9 If the computer was on a stand replace the stand 10 Reconnect the power cord and any external devices and then turn on the computer 11 Loc...

Страница 56: ...onnect the cable from the system board connector labeled SATAPWR0 5 Disconnect the cable from the hard drive and the optical drive 6 Remove the cable from the clips on the base pan and on the drive cage and then remove the drive power cable from the computer To reinstall the drive power cable reverse the removal procedure 46 Chapter 4 Removal and replacement procedures small form factor SFF chassi...

Страница 57: ...Prepare the computer for disassembly Preparation for disassembly on page 19 2 Remove the access panel Access panel on page 20 3 Rotate the baffle upward 4 Pull the baffle away from the rear of the computer to disengage the clips on the baffle from the rear of the computer Small baffle 47 ...

Страница 58: ...mbly Preparation for disassembly on page 19 2 Remove the access panel Access panel on page 20 3 Remove the power cable from the clips on top of the baffle 4 Lift the baffle off the fan sink and out of the computer To install the fan baffle reverse the removal procedure 48 Chapter 4 Removal and replacement procedures small form factor SFF chassis ...

Страница 59: ...urity screw that secures the lock NOTE The security screw requires a special security wrench to remove 4 From the inside of the computer lift the hood lock out of the computer To install the hood lock reverse the removal procedure When installing the hood lock on the inside rear of the computer insert the clips on the back of the lock into the slots on the computer rear panel 1 and then rotate the...

Страница 60: ...50 Chapter 4 Removal and replacement procedures small form factor SFF chassis ...

Страница 61: ...s panel on page 20 3 Remove the front bezel Front bezel on page 20 4 Rotate the drive cage to its upright position 5 Disconnect the cables from the system board as follows 1 Yellow connector labeled FRONT_USB 2 Blue connector labeled FRONT AUD 3 Blue connector labeled FRONT_USB3 0 6 Remove the cables from the three clips built into the basepan 4 7 Remove the Torx T15 screw 1 that secures the assem...

Страница 62: ...f the computer To install the front I O assembly reverse the removal procedure NOTE Be sure to correctly route the cables beneath the drive cage when reinstalling the assembly Proper cable routing prevents damage to the cables and allows the drive cage to close properly 52 Chapter 4 Removal and replacement procedures small form factor SFF chassis ...

Страница 63: ...otate the drive cage to its upright position 5 From the inside of the front of the chassis press the tab at the top of the power switch 1 and push the top of the power switch away from the front of the chassis 2 6 Remove the cable from the clips built into the bottom of the chassis then and disconnect the power switch cable from the system board connector labeled PB LED 7 Remove the power switch a...

Страница 64: ...e 20 3 Remove the front bezel Front bezel on page 20 4 Rotate the drive cage to its upright position 5 From the outside front of the chassis remove the two Torx T15 screws that secure the speaker 6 From the inside of the chassis disconnect the speaker cable from the white system board labeled SPKR and the remove the speaker from the chassis To install the speaker reverse the removal procedures 54 ...

Страница 65: ...el on page 20 3 Rotate the drive cage to its upright position 4 Rotate the small baffle into the upright position Small baffle on page 47 5 Remove the fan baffle Fan baffle on page 48 6 Disconnect the fan cable from the system board connector labeled CPUFAN 1 and then loosen the four captive screws 2 that secure the fan sink to the system board tray CAUTION Fan sink retaining screws should be remo...

Страница 66: ...B 3 2 GHz AMD A8 7600B 3 1 GHz AMD A6 8550B 3 7 GHz AMD A6 8350B 3 5 GHz AMD A4 7300B 3 8 GHz 1 Prepare the computer for disassembly Preparation for disassembly on page 19 2 Remove the access panel Access panel on page 20 3 Rotate the drive cage to its upright position 4 Rotate the small baffle into the upright position Small baffle on page 47 5 Remove the fan baffle Fan baffle on page 48 6 Remove...

Страница 67: ...The heat sink must be installed within 24 hours of installing the processor to prevent damage to the processor s solder connections To replace the processor reverse the removal procedures NOTE After installing a new processor onto the system board always update the system ROM to ensure that the latest version of the BIOS is being used on the computer The latest system BIOS can be found on the Web ...

Страница 68: ...ent on the system board when the computer is plugged into an active AC outlet To avoid possible personal injury and damage to the equipment the power cord should be disconnected from the computer and or the AC outlet before opening the computer 1 Prepare the computer for disassembly Preparation for disassembly on page 19 2 Remove the access panel Access panel on page 20 3 Rotate the drive cage up ...

Страница 69: ...release lever at the front of the power supply 1 slide the power supply forward and then remove it from the chassis 2 To install the power supply reverse the removal procedure CAUTION When installing the power supply cables make sure they are properly positioned so they are not cut by the drive cage and are not pinched by the rotating power supply Power supply 59 ...

Страница 70: ...ard Memory modules Memory on page 23 Expansion cards Expansion card on page 26 Heat sink Fan sink on page 55 Processor Processor on page 56 7 Disconnect all cables connected to the system board noting their location for reinstallation 8 Remove the eight Torx T15 screws that secure the system board to the chassis 9 Slide the system board toward the front of the computer to disengage the I O panel a...

Страница 71: ...emory module FRONT USB Yellow Front I O DIMM3 Black Memory module BATTERY Black RTC battery DIMM4 White Memory module FRONT AUD Blue Front I O PSWD Green Clear system passwords X4PCIEXP Black Expansion card PB LED Black Front I O power switch X1PCIEXP2 Black Expansion card PWRCMD White Power supply X1PCIEXP1 Black Expansion card SATAPWR0 Black Drives X16PCIEXP White Expansion card PWR White 6 pin ...

Страница 72: ... side is facing down and place the computer in the optional stand NOTE To stabilize the computer in a tower orientation HP recommends the use of the optional tower stand 3 Reconnect the power cord and any external devices and then turn on the computer NOTE Ensure at least 10 2 centimeters 4 inches of space on all sides of the computer remains clear and free of obstructions 4 Lock any security devi...

Страница 73: ...stablish a setup password that controls access to the Computer Setup F10 Utility and the settings described in this section Secure integrated I O functionality including the serial USB or parallel ports audio or embedded NIC so that they cannot be used until they are unsecured Enable or disable removable media boot ability Solve system configuration errors detected but not automatically fixed duri...

Страница 74: ...menu press Esc 5 To apply and save changes select Main Save Changes and Exit If you have made changes that you do not want applied select Ignore Changes and Exit To reset to factory settings or previously saved default settings some models select Apply Factory Defaults and Exit This option will restore the original factory system defaults NOTE Not all settings shown in the following sections are a...

Страница 75: ...BIOS version Integrated Video BiOS Revision Born On Date Serial Number SKU number UUID Universally Unique Identifier Asset Tracking Number Feature Byte Build ID Product Family System Board ID System Board CT Integrated MAC Address System Diagnostics Starts HP PC Hardware Diagnostics UEFI Lets you perform the following functions Memory Test Hard Drive Check Language Update System BIOS Lets you upda...

Страница 76: ...ttings and clears any established passwords Apply Factory Defaults and Exit Restores the factory system configuration settings as the default Ignore Changes and Exit Exits Computer Setup without applying or saving any changes Save Changes and Exit Saves changes to system configuration or default settings and exits Computer Setup Suppress POST Errors Suppresses most system messages during POST Powe...

Страница 77: ... Lets you change the BIOS administrator password You must know the current password to be able to change it Password Policy Let you set the guidelines for a valid password Options include Password minimum length Requires at least one symbol Requires at least one number Requires at least one upper case character Requires at least one lower case character Allow spaces Clear Password Jumper Select Ho...

Страница 78: ...h a program that utilizes Secure Erase firmware commands no file recovery program partition recovery program or other data recovery method will be able to extract data from the drive Save Restore MBR of the system hard drive Enabling this feature will save the Master Boot Record MBR of the system hard drive If the MBR gets changed the user will be prompted to restore the MBR Default is disabled Th...

Страница 79: ...POST process This delay is sometimes needed for hard disks on some PCI cards that spin up very slowly so slowly that they are not ready to boot by the time POST is finished The POST delay also gives you more time to select F10 to enter Computer F10 Setup Default is 0 Select the devices that the computer can boot from as well as other options including Fast Boot Default is disabled CD ROM Boot Defa...

Страница 80: ...on Secure Boot Lets you make sure an operating system is legitimate before booting to it making Windows resistant to malicious modification from preboot to full OS booting preventing firmware attacks UEFI and Windows Secure Boot only allow code signed by pre approved digital certificates to run during the firmware and OS boot process Default is Legacy Support Enable and Secure Boot Disable Secure ...

Страница 81: ... is allocated permanently to graphics and is unavailable to the operating system For example if you set this value to 512M on a system with 2 GB of RAM the system always allocates 512 MB for graphics and the other 1 5 GB for use by the BIOS and operating system Default is Auto which sets memory allocation to 512 MB Audio Device Select to show the device in the operating system Default is enabled I...

Страница 82: ... in the S5 state Power is removed from the wake up circuitry the expansion slots and any management features while in S5 Default is disabled SATA Power Management enable disable Enables or disables SATA bus and or device power management Default is enabled PCI Express Power Management enable disable Enabling this option permits the PCI Express links to use Active Power State Management ASPM to ent...

Страница 83: ...BIOS via Network during the next boot checks whether an updated BIOS is available and installs only specified updates This value is independent of the Automatic Update Frequency setting Available configurations include Check and install all BIOS updates automatically Check and install only important updates automatically Check for BIOS updates but let me decide whether to install them Default is C...

Страница 84: ... lights are error codes that will help you diagnose the problem Refer to POST error messages and diagnostic front panel LEDs and audible codes on page 106 for more information If the screen is blank plug the monitor into a different video port on the computer if one is available Or replace the monitor with a monitor that you know is functioning properly If you are working on a network plug another...

Страница 85: ...urned on and the green monitor light is on Check the Power LED on the front of the computer to see if it is flashing red The flashing lights are error codes that will help you diagnose the problem Refer to POST error messages and diagnostic front panel LEDs and audible codes on page 106 for more information Turn up the brightness and contrast controls of the monitor if the monitor is dim Press and...

Страница 86: ...applied to the system board To reduce the risk of personal injury from electrical shock and or hot surfaces be sure to disconnect the power cord from the wall outlet and allow the internal system components to cool before touching Cannot access the Computer Setup F10 Utility when booting the computer Cause Solution The Computer Setup F10 Utility is set to fast boot causing the F10 access screen to...

Страница 87: ...is turned on Press the Num Lock key The Num Lock light must be off if you want to use the arrow keys on the keypad You can also disable or enable the Num Lock key in Computer Setup at Advanced Device Options There is no sound or sound volume is too low Cause Solution System volume may be set low or muted 1 Check the Computer Setup settings to make sure the internal system speaker is not muted this...

Страница 88: ...cons in the task tray To prevent these applications from launching at startup In Windows 7 a Go to Start All Programs Accessories Run b Type msconfig and then press Enter c On the Startup tab of the System Configuration Utility clear applications that you do not want to launch automatically and the click OK In Windows 8 1 a On the Start screen right click and then select the All apps icon b Under ...

Страница 89: ...flashing Cause Solution System unable to power on Press and hold the power button for less than 4 seconds If the hard drive LED turns white then 1 If equipped with a voltage selector check that the voltage selector located on the rear of the power supply is set to the appropriate voltage Proper voltage setting depends on your region 2 Remove the expansion cards one at a time until the 5V_aux light...

Страница 90: ... fan does not spin make sure the fan cable is plugged onto the system board header 3 If fan a plugged in and not spinning replace it Computer powered off automatically and the Power LED flashes red three times and then white four times Cause Solution Power failure power supply is overloaded 1 If equipped with a voltage selector check that the voltage selector located on the rear of the power suppl...

Страница 91: ...rive Select Properties and then select the Tools tab Under Error checking click Check Now In Windows 8 1 on the Start screen type e and then click File Explorer from the list of applications In the left column expand Computer right click on a drive select Properties and then select the Tools tab Under Error checking click Check In Windows 10 type file in the taskbar search box and then select File...

Страница 92: ...rst in a multi hard drive configuration If attempting to boot from a hard drive ensure it is attached to the system board dark blue SATA connector Bootable hard drive is not listed first in the Boot Order Run the Computer Setup utility and select Storage Boot Order and ensure the bootable hard drive is listed immediately under the Hard Drive entry Computer will not boot from hard drive Cause Solut...

Страница 93: ...rd If using an SD card make sure that the lock tab located on the right of the SD card is not in the locked position If using a Memory Stick PRO card make sure that the lock tab located on the bottom of the Memory Stick PRO card is not in the locked position Can not write to the media card Cause Solution The media card is a read only memory ROM card Check the manufacturer s documentation included ...

Страница 94: ... installed into the computer and you are turning the PC on for the first time Wait a few seconds so that the operating system can recognize the reader and the available ports and then recognize the media inserted in the reader After inserting a media card in the reader the computer attempts to boot from the media card Cause Solution The inserted media card has boot capability 1 If you do not want ...

Страница 95: ...e monitor 1 In Control Panel select Category from the View by list then under Appearance and Personalization select Adjust screen resolution To access Control Panel in Windows 7 click Start and then select Control Panel To access Control Panel in Windows 8 1 from the Start screen type c and then select Control Panel from the list of applications To access Control Panel in Windows 10 type control p...

Страница 96: ...deo Replace the system board Monitor does not function properly when used with energy saver features Cause Solution Monitor without energy saver capabilities is being used with energy saver features enabled Disable monitor energy saver feature Dim characters Cause Solution The brightness and contrast controls are not set properly Adjust the monitor brightness and contrast controls Cables are not p...

Страница 97: ...on Monitor video cable is disconnected Connect the video cable between the monitor and computer CAUTION Ensure that the computer power is off while connecting the video cable Out of Range displays on screen Cause Solution Video resolution and refresh rate are set higher than what the monitor supports Restart the computer and enter Safe Mode Change the settings to a supported setting then restart t...

Страница 98: ...uzzy focus streaking ghosting or shadowing effects horizontal scrolling lines faint vertical bars or unable to center the picture on the screen flat panel monitors using an analog VGA input connection only Cause Solution Flat panel monitor s internal digital conversion circuits may be unable to correctly interpret the output synchronization of the graphics card 1 Select the monitor s Auto Adjustme...

Страница 99: ...p Enable the audio in Computer Setup Security Device Security System Audio The external speakers are not turned on Turn on the external speakers The audio device may be connected to the wrong jack Ensure that the device is connected to the correct jack on the computer The rear audio jack output is the green receptacle The speakers should be plugged into the line out jack and the headphones should ...

Страница 100: ...ice Sound from headphones is not clear or muffled Cause Solution Headphones are plugged into the rear audio output connector The rear audio output connector is for powered audio devices and is not designed for headphone use Plug the headphones into the headphone connector on the front of the computer Computer appears to be locked up while recording audio Cause Solution The hard disk may be full Be...

Страница 101: ...lowing table Printer will not print Cause Solution Printer is not turned on and online Turn the printer on and make sure it is online The correct printer drivers for the application are not installed 1 Install the correct printer driver for the application 2 Try printing using the MS DOS command DIR C printer port where printer port is the address of the printer being used If the printer works rel...

Страница 102: ... separated from ports with USB 3 0 devices If you still experience interference you may have to place the connectors farther apart using an external USB hub Keyboard commands and typing are not recognized by the computer Cause Solution Keyboard connector is not properly connected Shut down the computer reconnect the keyboard to the back of the computer and then restart the computer Program in use ...

Страница 103: ...o the back of the computer or the keyboard and restart Windows 10 1 Press the Ctrl and Esc keys at the same time or press the Windows logo key to display the Start menu 2 Use the arrow keys to scroll to and select the power icon at the top right on the menu and then press Enter 3 Use the arrow keys to select Shut Down and then press Enter 4 After the shutdown is complete plug the mouse connector i...

Страница 104: ...curely connected and that pins in the connector are not bent down Cable s of new external device are loose or power cables are unplugged Ensure that all cables are properly and securely connected and that pins in the cable or connector are not bent down Power switch of new external device is not turned on Turn off the computer turn on the external device then turn on the computer to integrate the ...

Страница 105: ...ll or remove a DIMM module 1 Reseat DIMMs Power on the system 2 Replace DIMMs one at a time to isolate the faulty module NOTE DIMM1 or XMM1 must always be installed DIMM1 must be installed before DIMM2 and DIMM3 must be installed before DIMM4 3 Replace third party memory with HP memory 4 Replace the system board Solving Network Problems Some common causes and solutions for network problems are lis...

Страница 106: ...ct Device Manager To access Device Manager in Windows 8 1 from the Start screen type c select Control Panel from the list of applications and then select Device Manager To access Device Manager in Windows 10 type device manager in the taskbar search box and then select Device Manager from the list of applications Network controller is disabled 1 Run Computer Setup and enable network controller 2 E...

Страница 107: ... is not configured for this computer Select the Network and Sharing Center icon in the Control Panel and configure the network controller To access Control Panel in Windows 7 click Start and then select Control Panel To access Control Panel in Windows 8 1 from the Start screen type c and then select Control Panel To access Control Panel in Windows 10 type control panel in the taskbar search box an...

Страница 108: ...Installation Server contains the NIC drivers for your NIC System setup utility reports unprogrammed EEPROM Cause Solution Unprogrammed EEPROM Contact an authorized service provider Solving memory problems If you encounter memory problems some common causes and solutions are listed in the following table CAUTION Power may still be supplied to the DIMMs when the computer is turned off depending on t...

Страница 109: ... is wrong Cause Solution The memory modules may not be installed correctly Check that the memory modules have been installed correctly and that proper modules are used Integrated graphics may use system memory No action required Insufficient memory error during operation Cause Solution Too many Terminate and Stay Resident programs TSRs are installed Delete any TSRs that you do not need You have ru...

Страница 110: ...he system may not have automatically recognized a newly installed device See reconfiguration directions in the Solving Hardware Installation Problems on page 94 section If the system still does not recognize the new device check to see if the device is listed within Computer Setup If it is listed the probable cause is a driver problem If it is not listed the probable cause is a hardware problem If...

Страница 111: ... as audio or video Wait at least 30 seconds to let the DVD ROM drive determine the type of media being played If the disc still does not start read the other solutions listed for this topic CD or DVD disc is dirty Clean CD or DVD with a CD cleaning kit available from most computer stores Windows does not detect the CD ROM or DVD ROM drive 1 Use Device Manager to remove or uninstall the device To a...

Страница 112: ...tup utility and enable USB ports in Security USB Security The device was not properly seated before power up Ensure the device is fully inserted into the USB port before applying power to the system System will not boot from USB flash drive Cause Solution Boot order is not correct Run the Computer Setup utility and change boot sequence in Storage Boot Order Removable Media Boot is disabled in the ...

Страница 113: ...he common causes and solutions listed in the following table Unable to connect to the Internet Cause Solution Internet Service Provider ISP account is not set up properly Verify Internet settings or contact your ISP for assistance Web browser is not set up properly Verify that the Web browser is installed and set up to work with your ISP Cable DSL modem is not plugged in Plug in cable DSL modem Yo...

Страница 114: ...the Delete button 4 Select the Cookies check box and click the Delete button Windows 10 1 Type control panel in the taskbar search box and then select Control Panel from the list of applications 2 Click Internet Options 3 In the Browsing history section click the Delete button 4 Select the Cookies and website data check box and click the Delete button Cannot automatically launch Internet programs ...

Страница 115: ...mputer will not continue and the HP logo does not display Cause Solution ROM issue POST error has occurred Observe the beeps and LED lights on the front of the computer See POST error messages and diagnostic front panel LEDs and audible codes on page 106 to determine possible causes See the Worldwide Limited Warranty for terms and conditions Illegal Operation has Occurred error message is displaye...

Страница 116: ...hedule reconfigure the computer to the Full Boot Every x Days mode using Computer Setup NOTE For more information on Computer Setup see Computer Setup F10 Utility on page 63 POST numeric codes and text messages This section covers those POST errors that have numeric codes associated with them The section also includes some text messages that may be encountered during POST NOTE The computer will be...

Страница 117: ...tup to update this information 00B MEBx Module did not checksum correctly Memory error during POST execution of the Management Engine ME BIOS Extensions option ROM 1 Reboot the computer 2 Unplug the power cord re seat the memory modules and reboot the computer 3 If the memory configuration was recently changed unplug the power cord restore the original memory configuration and reboot the computer ...

Страница 118: ...odule in Memory Socket s X X A memory module in memory socket identified in the error message is missing critical SPD information or is incompatible with the chipset 1 Verify proper memory module type 2 Try another memory socket 3 Replace with a supported module 2E4 DIMM Configuration Warning The current memory configuration is not optimized Rearrange the DIMMs so that each channel has the same am...

Страница 119: ...y and resetting CMOS on page 113 3 Replace the hard disk drive 3F2 Hard Disk 2 Error Hard disk 2 error 1 Check and or replace cables 2 Clear CMOS See Password security and resetting CMOS on page 113 3 Replace the hard disk drive 400 Serial Port A Address Conflict Detected Both external and internal serial ports are assigned to the same resources 1 Remove any serial port expansion cards 2 Clear CMO...

Страница 120: ...be very low For optimal performance replace the battery 70x Wireless Mode Not Supported The system has detected a wireless module installed in the system that is not supported and has been disabled Replace with a supported module 800 Keyboard Error Keyboard failure 1 Reconnect keyboard with computer turned off 2 Check connector for bent or missing pins 3 Ensure that none of the keys are depressed ...

Страница 121: ...tioned 1 Reseat power supply fan 2 Reseat fan cable 3 Replace power supply fan Interpreting system validation diagnostic front panel LEDs and audible codes During the system validation phase that occurs at system startup the BIOS validates the functionality of the following subsystems and conditions AC adapter System board power Processor failure BIOS corruption Memory failure Graphics failure Sys...

Страница 122: ...s checking or recovering the boot block Hardware 3 2 The embedded controller has timed out waiting for BIOS to return from memory initialization 3 3 The embedded controller has timed out waiting for BIOS to return from graphics initialization 3 4 The system board displays a power failure crowbar 3 5 The processor is not detected 3 6 The processor does not support an enabled feature Thermal 4 2 A p...

Страница 123: ...n the computer by resetting the password jumper CAUTION Pushing the CMOS button will reset CMOS values to factory defaults It is important to back up the computer CMOS settings before resetting them in case they are needed later Back up is easily done through Computer Setup See Computer Setup F10 Utility on page 63 for information on backing up the CMOS settings Resetting the password jumper CAUTI...

Страница 124: ...assword jumper is green so that it can be easily identified For assistance locating the password jumper and other system board components see the system board components image at System board on page 60 5 Remove the jumper from pins 1 and 2 6 Place the jumper on either pin 1 or 2 but not both so that it does not get lost 7 Replace the access panel and reconnect the external equipment 8 Plug in the...

Страница 125: ... as shown current password 4 Press Enter Clearing and resetting the CMOS The computer s configuration memory CMOS stores information about the computer s configuration The CMOS button resets CMOS but does not clear the power on and setup passwords 1 Turn off the computer and any external devices and disconnect the power cord from the power outlet 2 Disconnect the keyboard monitor and any other ext...

Страница 126: ... The CMOS button will not clear CMOS if the power cord is connected NOTE For assistance locating the CMOS button and other system board components see the system board components image at System board on page 60 5 Replace the access panel 6 Reconnect the external devices 7 Plug in the computer and turn on power NOTE You will receive POST error messages after clearing CMOS and rebooting advising yo...

Страница 127: ...tics from one of three places depending on your preference and the health of the computer 1 Turn on the computer and press Esc repeatedly until the BIOS Boot Menu appears 2 Press F2 or select Diagnostics F2 Pressing F2 signals the system to search for the diagnostics in the following locations a A connected USB drive to download the diagnostics tools to a USB drive see the instructions in Download...

Страница 128: ...ext box enter the product name and then click Go or Click Find Now to let HP automatically detect your product 4 Select your computer model and then select your operating system 5 In the Diagnostic section click HP UEFI Support Environment 6 Click Download and then select Run 118 Chapter 9 HP PC Hardware Diagnostics ...

Страница 129: ...al information For more information see Using Windows tools on page 121 NOTE If storage is 32 GB or less Microsoft System Restore is disabled by default Creating HP Recovery media select products only If possible check for the presence of the Recovery partition and the Windows partition From the Start menu select File Explorer If your computer does not list the Windows partition and the Recovery p...

Страница 130: ...he computer the drive cannot be connected to a USB port on an external device such as a USB hub If you cannot create DVD media yourself you can obtain recovery discs for your computer from HP See the Worldwide Telephone Numbers booklet included with the computer You can also find contact information on the HP website Go to http www hp com support select your country or region and follow the on scr...

Страница 131: ...n select products only or use the HP Recovery media For more information see Recovering using HP Recovery Manager on page 121 If you have not already created recovery media see Creating HP Recovery media select products only on page 119 On select products if you want to recover the computer s original factory partition and content or if you have replaced the hard drive you can use the Factory Rese...

Страница 132: ...re installed at the factory Factory Reset Restores the computer to its original factory state by deleting all information from the hard drive and re creating the partitions Then it reinstalls the operating system and the software that was installed at the factory The HP Recovery partition select products only allows System Recovery only Using the HP Recovery partition select products only The HP R...

Страница 133: ...y on page 119 NOTE The Remove Recovery Partition option is only available on products that support this function Follow these steps to remove the HP Recovery partition 1 Type recovery in the taskbar search box and then select HP Recovery Manager 2 Select Remove Recovery Partition and then follow the on screen instructions Backing up restoring and recovering in Windows 8 1 or Windows 8 Your compute...

Страница 134: ...and steps see Help and Support From the Start screen type help and then select Help and Support Using Reset when the system is not responding NOTE You may be prompted by User Account Control for your permission or password when you perform certain tasks To continue a task select the appropriate option For information about User Account Control see Help and Support From the Start screen type help a...

Страница 135: ... system media completely erases the hard drive contents and reformats the hard drive All files that you have created and any software that you have installed on the computer are permanently removed When reformatting is complete the recovery process helps you restore the operating system as well as drivers software and utilities To initiate recovery using Windows operating system media NOTE This pr...

Страница 136: ...nd other personal files create a backup of your personal information If files are accidentally deleted from the hard drive and they can no longer be restored from the Recycle Bin or if files become corrupted you can restore the files that you backed up In case of system failure you can use the backup files to restore the contents of your computer See Backing up your information on page 128 NOTE HP...

Страница 137: ... Recovery Media Creation formats the USB flash drive deleting any files on it 1 Close all open programs 2 Insert the USB flash drive into a USB port on the computer 3 Click the Start button click All Programs click Security and Protection click Recovery Manager and then click Recovery Media Creation 4 Click Create recovery media with a USB flash drive and then click Next 5 Select the USB flash dri...

Страница 138: ...ystem setup As you add new software and data files you should continue to back up your system on a regular basis to maintain a reasonably current backup Your initial and subsequent backups allow you to restore your data and settings if a failure occurs You can back up your information to an optional external hard drive a network drive or discs Note the following when backing up Store personal file...

Страница 139: ...backups you made If you were not able to create system recovery DVDs or USB flash drive you can order a recovery disc set from support Go to http www hp com support select your country or region and follow the on screen instructions NOTE Always use the System Restore procedure before you use the System Recovery program See System Restore on page 129 You must choose one of the following methods to ...

Страница 140: ...esponding CAUTION System Recovery deletes all data and programs you created or installed If Windows is not responding but the computer is working follow these steps to perform a System Recovery 1 Turn off the computer If necessary press and hold the power button until the computer turns off 2 Disconnect all peripheral devices from the computer except the monitor keyboard and mouse 3 Press the powe...

Страница 141: ... finished remove the recovery disc or the recovery USB flash drive from the system 10 Click Finish to restart the computer Using HP Recovery Disc operating system discs select models only Use the steps provided in this section if you used HP Recovery Disc Creator to create a Windows 7 operating system DVD and a Driver Recovery DVD If you created recovery media using Creating recovery media using H...

Страница 142: ...nu and press Enter Use the arrow keys to select the location where the recovery DVD is inserted Press Enter to boot from that device 3 When prompted press any keyboard key 4 Follow the on screen instructions 5 Click Next 6 Select Install now 7 Follow the on screen instructions After the repair is completed 1 Eject the Windows 7 operating system DVD and then insert the Driver Recovery DVD 2 Follow ...

Страница 143: ...e lithium battery can be extended by plugging the computer into a live AC wall socket The lithium battery is only used when the computer is NOT connected to AC power HP encourages customers to recycle used electronic hardware HP original print cartridges and rechargeable batteries For more information about recycling programs go to http www hp com recycle 1 Remove disengage any security devices th...

Страница 144: ...t extends above one edge of the battery When the battery pops up lift it out 1 b To insert the new battery slide one edge of the replacement battery under the lip of the holder with the positive side up Push the other edge down until the clamp snaps over the other edge of the battery 2 Type 3 a Pull back on the clip 1 that is holding the battery in place and remove the battery 2 134 Appendix A Bat...

Страница 145: ...ing steps to complete this procedure 8 Replace the computer access panel 9 Plug in the computer and turn on power to the computer 10 Reset the date and time your passwords and any special system setups using Computer Setup 11 Lock any security devices that were disengaged when the computer access panel was removed 135 ...

Страница 146: ...cy responsible for evaluation in the country where the power cord set will be installed 2 The power cord set must have a minimum current capacity of 10A 7A Japan only and a nominal voltage rating of 125 or 250 volts AC as required by each country s power system 3 The diameter of the wire must be a minimum of 0 75 mm2 or 18AWG and the length of the cord must be between 1 8 m 6 feet and 3 6 m 12 fee...

Страница 147: ... set fittings appliance coupler and wall plug must bear the certification mark of the agency responsible for evaluation in the country where it will be used 2 The flexible cord must be Type SVT or equivalent No 18 AWG 3 conductor The wall plug must be a two pole grounding type with a NEMA 5 15P 15A 125V or NEMA 6 15P 15A 250V configuration 3 Appliance coupler flexible cord and wall plug must bear ...

Страница 148: ...e 2 Follow the instructions to flash the BIOS that are found on the website Flashing the BIOS will reset it back to factory settings 3 Turn on the system and while system is powering on and after the HP splash screen press the F10 key to enter BIOS setup screen 4 Select Security System Security from the main menu If the Embedded Security Device Support option is set to Disable skip to step 7 5 To ...

Страница 149: ...and AC power cord and turn the computer on The passwords are now cleared and all other user configurable non volatile memory settings are reset to their factory default values 14 Enter the F10 setup utility 15 Select File Default Setup Restore Factory Settings as Default This will set the default settings back to the factory defaults 16 Select File Apply Defaults and Exit 17 Shut down the computer...

Страница 150: ...limit may be limited by the type and number of options installed Relative Humidity noncondensing Operating Nonoperating 38 7 C max wet bulb 10 90 5 95 10 90 5 95 Maximum Altitude unpressurized Operating Nonoperating 10 000 ft 30 000 ft 3048 m 9144 m Power Supply Operating Voltage Range Rated Voltage Range Rated Line Frequency Operating Line Frequency 90 264 VAC 100 240 VAC 50 60 Hz 47 63 Hz Standa...

Страница 151: ...19 drive power cable removal and replacement 46 Driver Recovery DVD creating 127 using for restore 131 Driver Recovery media Windows 125 Driver Recovery media Windows 8 1 125 drives cable connections 32 installation 32 locations 32 E electrostatic discharge ESD 11 preventing damage 12 error codes 106 111 messages 106 expansion card installation 26 removal 26 F F10 Setup access problem 76 f11 recov...

Страница 152: ...fan 15 operating voltage range 140 removal and replacement 58 power supply SFF illustrated 6 power switch illustrated 7 removal and replacement 53 Power On password 114 115 power on password 113 printer port illustrated 7 26 printer problems 91 problems audio 89 CD ROM or DVD 100 Computer Setup 76 F10 Setup 76 flash drive 102 front panel 103 general 76 hard drive 81 hardware installation 94 Intern...

Страница 153: ...ws 7 129 system restore points creating Windows 7 126 System Restore Windows 7 129 T tamper proof screws tool 15 temperature control 13 tools servicing 15 Torx T15 screwdriver 15 tower orientation 62 V ventilation proper 13 W Windows 10 backup and restore 119 Windows 7 backing up information 128 backup and recovery 125 Backup and Restore 128 creating backups 126 creating recovery media 126 creatin...

Отзывы: