background image

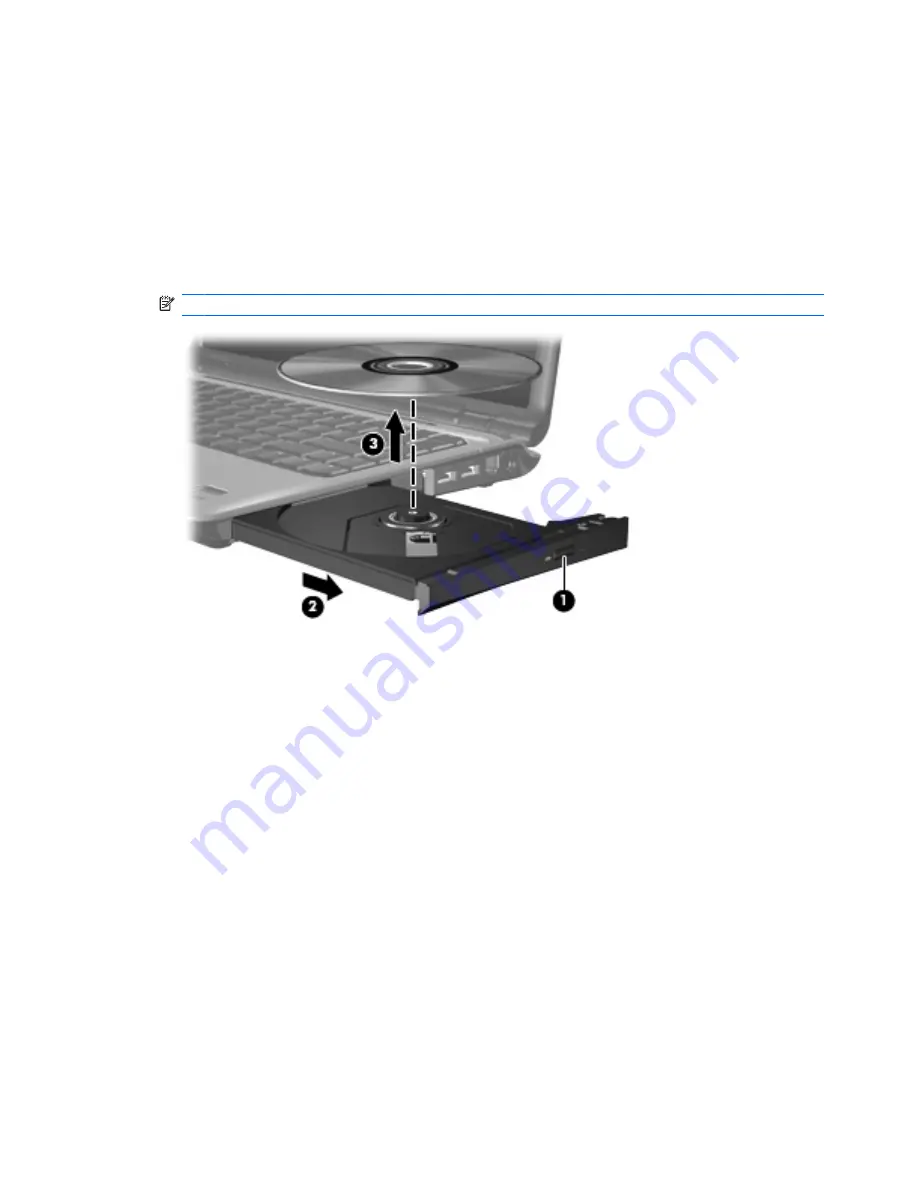
Removing an optical disc (CD or DVD)

There are 2 ways to remove a disc, depending on whether the disc tray opens normally or not.

When the disc tray opens

1.

Press the release button 

(1)

 on the drive bezel to release the disc tray, and then gently pull out the

tray 

(2)

 until it stops.

2.

Remove the disc 

(3)

 from the tray by gently pressing down on the spindle while lifting the outer

edges of the disc. Hold the disc by the edges and avoid touching the flat surfaces.

NOTE:

If the tray is not fully accessible, tilt the disc carefully as you remove it.

3.

Close the disc tray and place the disc in a protective case.

When the disc tray does not open

1.

Insert the end of a paper clip 

(1)

 into the release access in the front bezel of the drive.

2.

Press in gently on the paper clip until the tray is released, and then pull out the tray 

(2)

 until it stops.

12

Chapter 1   Using multimedia hardware

Содержание Dv2736us - Pavilion - Turion 64 X2 2.1 GHz

Страница 1: ...Multimedia User Guide ...

Страница 2: ... without notice The only warranties for HP products and services are set forth in the express warranty statements accompanying such products and services Nothing herein should be construed as constituting an additional warranty HP shall not be liable for technical or editorial errors or omissions contained herein First Edition November 2007 Document Part Number 460551 001 ...

Страница 3: ...Product notice This user guide describes features that are common to most models Some features may not be available on your computer iii ...

Страница 4: ...iv Product notice ...

Страница 5: ...g the installed optical drive 11 Inserting an optical disc CD or DVD 11 Removing an optical disc CD or DVD 12 When the disc tray opens 12 When the disc tray does not open 12 Using the media activity functions 14 Using the media activity hotkeys 14 Using the media activity buttons 15 Previous rewind button 15 Play pause button 15 Next fast forward button 16 Stop button 16 2 Working with multimedia ...

Страница 6: ...vi ...

Страница 7: ... Produce sound 3 Audio in microphone jack Connects an optional computer headset microphone stereo array microphone or monaural microphone 4 Audio out headphone jacks 2 Produce sound when connected to optional powered stereo speakers headphones ear buds a headset or television audio 5 Volume mute button Mutes and restores speaker sound 6 Volume scroll zone Adjusts speaker volume Using the audio fea...

Страница 8: ...me before putting on headphones earbuds or a headset For additional safety information refer to the Regulatory Safety and Environmental Notices CAUTION To prevent possible damage to an external device do not plug a single sound channel monaural connector into the headphone jack In addition to connecting headphones the headphone jack is used to connect the audio out function of an audio device such...

Страница 9: ... far right of the taskbar b Increase or decrease the volume by moving the slider up or down Click the Mute icon to mute the volume or a Right click the Volume icon in the notification area and then click Open Volume Mixer b In the Master Volume column increase or decrease the volume by moving the Volume slider up or down You can also mute the volume by clicking the Mute icon If the Volume icon is ...

Страница 10: ...ictures Pressing the media button launches the QuickPlay program Pressing the DVD button launches the DVD playback feature of the QuickPlay program NOTE If the computer has been set up to require a logon password you may be asked to log on to Windows QuickPlay launches after you log on Refer to the QuickPlay software Help for more information 4 Chapter 1 Using multimedia hardware ...

Страница 11: ...jector to the computer To connect a display device connect the device cable to the external monitor port NOTE If a properly connected external display device does not display an image press fn f4 to transfer the image to the device Repeatedly pressing fn f4 alternates the screen image between the computer display and the device Using the video features 5 ...

Страница 12: ...ted to the S Video out jack while simultaneously supporting an image on the computer display or on any other supported external display NOTE The S Video connection provides a higher quality image than a composite video connection To connect a video device to the S Video out jack 1 Plug one end of the S Video cable into the S Video out jack on the computer NOTE If the S Video out jack on the comput...

Страница 13: ...supporting an image on the computer display or any other supported external display NOTE To transmit video signals through the HDMI port you need an HDMI cable purchased separately available from most electronics retailers To connect a video or audio device to the HDMI port 1 Plug one end of the HDMI cable into the HDMI port on the computer 2 Connect the other end of the cable to the video device ...

Страница 14: ...iment with the following features Video Record and play back webcam video You can also e mail or upload video to YouTube using the icon on the software interface Streaming video When you open your instant message program YouCam displays a floating toolbar that lets you add graphic effects Special effects Add frames filters and emoticons to your snapshots and video Snapshots Take single frame or bu...

Страница 15: ...e your network firewall temporarily disable the firewall NOTE Under some circumstances a firewall can block access to Internet games interfere with printer or file sharing on a network or block authorized e mail attachments To temporarily solve the problem disable the firewall perform the task that you want to perform and then reenable the firewall To permanently resolve the problem reconfigure th...

Страница 16: ...inal image A higher saturation setting creates a bolder image a lower saturation setting creates a more subtle image Sharpness Controls the definition of edges in an image A higher sharpness setting creates a more defined image a lower sharpness setting creates a softer image Gamma Controls the contrast affecting the mid level grays or midtones of an image Adjusting the gamma of an image allows yo...

Страница 17: ...ull out the tray 2 4 Hold the disc by the edges to avoid touching the flat surfaces and position the disc label side up over the tray spindle NOTE If the tray is not fully accessible tilt the disc carefully to position it over the spindle 5 Gently press the disc 3 down onto the tray spindle until the disc snaps into place 6 Close the disc tray NOTE After you insert a disc a short pause is normal I...

Страница 18: ...on the spindle while lifting the outer edges of the disc Hold the disc by the edges and avoid touching the flat surfaces NOTE If the tray is not fully accessible tilt the disc carefully as you remove it 3 Close the disc tray and place the disc in a protective case When the disc tray does not open 1 Insert the end of a paper clip 1 into the release access in the front bezel of the drive 2 Press in ...

Страница 19: ...while lifting the outer edges of the disc Hold the disc by the edges and avoid touching the flat surfaces NOTE If the tray is not fully accessible tilt the disc carefully as you remove it 4 Close the disc tray and place the disc in a protective case Using an optical drive 13 ...

Страница 20: ...on of the fn key 1 and a function key When an audio CD or a DVD is not playing press fn f9 2 to play the disc When an audio CD or a DVD is playing use the following hotkeys To pause or resume playing the disc press fn f9 2 To stop the disc press fn f10 3 To play the previous track of an audio CD or the previous chapter of a DVD press fn f11 4 To play the next track of an audio CD or the next chapt...

Страница 21: ...pause button 2 Next fast forward button 3 Stop button 4 Previous rewind button Disc status Button Function Playing Previous rewind button Plays a previous track or chapter Playing fn previous rewind button Rewinds the playback Play pause button Disc status Button Function Not playing Play pause button Plays the disc Playing Play pause button Pauses the playback Using the media activity functions 1...

Страница 22: ...tion Playing Next fast forward button Plays the next track or chapter Playing fn next fast forward button Fast forwards the playback Stop button Disc status Button Function Playing Stop button Stops the playback 16 Chapter 1 Using multimedia hardware ...

Страница 23: ...iting to a disc connect the computer to a reliable external power source Do not write to a disc while the computer is running on battery power Before writing to a disc close all open programs except the disc software you are using Do not copy directly from a source disc to a destination disc or from a network drive to a destination disc Instead copy from a source disc or network drive to your hard...

Страница 24: ...ware 1 Select Start All Programs and then open the multimedia program you want to use For example if you want to use Windows Media Player to play an audio CD click Windows Media Player NOTE Some programs may be located in subfolders 2 Insert the media disc such as an audio CD into the optical drive 3 Follow the instructions on the screen or 1 Insert the media disc such as an audio CD into the opti...

Страница 25: ...c Otherwise you may see a warning message asking if you want to continue If this message is displayed click No After you click No the computer may behave in either of the following ways Playback may resume or The playback window in the multimedia program may close To return to playing the CD or DVD click the Play button in your multimedia program to restart the disc In rare cases you may need to e...

Страница 26: ... left pane click Device Manager NOTE Windows includes the User Account Control feature to improve the security of your computer You may be prompted for your permission or password for tasks such as installing applications running utilities or changing Windows settings Refer to Windows online Help for more information 3 Click the sign next to DVD CD ROM drives 4 Right click the DVD drive for which ...

Страница 27: ...crophone identifying 1 J jacks audio in microphone 1 2 audio out headphone 1 2 S Video out 6 M media activity buttons 15 media activity hotkeys 14 media button 4 microphone internal 1 microphones supported 2 monitor connecting 5 multimedia software described 17 using 18 mute button 1 3 O optical disc inserting 11 removing 12 writing to 17 optical drive playing 19 protecting 17 P ports external mon...

Страница 28: ......

Отзывы: