HP Designjet 510 series Скачать руководство пользователя страница 15

EN

FR

IT

ES

PT

RU

DE

10:6

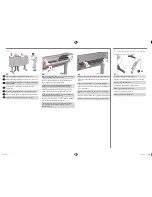
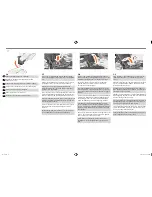
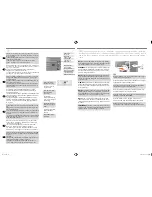
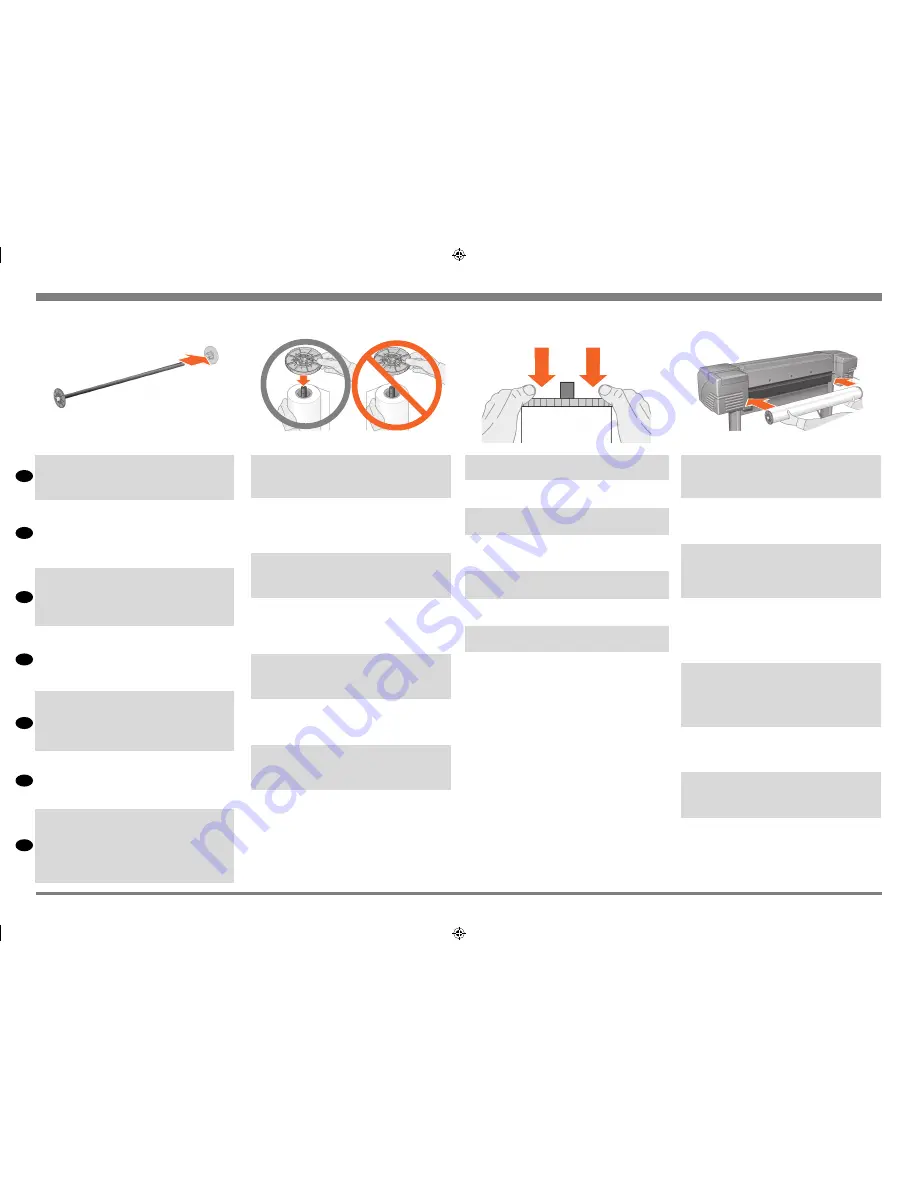
With the blue-colored roll stop on the right (as seen from 

the back of the printer), slide the spindle into the printer left 

and then right as shown by the arrows. The paper should 

oriented on the roll exactly as shown.

Dirigez le taquet bleu vers la droite (vue de l’arrière de 

l’imprimante), insérez la bobine dans l’imprimante, à 

gauche puis à droite (dans le sens des flèches). Le papier 

doit être orienté comme sur l’illustration ci-dessus.

Tenendo il blocco blu del rotolo a destra (visto dal retro 

della stampante), infilare l’alberino nella stampante prima a 

sinistra e poi a destra come indicato dalle frecce. La carta 

dovrà essere orientata sul rotolo secondo quanto indicato 

in figura.

Das blaue Endstück der Rolle muß sich rechts befinden (von 

der Rückseite des Druckers betrachtet). Schieben Sie die 

Spindel erst rechts und dann links gemäß der Pfeile in der 

nachfolgenden Abbildung in den Drucker. Das Papier muß 

auf der Rolle exakt wie nachfolgend abgebildet ausgerichtet 

sein.

Manteniendo el tope de color azul en la parte derecha 

(como se ve desde la parte posterior de la impresora), 

inserte el eje en la parte izquierda de la impresora y, a 

continuación, en la derecha como indican las flechas. El 

papel debe estar situado en el rollo exactamente como se 

muestra.

Com a trava de rolo azul na direita (como visto por trás 

da impressora), deslize o cilindro na esquerda e depois na 

direita da impressora como mostrado pelas setas. O papel 

deve ficar orientado no rolo exatamente como mostrado.

Вставьте шпиндель в принтер (синий ограничитель должен 

быть слева), как показано на рисунке. Вставьте сначала 

левый конец шпинделя, а затем правый. Бумага должна 

быть расположена именно так, как показано на рисунке.

10

10:5

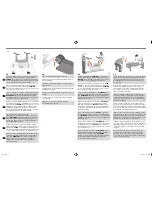
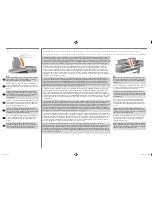
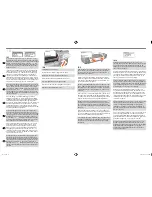
Put the removable stop on to the upper end of the  

spindle, and push it down as far as it will go.

Insérez le taquet amovible à l’extrémité de la bobine, puis 

poussez-le au maximum vers le bas.

Mettere il blocco rimovibile sull’estremità superiore 

dell’alberino e spingerlo a fondo.

Setzen Sie das abnehmbare Endstück auf das obere Ende 

der Spindel auf, und drücken Sie es bis zum Anschlag nach 

unten auf die Spindel.

Coloque el tope removible en el extremo superior del eje y 

empújelo hacia abajo hasta donde llegue.

Coloque a trava removível na extremidade superior do eixo 

e empurre-a para baixo o máximo possível.

Наденьте съемный ограничитель на верхний конец 

шпинделя и сдвиньте его вниз до упора.

10:3

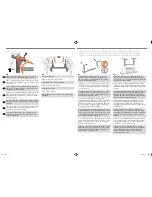
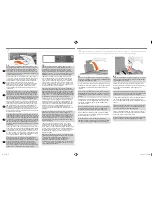
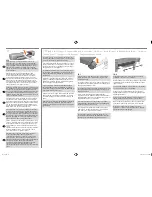
The spindle has a stop at each end to keep the roll in position. 

The stop that is colored blue can be removed to mount a new 

roll; it slides along the spindle to hold rolls of different widths. 

Remove the blue-colored stop from the spindle end, and stand 

the spindle vertically, with the fixed stop on the floor.

A chacune de ses extrémités, la bobine est dotée d’un taquet 

permettant de la maintenir en place. Le taquet bleu peut être 

démonté pour la mise en place d’un nouveau rouleau. Ce 

taquet peut être déplacé le long de la bobine selon la largeur 

des rouleaux de papier utilisé. Retirez le taquet bleu de 

l’extrémité de la bobine. Maintenez la bobine verticalement, 

le taquet fixe posé sur le sol.

L’alberino ha un blocco su ciascuna estremità per tenere il 

rotolo in posizione. Il blocco di colore blu può essere tolto per 

montare un nuovo rotolo; questo scorre lungo l’alberino, che 

può tenere rotoli di lunghezze diverse. Togliere il blocco di 

colore blu dall’estremità dell’alberino e tenere l’albero dritto 

in verticale, con il blocco fisso sul pavimento.

Die Spindel besitzt an einem Ende ein Endstück, mit dem die 

Rolle festgehalten wird. Das blaue Endstück kann beim Einle-

gen einer neuen Rolle entfernt werden. Es kann auf der Spin-

del verschoben werden, um so Rollen mit unterschiedlichen 

Breiten zu installieren. Entfernen Sie das blaue Endstück von 

einem Ende der Spindel, und stellen Sie die Spindel senkrecht 

mit dem fest montierten Endstück auf den Boden.

El eje tiene un tope en cada extremo para mantener el rollo 

en posición. El tope de color azul se puede quitar para mon

-

tar un nuevo rollo; se desliza a lo largo del eje para contener 

rollos de diferente anchura. Retire el tope de color azul del 

extremo del eje y mantenga el eje verticalmente, con el tope 

fijo en el suelo.

O cilindro tem uma trava em cada extremidade para manter 

o rolo em posição. A trava, na cor azul, pode ser removida 

para montar um novo rolo; ela desliza ao longo do cilindro 

para manter firme rolos de diferentes larguras. Remova a 

trava azul de cada extremidade do cilindro e coloque-o na 

vertical, com a trava fixa apoiada no chão.

На каждом конце шпинделя имеется ограничитель, 

удерживающий рулон в правильном положении. 

Ограничитель синего цвета снимается при установке нового 

рулона и перемещается по шпинделю в соответствии 

с шириной используемого рулона. Снимите синий 

ограничитель с правого конца шпинделя и поставьте 

шпиндель вертикально, фиксированным ограничителем 

вниз.

10:4

Slide the new roll of paper on to the spindle. Make sure the 

orientation of the paper is loaded exactly as shown. If it is 

not, remove the roll, turn it through 180 degrees vertically 

and slide it back on to the spindle.

Placez le nouveau rouleau de papier sur la bobine.Assurez-

vous que le rouleau est correctement orienté, comme le 

montre l’illustration ci-dessus. Dans le cas contraire, retirez 

le rouleau, retournez-le verticalement de 180 degrés, puis 

replacez-le sur la bobine.

Infilare il nuovo rotolo di carta sull’alberino. Verificare che 

la carta venga caricata esattamente con l’orientamento 

indicato. In caso contrario, togliere il rotolo, girarlo di 180 

gradi in senso verticale e infilarlo nuovamente sull’alberino.

Schieben Sie die neue Rolle Papier auf die Spindel. 

Vergewissern Sie sich, daß das Papier exakt wie abgebildet 

geladen ist. Wenn dies nicht der Fall ist, entfernen Sie die 

Rolle, drehen Sie diese vertikal um 180 Grad, und schieben 

Sie diese wieder auf die Spindel.

Inserte el nuevo rollo de papel en el eje. Asegúrese de que 

el papel se carga en la orientación mostrada. Si la orien-

tación no es la correcta, retire el rollo, gírelo180 grados 

verticalmente y vuelva a deslizarlo en el eje.

Deslize o novo rolo de papel para dentro do cilindro. Cer

-

tifique-se de que a orientação do papel esteja exatamente 

como indicado. Se não estiver, remova o rolo, gire-o 180 

graus verticalmente e deslize-o novamente no cilindro.

Наденьте новый рулон на шпиндель. Убедитесь, что 

бумага направлена именно так, как показано выше. 

В противном случае снимите рулон, переверните его и 

снова наденьте на шпиндель.

emea1.indd   15

9/30/2010   4:05:53 PM

Содержание Designjet 510 series

Страница 1: ...the items until you are prompted to do so on this Poster The packaging varies between models there may be additional items in the box These Assembly and Set Up Instructions and the Day to day package containing the Using your printer documentation CD are supplied in the box Vérifiez qu aucun élément ne manque Avertissez votre distributeur le cas échéant N ouvrez pas les éléments avant les étapes v...

Страница 2: ...ller l accessoire lors de l installation principale consultez les étapes appropriées figurant sur ce poster Pour installer des cartes reportez vous à la section Méthodes de connexion de l imprimante et à la docu mentation fournie avec ces accessoires Lisez attentivement ces instructions et terminez chaque étape avant de passer à la suivante Démarche à suivre Certains éléments de l imprimante étant...

Страница 3: ...авляется с ножками и приемной корзиной The D A1 size printer with no stand or paper bin as standard If you have ordered a stand and paper bin and are installing it now follow these instructions as for a E A0 size model Imprimante au format D A1 livrée en standard sans socle ni bac récepteur Si vous avez commandé un socle et un bac récepteur et souhaitez les installer suivez la même procédure que p...

Страница 4: ...as de los tornillos Nota Todos los tornillos son para el soporte La cesta no necesita tornillos Uma chave de parafuso e 22 parafusos são fornecidos na caixa do suporte 16 parafusos para montar o suporte 4 para fixá lo na impressora e 2 de reserva Não tente retirar as arruelas dos parafusos Observação todos os parafusos são para o suporte A cesta não precisa de parafusos В коробке с основанием имее...

Страница 5: ...puede apretar todos los tornillos adecuadamente intente desatornillar uno o dos de forma que las patas las bases y las abrazaderas cruzadas estén correctamente alinea das a continuación vuelva a apretarlos Veja se todos os parafusos estão apertados Se não puder apertar os parafusos totalmente tente soltar um ou os dois para que os pedestais pés e suportes em cruz fiquem alinhados e aperte os de no...

Страница 6: ... posible que la impresora oscile de un lado pero esto es normal siempre y cuando los tornillos se hayan apretado como se indica en los pasos anteriores Incline e levante a impressora 2 Incline a impressora 90 graus para o lado e coloque a de pé sobre os pedestais A impressora pode parecer um pouco solta de um lado mas isso não tem problema se os parafusos tiverem sido bem apertados Поставые принте...

Страница 7: ...e i cappucci di polistirolo dalle estremità Entfernen Sie die Pastikhülle und die Endstücke aus Schaumstoff Quite las cubiertas de plásticos y las tapas de espuma Remova a tampa de plásticoe as extremidades de espuma Снимите с принтера весь упаковочный материал 4 8 Remove the tapes from the window and the spindle Remove also the small bag of desiccant material Retirez les bandes adhésives du capot...

Страница 8: ...supports du bac de réception aux montants du support un sur chaque montant Fissare i supporti del cesto ai piedi del piedistallo uno a ogni piede Bringen Sie an jedem Standbein eine Halterung an Fije los soportes de la cesta a las patas uno en cada una de ellas Encaixe os apoios da cesta nas pernas do suporte um em cada perna Смонтируйте опору приемника на каждой из стоек основания 5 3 Fit the two...

Страница 9: ...ora ПРЕДУПРЕЖДЕНИЯ Избегайте попадания в механизм включенного принтератаких предметов как волосы бижутерия и одежда Убедитесь что прилагаемый к принтеру кабель питания соответствует электрической розетке Для подключения этого принтера всегда используйте только трехпроводный кабель питания с заземлением 7 1 Plug the power cord into the socket at the back of the printer and then into the AC power ou...

Страница 10: ... не светится это означает проблемы с питанием Проверьте подключение кабеля питания и исправность электрической розетки 7 3 Select a language After up to a minute the printer s front panel menu will invite you to set the language The menus are available in the following languages English Italian Portuguese German French Spanish Catalan Japanese Korean Traditional Chinese and Simplified Chinese On t...

Страница 11: ...is Vous devez les remplacer par des têtes d impression actives normales lorsque les tubes d encre de l imprimante sont entièrement remplis Vous ne pouvez pas imprimer si les têtes d impression de configuration sont encore installées Veillez à ne pas retirer les têtes d impression de configuration trop tôt sans quoi l imprimante ne pourra pas s initialiser Après avoir retiré les têtes d impression ...

Страница 12: ...звлеките сервисные печатающие головки Для этого поднимите синюю ручку 9 3 Lift up the printhead cover this will give you access to the set up printheads Soulevez le capot des têtes d impression Vous pourrez ainsi accéder aux têtes d impression de configuration Sollevare il coperchio delle testine in questo modo si potrà accedere alle testine di installazione Klappen Sie die Druckkopfabdeckung nach...

Страница 13: ...hten Sie darauf daß die Haken der Abdeckung über der Verriegelung arretieren Cuando haya sustituido todos los cabezales de impre sión de configuración con cabezales normales cierre de nuevo la cubierta de los cabezales de impresión sobre los cabezales asegurándose de que la cubierta se engancha en el pestillo Depois de trocar todos os cabeçotes de configuração pelos normais puxe a tampa do cabeçot...

Страница 14: ...mpressora vai usar agora uma determinada quantida de de papel para verificação e calibração Se preferir usar folhas de papel consulte as instruções no Guia de Bolso При выполнении процедур выравнивания и калибровки принтер использует небольшое количество бумаги инструкции по загрузке листовой бумаги см в Кратком руководстве 9 10 Close the window After the replacement of the set up printheads the p...

Страница 15: ...na estremità per tenere il rotolo in posizione Il blocco di colore blu può essere tolto per montare un nuovo rotolo questo scorre lungo l alberino che può tenere rotoli di lunghezze diverse Togliere il blocco di colore blu dall estremità dell alberino e tenere l albero dritto in verticale con il blocco fisso sul pavimento Die Spindel besitzt an einem Ende ein Endstück mit dem die Rolle festgehalte...

Страница 16: ...apalhar Стоя спереди принтера вставьте бумагу в прорезь сзади принтера и протяните ее как показано на рисунке Для облегчения этой операции закройте приемную корзину для бумаги 10 8 Lift the blue paper load lever Soulevez le levier bleu de chargement de papier Sollevare la leva blu di caricamento della carta Stellen Sie den blauen Papierladehebel nach oben Levante la palanca azul de carga de papel ...

Страница 17: ...are la carta in direzione del lato frontale Lehnen Sie sich über den Drucker und führen Sie das Papier von hinten nach vorne durch Inclinándose sobre la impresora introduzca el papel hacia la parte frontal Apoiando se na impressora alimente o papel em direção à frente Продолжайте вставлять бумагу как показано выше пока ее край не покажется из принтера 10 13 Lower the blue paper load lever The prin...

Страница 18: ...a impressora execu tar a rotina de calibração de cores Não a cancele porque ela garante que as cores impressas sejam as melhores para o papel carregado Alinhamento do cabeçote e Calibração de cores são processos diferentes e ambos devem ser feitos quan do necessário São descritos rapidamente no Guia de Bolso e detalhadamente no Guia de Referência do Usuário on line Теперь принтер напечатает тестов...

Страница 19: ...аг 12 NOTE An internal HP JetDirect Print Server may already be installed in your printer inside the compartment at the top left rear of the printer If it is skip to step 8 REMARQUE il est possible qu une carte HP JetDirect Print Server soit déjà installée dans l imprimante à l intérieur du compartiment situé en haut à gauche Si c est le cas passez à l étape 8 ci dessous NOTA nella stampante potre...

Страница 20: ...erriegelung b Schieben Sie die Abdeckung in Richtung des eingeprägten Pfeils Klappen Sie die Abdeckung an den Scharnierklammern auf die Seite auf der sich die Kabelöffnung befindet Retire cuidadosamente la cubierta de plástico de la parte posterior izquierda de la impresora desenganchándola Esta cubierta permite tener acceso a dos ranuras para una tarjeta Accessory y una tarjeta LAN a Presione con...

Страница 21: ...е Enter Будет показан аппаратный адрес принтера МАС хххххххх При установке программного обеспечения может также потребоваться IP адрес и имя порта AppleTalk 12 6 Insert the LAN cable into the LAN card it is simply pushed into place with a click Raccordez le câble réseau à la carte réseau Pour ce faire insérez la dans la prise jusqu à ce qu un déclic se fasse entendre Inserire il cavo di rete nella...

Страница 22: ...ßen Sie das Produkt jetzt noch nicht an den Computer an Sie müssen zuerst den Produkttreiber auf dem Computer installieren Gehen Sie dazu folgender maßen vor Legen Sie die DVD mit dem HP Start up Kit in das Laufwerk des Computers ein Windows Wenn die DVD nicht automatisch gestartet wird doppelklicken Sie im Stammverzeichnis der DVD auf die Datei autorun exe Zur Installation eines NetzwerkProdukts ...

Страница 23: ...ação expressa de rede caso contrário clique em Instalação personalizada e siga as instruções que aparecem na tela Para Mac Se o DVD não iniciar automaticamente abra o ícone DVD em sua área de trabalho Abra o ícone Instalador da HP Designjet para Mac OS X e siga as instruções que aparecem na tela OBSERVAÇÃO Se a instalação falhar reinicie o software por http www hp com go 510 drivers Примечание к п...

Страница 24: ...ty statements accompanying such products and services Nothing herein should be construed as constituting an additional warranty HP shall not be liable for techni cal or editorial errors or omissions contained herein Trademarks Microsoft and Windows are U S registered trademarks of Microsoft Corporation Mac and Mac OS are trademarks of Apple Inc registered in the U S and other countries emea1 indd ...

Отзывы: