background image

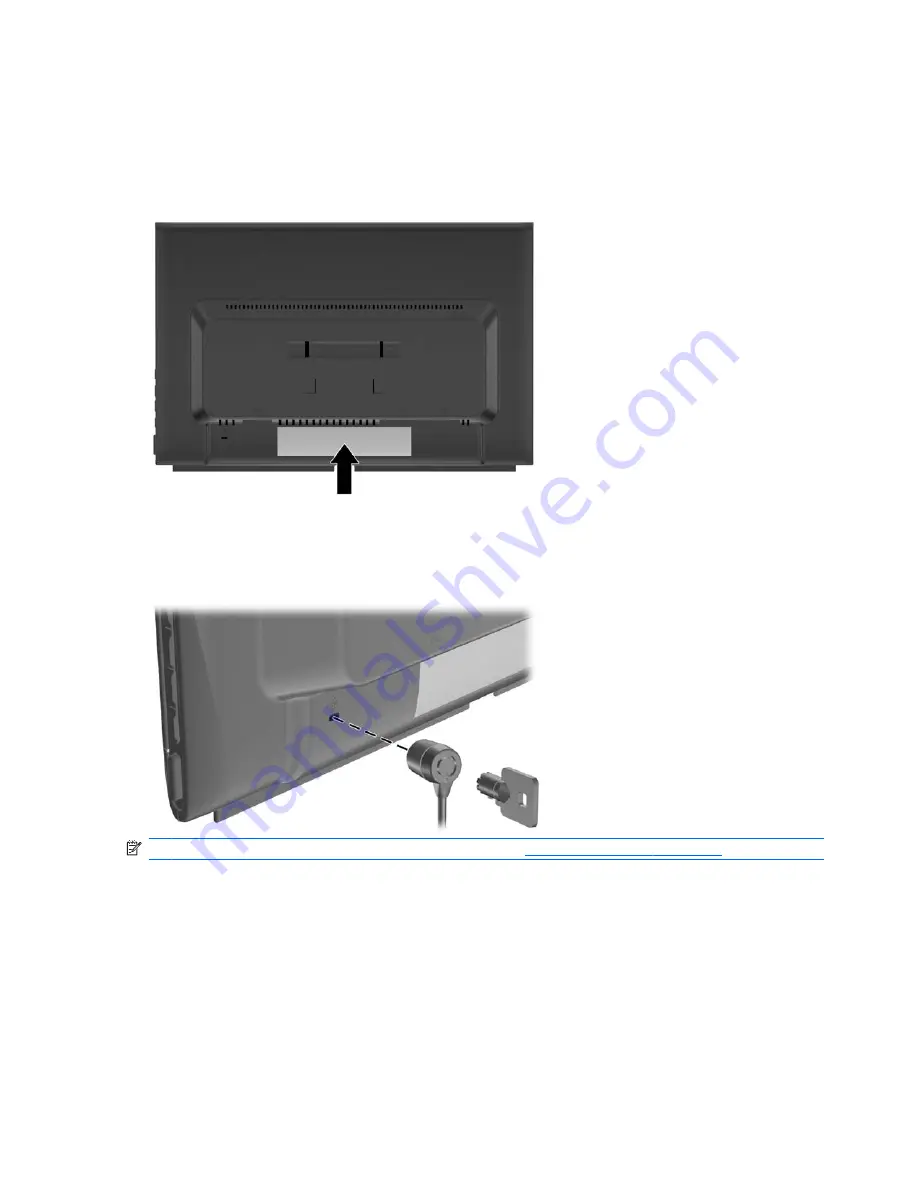
Locating the Rating Labels

The rating labels on the monitor provide the spare part number, product number, and serial number.
You may need these numbers when contacting HP about the monitor model. The rating labels are
located on the rear panel of the monitor display head.

Figure 3-6

  Locating the Rating Labels

Installing a Cable Lock

You can secure the monitor to a fixed object with an optional cable lock available from HP.

NOTE:

For more information on HP accessories, go to 

http://www.hp.com/go/options

.

8

Chapter 3   Setting Up the Monitor

ENWW

Содержание CQ1859

Страница 1: ...CQ1859 CQ1859e and CQ1859s LCD Monitors User Guide ...

Страница 2: ... information in this document is provided as is without warranty of any kind including but not limited to the implied warranties of merchantability and fitness for a particular purpose and is subject to change without notice The warranties for Hewlett Packard products are set forth in the express limited warranty statements accompanying such products Nothing herein should be construed as constitut...

Страница 3: ...ecifications WARNING Text set off in this manner indicates that failure to follow directions could result in bodily harm or loss of life CAUTION Text set off in this manner indicates that failure to follow directions could result in damage to equipment or loss of information NOTE Text set off in this manner provides important supplemental information ENWW iii ...

Страница 4: ...iv About This Guide ENWW ...

Страница 5: ...Stand 7 Turning on the Monitor 7 Locating the Rating Labels 8 Installing a Cable Lock 8 4 Operating the Monitor Software and Utilities 9 The Information File 9 The Image Color Matching File 9 Installing the INF and ICM Files 10 Installing from the CD 10 Downloading from the Worldwide Web 10 Using the Auto Adjustment Function 11 Side Panel Controls 12 Adjusting the Monitor Settings 13 Using the On ...

Страница 6: ...Appendix C Agency Regulatory Notices Federal Communications Commission Notice 26 Modifications 26 Cables 26 Declaration of Conformity for Products Marked with the FCC Logo United States Only 26 Canadian Notice 27 Avis Canadien 27 European Union Regulatory Notice 27 German Ergonomics Notice 28 Japanese Notice 28 Korean Notice 28 Power Cord Set Requirements 28 Japanese Power Cord Requirements 28 Pro...

Страница 7: ...t capability Video signal input to support VGA analog with VGA signal cable provided Internal speakers with audio cable included Plug and play capability if supported by the system Security slot provision on rear of monitor for optional cable lock Cable management feature for placement of cables and cords On Screen Display OSD adjustments in several languages for easy setup and screen optimization...

Страница 8: ...Do not pull on a cord or cable When unplugging from the electrical outlet grasp the cord by the plug To reduce the risk of serious injury read the Safety and Comfort Guide It describes proper workstation setup posture and health and work habits for computer users and provides important electrical and mechanical safety information This guide is located on the Web at http www hp com ergo and or on t...

Страница 9: ... image are not covered under the HP warranty Slots and openings in the cabinet are provided for ventilation These openings must not be blocked or covered Never push objects of any kind into cabinet slots or other openings Do not drop the monitor or place it on an unstable surface Do not allow anything to rest on the power cord Do not walk on the cord Keep the monitor in a well ventilated area away...

Страница 10: ...ressure on the panel may cause non uniformity of color or disorientation of the liquid crystals If this occurs the screen will not recover to its normal condition 1 Lift the monitor panel from its box and place it face down on a flat surface covered by a dry clean cloth 2 Assemble the monitor stand by snapping the top of the backplate into the cylindrical portion of the stand Figure 3 1 Assembling...

Страница 11: ...stand into the latch holes on the monitor 2 Figure 3 2 Installing the Monitor Stand Rear Components Figure 3 3 Rear Components Component Function 1 AC Power Connector Connects the AC power cord to the monitor 2 Audio Connects the audio cable to the monitor 3 VGA Connects the VGA cable to the monitor ENWW Rear Components 5 ...

Страница 12: ... to the AC power connector on the monitor and connect the other end of the cable to an electrical wall outlet Figure 3 4 Connecting the Cables WARNING To reduce the risk of electric shock or damage to the equipment Do not disable the power cord grounding plug The grounding plug is an important safety feature Plug the power cord into a grounded earthed electrical outlet that is easily accessible at...

Страница 13: ...een saver application or turn off the monitor when it is not in use for a prolonged period of time Image retention is a condition that may occur on all LCD screens Monitors with a burned in image are not covered under the HP warranty A prolonged period of time is 12 consecutive hours of non use NOTE You can disable the power LED in the OSD menu Press the Menu button on the side of the monitor then...

Страница 14: ... about the monitor model The rating labels are located on the rear panel of the monitor display head Figure 3 6 Locating the Rating Labels Installing a Cable Lock You can secure the monitor to a fixed object with an optional cable lock available from HP NOTE For more information on HP accessories go to http www hp com go options 8 Chapter 3 Setting Up the Monitor ENWW ...

Страница 15: ...itor is Microsoft Windows Plug and Play compatible and the monitor will work correctly without installing the INF file Monitor Plug and Play compatibility requires that the computer s graphic card is VESA DDC2 compliant and that the monitor connects directly to the graphics card Plug and Play does not work through separate BNC type connectors or through distribution buffers boxes The Image Color M...

Страница 16: ...n and refresh rates appear in the Windows Display control panel NOTE You may need to install the digitally signed monitor INF and ICM files manually from the CD in the event of an installation error Refer to the Monitor Driver Software Readme file on the CD Downloading from the Worldwide Web To download the latest version of INF and ICM files from the HP monitors support Web site 1 Refer to http w...

Страница 17: ...r to warm up for 20 minutes before adjusting 2 Press the Auto OK button on the monitor side panel You can also press the Menu button then select Image Control Auto Adjustment from the OSD Main Menu Refer to Adjusting the Monitor Settings on page 13 in this chapter If the result is not satisfactory continue with the procedure 3 Insert the CD in the disc drive The CD menu is displayed 4 Select Open ...

Страница 18: ... Quick View OSD sub menu If the OSD menu is on press to navigate forward through the OSD menu and increase adjustment levels 3 Volume Minus If the OSD menu is inactive press to open the Volume adjustment OSD sub menu If the OSD menu is on press to navigate backward through the OSD menu and decrease adjustment levels 4 Menu Opens selects or exits the OSD menu 5 Power LED Green Fully powered Amber S...

Страница 19: ... button on the monitor s side panel 3 To navigate through the OSD Menu press the Plus button on the monitor s side panel to scroll up or the Minus button to scroll in reverse 4 To select an item from the OSD Menu use the or buttons to scroll to and highlight your selection then press the OK button to select that function 5 Adjust the item using the or buttons on the side panel to adjust the scale ...

Страница 20: ... K Changes to slightly blueish white 6500 K Changes to slightly reddish white sRGB Sets your screen colors to adapt to the color standards used in the image technology industry Quick View Select from the following viewing modes Movie Photo Gaming Text Custom settings saved when you adjust the Brightness Contrast or Color in one of the other Quick View options Custom Color Selects and adjusts your ...

Страница 21: ...ntrol Provides a menu for adjusting the on screen display OSD controls Horizontal OSD Position Changes the viewing position of the OSD menu to the left or right area of the screen The factory default range is 50 Vertical OSD Position Changes the viewing position of the OSD menu to the top or bottom area of the screen The factory default range is 50 OSD Transparency Adjust to view the background in...

Страница 22: ...onitor The factory default is On Volume Adjusts the volume of the monitor speakers The ranges is 0 100 The factory default setting is 90 Sleep Timer Provides the timer adjustment menu options Set Current Time sets the current time in hours and minutes Set Sleep Time sets the time you want to place the monitor in sleep mode Set on Time sets the time you want the monitor to wake up from sleep mode T...

Страница 23: ...image Clock Increases decreases the value to minimize any vertical bars or stripes visible on the screen background Clock Phase Increases decreases the value to minimize video distortion or video jitter NOTE When using the controls you will obtain the best results by using the auto adjustment pattern software utility provided on the CD When adjusting the Clock and Clock Phase values if the monitor...

Страница 24: ...curs If a preset is selected in the Quick View menu then the Brightness Contrast or Color is also changed in the OSD Sleep Timer Mode The Sleep Timer mode is an energy saving feature that enables you to set a time for the monitor to power on and off at the same time every day This also extends the life of the backlight bulbs in the monitor The Sleep Timer has five settings Set Current Time Set Sle...

Страница 25: ...GB support you will need to change the monitor s color temperature to sRGB and install the sRGB color profile ICM file NOTE The sRGB color temperature preset will improve the color accuracy of sRGB images on the computer monitor but some color variation may still occur Changing the Color Temperature 1 Press the Menu button on the side panel of the monitor to launch the Main Menu of the OSD 2 Selec...

Страница 26: ...ion 3 Click Display Settings 4 Click the Advanced Settings button 5 Click the Color Management tab then click the Color Management button 6 Click the Advanced tab then click the Change System Defaults button 7 On the Devices tab click theAdd button 8 Select the RGB Color Space Profile icm file then click the OK button 9 To activate a color profile for the monitor you must set it as the Default Mon...

Страница 27: ...on the side panel If this does not correct the image press the Menu button to open the OSD Menu and adjust the brightness and contrast scales as needed Image is not centered Position may need adjustment Press the Menu button to access the OSD menu Select Image Control Horizontal Position or Vertical Position to adjust the horizontal or vertical position of the image Check Video Cable is displayed ...

Страница 28: ... to Call Technical Support If you cannot solve a problem using the troubleshooting tips in this section you may need to call technical support Have the following information available when you call Monitor model number Monitor serial number Purchase date on invoice Conditions under which the problem occurred Error messages received Hardware configuration Name and version of the hardware and softwa...

Страница 29: ...al Speakers 1 watt per channel Tilt 10 to 30 Maximum Weight Unpacked 2 9 kg 6 39 lbs Dimensions includes base at 10 tilt Height Depth Width 30 24 cm 13 09 cm 45 25 cm 11 91 inches 5 15 inches 17 81 inches Maximum Graphic Resolution 1366 x 768 60 Hz analog input Optimum Graphic Resolution 1366 x 768 60 Hz analog input Text Mode 720 400 Dot Pitch 0 10 H 0 30 W mm Pixels Per Inch 85 PPI Horizontal Fr...

Страница 30: ...g a standard graphics adapter You are not using a preset mode It this occurs you may need to readjust the parameters of the monitor screen by using the on screen display Your changes can be made to any or all of these modes and saved in memory The monitor automatically stores the new setting then recognizes the new mode just as it does a preset mode In addition to the factory preset modes there ar...

Страница 31: ...ment features NOTE The above power saver feature only works when connected to computers that have energy saver features By selecting the settings in the monitor s Energy Saver utility you can also program the monitor to enter into the reduced power state at a predetermined time When the monitor s Energy Saver utility causes the monitor to enter the reduced power state the power light blinks amber ...

Страница 32: ...ving antenna Increase the separation between the equipment and the receiver Connect the equipment into an outlet on a circuit different from that to which the receiver is connected Consult the dealer or an experienced radio or television technician for help Modifications The FCC requires the user to be notified that any changes or modifications made to this device that are not expressly approved b...

Страница 33: ...gences du Règlement sur le matériel brouilleur du Canada European Union Regulatory Notice This product complies with the following EU Directives Low Voltage Directive 2006 95 EC EMC Directive 2004 108 EC Compliance with these directives implies conformity to applicable harmonized European standards European Norms which are listed on the EU Declaration of Conformity issued by Hewlett Packard for th...

Страница 34: ...rchase a power cord that is approved for use in that country The power cord must be rated for the product and for the voltage and current marked on the product s electrical ratings label The voltage and current rating of the cord should be greater than the voltage and current rating marked on the product In addition the cross sectional area of the wire must be a minimum of 0 75 mm or 18 AWG and th...

Страница 35: ...h and the environment For more information about where you can drop off your waste equipment for recycling please contact the local city office the household waste disposal service or the shop where you purchased the product Chemical Substances HP is committed to providing our customers with information about the chemical substances in our products as needed to comply with legal requirements such ...

Страница 36: ...11363 2006 11363 2006 Turkey EEE Regulation In Conformity with the EEE Regulation EEE Yönetmeliğine Uygundur 30 Appendix C Agency Regulatory Notices ENWW ...

Страница 37: ...pixel A defective whole pixel is always turned on a bright spot on a dark background or it is always off a dark spot on a bright background The first is the more visible of the two A defective sub pixel dot defect is less visible than a defective whole pixel and is small and only visible on a specific background To locate defective pixels the monitor should be viewed under normal operating conditi...

Отзывы: