


13
2.
The emergency video recording length is same as the recording
interval setting. When the emergency recording length reaches
the setting, the system will return to the general recording mode.
Note:
1. If the
Collision Detection
function is enabled and a collision is detected, the camcorder
will automatically trigger the emergency recording.
2. The emergency file is created as a new file and saved in Emergency folder, which will be
protected to avoid being overwritten by normal loop recording. The Emergency folder will
occupy 40% of available memory card capacity. For example, if you use 8GB memory card,
about 3.2GB memory space will be saved for emergency files. When the Emergency folder
is full, the oldest emergency file will be automatically deleted by the newest emergency
file.
3.2
Picture in Video
You can also use this camcorder to take snapshots of the current
scene.
1.
In recording status, press
to
capture recording screen shots
from the front (and rear) lens.
2.
When the icon
shows in the
central of screen, it means the
screenshots is completed.
Note:
1. The screen shots image resolution quality is depending on the video resolution setting.
2. The picture resolution is limited by the speed of the target object and changes in ambient
lighting. The photograph function is better used for taking still pictures in accident scenes
or when the car is stopped to wait for a traffic light.
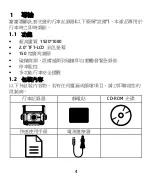
Содержание CD-ROM
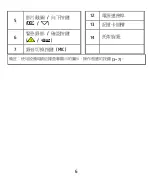
Страница 22: ...5 1 3 產品概要 編號 項目 編號 項目 1 LED 指示燈 8 喇叭 2 LCD 彩色螢幕 9 廣角鏡頭 3 目錄 返回按鍵 10 麥克風 4 播放 向上按鍵 11 電源開關 ...
Страница 23: ...6 5 影片截圖 向下按鍵 12 電源連接埠 13 記憶卡插槽 6 緊急錄影 確認按鍵 OK 14 托架旋鈕 7 錄音切換按鍵 MIC 備註 使用設備時請依據螢幕顯示的圖示 操作相應的按鍵 3 7 ...
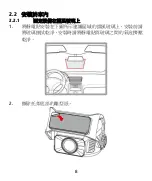
Страница 25: ...8 2 2 安裝於車內 2 2 1 固定設備在擋風玻璃上 1 將靜電貼安裝在下圖所示建議區域的擋風玻璃上 安裝前請 將玻璃擦拭乾淨 安裝時請將靜電貼與玻璃之間的氣泡擠壓 乾淨 2 撕除托架底部的離型紙 ...
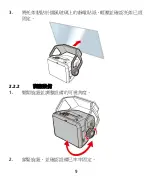
Страница 26: ...9 3 將托架黏貼於擋風玻璃上的靜電貼紙 輕壓並確認托架已經 固定 2 2 2 調整設備 1 鬆開旋鈕並調整設備的可視角度 2 鎖緊旋鈕 並確認設備已牢牢固定 ...
Страница 39: ...5 1 3 产品概要 编号 项目 编号 项目 1 LED 指示灯 8 喇叭 2 LCD 彩色屏幕 9 广角镜头 3 目录 返回按键 10 麦克风 4 播放 向上按键 11 电源开关 ...
Страница 40: ...6 5 影片截图 向下按键 12 电源端口 13 记忆卡插槽 6 紧急录像 确认按键 OK 14 托架旋钮 7 录音切换按键 MIC 注 使用设备时请依据屏幕显示的图标 操作相应的按键 3 7 ...
Страница 42: ...8 2 2 安装于车内 2 2 1 固定设备在挡风玻璃上 1 将静电贴安装在下图所示建议区域的挡风玻璃上 安装前请 将玻璃擦拭干净 安装时请将静电贴与玻璃之间的气泡挤压 干净 2 撕除托架底部的离型纸 ...
Страница 43: ...9 3 将托架黏贴于挡风玻璃上的静电贴纸 轻压并确认托架已经 固定 2 2 2 调整设备 1 松开旋钮并调整设备的可视角度 2 锁紧旋钮 并确认设备已牢牢固定 ...


