HP c3700 - Workstation Скачать руководство пользователя страница 7

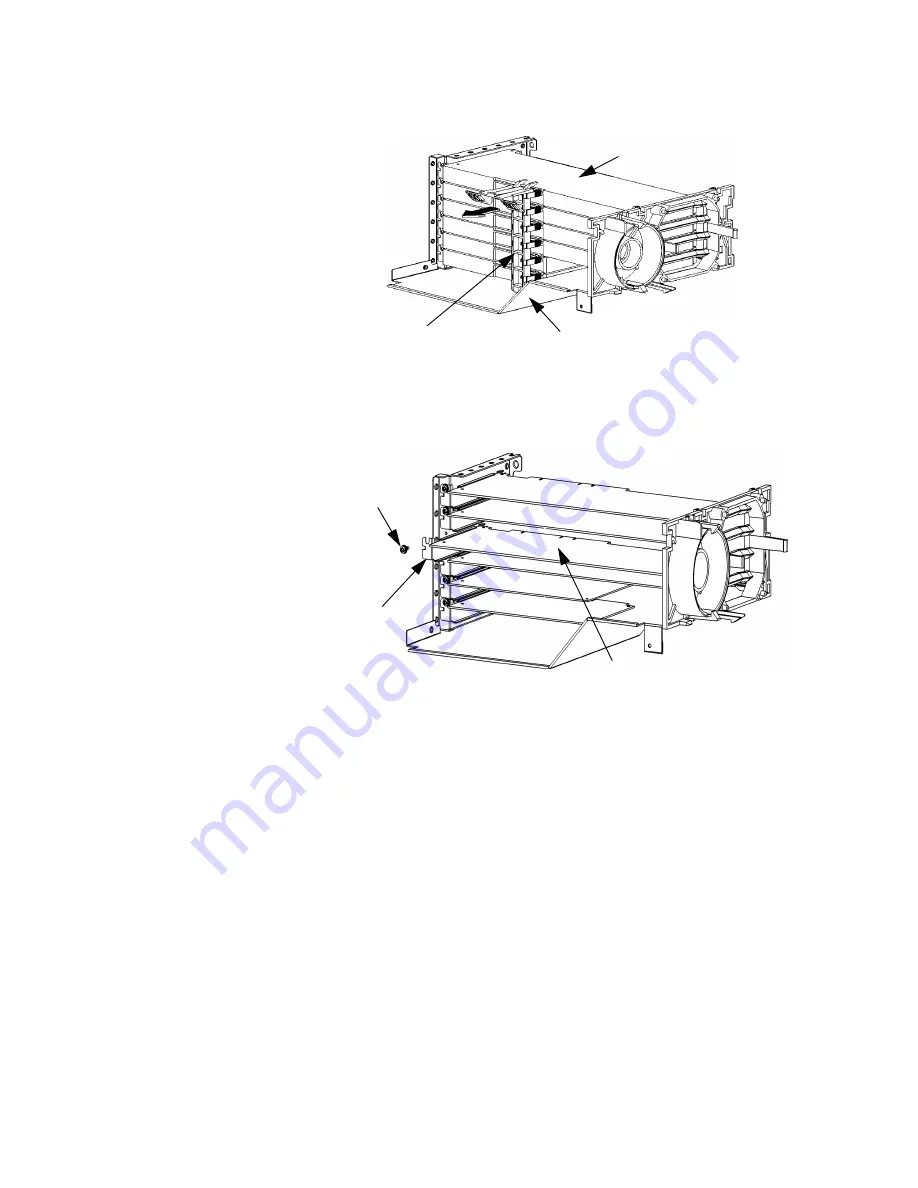
Figure 0-4

Removing the I/O Card Retainer

3. Locate the card you want to remove and, using the T-15 Torx driver, remove the I/O card’s

bulkhead screw as shown below:.

Figure 0-5

Removing the I/O Card

4. Pull evenly on the outside edges of the I/O card to remove it.

To install a card into your system unit, follow these steps.

1.

Locate the appropriate slot for the I/O card that is to be installed.

2.

Insert the card into the slot you have chosen with the bulkhead appropriately positioned. See
above. The non-bulkhead end of the card should be placed in the card guide. Press firmly and
evenly on the card until it is seated in the connector. Screw the T-15 Torx screw into the card’s
bulkhead (using 6 inch-pounds of torque) to secure the card.

3.

Replace the card retainer by placing the bottom retainer hook in the slot on the air divider and
the clips on the PULL tabs into their slots on the chassis wall.

4.

Close the left side panel of the system unit by following the procedure in the User’s

Guide.

Also

refer to your workstation documentation for instructions on using the HP-UX System Administra-
tion Manager (SAM) utility to verify your graphics configuration

I/O Card Retainer

I/O Card

Air Divider

I/O Card
Bulkhead
Screw

I/O Card
Bulkhead

I/O Card Being Removed

Содержание c3700 - Workstation

Страница 1: ...onfigurations other than these 2 O S requirements The prerequisite OS software must be installed before the Fire GL UX card will function as a console device If the workstation was ordered with the Fire GL UX card inte grated at the factory and HP UX ignited the prerequisite software should already be installed OS requirements for HP UX 11 0 On Media General Release Patch Bundle Nov 1999 ACE 11 0 ...

Страница 2: ...X card The following list of monitors plus all other monitors that HP supports in the future are supported with the Fire GL UX card NOTE The Fire GL UX card does not support all timings and resolutions that each display device will accept Use the HP System Administration Manager SAM utility to select alternative settings See your workstation Owner s Guide for information on using the opt graphics ...

Страница 3: ...Your Fire GL UX software is now ready for use NOTE For Ignite UX The March 2002 or later release of Ignite UX must be used on an ignite server to boot target workstations having a Fire GL UX console All of the prerequisite OS software and all patches on the Fire GL UX Software CD ROM must be ignited on the target workstation in order to generate a functioning and supported configuration Making Sof...

Страница 4: ...s card and the remaining slot for any additional supported card Figure 0 1 j6700 PCI Card Slot Numbering NOTE You will need a T 15 Torx driver or flathead screwdriver to remove the I O slot bulkhead screws Here are the steps required to remove a graphics card from your j6700 or j6000 computer 1 Power down the system and unplug the power cord from the electrical outlet 2 Open the side panel of the ...

Страница 5: ... utility to verify your graphics configuration CAUTION The j Class workstations supply about 75 Watts of power to the PCI slots Do not insert cards that together draw more than 75 Watts or damage to the workstation may result Please look at the specifications that come with your individual cards for power requirements Note that each j Class PCI slot can provide up to 25 watts c3650 and c3700 I O C...

Страница 6: ...tom starting with one See below Figure 0 3 c3650 c3700 I O Slot Numbering You will need a T 15 Torx driver or flathead screwdriver to remove the I O slot bulkhead screws Here are the steps required for remove an I O card from the system unit 1 Power off the system and unplug the system unit power cord from the electrical outlet Note that when you press the system power switch the system automatica...

Страница 7: ...ould be placed in the card guide Press firmly and evenly on the card until it is seated in the connector Screw the T 15 Torx screw into the card s bulkhead using 6 inch pounds of torque to secure the card 3 Replace the card retainer by placing the bottom retainer hook in the slot on the air divider and the clips on the PULL tabs into their slots on the chassis wall 4 Close the left side panel of t...

Страница 8: ...nformation NOTE This graphics card is a Class A device Systems will perform at FCC Class A CISPR 22 EN55022 Class A VCCI Class A levels when this device is integrated Federal Communications Commission Radio Frequency Interference Statement for USA only This equipment has been tested and found to comply with the limits for a Class A digital device pur suant to Part 15 of the FCC Rules and the Canad...

Страница 9: ...ified by EMV Testhaus GmbH DAR accredited Nr TTI P G 101 95 20 Australia New Zealand AS NZS 3548 1995 Fort Collins CCQD HTC Supplementary information The product herewith complies with the requirements of the following Directives and carries the CE marking accordingly the EMC directive 89 336 EEC and 92 31 EEC and 93 68 EEC the Low Voltage Directive 73 23 EEC and 93 68 EEC This product was tested ...

Отзывы: