background image

9/18/2020

HPE 4200 vl Switch Series - Installation

11/12

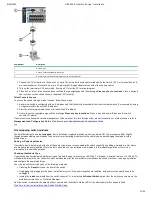
Item Number

Description

1

Console port

2

Console cable suppliedwith the switch

3

PC running a terminalemulator program, ora VT-100 terminal

1. Connect the PC orterminal to the switch’s Console Port using theconsole cable included with the Switch. (If PC or terminal has a 25-

pin serial connector, first attach a 9-pin to 25-pin straight-through adapterat one end of the console cable.)

2. Turn on the terminal or PC’s power and, if using a PC, start the PC termina lprogram.
3. Press 

Enter

 two or three times and user will see the copyright page and the message Press any key to continue. Press a key,and

user will then see the switch console command (CLI) prompt.

Telnet Console Access
To access the switch through a telnet session, follow these steps:

1. Ensure the switch is configured with an IP address and that the switch isreachable from the telnet workstation (For example by using

a Pingcommand to the switch’s IP address)

2. Start the telnet program and connect to the switch’s IP address.
3. User will see the copyright page and the message Press any key tocontinue. Press a key, and user will then see the switch

console CLI prompt.

If user want to continue with console management of the switch at this time through either a direct connection or a telnet session, refer to
Management and Configuration Guide. 

Click here to go to Management and Configuration Guide

 .

top

Hot swapping switch modules

The switch modules can be hot swapped, that is installed or replaced whilethe switch is powered ON. The procedures differ slightly,
though between adding new modules to an empty slot or replacing modules with the same type, and exchanging the module with a
different type.
Adding or Replacing Modules
If a module has to be replaced with one of the same type, or user are expanding the switch capability by adding a module in a slot where
one was not previously installed (Since the last switch reboot), the replaced or new module is immediately operational; there is no
interruption to the switch operation.
Changing the Module Type
If user exchange a module with a different type of module though, for example a 100/1000-T xl Module is installed in place of a 10/100-TX
xl Module that was in the slot, the switch must be rebooted after the new module is installed sothe switch processor can properly initialize
and configure the new moduletype.

User can reboot the switch by any of the following methods:

Pressing the Reset button on the front of the switch.
Unplugging and plugging in the power cord (Power cycle). If two powersupplies are installed, both power cords would have to be
unplugged.
Issuing the reload command from the switch console CLI, or selecting theReboot Switch option from the switch console menu, the
web browser interface, or ProCurve Manager.

Until the switch is rebooted, the module will not operate and the Module Status LED for the affected slot will continue to flash.

Click here to view the Installation and Getting Started Guide.

Содержание 4202vl-48GS

Страница 1: ... Getting Started Guide ProCurve Manager CD ROM and booklet Customer Support Warranty booklet Accessory kit 5065 6521 for the 8 slot 4208vl Switch 4208vl 64GSwitch 4208vl 96 Switch 4208vl 72GS Switch Accessory kit 5064 9943 for the 4 slot 4204vl Switch 4202vl 48G Switch 4202vl 72 Switch 4204vl 48GS Switch Each kit contains Two mounting brackets Six 10 mm M4 screws to attach the mounting brackets to...

Страница 2: ...table for cable types and lengths Port Type Cable Type Length Limits Twisted pair cables 10 100 1000Base T For either 10 100 Mb s or 1000 Mbpsoperation Category 5 or better 100 ohm UTP or shielded Twisted pair STP balanced cable For 1000 Mbps Gigabit operation Category 5e cabling or better is recommended 100 m The Auto MDI MDI X feature only works when the port is in auto negotiation mode Fiber op...

Страница 3: ... vl Modules can be installed in any of the slots User can install exchange or remove modules after the switch has been powered on Whenever a module is installed during this process it isinitialized and tested for correct operation During this process the switchSelf Test LED is on If user hot swap another module while the switch isinitializing and testing the first module it is possible to cause th...

Страница 4: ...n Each supply provides enough power to operate afully loaded switch so even if one fails the switch will continue to operate normally Install the second power supply into power slot number 2 as shown in figure 3 The slot cover can be removed with either a flat bladed or Torx T 10 screwdriver Retain the slot cover for future use CAUTION The switch power supplies are hot swappable they can be instal...

Страница 5: ...p Verify the switch passes self test After user have installed any modules and the optional second power supply but before mounting the switch in its network location user should first verify it is working properly by plugging it into a power source and verifying it passesits self test If user have installed a second power supply repeat these procedures with thesecond power supply to verify it wor...

Страница 6: ...Ds go off User may see each port LED go ON briefly in sequence as theport is tested For the duration of the self test the Self Test LED stays ON When the self test completes successfully The Power LED stays on and the Status LEDs on the switch chassis stay on for the devices installed one for each switch module installed one for each power supply installed and one for all the fans The Fault and Se...

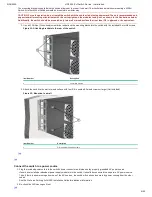
Страница 7: ...0 5 in apart in each rack cabinet upright as shownin the illustration below Ensure that the screws are at the same level ineach upright Figure 8 Partially installed screw for bracket notch Item Number Description 1 Partially install a screw into the top hole of aclose 0 5 in pair on both sides of the rack 3 Place the switch in the rack and lower it so the notches in the bottom of the bracket slide...

Страница 8: ...e 12 24 screws supplied with the switch use the clips and screws that came withthe cabinet Plan which four holes user will be using in the cabinet and installall four clips and partially install the two bottom screws as described in step2 before proceeding to step 3 top Horizontal surface mounting Place the switch on a table or other horizontal surface Use a sturdy surface in an uncluttered area U...

Страница 9: ...cketsto the switch with the included10 mm M4 screws Figure 11 Attaching brackets to the rear of the switch Item Number Description 1 10 mm M4 screws 2 Attach the switch to the wall or wood surface with four 5 8 in number12 wood screwsor larger Not included Figure 12 Mounting to a wall Item Number Description 1 5 8 in number 12 wood screws top top Connect the switch to a power source 1 Plug the inc...

Страница 10: ...ming switch management tasks including the following Monitor switch and port status and observe network activity statistics Modify the switch s configuration Read the event log and access diagnostic tools to help in troubleshooting Download new software to the switch Add passwords to control access to the switch from the console web browser interface and network management stations The console can...

Страница 11: ...Configuration Guide top Hot swapping switch modules The switch modules can be hot swapped that is installed or replaced whilethe switch is powered ON The procedures differ slightly though between adding new modules to an empty slot or replacing modules with the same type and exchanging the module with a different type Adding or Replacing Modules If a module has to be replaced with one of the same ...

Страница 12: ...r its affiliates subcontractors or suppliers will be liable for incidental special or consequential damages including downtime cost lost profits damages relating to the procurement of substitute products or services or damages for loss of data or software restoration The information in this document is subject to change without notice Hewlett Packard Enterprise Development and the names of Hewlett...

Отзывы: