background image

Содержание 3000 9 8LX RX Series

Страница 1: ...HP 3000 Series 9X8LX RX PA RISC Computer System Installation and Configuration Guide Series 9X8LX RX Family rli HEWLETT PACKARD HP Part No A2051 90006 Printed in U S A 1993 First Edition E1093 ...

Страница 2: ...use of this material Hewlett Packard assumes no responsibility for the use or reliability of its software on equipment that is not furnished by Hewlett Packard This document contains proprietary information which is protected by copyright All rights are reserved No part of this document may be photographed reproduced or translated to another language without prior written consent of Hewlett Packar...

Страница 3: ...duct updates and fixes do not require manual changes and conversely manual corrections may be done without accompanying product changes Therefore do not expect a one to one correspondence between product updates and manual updates First Edition October 1993 List of Effective Pages The List of Effective Pages gives the date of the current edition and of any pages changed in updates to that edition ...

Страница 4: ...rates uses and can radiate radio frequency energy and if not installed and used in accordance with the instructions manual may cause interference to radio communications It has been tested for compliance with the limits of Class A computing devices pursuant to Subpart J of Part 15 of FCC Rules which are deSigned to provide reasonable protection against such interference Operation of this equipment...

Страница 5: ...synyt Suomessa laserturvallisuuden osalta Tyoministerion tyosuojeluosasto Laitteen turvallisuusluokka on maaritetty valtioneuvoston paatoksen N o 472 1985 ja standardin SFS EN 60825 1992 mukaisesti Tiedot CD ROM levyasemassa kaytettavan laserdiodin sateilyominaisuuksista Aallonpituus 790 nm Teho 1 1 pW Luokan 1 laser Acoustics Germany only Laermangabe SchalldruckpegelLpA gemessen an Arbitplatzbei ...

Страница 6: ...y part or all of the product Do not proceed beyond a CAUTION sign until the indicated conditions are fully understood and met Caution Preface This manual is intended for use by trained and experienced Hewlett Packard field maintenance personnel This edition of the Installation and Configuration Guide contains technical information about the HP 3000 Series 9X8LXjRX Family of computers listed in the...

Страница 7: ...88 Al A2 EMC CISPR 22 1985 EN55022 1988 Class A IEC801 2 1991 prEN55024 2 1992 3kV CD 8kV AD IEC801 3 1991 prEN55024 3 1991 3V m IEC801 4 1988 prEN55024 4 1992 0 5kV Signal Lines 1KV Power Lines Supplementary Information The product herewith complies with the requirements of the Low VOltage Directive 73 23 EEC and the EKC Directives 89 336 EEC RoseVille e Ed Heinsen NCMO Q ality Manager Quality De...

Страница 8: ......

Страница 9: ...2 2 5 2 5 2 7 2 7 2 7 3 Receiving The System Unpacking and Inspection Unpack the HP 3000 9X8LX RX Computer In Case of Damage Physical Inventory Manuals Equipment Computer Claims Procedures Repacking Storage Requirements 3 1 3 1 3 4 3 4 3 4 3 4 3 4 3 4 3 5 3 5 4 Installation Installation Procedures SPU Installation System Console Installation Peripheral Equipment DTC Installation PowerTrust UPS Ext...

Страница 10: ...4 5 5 A Remote Support Modem Configuration Quick Reference HP Support Link HP50759A Hayes Smartmodem 2400 Black Box V 32 Plus Version 2 01 01 Multitech MT224EH7 HP 37212B Modem Cable Pin out Multifunction I O PCA Modem Line Behavior CCITT Mode AP protocol 0 Bell Mode AP protocol 1 CCITT _BIS Mode AP protocol 2 Modem Settings HP Predictive Support A 2 A 2 A 4 A 5 A 6 A 7 A 8 A 9 A 9 A 9 A lO A I0 C...

Страница 11: ...gnetic Susceptibility Specifications 2 5 2 S1otand 4 Slot Chassis Physical Specifications 2 6 Technical Tasks Personnel 4 1 A2941A Line Cord Options A I Settings for Remote Support Modem Quick Reference A 2 8 Position DIP Switch Option Settings Set S A 3 4 Position DIP Switch Option Settings Set X A 4 Switch Option Settings A 5 HP 37212B Switch Configuration A 6 92219Q Cable Pin out A 7 Predictive...

Страница 12: ......

Страница 13: ...2 Site Considerations This chapter defines HP organizations and lists site preparation responsibilities Chapter 3 Receiving The System This chapter provides information on receiving the system instructions for unpacking the system and putting it into position Chapter 4 Installation Contains installation procedures and configuration information Chapter 5 Starting the Computer System Provides instru...

Страница 14: ......

Страница 15: ... preparation is required When the computer is configured into a larger system employing numerous peripherals and mass storage devices you should study and become more familiar with the contents of this chapter The CE or Site Preparation Specialist provides peripheral equipment power and environmental specifications contained in the HP CEO Site Preparation Handbook and the HP 3000 and HP 9000 CE Ha...

Страница 16: ...F hour without tape media lOoC 18 F hour with tape media High Speed Fan Activated 30 C to 38 C 86 F to 100 4 F Overtemp Warning 40 C to 48 C 104 F to 118 4 F Overtemp Hardware Shutdown Overtemp Warning 2 C 3 F Operating Humidity 20 to 80 RH max wet bulb 26 C non condensing Non operating Humidity 5 to 80 RH non condensing less than 30 RH hr rate of change Operating Altitude to 3048 meters 10 000 ft...

Страница 17: ...tts DC continuous AC Input Line Frequency 47 to 63 Hz Transient Tolerance Low Energy 3000 volts lOps 500 ns rise fall High Energy 1000 volts 1 2j lsrise Holdup without System Reset 20 ms 50 Hz 1 cycle Battery Backup Time 15 minutes with optional 600 VA PowerTrust UPS Note 1 The power supply is an auto ranging power supply It does not have to be recon figured to operate over its rated operating ran...

Страница 18: ...includes 5V_S current Table 2 4 Electromagnetic Susceptibility Specifications Radiated 3Vjm 28 MHz to 1 GHz Conducted 3V rrns 30 Hz to 100 MHz 1V rrns 100 MHz to 400 MHz Radiated Magnetic Field Immunity 1 gauss p p 48 Hz to 198 kHz Electrostatic Air Discharge 5 kV no effect 25 kV no hardware failure Electrostatic Contact Discharge 4 kV Table 2 5 2 Slot and 4 Slot Chassis Physical Specifications De...

Страница 19: ...nical tasks and lists the personnel who should be responsible for completing each task Third Party Service If an HP 3000 Series 9X8LX RX Computer system and or applications software is purchased from a third party vendor that third party is responsible for providing consultation services on the system operation and applications software In the situation of a third party purchase a maintenance agre...

Страница 20: ...eakers and wire sizes Electrician and HP CE Verification that maintenance power outlets those used for Electrician floor cleaning etc are on separate circuits from the computer system Recommendations about lightning protection HP CE Measurements and recommendations on radiated interference HP CE Answers to questions concerning modems and modem HP CE options Thermal load of HP equipment HP CE Therm...

Страница 21: ...ion 2 The forms in Section 2 will be completed as the site planning preparation and equipment installation progresses Local Codes Special local codes exist in some locations regulating the installation of computer equipment The customer is responsible for making sure the system is in compliance with all local laws regulations and codes for mechanical building and electrical distribution systems pr...

Страница 22: ......

Страница 23: ...hen the container is opened Unpack the shipping containers and inspect each item for damage Look for damage such as broken controls and connectors dented corners scratches bent panels and loose components Check the rigid foam packing material for signs of damage which could indicate rough handling during transit Unpack the HP 3000 9X8LX RX Computer The unpacking of the computer is shown on the fla...

Страница 24: ...erials See Figure 3 1 Figure 3 1 Removing Loose Parts 2 Close the flap with the handles cut in it the other three flaps should be open 3 Position yourself so that you must reach across the box to grasp the handles See Figure 3 2 Figure 3 2 Positioning the Shipping Box 3 2 Receiving The System ...

Страница 25: ...rd They should also slide easily over hard floors or carpets 5 Open the top flap See Figure 3 3 Reach into the shipping box and grasp the computer on the left and right side Figure 3 3 Raising the Flap 6 Pulling alternately with your left and right hand slowly slide the computer out of the shipping box See Figure 3 4 Save the shipping box and packing materials in case the computer needs to be move...

Страница 26: ...s are identical to those specified on the picklist The model and serial numbers are printed on a general information label located on the back of the computer The computer comes with some peripherals embedded in the SPU cabinet Check that these peripherals are integrated and that they match the equipment list The general information label contains the serial numbers of the embedded peripherals alo...

Страница 27: ...ature with tape media 400 to 450 C 400 to 1130 F Storage Temperature without tape media 400 to 650 C 400 to 149 0 F Rate of change with tape media 100 Cjhr Rate of change without tape media 200 Cjhr Non operating humidity 5 to 80 non condensing Humidity rate of change 30 RHjhr The computer and components should be protected from environmental extremes that can cause condensation within the equipme...

Страница 28: ......

Страница 29: ...cedures Installation Procedures Tools required Standard CE hand tool set plus a 10 Torx driver SPU Installation To install the SPU perform the following steps 1 Observe all ESD precautions while performing installation procedures on any electronic equipment 2 Remove the I O RFI covers from the slots that will hold any I O cards to be installed Note Refer to the CE Handbook part number A2051 90003 ...

Страница 30: ... Multifunction I O card Note The ThinLAN connector is enabled at the factory and the AUI LAN connector is disabled If the AUI LAN connector needs to be enabled the Multifunction I O card has to be removed and jumper block WI needs to be repositioned Refer to the CE Handbook Chapter 4 for more configuration information f Do not leave any open I O slots after all I O cards are installed This would v...

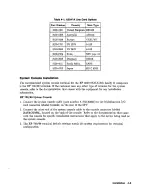
Страница 31: ...f terminal for the system console refer to the documentation that comes with the equipment for any installation information HP 700 96 System Console 1 Connect the system console cable part number A1703 63003 to the Multifunction I O card connector labeled Console on the rear of the SPU 2 Connect the other end of the system console cable to the console connector labeled DATACOMM located on the back...

Страница 32: ... BNC T connector assembly 6 Cover all the BNC T connector assemblies with the fabric anti static coverthat came with the T connector 7 Refer to the documentation that came with the DTC for complete installation and configuration instructions Note Be sure that each end of the system LAN link has a BNC LAN Terminator part number 92227P installed PowerTrust UPS To connect the PowerTrust UPS to the SP...

Страница 33: ...xternal disk SCSI terminator part number 1252 3920 or K2291 to the top connector on the back of the disk cabinet 6 Plug the disk cabinet power cord into an appropriate ac wall outlet 7 This completes the hardware installation of the external disk cabinet Refer to the documentation that comes with the disk cabinet for any additional information Installation Completion 1 Make sure all SPU and periph...

Страница 34: ......

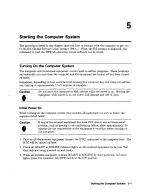
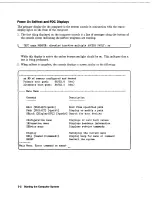
Страница 35: ... power is on Moving the equipment while power is on can cause disk damage and loss of data Caution Initial Power On When turning on the computer system this includes all equipment be sure to follow the sequence listed below If any of the external equipment has been OFF due to any environmental problem such as heating or air conditioning failure allow approximately 30 minutes for the temperature of...

Страница 36: ...s being performed 2 When self testiscomplete the console displaysa screen similarto the following xx ME of memory configured and tested Primary boot path 56 52 6 dec Alternate boot path 56 52 0 dec Main Menu Command Description BOot PRIIALTI path PAth PRIIALT path SEArch DIsplayIIPL path Boot from specified path Display or modify a path Search for boot devices COnfiguration menu INformation menu S...

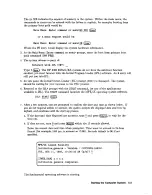
Страница 37: ...hould be waiting for your response to the 1SL prompt 6 Respond to the 1SL prompt with the STARTcommand or any of the applications available in 18L The START command launches the MPEjiX operating system software ISL START Enter 7 After a few minutes you are prompted to confirm the date and time as shown below If you do not respond within 15 seconds the system accepts the displayed date and time by ...

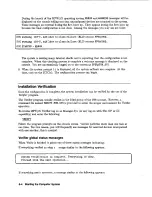
Страница 38: ...figuration process can begin Installation Verification Once the configuration is complete the system installation can be verified by the use of the Verifier program The Verifier program usually resides in the DIAG group of the SYS account However a command file named VERIFY PUB SYS is provided to setup the proper environment for Verifier operation To invoke MPEfiX Verifier log on as Manager Sys or...

Страница 39: ...vice failed You should not attempt to use the system until the problem has been corrected Critical devices are all system disks all non system private volume disks and tap e drive logical device 7 Verifier log file In addition to the messages described above MPE iX Verifier creates a log file named VERLOG This file contains a detailed history of the verification actions and status messages and a s...

Страница 40: ......

Страница 41: ...et both local and remote modems to either o the same compression mode OR o to NO data compression If problems occur connecting two modems usually the fault is that one is enabled for some MNP level and the other modem is set for no data compression If the modem sends up modem dialog with all of the signals asserted it is possible for the user to be logged off immediately when a password is enabled...

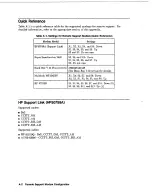
Страница 42: ... Do not care Hayes Smartrnodem 2400 S3 S9 and S10 Down si S4 S5 S6 and S7 Up S2 Do not care Black Box V 32 Plus 2 01 01 AT D2 Sl Cl R See Black Box V 32 section for details Multitech MT224EH7 Xl X4 S3 S7 and S8 Down X2 X3 si S2 S4 S5 and S6 Up HP 37212B si S2 S4 S5 S6 S7 and S10 Down 0 S3 S8 S9 SI1 and S12 Up 1 HP Support Link HP50759A Supported modes Bell CCITT_OM CCITT_AM CCITT_BIS_OM CCITT _BIS...

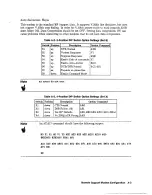
Страница 43: ...rmal D2 S2 xx Verbose Resp onses VI S3 up Suppress Responses QO S4 up Enable Echo of commands E1 S5 up Enable Auto Answer SO l S6 up DCDjDSR Normal C1 Sl S7 xx Depends on phone line S8 down Enable Command Mode Note xx means do not care Table A 3 4 Position DIP Switch Option Settings Set X Switch Position Description Option Command Xl down CTS Normal RO X2 down DSR Follows OR Sl X3 down Use RP Defa...

Страница 44: ... O PCA and the modem drive circuit 111 This modem has been used in the past with the CIa based AP card and had the same problem Caution Turn off all data compression modes The Hayes defaults for the modem lines must be changed to the following Table A 4 Switch Option Settings Switch Position Description Option Command SI up DTR normal AT D3 W S2 xx S3 down Result codes disabled ATQl W S4 up Charac...

Страница 45: ...the modem lines are incorrect and must be changed before this modem will work properly To do this from the front panel go into the Change DTE Parameters and set the following Responds to DTR DSR is Normal DCD is Normal CTS follows RTS This can be done with the following AT command AT D2 S1 C1 R For Hayes dialing make certain that the AT command set is enabled It is normally good to disable status ...

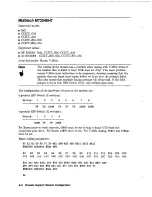
Страница 46: ...t so that DSR followsDCD this problem goes away The configuration of the hardware switches on the modem are 8 position DIP Switch S switches Switch 1 2 3 4 5 6 7 8 UP UP DOWN UP UP UP DOWN DOWN 4 position DIP Switch X switches Switch 1 2 3 4 DOWN UP UP DOWN For Hayes mode to work correctly AT ROmust be set so that it drops CTS when the connection goes down For Hayes AT VO must be set For V 25bis d...

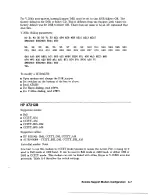
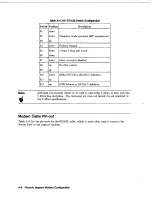
Страница 47: ...VDO XOYO MB2400 SB2400 BAl WO VAL To modify a MT224E7B Open modem and change the DSR jumper Set switches on the bottom of the box to above Send AT RO For Hayes dialing send AT VO For V 25bis dialing send AT V1 HP 372128 Supported modes Bell CCITT_OM CCITT_AM CCITT_BIS_OM CCITT_BIS_AM Supported cables HP 92219Q Bell CCITT_OM CCITT_AM A1703 64006 CCITT_BIS_OM CCITT_BIS_AM Auto dial modes None It is ...

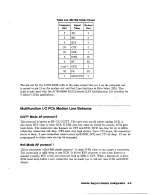
Страница 48: ...p SID down DSR CTS CD to RS 232 C definition S11 up S12 up DTR behaves to RS 232 C definition Note Although this modem claims to be able to dial using V 25bis it only uses the V 25bis line discipline The command set does not match the set specified in the V 25bis specification Modem Cable Pin out Table A 6 list the pin outs for the 92219Q cable which is most often used to connect the Access Port t...

Страница 49: ... raises RTS when it raises DTR If DSR does not come up within 25 seconds DTR goes back down The connection also depends on CTS and DCD DCD can drop for up to 400ms before the connection will drop CTS must stay high always Once CTS drops the connection starts to drop A new connection cannot occur until DSR DCD and CTS all drop FS can be programmed to either state via the CA command Bell Mode AP pro...

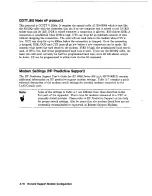
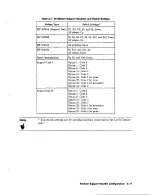
Страница 50: ...alf of the programmed baud rate is used If you use the 92219Q cable the baud rate will most certainly be half the programmed baud rate since RI will almost always be down FS can be programmed to either state via the CA command Modem Settings HP Predictive Support The HP Predictive Support User s Guide for HP 3000 Series 900 pin 50779 90012 contains additional information on HP predictive support m...

Страница 51: ...n Support Link I Option 1 Code 3 Option 1 Code 2 Option 8 Code 2 Option 15 Code 2 Option 16 Code 2 Option 22 Code 1 for pulse Option 22 Code 2 for tone Option 22 Code 3 for autoselect Option 24 Code 2 Support link II Option 1 Code 3 Option 1 Code 2 Option 8 Code 2 Option 15 Code 2 Option 16 Code 2 Option 22 Code 1 for autoselect Option 22 Code 2 for tone Option 22 Code 3 for pulse Note 1 The switc...

Страница 52: ......

Отзывы: