HP 24wd Скачать руководство пользователя страница 13


12 

Chapter V. Technical Information   


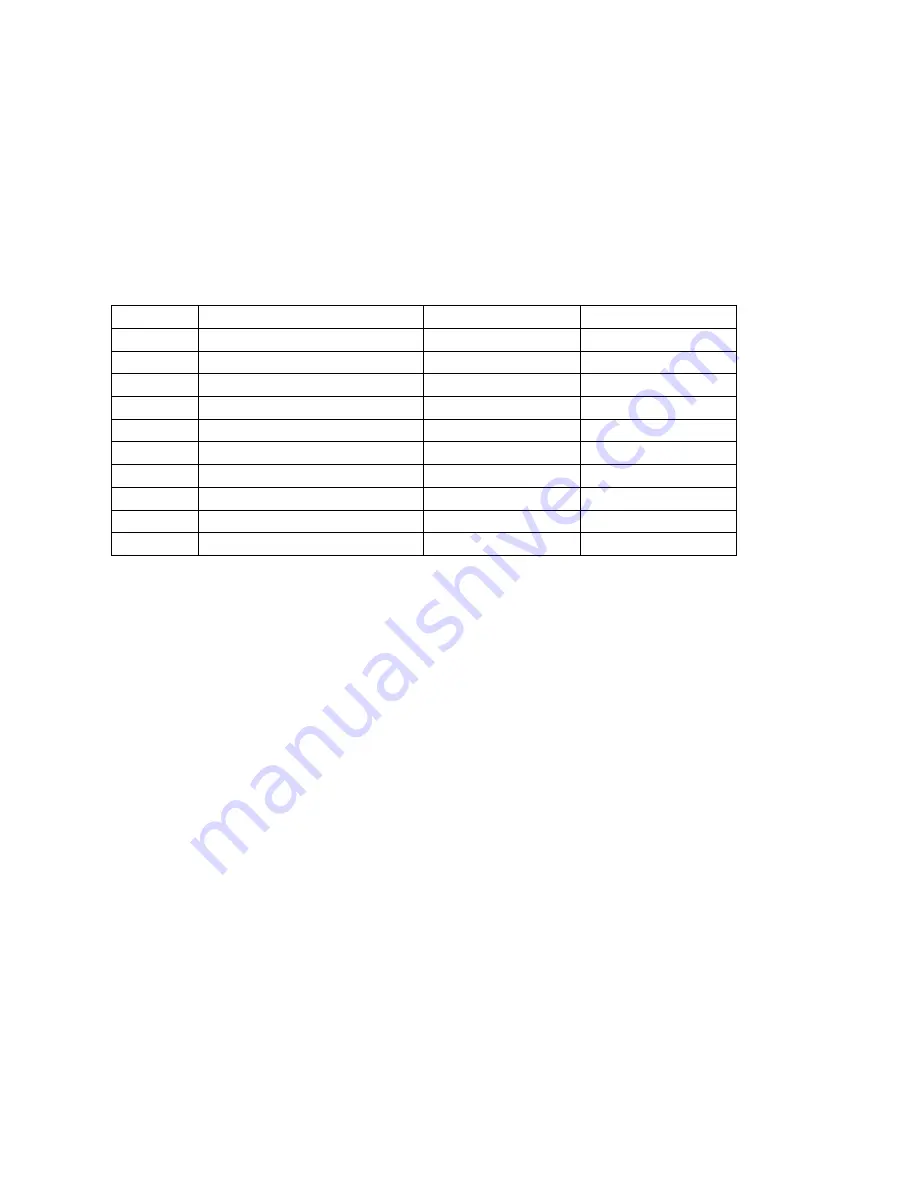
5.1   Factory preset display mode 

Criteria   

Resolution 

Horizontal frequency    Vertical frequency   

640X480 @60 Hz   

31.469   

59.94   

720X400 @70 Hz   

31.469   

70.087   

800X600 @60 Hz   

37.879   

60.317   

1024X768 @60 Hz   

48.363   

60.004   

1280X720 @60 Hz   

45.00 

60.00 

1280X1024 @ 60 Hz   

63.981 

60.02 

1440X900 @60 Hz   

55.935 

59.887 

1600X900 @60 Hz   

60.00 

60.00 

1680X1050@60 Hz 

65.29 

60.00 

10 

1920X1080@ 60Hz 

67.50 

60.00 


Note: The factory preset display mode is subject to change without notice.   

Содержание 24wd

Страница 1: ...HP 24wd LED Backlit Monitor User Guide ...

Страница 2: ...ments accompanying such products and services Nothing herein should be construed as constituting an additional warranty HP shall not be liable for technical or editorial errors or omissions contained herein This document contains proprietary information that is protected by copyright No part of this document may be photocopied reproduced or translated to another language without the prior written ...

Страница 3: ...th Windows 9x 2000 XP 7 Vista operation systems 1 2 Check list Please make sure the following items are included with your LCD monitor The monitor and the pedestal Lower stand Power cord Adapter VGA cable DVI cable Optional Documentation and software CD Setup poster Warranty certificate Optional If any of these items are missing please contact your dealer for technical support and custom service N...

Страница 4: ...3 Chapter II Installation 2 1 Install the pedestal Please follow the steps illustrated below to install the pedestal ...

Страница 5: ...he nearest electrical outlet 4 Power on your computer and monitor If your monitor displays an image the installation has been successfully done If the monitor does not display any image check all the connections Cautions 1 For installation please complete signal cord connection before plugging the power cord into the electrical outlet to avoid damaging the monitor 2 During installation please supp...

Страница 6: ...5 2 3 Disconnect the pedestal for shipping Press the clip button on the pedestal and remove the pedestal from the stand ...

Страница 7: ...6 Chapter III Monitor overview Overview of front panel controls ...

Страница 8: ...y using the on screen display menu system 1 If your monitor is not powered on press the Power button to turn it on 2 Press the Menu button to activate the OSD menu The OSD main menu will be displayed 3 To view the main menu or submenu press the on the front panel of your monitor to scroll up or the to scroll down Then press the OK button to select a highlighted function When the highlight scrolls ...

Страница 9: ... default Cool 9300K Change color to slightly blueish white Custom RGB Selects and adjusts your own color scales Red Color sets your own red color levels Green Color sets your own green color levels Blue Color sets your own blue color levels Image control To adjust the image on the screen The ambient brightness sensor can also be enabled or disabled only applicable to some models Auto adjustment To...

Страница 10: ...sts the screen imageto look sharper or soft Dynamic Contrast Turns Dynamic Contrast Ratio On or Off The factory default is Off OSD Control Provides a menu for adjusting the on screen display OSD control OSD position To adjust OSD position for your monitor Horizontal OSD Position To adjust the visual position of the OSD menu to the right or left of the screen The factory default horizontal position...

Страница 11: ... the factory default on off setting Monitor Status The operational status of your monitor will be displayed when you power on your monitor To select the positions where the status information is displayed Top Middle Bottom Off The factory default setting is Top DDC CI support Controlling some OSD menu functions such as brightness contrast and color temperature on your computer is allowed This feat...

Страница 12: ...leep Now to activate the sleep mode for your monitor Language Selects the language in which the OSD menu is displayed The factory default is English Information To select and display important information about your monitor Factory Reset The factory default settings will be reset Input Control When the monitor is connected to two active and valid video sources switching between the video input sou...

Страница 13: ... 59 94 2 720X400 70 Hz 31 469 70 087 3 800X600 60 Hz 37 879 60 317 4 1024X768 60 Hz 48 363 60 004 5 1280X720 60 Hz 45 00 60 00 6 1280X1024 60 Hz 63 981 60 02 7 1440X900 60 Hz 55 935 59 887 8 1600X900 60 Hz 60 00 60 00 9 1680X1050 60 Hz 65 29 60 00 10 1920X1080 60Hz 67 50 60 00 Note The factory preset display mode is subject to change without notice ...

Страница 14: ...e Control Languages Color Management Information Factory Reset Input Control Exit Size Packing 630 L x 119 W x 479 H mm Net weight Gross weight 3 6 KG 5 6 KG Power supply 100 240VAC 50 60Hz Altitude under operational condition 0 3658 m 0 12000 feet Altitude under storing condition 0 12192 m 0 40 000 feet Input signal VGA and DVI Contrast 1000 1 Brightness 250 cd m2 Response time 5 ms Color display...

Страница 15: ...ignal 2 Green Signal 3 Blue Signal 4 Ground 5 Cable testing 6 Red Signal Ground 7 Green Signal Ground 8 Blue Signal Ground 9 5 VDC 10 Null 11 Ground 12 SDA for DDC 13 Horizontal synchronization 14 Vertical synchronization 15 SCL for DDC VGA Interface ...

Страница 16: ... 13 TMDS Data 3 14 3 3 5V Power from PC 15 Ground Return for 5V 16 Hot Plug Detect 17 TMDS Data 0 18 TMDS Data 0 19 TMDS Data 0 5 Shield 20 TMDS Data 5 21 TMDS Data 5 22 TMDS Clock Shield 23 TMDS Clock 24 TMDS Clock DVI Interface 5 4 Panel testing The ratio of valid pixels on each LCD screen reaches 99 99 or higher However less than 0 01 of the pixels may cause dark dots displayed on the screen ...

Страница 17: ... describes proper workstation setup posture and health and work habits for computer users and provides important electrical and mechanical safety information This guide is located on the Web at http www hp com ergo and or on the documentation CD if one is included with the monitor CAUTION For the protection of the monitor as well as the computer connect all power cords for the computer and its per...

Страница 18: ...let and the total ampere rating of the products connected to the power cord does not exceed the rating of the power cord Look on the power label to determine the ampere rating Amps or A for each device Install your monitor near a power outlet that you can easily reach Disconnect the monitor by grasping the plug firmly and pulling it from the outlet Never disconnect the monitor by pulling the cord ...

Страница 19: ...itor by using a screen saver program and turning off the monitor when not in use Note The HP Warranty does not cover monitors with a burned in image Slots and openings in the cabinet are provided for ventilation These openings must not be blocked or covered Never push objects of any kind into cabinet slots or other openings Do not drop your monitor or place it on an unstable surface Do not allow a...

Страница 20: ...nt marked on the product s electrical ratings label The voltage and current rating of the cord should be greater than the voltage and current rating marked on the product In addition the cross sectional area of the wire must be a minimum of 0 75 mm or 18 AWG and the length of the cord must be between 6 feet 1 8 m and 12 feet 3 6 m If you have questions about the type of power cord to use contact a...

Страница 21: ...external ENERGY STAR R qualified display this feature also supports similar power management features for the display To take advantage of these potential energy savings users should use the default power management settings that are provided with ENERGY STAR qualified computers and displays The default power management settings on ENERGY STAR R qualified computers are preset to behave in the foll...

Страница 22: ...comply with legal requirements such as REACH Regulation EC No 1907 2006 of the European Parliament and Council A chemical information report for this product can be found at http www hp com go reach Restriction of Hazardous Substances RoHS A Japanese regulatory requirement defined by specification JIS C 0950 2005 mandates that manufacturers provide Material Content Declarations for certain categor...

Страница 23: ... waste equipment by handing it over to a designated collection point for the recycling or waste electrical and electronic equipment The separate collection and recycling of your waste equipment at the time of disposal will help to conserve natural resources and ensure that it is recycled in a manner that protects human health and the environment For more information about where you can drop off yo...

Страница 24: ...wer is off while connecting the video cable Enter Safe Mode after your computer is restarted Apply the setting supported by your monitor See table 5 1 in Chapter 5 B Factory Preset Display Mode Restart your computer to activate the new setting Blurred and ghost image Adjust the contrast and brightness controls Make sure no extension cord or switch box is used HP suggests you to connect your monito...

Страница 25: ...cal support website at www hp com support Select the country territory where you are Follow the link to visit pages applicable to your monitor Preparing to Call Technical Support If you cannot solve a problem by using the troubleshooting tips in this section you might have to call technical support For technical support contact information refer to the printed documentation included with the monit...

Отзывы: