HP 2009m - 20

User’s Guide

5–1

5

Operating the Digital Picture Frame Card Reader

(Select Models)

The Digital Picture Frame (DPF) card reader can be used when your computer is on or off. When your computer is on, 
it can search through the memory cards inserted in the DPF card reader. When your computer is off, the DPF card 
reader is capable of operating on its own; when you insert a supported memory card or USB flash drive into the DPF 
card reader, it allows you to view photos, play movies, and listen to music on your DPF card reader monitor display.

The DPF card reader supports the following formats:

Photo: .jpg, .bmp, .gif, .png, and .tiff

Video: .avi, .mpg, .vob, .dat, .mp4, .ts, .divx, .xvid, and .mov

Audio: .mp3, .wav, .ogg, .fla, and .wma

You can operate the DPF card reader with either the remote control or the On Screen Display (OSD) buttons on the 
front of the monitor.
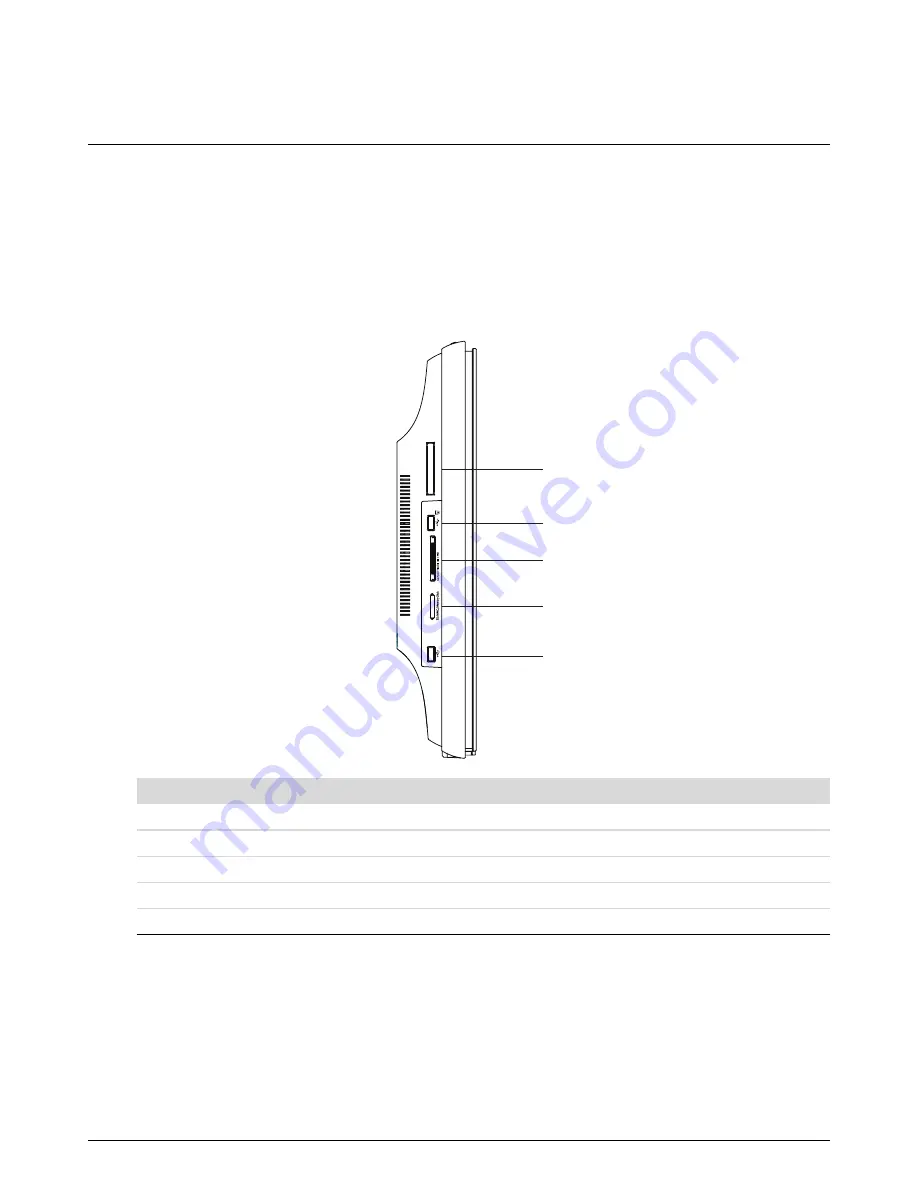
Remote Slot

Description

A

Remote Storage Slot

B

USB 2.0 input for the DPF card reader

C

Compact Flash I/II/MD

D

SD/MMC/Memory Stick

E

Standalone USB 2.0 connector, not compatible with DPF card reader

A

E

D

C

B

Содержание 2009m - 20" LCD Monitor

Страница 1: ...User s Guide w2228h 2229h w2448h hc w2558hc ...

Страница 2: ...her language without the prior written consent of HP Hewlett Packard Company 10955 Tantau Avenue Cupertino California 95014 0770 USA Copyright 2006 2009 Hewlett Packard Development Company L P Microsoft and Windows are U S registered trademarks of Microsoft Corporation Adobe and Acrobat are trademarks of Adobe Systems Incorporated ENERGY STAR and the ENERGY STAR logo are U S registered marks of th...

Страница 3: ...de blocks of text may be accompanied by an icon These blocks are notes cautions and warnings and they are used as follows WARNING Indicates that failure to follow directions could result in bodily harm or loss of life CAUTION Indicates that failure to follow directions could result in damage to equipment or loss of information NOTE Indicates additional information ...

Страница 4: ...iv User s Guide ...

Страница 5: ...onitor 3 1 Wall mounting the monitor 3 2 Preparation 3 2 Connecting the VGA Analog or DVI D Digital Cable 3 3 To connect the VGA cable 3 4 To connect the DVI D cable 3 4 Connecting the VGA DVI I Cable Select Models Only 3 4 Connecting the HDMI Cable 3 4 Audio and Video Cables and Adapters 3 5 Connecting the Audio Cable 3 6 Connecting the USB Hub Cable 3 6 Connecting USB Devices to the Monitor 3 7 ...

Страница 6: ...al Content Protection HDCP 4 11 5 Operating the Digital Picture Frame Card Reader Select Models Using the Monitor Menu with the Remote Control 5 2 Main Menu 5 3 Viewing Photos 5 3 Viewing a Slide Show 5 4 Listening to Music Audio 5 4 Watching Video Files 5 5 Changing Settings 5 5 Changing the language setting 5 6 Changing the display image size setting 5 6 Changing the slideshow transition 5 7 Cha...

Страница 7: ...rials Disposal C 2 Chemical Substances C 2 Canadian Notice C 2 Avis Canadien C 2 European Union Regulatory Notice C 2 Disposal of Waste Equipment by Users in Private Households in the European Union C 3 Japanese Notice C 3 Japanese Power Cord Notice C 3 Japanese Material Content Declaration C 3 Korean Notice C 4 EPA ENERGY STAR Compliance C 4 HP Recycling Program C 4 Republic of Turkey EEE Regulat...

Страница 8: ...viii User s Guide ...

Страница 9: ...rom one side of the monitor to the other Tilt adjustment Height adjustment Swivel adjustment Pivot adjustment for landscape or portrait viewing select models only Webcam and microphone select models only Two slot memory card reader with remote control select models only Removable pedestal and Video Electronics Standards Association VESA standard mounting holes for flexible mounting solutions inclu...

Страница 10: ...y Task light select models only Keyboard parking Power Saver to reduce energy consumption Quick View settings display CD included Drivers Auto adjustment software My Display software Webcam software select models only Documents Adobe Acrobat Reader Double hinged base design ...

Страница 11: ...power cord Do not walk on the cord WARNING Always connect your monitor the computer and other equipment to a grounded earthed power outlet To reduce the risk of electric shock or damage to your equipment do not disable the power cord grounding feature The grounding plug is an important safety feature WARNING For your safety be sure that the grounded power outlet you plug the power cord into is eas...

Страница 12: ...nitor from the power outlet before cleaning Do not use liquid cleaners or aerosol cleaners Do not drop the monitor or place it on an unstable surface When removing the monitor base you must lay the monitor face down on a soft area to prevent it from getting scratched defaced or broken Cleaning the Monitor The monitor is a high quality optical device that requires special care when cleaning To clea...

Страница 13: ...mounting You may need a straight slot screwdriver to secure some cables Installing the Monitor You can install the monitor on a desktop or wall mount it Place the monitor in a convenient well ventilated location near your computer Connect the monitor cables after you have installed the monitor Unfolding the monitor 1 With the monitor still in its flat folded state set it screen side up on a flat s...

Страница 14: ...reparation 1 Disconnect the power cable and any other cables from the monitor 2 Carefully place the monitor face down on a flat soft surface This might entail elongating the hinge and tilting the monitor back to ensure the monitor is flat 3 With your fingertips snap off the VESA cover from the back of the monitor 4 Remove all four screws from the VESA plate 5 Save the removed items cover screws an...

Страница 15: ...deo cable or a DVI D video cable provided with select models To use DVI you must have a DVI compliant graphic card Connectors are located on the back of the monitor Be sure the computer and monitor are turned off and unplugged Some graphic cards have both a DVI connector and a DVI to VGA converter included in the box select models only If the monitor has a VGA connector but no DVI connector use th...

Страница 16: ...hic card installed The monitor DVI D connector and cable are included with select models only Connecting the VGA DVI I Cable Select Models Only Connect the VGA end of the cable to the back of the computer and connect the DVI I end of the cable to the monitor Connecting the HDMI Cable Connect one end of the HDMI cable to the back of the monitor and the other end to any compatible digital audio vide...

Страница 17: ... VGA transmits an analog video signal DVI to VGA adapter Connects a DVI monitor to a VGA connector on the back of the computer TV or set top box or connects a VGA monitor to a DVI connector on the back of the computer TV or set top box DVI to HDMI adapter Connects a DVI monitor to an HDMI connector on the back of the computer TV or set top box or connects an HDMI monitor to a DVI connector on the ...

Страница 18: ...kers to the computer by using the audio cable as shown in the following illustration Connecting the audio cables connector locations may vary Connecting the USB Hub Cable Connect the USB hub cable from the computer to the USB In connector on the monitor This enables USB 2 0 ports on the monitor USB In ...

Страница 19: ...hock or damage to your equipment Do not disable the power cord grounding plug The grounding plug is an important safety feature Plug the power cord into a grounded earthed electrical outlet Be sure that the grounded power outlet you plug the power cord is easily accessible to the operator and located as close to the equipment as possible A power cord should be routed so that it is not likely to be...

Страница 20: ...iewing adjust the screen tilt to your own preference as follows 1 Face the front of the monitor and hold the base so that you do not topple the monitor while changing the tilt 2 Adjust the tilt by moving the top edge of the monitor either toward or away from you without touching the screen NOTE If your monitor has the pivot feature make sure the cords are set loosely enough so they will not pull a...

Страница 21: ...ws a usable range of motion with the swivel feature CAUTION The monitor can fall back if the hinge is extended fully and the monitor screen is tilted back too far CAUTION To avoid breakage or other damage avoid applying pressure to the LCD screen while swiveling it or changing the tilt ...

Страница 22: ...tilt the monitor backward 10 to 30 degrees by pulling the bottom of the screen toward you NOTE For full functionality of this pivot feature select models only the My Display software may need to be installed See My Display Software Select Models in the Operating the Monitor chapter for information on how to install this software Some graphics cards support rotating the image of the display automat...

Страница 23: ...ed back pivot it clockwise to portrait position If it is in portrait position tilt it back and pivot the monitor counterclockwise to landscape orientation CAUTION The first step is important the double hinged monitor can scratch the base surface if the monitor is not tilted back enough before pivoting it ...

Страница 24: ...Setting Up the Monitor 3 12 User s Guide Keyboard Parking If you need more space on your desktop place the keyboard under the monitor when not in use ...

Страница 25: ...ternet To download the latest version of drivers and software files from the HP Support site 1 Refer to http www hp com support 2 Select your country region 3 Select Download Drivers and Software 4 Enter the model number of your monitor The software download pages for your monitor are displayed 5 Download and install the driver and software files by using the instructions in the download pages 6 E...

Страница 26: ... You can also press the Menu button and then select Image Control followed by Auto Adjustment from the OSD menu See Adjusting Screen Quality in this chapter If the result is not satisfactory continue with the procedure 3 Insert the CD in your computer CD drive The CD menu displays 4 Select the language 5 Select Open Auto Adjustment Software 6 The setup test pattern displays Auto adjustment setup t...

Страница 27: ... taskbar Or 1 Click the Windows Vista start button on the taskbar 2 Click All Programs 3 Click HP My Display 4 Select HP My Display For additional information refer to the onscreen Help within the software Front Panel Controls Control buttons are located on the front or top of the monitor Icon Description Power Turns the monitor on and to standby or sleep mode NOTE The power button is located on t...

Страница 28: ...oll up at the top of the selections 4 To adjust the scale of a selected item press the or button 5 Select Save and Return If you don t want to save the setting select Cancel from the Sub Menu or Exit from the Main Menu 6 Press the Menu button to exit the OSD OSD Menu Selections The following table lists the On Screen Display OSD menu selections and their functional descriptions After changing an O...

Страница 29: ...onal scaling of height and width Fill to Aspect Ratio Image is sized to fit the screen and maintains proportional image Refresh Overdrive select models Provides access to the gray to gray panel overdrive function Enabled for panel native resolution only The default is Off Sharpness select models On a scale of 1 to 5 adjusts the screen image to look sharper or softer NOTE If the one to one custom s...

Страница 30: ... Management Selects the power management features of the monitor Volume Adjusts the volume level OSD Control Adjusts the position of the OSD menu on the screen Horizontal OSD Position Changes the viewing position of the OSD menu to the left or right area of the screen The factory default range is 50 Vertical OSD Position Changes the viewing position of the OSD menu to the top or bottom area of the...

Страница 31: ...onitor to wake up from sleep mode Timer Sets the Sleep Timer feature On or Off the default setting is Off Sleep Now Immediately sets the monitor to enter sleep mode Default Video Input Selects the default video input signal when the monitor is connected to two active and valid video sources The default is DVI You must restart the computer to have the change take effect Information Selects and disp...

Страница 32: ...ng message OSD Lock out appears for 10 seconds If the OSD is locked press and hold the Menu button for 10 seconds to unlock the OSD If the OSD is unlocked press and hold the Menu button for 10 seconds to lock the OSD No Input Signal Indicates the monitor is not receiving a video signal from the computer on the monitor video input connector s Check to see if the computer or input signal source is o...

Страница 33: ...er state the monitor screen is blank the backlight is off and the Power light is amber The monitor uses minimum power When the monitor is awakened a brief warm up period occurs before the monitor returns to normal operating mode The energy saving reduced power state activates if the monitor does not detect either the horizontal sync signal or the vertical sync signal The power saver feature must b...

Страница 34: ... Models Install CyberLink YouCam software and driver from the CD that came with your monitor Use your webcam to create videos from files on your computer create snapshots to view organize edit send and print create video notes for an enhanced visual calendar and to share initiate live video chats with Windows Live Messenger or other compatible software program import live videos into a movie makin...

Страница 35: ... an Internet messenger or video phone call program Make sure the person you are calling has compatible video calling software 2 Enable your webcam as the default video input This is usually done through the video setup in the Tools menu in the software program you are using 3 Send your video call by following the instructions for the video calling software program To start a video chat in CyberLin...

Страница 36: ...Operating the Monitor 4 12 User s Guide ...

Страница 37: ...PF card reader it allows you to view photos play movies and listen to music on your DPF card reader monitor display The DPF card reader supports the following formats Photo jpg bmp gif png and tiff Video avi mpg vob dat mp4 ts divx xvid and mov Audio mp3 wav ogg fla and wma You can operate the DPF card reader with either the remote control or the On Screen Display OSD buttons on the front of the m...

Страница 38: ... at the bottom center of the display Press the power button A to activate the DPF menu on the DPF card reader display The function buttons allow you to view pictures B watch videos C and listen to music D 2 The navigation buttons allow you to move through the various menus and selections Up Arrow button E Left Arrow button F Right Arrow button G Down Arrow button H and Back button I NOTE The B C a...

Страница 39: ...ll the photos on your media card 1 Insert your memory card or USB flash drive into the DPF card reader 2 Press the MENU button on your remote control and press the OK button when the photo image is highlighted on the screen 3 Use any of the navigation buttons to move to the photo icon press OK Or press the Photo button camera icon on the remote To de select an image press the Back button 4 To sele...

Страница 40: ...button The DPF card reader adds a yellow border around each image a Use the navigation buttons to move to other pages of items b Use the Back button to de select 6 From lower right image use the navigation buttons to scroll to next page if there is one Otherwise the selection wraps around 7 When selections are complete press the OK button again The Navigation sub menu appears at bottom of screen 8...

Страница 41: ...ss the On button or the Menu button on your remote control 3 Use the navigation buttons to move to the Movie icon then press the OK button Or press the Movie button film icon 4 A menu of available movies or video clips is shown Use the navigation buttons to select an item to be played Press the OK button to play an item A blue background is used to identify the video currently selected 5 To show t...

Страница 42: ...ons are English German French Spanish Portuguese Italian Dutch 3 Press the navigation buttons to select the language you want to use Then press the OK button All the menu selections will change to the new language you have selected 4 Press the Left Arrow button or the Back button to get back to the Settings List 5 Press the Menu button to return to the DPF menu Changing the display image size sett...

Страница 43: ...ss the Right Arrow button to scroll through the slideshow speed choices The current choices are 3 seconds 5 seconds 10 seconds 30 seconds 60 seconds Manual control 3 Use the navigation buttons to select the slideshow speed you want and then press the OK button 4 Press the Left Arrow button or the Back button to get back to the Settings List 5 Press the Menu button to return to the DPF menu Changin...

Страница 44: ... Settings List 7 Press the Menu button to return to the DPF menu Restoring factory default The factory default settings are as follows Language English Display Image Size Original Slide Show Transition Normal Slide Show Speed 5 seconds Slide Show Shuffle No Shuffle Adjust LCD Settings affects DPF card reader only Brightness 50 Contrast 50 Tint 50 Color 50 Factory Default No 1 Use the navigation bu...

Страница 45: ...ld still be vertical to the desktop so you can access the hinge WARNING Before folding the monitor turn off the monitor power and disconnect all power video and audio cables To disconnect power from the equipment unplug the power cord from the power outlet by grasping the power plug firmly Never pull on the cord CAUTION The screen is fragile Placing the monitor screen down on a flat soft area prev...

Страница 46: ...he strap ends through the slips 4 Lower the monitor screen down flat horizontal to the desktop 5 Pivot the monitor to the portrait position in the figure you would be facing the monitor where the straight arrow is Perform this step only if you have the pivot feature 6 Place the folded monitor screen side up in its original shipping box ...

Страница 47: ... the image Check Video Cable appears on screen Connect the monitor VGA signal cable to the VGA connector on the computer or connect the DVI D signal cable to the DVI connector on the computer Be sure that the computer power is off while connecting the video cable Input Signal Out of Range appears on screen Restart your computer and enter Safe Mode Change your settings to a supported setting see th...

Страница 48: ...ed Refer to Installing Drivers in the Operating the Monitor chapter for more information HP monitor drivers are also available at http www hp com support Picture bounces flickers or wave pattern is present in the picture Move electrical devices that may cause electrical interference as far away from the monitor as possible Use the maximum refresh rate that your monitor is capable of at the resolut...

Страница 49: ...printed documentation included with the monitor Have the following information available when you call Monitor model number located on label on back of monitor Monitor serial number located on label on back of monitor or in the OSD display in the Information menu Purchase date on invoice Conditions under which the problem occurred Error messages received Hardware configuration Name and version of ...

Страница 50: ...Troubleshooting A 4 User s Guide ...

Страница 51: ... x d Maximum Graphics Resolution Optimum Graphics Resolution Text Mode Dot Pitch Horizontal Frequency analog mode Vertical Refresh Rate analog mode Environmental Requirements Temperature independent of altitude Operating Temperature Non operating Temperature Relative Humidity Power Source Power Consumption Sleep Power Consumption TFT LCD active matrix 22 in 55 9 cm diagonal 5o to 25o 19 6 lb 8 9 k...

Страница 52: ...29o to 140o F 20o to 60o C 25 to 85 100 240Vv 50 60 Hz 130 watts maximum 2 watts typical model w2558 Display Type Viewable Image Size Tilt Maximum Weight unpacked Dimensions h x w x d high position low position Maximum Graphics Resolution Optimum Graphics Resolution Text Mode Dot Pitch Horizontal Frequency analog mode Vertical Refresh Rate analog mode Environmental Requirements Temperature indepen...

Страница 53: ...es 1 through 19 All models support high definition video inputs 1 through 10 Factory Preset Video Input Modes w2228 and 2229h Preset Resolution Horizontal Frequency kHz Vertical Frequency Hz 1 640 x 480 31 4 59 9 2 640 x 480 37 5 75 0 3 720 x 400 31 5 70 0 4 800 x 600 37 9 60 3 5 800 x 600 46 9 75 0 6 832 x 624 49 7 74 5 7 1024 x 768 48 4 60 0 8 1024 x 768 60 0 75 0 9 1152 x 870 68 7 75 1 10 1152 ...

Страница 54: ...600 37 9 60 3 5 800 x 600 46 9 75 0 6 832 x 624 49 7 74 6 7 1024 x 768 48 4 60 0 8 1024 x 768 60 0 75 0 9 1152 x 720 44 9 60 0 10 1152 x 870 68 7 75 1 11 1152 x 900 61 8 65 9 12 1280 x 768 47 4 60 0 13 1280 x 960 60 0 60 0 14 1280 x 1024 64 0 60 0 15 1280 x 1024 80 0 75 0 16 1440 x 900 55 9 60 0 17 1600 x 1000 61 6 60 0 18 1680 x 1050 65 3 60 0 19 1600 x 1200 75 0 60 0 20 1920 x 1200 74 0 60 0 21 ...

Страница 55: ... 47 8 60 0 11 1280 x 960 60 0 60 0 12 1280 x 1024 64 0 60 0 13 1280 x 1024 80 0 75 0 14 1440 x 900 55 9 59 9 15 1600 x 1000 61 6 60 0 16 1680 x 1050 65 3 60 0 17 1600 x 1200 75 0 60 0 18 1600 x 1200 93 8 75 0 19 1920 x 1200 74 0 60 0 High Definition Video Modes w2228 2229h w2448 w2558 Preset Resolution Horizontal Frequency kHz Vertical Frequency Hz 1 720 x 480 15 7 60 2 720 x 480 31 5 60 3 1280 x ...

Страница 56: ...ll continue to improve its ability to produce displays with fewer cosmetic imperfections and we will adjust guidelines as improvements are made For more information about your HP LCD Monitor refer to the HP Web site at http www hp com support Power Cord Set Requirements The monitor power supply is provided with Automatic Line Switching ALS This feature allows the monitor to operate on input voltag...

Страница 57: ...at to which the receiver is connected Consult the dealer or an experienced radio or television technician for help Modifications The FCC requires the user to be notified that any changes or modifications made to this device that are not expressly approved by Hewlett Packard Company may void the user s authority to operate the equipment Cables Connections to this device must be made with shielded c...

Страница 58: ... all requirements of the Canadian Interference Causing Equipment Regulations Avis Canadien Cet appareil numérique de la classe B respecte toutes les exigences du Règlement sur le matériel brouilleur du Canada European Union Regulatory Notice This product complies with the following EU Directives Low Voltage Directive 2006 95 EC EMC Directive 2004 108 EC Compliance with these directives implies con...

Страница 59: ...will help to conserve natural resources and ensure that it is recycled in a manner that protects human health and the environment For more information about where you can drop off your waste equipment for recycling please contact your local city office your household waste disposal service or the shop where you purchased the product Japanese Notice Japanese Power Cord Notice Japanese Material Cont...

Страница 60: ... help protect the environment ENERGY STAR is a registered trademark owned by the U S government HP Recycling Program HP offers product end of life return programs for HP and other manufacturers hardware in several geographic areas The terms and availability of these programs vary by geography because of differences in regulatory requirements and local customer demand For information on the HP recy...

Страница 61: ...ast one of the homogeneous materials used for this part is above the limit requirement in SJ T11363 2006 All parts named in this table with an X are in compliance with the European Union s RoHS Legislation Directive 2002 95 EC of the European Parliament and of the Council of 27 January 2003 on the restriction of the use of certain hazardous substances in electrical and electronic equipment Note Th...

Страница 62: ...Part number 490757 009 ...

Отзывы: