background image

Add-On Devices

Reference Guide

5–11

Replacing the Hard Drive

To Replace the Hard Drive

You will need a small Phillips screwdriver for this procedure. 

1. Save your work and shut down the notebook. If you are not 

sure whether the notebook is off or in Hibernation, briefly 
press the power button. If your work returns to the screen, 
save your work, exit all applications, and then shut down the 
notebook.

2. Disconnect all external devices connected to the notebook.

3. Disconnect the power cord

4. Remove the battery pack.

5. Turn the unit bottom-side up.

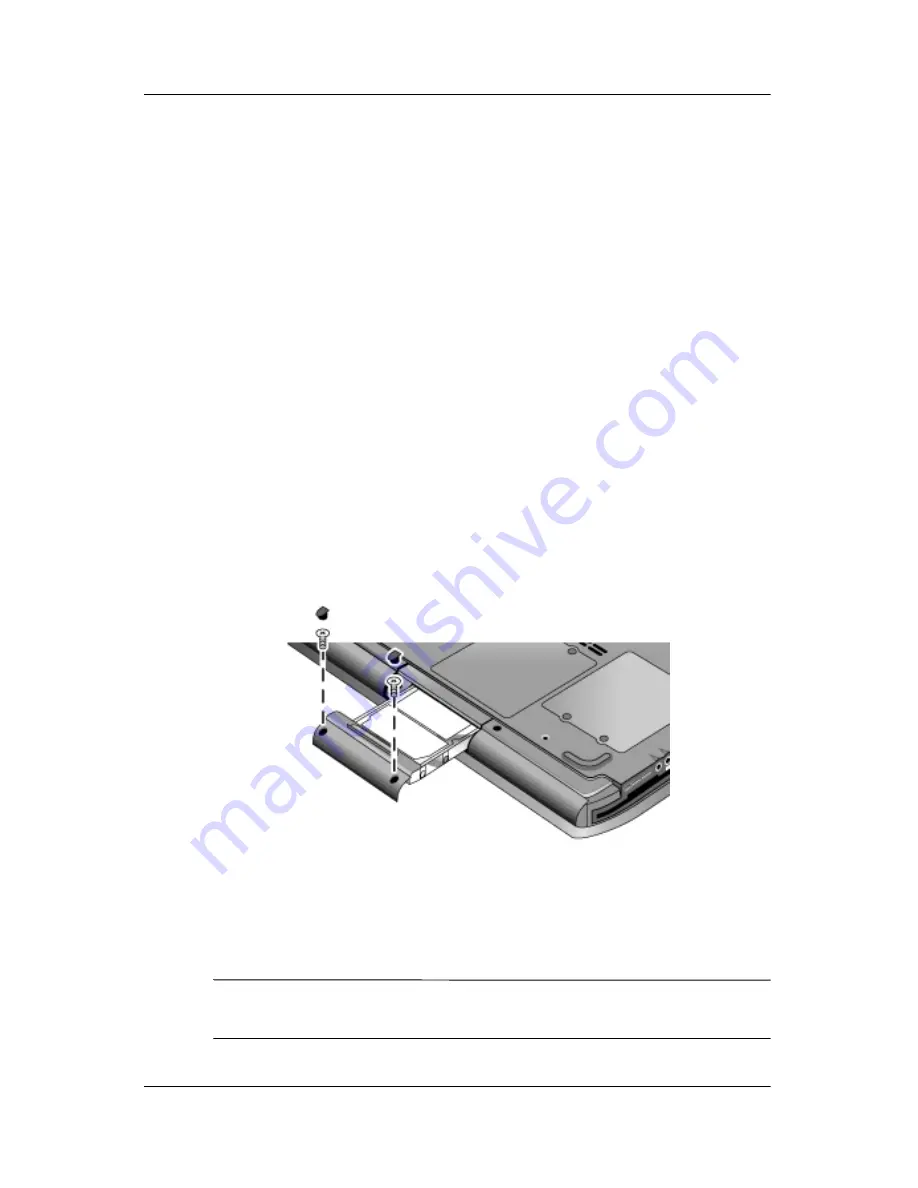
6. Match your notebook to the following illustration. Use a 

pointed tool to remove the plugs from the 2 or 3 screw holes, 
then remove the screws. The number of screws varies by model. 

7. Gently pull the hard drive out of the notebook.

8. Gently slide the new drive into the hard drive compartment. 

Press firmly to make sure the connector seats properly.

9. Reinstall the hard drive screws and plugs.

If you are installing a new hard drive, you should create a Utility 
partition on the drive before loading any software. 

Содержание Compaq 370698-001

Страница 1: ...ins how to set up operate maintain and troubleshoot your notebook It also provides information on battery pack and power management external device connections and modem and network connections The last chapter provides additional reference material on modem commands safety and regulatory information ...

Страница 2: ......

Страница 3: ...ly warranties for HP products and services are set forth in the express warranty statements accompanying such products and services Nothing herein should be construed as constituting an additional warranty HP shall not be liable for technical or editorial errors or omissions contained herein Reference Guide Compaq Notebook Series First Edition June 2004 Reference Number 2200 Document Part Number 3...

Страница 4: ......

Страница 5: ...k 1 7 Step 2 Connect AC Power 1 8 Step 3 Connect a Phone Line 1 9 Step 4 Turn On the Notebook 1 10 Step 5 Set Up Windows 1 11 2 Basic Operation Operating Your Notebook 2 1 Default Power Settings 2 2 To Reset the Notebook 2 3 To Change the Boot Device 2 3 To Use the TouchPad 2 4 To Use the Tap to Click Function of the TouchPad 2 5 To Use the Function Hot Keys 2 6 To Use the One Touch Buttons 2 7 To...

Страница 6: ...e Hard Drive 2 15 Taking Care of Your Notebook 2 16 To Protect Your Hard Drive 2 16 To Maintain Your Notebook 2 16 To Safeguard Your Data 2 17 To Extend the Life of the Display 2 17 To Clean Your Notebook 2 17 3 Battery Packs and Power Management Managing Power Consumption 3 1 How the Notebook Manages Power Automatically 3 2 To Change Timeout Settings and Create Power Schemes 3 3 Using Battery Pow...

Страница 7: ...Models Only 4 7 To Turn Wireless Communication On and Off 4 8 5 Add On Devices Connecting External Devices 5 1 To Insert or Remove a PC Card 5 1 To Connect an Audio Device 5 3 To Connect a TV to Your Notebook Select Models Only 5 4 To Connect a 1394 Device Select Models Only 5 6 Installing Additional RAM Memory 5 7 To Install a RAM Expansion Module 5 7 To Remove a RAM Expansion Module 5 9 Replacin...

Страница 8: ...6 10 PC Card PCMCIA Problems 6 13 Performance Problems 6 14 Power and Battery Pack Problems 6 15 Printing Problems 6 17 Serial Parallel and USB Problems 6 18 Startup Problems 6 19 Wireless Problems 6 21 Configuring Your Notebook 6 23 To Run the BIOS Setup Utility 6 23 Updating Software and Drivers from the Web 6 28 Using System Recovery Features 6 28 Safeguarding Your Data 6 29 Operating System OS...

Страница 9: ...Your Notebook Identifying Parts of the Notebook Components included with the notebook may vary by geographical region and the features you selected The following tables identify the standard external components included with most notebook models ...

Страница 10: ...wer mode hard drive activity and battery 6 Notebook open close latch 2 TouchPad scroll pad Click buttons and an on off button 7 CD ROM DVD or other drive 3 Power button turns the notebook on and off 8 Battery pack 4 Keyboard status lights 9 Wireless on off button and indicator light select models only 5 One Touch buttons Hard drive ...

Страница 11: ...s 8 PC Card and CardBus slot and button select models only location varies by model 3 RJ 45 jack connects a network cable 9 IEEE 1394 port select models only 4 S Video out jack select models only Audio jacks left to right external microphone audio out headphones 5 External monitor port q Volume control 6 Cable lock slot security connector w Audio mute button and audio mute light ...

Страница 12: ...ly a Mini PCI device authorized for use in your notebook by the governmental agency that regulates wireless devicesgin your country If you install a device and then receive a warning message remove the device to restore notebook functionality Then contact Customer Care 1 Hard drive 4 Reset button 2 Battery latch 5 Mini PCI cover no user parts inside 3 RAM memory cover ...

Страница 13: ...n the front of the notebook 1 Power mode On Notebook is on even if the display is off Blinking Notebook is in Standby Off Notebook is off or in Hibernation 2 Hard drive activity On Notebook is accessing the hard drive 3 Battery status Green AC adapter is connected and the battery pack is fully charged Amber AC adapter is connected and the battery pack is charging Blinking AC adapter is connected a...

Страница 14: ...es of the keyboard locks 1 Caps Lock On Caps Lock is active 2 Num Lock On Num Lock is active The Keypad Lock must also be on to use the embedded keypad 3 Keypad Lock On The embedded keypad is active Fn F8 Num Lock must also be on to activate the numeric keys Otherwise cursor control is active as marked on an external keyboard ...

Страница 15: ... included with the product When you set up your notebook for the first time you will connect the AC adapter charge the battery pack turn on the notebook and run the Microsoft Windows Setup program Step 1 Insert the Battery Pack ÅWARNING Do not mutilate or puncture battery packs Do not dispose of battery packs in fire or they can burst or explode releasing hazardous chemicals Rechargeable battery p...

Страница 16: ...pter could damage the notebook or adapter cause data loss and may void your warranty 1 Plug the AC adapter into the notebook 2 Connect the power cord to the AC adapter 3 Plug the power cord into a wall outlet The notebook battery starts charging When unplugging the power cord unplug it from the outlet before unplugging it from the AC adapter While the battery pack is charging you can continue with...

Страница 17: ...sure the telephone line is an analog line sometimes called a data line Do not use a digital line 2 Connect the telephone cord RJ 11 into a telephone jack 3 Plug the other end of the telephone cord into the RJ 11 modem jack on the notebook For details about using the modem see Using the Modem ...

Страница 18: ...dapter plugged in for several hours to fully charge the battery pack Charge times will vary ÅWARNING This notebook is designed to run demanding applications at full power As a result of increased power consumption it is normal for the notebook to feel warm or hot when used continuously To avoid potential discomfort or burns do not block the air vents or use the notebook on your lap for extended pe...

Страница 19: ... the Windows Setup program runs automatically and includes opportunities to customize your setup 1 Follow the Setup program instructions on the screen If the program prompts you to enter the Product ID code locate the code on the bottom of the notebook 2 Check the modem country or region settings Select Start Control Panel Printers and Other Hardware Phone and Modem Options then select your countr...

Страница 20: ...1 12 Reference Guide Getting Started with Your Notebook ...

Страница 21: ... Your Notebook You can start and stop your notebook by using the power button However alternative methods may be required depending on power considerations types of active connections and startup time This chapter describes several of these methods ...

Страница 22: ...hutdown procedures cannot be used press and hold the power button for 4 seconds to turn off the notebook Powers off the notebook Standby Power status light blinks Select Start Turn Off Computer Standby or Allow the system to time out Saves significant power Turns off the display and other components Maintains current session in RAM Restarts quickly Restores network connections Hibernation Power st...

Страница 23: ...nsert the tip of a paper clip into the reset button on the bottom of the notebook then press the power button to restart To Change the Boot Device The notebook normally boots from its internal hard drive You can also boot the notebook from a diskette drive a CD ROM drive or an internal network interface card 1 Select Start Turn Off Computer Restart 2 When the logo screen appears press esc to displ...

Страница 24: ...cidentally when you are typing The indicator light turns off when you turn off the TouchPad 1 Click buttons The Click buttons work like the left and right buttons on a standard mouse 2 TouchPad touch sensitive pointing device 3 TouchPad on off button and indicator light 4 Scroll pad The scroll pad causes the contents of the active window to scroll vertically ...

Страница 25: ...r TouchPad is enabled by default To disable it follow the instructions included here 1 Select Start Control Panel Printers and Other Hardware Mouse The Mouse Properties dialog box opens 2 Select the Tapping tab 3 In the left panel clear the Tapping check box 4 Select Apply OK The Tap to Click function is now disabled ...

Страница 26: ... brightness Fn F2 Increases the display brightness Fn F5 Toggles the external monitor on and off Fn F8 Toggles the built in keypad on and off Does not affect an external keyboard If Num Lock is on then the numeric functions are active otherwise cursor control is active as marked on an external keyboard Fn F12 Initiates Hibernation Fn NumLock Toggles Scroll Lock on and off Fn Page Up Increases the ...

Страница 27: ... the corresponding application document or Web site To program a One Touch button 1 Select Start All Programs Utilities One Touch 2 On the One Touch tab select the button you want to reprogram 3 Type a label for the button then select the application document folder or Web site you want the button to open 4 If you want a label to appear onscreen when you press a One Touch button select that option...

Страница 28: ...shortcut menu for the selected item This is the same menu that appears when you right click while pointing at the selected item This key combination Does this Windows key E Runs Windows Explorer Windows key F1 Runs Windows Help Windows key F Runs Windows Find Search Windows key M Minimizes all displayed windows Shift Windows key M Returns all minimized windows to original size Windows key R Runs t...

Страница 29: ...characters These special characters appear on the lower right corner of some keys on the keyboard For example To type an International character press and hold the ALT GR key then press the key containing the International character you want to display If your keyboard does not have an ALT GR key you can use the ALT key instead of the ALT GR key to get the same result 1 Shifted 2 Unshifted 3 ALT G...

Страница 30: ...tion of the CD or DVD drive varies by model 1 Press the button on the face of the CD or DVD drive If you are using this drive for the first time be sure to remove the cardboard packing insert if present 2 Press the CD or DVD gently but firmly onto the spindle label facing up or Remove the CD or DVD 3 Slide the tray back into the module to close it If your notebook loses power you can manually open...

Страница 31: ... embedded in the disc data These codes prevent DVD movies from being played outside the region of the world in which they are sold If you get a region code error you are trying to play a DVD intended for a different region Most DVD drives let you change the region code only a limited number of times usually no more than 4 When you reach this limit your last change to the region code will be hard c...

Страница 32: ... notebook is equipped with a DVD RW R and CD RW Combo Drive you must install your DVD burning software from the CDs included with your notebook before you can write to DVD media When writing to DVD R or DVD RW media observe the following guidelines Place the notebook on a flat stable surface Ensure that the AC adapter is connected to the notebook and an AC electrical outlet Close and exit all othe...

Страница 33: ... leaves Standby To cancel password protection repeat the preceding steps but set an empty password For complete protection set passwords in Windows and through the BIOS Setup utility see Configuring Your Notebook in the Troubleshooting chapter To Lock Your Notebook To protect against unauthorized access while your notebook is running lock the notebook before leaving it unattended or set up a scree...

Страница 34: ... a lock not included with the notebook 1 Wrap the cable around a secure object 2 Insert the cable into the security cable slot on the notebook 3 Lock it with the cable lock key then store the key in a safe place away from the notebook The purpose of security solutions is to act as a deterrent These solutions do not prevent the product from being mishandled or stolen ...

Страница 35: ...ve to help keep your information secure ÄCAUTION When you enable the hard drive lock the current BIOS user password or administrator password if that is the only password set is encoded on the hard drive If you move the hard drive to another notebook you cannot access the drive until you set the user or administrator password to match the drive password After you match the drive password you can c...

Страница 36: ...igid surface while the hard drive is operating could destroy data or damage the drive Carry the notebook in a padded case to protect against bumps and jolts Set down the notebook gently To Maintain Your Notebook Provide adequate ventilation around the notebook Always set the notebook on a flat surface so that air can flow freely around and underneath it Always shut down the notebook or put it in H...

Страница 37: ...ts for both AC and battery pack operation to the shortest comfortable interval Avoid using a screen saver or other software that prevents the notebook from changing to Display off or Standby mode after a timeout period If you use a screen saver enable the option to shut off the display after a time delay Do not disable Display off or Standby timeouts If you are using AC power and have no external ...

Страница 38: ...2 18 Reference Guide Basic Operation ...

Страница 39: ...ttery power you can maximize operating time without compromising performance Your notebook is designed to help you reduce power consumption and extend battery life During idle periods the notebook automatically enters power saving modes after specified timeout periods You can adjust these timeouts to suit your working habits ...

Страница 40: ...urs The result is To resume No keyboard pointing device or other input activity occurs for the specified interval Display is turned off Conserves battery power and extends the life of the display Briefly press any key or move a pointing device to turn on the display The hard drive is not accessed for a specified interval Hard drive is turned off Is usually set to occur shortly after the display is...

Страница 41: ... 1 Select Start Control Panel Performance and Maintenance Power Options 2 Select the Power Schemes tab then enter the settings you want If you do not want a particular timeout to occur set the value to Never See Windows Help for details If you want to save the settings as a power scheme select Save As and enter a name for the scheme ÄCAUTION Do not disable Hibernate support in the Power Options se...

Страница 42: ... pointer over the power icon to display the remaining battery charge This value is shown as either a percentage of charge remaining or as time remaining Select the power icon to open the Battery Meter window From the Windows Control Panel Select Start Control Panel Performance and Maintenance Power Options then select the Power Meter tab to see the battery status The Alarms and Advanced tabs provi...

Страница 43: ...ocedures Replace the battery pack with a charged one Plug in the AC adapter If you plug in the AC adapter you can continue to work while your battery pack recharges To Recharge the Battery Pack ÄCAUTION The AC adapter is normally warm when plugged into an AC outlet The notebook is normally warm while recharging Do not recharge the notebook in a briefcase or other confined space or the battery pack...

Страница 44: ...to save your current session but will not be using the notebook for a day or more Set the automatic timeout settings to emphasize saving power If your notebook has a multispeed processor use the lower speed on battery power the default settings conserve battery power If your notebook has a wireless on off button turn off the wireless function when you are not using it Press the wireless on off but...

Страница 45: ... for more than 2 weeks remove and store the battery pack ÄCAUTION To prevent damage to the battery pack do not expose it to high temperatures for extended periods of time High temperatures accelerate the self discharge rate of a stored battery pack To prolong the charge of a stored battery pack place it in a cool dry location To maintain the accuracy of battery charge displays calibrate a battery ...

Страница 46: ...attery pack has reached the end of its useful life do not dispose of it in general household waste In Europe dispose of or recycle battery packs by using the public collection system or by returning them to your service partner In other regions refer to the Worldwide Telephone Numbers booklet included with the notebook to contact your service partner and request information about battery pack disp...

Страница 47: ...k Express for sending and receiving e mail messages Windows Fax Console for sending and receiving faxes For best performance you can connect to any Internet service provider ISP or modem network that has V 90 or V 92 interoperable modems Check with your ISP for a list of telephone numbers that support V 90 or V 92 V 92 enables modem on hold technology that allows an Internet session to be interrup...

Страница 48: ...ltiple phone lines or a private branch exchange PBX It cannot be connected to a coin operated telephone and does not work with party lines Some of these connections may result in excess electrical voltage and could cause a malfunction in the internal modem Check your telephone line type before connecting your phone line ...

Страница 49: ...e dialing from Italy and fail to connect to your server or cancel the connection you must wait one minute before dialing that number again If you dial before then you will get the message delay After the fourth failed connection you must wait one hour before trying the number again If you dial before the hour is up you will get the message black list When your modem is in use an external surge pro...

Страница 50: ...onnection speeds or on the Dialing Rules tab select Edit to set dialing options Communications software Many communications applications provide options for controlling modem settings See the Help for your software AT commands You can control many aspects of modem operation using modem AT commands AT commands are special strings of characters sent to the modem to set up specific conditions Those c...

Страница 51: ...X 100 Mbps connections 2 Plug the LAN cable not supplied into the built in LAN port The cable must have an RJ 45 connector 3 Windows automatically detects and sets up a LAN connection To edit settings open Network and Dial up Connections in Control Panel See Windows Help for information about setting up and using LAN connections Select Start Help and Support Contact your network administrator for ...

Страница 52: ... another compatible wireless enabled notebook A WLAN adapter cannot be used to connect the notebook to a mobile telephone service or a cordless telephone Setting up a wireless network requires A notebook equipped with a WLAN adapter The WLAN adapter can be integrated or a free standing add on such as a PC Card A wireless access point Wireless access point functionality can be provided by a standal...

Страница 53: ...than through cables you can move from place to place within the network from your office to a conference room for example and remain on the network the entire time ÅWARNING Exposure to Radio Frequency Radiation The radiated output power of this device is below the FCC radio frequency exposure limits Nevertheless the device should be used in such a manner that the potential for human contact during...

Страница 54: ...ireless function Turning On Communication and Making a Connection If your notebook has wireless 802 11 capabilities the wireless indicator light on the front of the notebook turns on when 802 11 communication is turned on 1 If the notebook is not on turn it on 2 If you normally press the wireless on off button on the front of the notebook to turn wireless 802 11 communication on and off press the ...

Страница 55: ... reside on other network notebooks 2 To turn off the wireless 802 11 communication without turning off the notebook press the wireless on off button or Right click the wireless network connection icon in the taskbar then select Disable Putting the notebook in Standby or shutting it down also turns off the wireless function ...

Страница 56: ...4 10 Reference Guide Modem and Network Connections ...

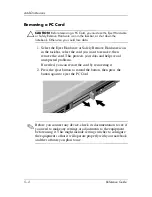
Страница 57: ...e location and number of the PC Card slots vary by model series Inserting a PC Card 1 Hold the PC Card label side up and its connectors facing the card slot 2 Aligning the PC Card along the bottom of the slot slide the PC Card until it is seated Most cards are properly seated when the outer edge is flush with the casing of the notebook but some cards are designed to protrude from the case ...

Страница 58: ... remove then remove the card This protects your data and helps avoid unexpected problems If needed you can restart the card by reinserting it 2 Press the eject button to extend the button then press the button again to eject the PC Card Before you connect any device check its documentation to see if you need to make any settings or adjustments to the equipment before using it This might include se...

Страница 59: ...he headphone and line in jacks are three terminal stereo jacks They are not compatible with two terminal mono plugs Connecting a mono plug into either of these jacks may damage the notebook When you plug a device into the headphone port the built in speakers automatically turn off 1 External microphone connector pink 2 Audio out headphones connector green ...

Страница 60: ...the S Video cable is not plugged into your notebook and TV the red button will not be displayed 4 Select Apply to accept the changes 5 If you are prompted to restart Windows select Yes Adjusting Monitor Resolution and Other Settings 1 Select Start Control Panel Appearance and Themes Display 2 On the Settings tab adjust the Screen area Other settings are also available If you need to increase the r...

Страница 61: ...is reason higher resolutions and higher numbers of colors may cause unexpected behavior on the displays Try starting with 1024 768 resolution on the external display and 64 K colors 16 bit on both displays You can then try higher settings to see whether they work for your applications In addition certain operations such as playing DVDs and running 3D graphics require extra video memory so you may ...

Страница 62: ... and other notebooks Attach the device cable to the 1394 port Windows automatically recognizes the device The 1394 port is a 4 wire port If you want to connect a device that has a 6 wire plug you can purchase a simple adapter if the device is unpowered or a hub if the device requires power If you have problems making this connection go to the device manufacturer Web site for the latest version of ...

Страница 63: ...e permanently damaged by it Handle the RAM module only by its edges Before installing the memory module discharge static electricity by touching the metal shielding around the connectors on the back of the notebook 1 Save your work and shut down the notebook If you are not sure whether the notebook is off or in Hibernation briefly press the power button If your work returns to the screen save your...

Страница 64: ...your notebook to the following illustration Insert the RAM board into the connector at about a 30 degree angle until it is fully inserted Then press down at both sides until both latches snap closed 7 Replace the cover 8 Insert the battery pack ...

Страница 65: ...RAM module only by its edges Before installing the memory module discharge static electricity by touching the metal shielding around the connectors on the back of the notebook 1 Save your work and shut down the notebook If you are not sure whether the notebook is off or in Hibernation briefly press the power button If your work returns to the screen save your work exit all applications and then sh...

Страница 66: ...e screws holding the RAM cover then remove the cover 6 Match your notebook to the following illustration Release the 2 latches at the sides of the RAM board so the free edge of the board pops up 7 Pull the board out of the connector 8 Replace the cover 9 Insert the battery pack ...

Страница 67: ...evices connected to the notebook 3 Disconnect the power cord 4 Remove the battery pack 5 Turn the unit bottom side up 6 Match your notebook to the following illustration Use a pointed tool to remove the plugs from the 2 or 3 screw holes then remove the screws The number of screws varies by model 7 Gently pull the hard drive out of the notebook 8 Gently slide the new drive into the hard drive compa...

Страница 68: ...e drive out of the holder 2 Notice that the hard drive has a pin connector attachment at one end Carefully remove this connector from the end of the drive Work alternately at each end so that the connector slides off evenly without bending the connector pins 3 Carefully put the pin connector attachment back onto the pins on the end of the new hard drive Work alternately at each end so that the con...

Страница 69: ...ew hard drive you also need to prepare it to be able to work with your notebook If you want to restore the Windows software and operating system that were originally installed on your notebook follow the system recovery procedures described in the Troubleshooting chapter of this guide ...

Страница 70: ...5 14 Reference Guide Add On Devices ...

Страница 71: ...n the order in which they are presented Here are some other sources of information for troubleshooting Use the Windows troubleshooters Select Start Help and Support Select the question mark One Touch key located at the top of the keyboard See the Microsoft Windows manual shipped with the notebook Refer to the Worldwide Telephone Numbers booklet to contact customer service for help and support ...

Страница 72: ...r full use of sound capabilities If Sound Does Not Record Plug in an external microphone The notebook does not have a built in microphone Check the software controls for recording sound by selecting Start All Programs Accessories Multimedia or Entertainment Sound Recorder In Volume Control select Option Properties and make sure the microphone is enabled in the recording controls If You Hear Loud H...

Страница 73: ...D Plays Erratically Dirt or smudges can cause a disc to skip Clean the disc with a soft cloth If the disc is badly scratched it will probably have to be replaced If you are playing the DVD on battery power try changing the power scheme If You Get a Region Code Error When Playing a DVD Movie DVDs can have regional codes embedded in the disc data These codes prevent DVD movies from being played outs...

Страница 74: ... Not Fill the Screen Each side of a double sided DVD has a different format standard or widescreen In widescreen format black bands appear at the top and bottom of the screen To view the standard format flip the disc over and play the other side Display Problems If the Notebook Is On But the Screen Is Blank Move the mouse or tap the TouchPad This will wake the display if it is in Display off mode ...

Страница 75: ...tor Select the external monitor as the primary display device in the display properties Continue to toggle Fn F5 until the external display is enabled Hard Drive Problems If the Notebook Hard Drive Does Not Spin Make sure the notebook has power If necessary connect the AC adapter and make sure it is fully plugged into a power source and into the back of the notebook Remove and reinsert the hard dr...

Страница 76: ...ll the original factory software using the system recovery features described in this guide Heat Problems Your notebook normally gets warm during routine operation If the Notebook Gets Abnormally Hot Always set the notebook on a flat surface so that air can flow freely around and underneath it Make sure the air vents on the bottom and sides of the notebook are clear Keep in mind that games and oth...

Страница 77: ...Pad Does Not Work Press the TouchPad on off button to turn on the light Do not touch the TouchPad while the notebook is rebooting or resuming from Standby mode If you do try the following press a key on the keyboard to restore normal operation If an external mouse is connected the built in pointing devices are normally disabled You can change this setting with the BIOS Setup utility See Configurin...

Страница 78: ...l Performance and Maintenance System 2 If the network interface is disabled try to enable it If it has a conflict try disabling another device If You Cannot Browse the Network Neighborhood or My Network Places Select Start Search Notebooks or People to look for a notebook If You Cannot Log In to Netware Servers If a Netware server is using IPX SPX protocol you may need to force your frame type to ...

Страница 79: ...ftware troubleshooter in Windows Help The full amount of RAM in your notebook is not available for running applications A certain amount of RAM is used for display memory The amount of display memory is shown in the BIOS Setup utility If Memory Does Not Increase After Adding RAM Make sure your notebook is using only PC2100 DDR 266 MHz or higher memory RAM modules If the Notebook Beeps But Does Not...

Страница 80: ...s similar to static Eliminate extra connections in the line If possible connect directly to the wall jack Try another telephone line preferably one normally used for a fax machine or modem If the Modem Does Not Dial or No Dial Tone Is Detected Check all cables and connections Connect a standard telephone to the phone line and make sure the line is working Make sure someone else is not using the sa...

Страница 81: ...disable it Your telephone company can provide instructions If the Modem Dials But Does Not Connect Make sure you are using an analog telephone line 2 3 or 4 wires You must not use a digital line In a hotel ask for a data line Try another telephone line preferably one normally used for a fax machine or modem The modem at the other end may have a problem Try dialing to a different modem If the Modem...

Страница 82: ... modems Try a different phone line or dial a different server number If the Modem Causes an ERROR Message A string of AT commands may contain an incorrect command If you entered commands as extra settings for the modem in Control Panel or in your communications software check the commands If the Modem Does Not Fax If you are using fax Class 2 in the fax software try using Class 1 Close any other c...

Страница 83: ...Card Restart the notebook by selecting Start Turn Off Computer Restart Try the card in another notebook to see whether the card functions properly Zoomed Video is not supported If the card requires an IRQ make sure one is available Open the hardware Device Manager Select Start Control Panel Performance and Maintenance System If a Network PC Card Stops Communicating Properly The card may have been ...

Страница 84: ...s scanning program can affect performance Press ctrl alt del and use Task Manager to see if an application is not responding Restart the notebook by selecting Start Turn Off Computer Restart Some file browsers respond slowly while processing graphics or waiting for broken network connections to time out If the notebook hard drive frequently runs as indicated by the hard drive light on the front of...

Страница 85: ...graphic intensive applications are running Power and Battery Pack Problems If the Notebook Turns Off Immediately After It Turns On Battery power is probably extremely low Plug in the AC adapter or insert a charged battery pack If the Notebook Keeps Beeping The notebook beeps repeatedly or displays a warning when battery power is low Save your work shut down Windows immediately and insert a charged...

Страница 86: ...ed save time to reduce hard disk access If the operating time has gradually become shorter and the battery pack is more than a year or two old you may need to replace the battery pack Heavy modem use can impact battery operating time PC Card use can impact battery operating time Test and recondition the battery pack every 3 months If the Time Remaining for the Battery Pack Is Not Correct The Time ...

Страница 87: ...Power Schemes tab Make sure the Hibernation timeouts for both AC power and battery power are not set to Never Printing Problems You will be able to solve most printing problems by using the Print troubleshooter in Windows Help Select Start Help and Support If a Serial or Parallel Printer Does Not Print Make sure the printer is on and has paper in it Make sure you are using the correct printer cabl...

Страница 88: ...the USB port Check the port settings in Control Panel Open the hardware Device Manager then select Ports COM LPT If a Serial Modem Does Not Work Properly Make sure the port connection is secure Use the Modem troubleshooter in Windows Help Select Start Help and Support In Control Panel open Phone and Modem Options and check the modem settings Disable the internal modem 1 Open the hardware Device Ma...

Страница 89: ...spond When You Turn It On Connect the AC adapter Reset the notebook by inserting the tip of a paper clip into the reset button on the bottom of the notebook Then press the power button to turn it on If the notebook still does not respond remove the battery pack and AC adapter remove any PC Cards and undock the notebook if docked Then plug in the AC adapter again and reset the notebook using the re...

Страница 90: ...e under Removable Drive If the Notebook Stops Responding After Booting Check whether you are connected to a TCP IP network with no DHCP server This can cause a long delay at startup because DHCP is enabled Contact your network administrator to determine the proper TCP IP configuration If the Notebook Takes a Long Time to Resume After Entering Standby The notebook can routinely take a minute or mor...

Страница 91: ...etwork resources your notebook may not have been assigned an IP address If the subnet mask for your wireless connection is 255 255 000 000 the network server did not assign an IP address to your notebook and you may have to release and renew your network IP address If releasing and renewing the IP address does not fix the problem the access point may need to be rebooted If you want to change the S...

Страница 92: ...k on the Network Make sure the notebook is properly connected to the network Make sure your TCP IP setup is correct for your network by selecting Start Control Panel Network Connections If You Can Connect But the Network Is Slow Check whether you might be in an area served by more than one wireless LAN If so the LANs could be interfering with each other Move closer to the access point for an infra...

Страница 93: ...ook operates 1 Select Start Turn Off Computer Restart 2 When the logo screen appears press F2 to enter BIOS Setup 3 The pointing devices are not active in BIOS Setup so you will need to use the keyboard to navigate Press the left and right arrow keys to move among menus Press the up and down arrow keys to move among parameters in a menu Press or to move through values for the current parameter or ...

Страница 94: ...e Sets the language for BIOS Setup Detected automatically Internal Hard Disk Sets the hard drive type and various parameters Detected automatically UMA Video Memory Sets the video memory size allocated from total installed memory RAM Auto Memory Shows the extended memory size Detected automatically Serial Number Displays the serial number as shown on the back of the unit Detected automatically Ser...

Страница 95: ...ected Auto External Pointing Device Disables the internal pointing devices when an external pointing device is connected Auto Legacy USB Support Enables BIOS support for USB mouse keyboard and diskette disk drive during startup Enabled Wake On LAN from Power Off Lets the notebook be turned on via the LAN port If this option is enabled the notebook uses increased power while it is shut down Disable...

Страница 96: ...ters Enter Set Administrator Password Press enter to set change or clear the administrator password which protects BIOS Setup settings The password can have no more than 8 characters 0 9 A Z and cannot include special or accented characters Enter Require Password on Boot Sets whether a user password is required when the notebook boots Requires the administrator password for changes Disabled Intern...

Страница 97: ...nned Built in LAN provides diskless boot from a network server 1 Hard Drive 2 Removable devices 3 CD ROM Drive 4 Built in LAN Exit Menu Setting Description Default Save Changes and Exit Saves Setup changes then exits and reboots Discard Changes and Exit Discards any Setup changes made since last save then exits and reboots Does not affect password date or time changes Get Default Values Restores d...

Страница 98: ...lution consists of the following restore CDs Operating System CD Driver Recovery CD Application Recovery CDs Third party CDs for software included on select models Please refer to Microsoft operating system OS documentation and Web site for specific information regarding Repairing missing or damaged OS files Adding or removing Windows components Creating System Restore Points The Operating System ...

Страница 99: ...You should periodically set personal restore points when the notebook is functioning at optimal performance and before installing new software or devices This enables you to return to a previous configuration restore point if you encounter problems To set a system restore point 1 Select Start Help Support Select the task Use Tools to view your computer information and diagnose problems Select Syst...

Страница 100: ...urn on the notebook 2 Immediately insert the OS CD into the notebook 3 Press and hold the power button for 5 seconds to turn off the notebook 4 Press the power button again to start the notebook 5 When prompted press any key to boot from CD After a few minutes the Welcome to Setup screen is displayed 6 Press enter to continue A Licensing Agreement screen is displayed 7 Press F8 to accept the agree...

Страница 101: ...nnect the notebook to external power and turn on the notebook 2 Immediately insert the OS CD into the notebook 3 Press and hold the power button for 5 seconds to turn off the notebook 4 Press the power button again to start the notebook 5 When prompted press any key to boot from the CD After a few minutes the Welcome to Setup screen opens 6 Press enter to continue A Licensing Agreement screen is d...

Страница 102: ...ver Recovery CD with the OS CD for hardware driver and system utility refresh and for full system software restoration To reinstall drivers 1 While running Windows insert the Driver Recovery CD into the optical drive 2 If you do not have Autorun enabled select Start Run Then type D SWSETUP APPINSTL SETUP EXE where D indicates the optical drive 3 Select the desired driver s or system utility from t...

Страница 103: ...mute button 1 3 port locations 5 3 troubleshooting 6 2 volume control location 1 3 B back panel components 1 3 battery packs checking battery status 1 5 3 4 creating power schemes 3 3 disposal and recycling 3 8 disposing of 3 8 extending life of 3 6 installing 1 7 location 1 2 low battery warning 3 5 recharging 3 5 release latch 1 4 saving power automatically 3 2 saving power manually 3 3 status l...

Страница 104: ...t panel 1 3 status lights 1 1 configuring modem 4 4 notebook 6 23 connecting 1394 device 5 6 AC power 1 8 audio device 5 3 external devices 5 1 local area network LAN 4 5 phone line 1 9 wireless network 4 7 connectors audio 1 3 RJ 11 modem 1 3 RJ 45 network 1 3 security 1 3 S Video out 1 3 D decreasing display brightness 2 6 display adjusting brightness 2 6 adjusting settings 5 4 cleaning 2 17 ext...

Страница 105: ...ightness 2 6 inserting battery pack 1 7 CD 2 10 DVD 2 10 PC Card 5 1 RAM memory 5 7 K keyboard status lights 1 2 1 6 troubleshooting 6 7 keys ALT GR 2 9 Applications 2 8 Fn Function 2 6 Windows 2 8 L LAN local area network connection 4 5 troubleshooting 6 8 using a wireless adapter 4 6 left panel components 1 3 locking hard drive 2 15 notebook 2 13 low battery warning 3 5 M maintenance and care 2 ...

Страница 106: ...3 power button 1 2 1 10 manage consumption automatically 3 2 manage consumption manually 3 3 mode status light 1 5 settings 2 2 troubleshooting 6 15 power saving modes 3 3 printing troubleshooting 6 17 protecting data 2 17 hard drive 2 16 R RAM cover 1 4 installing 5 7 removing 5 9 troubleshooting 6 9 recharging the battery pack 3 5 reinstalling operating system 6 31 software 6 32 removing CD 2 10...

Страница 107: ...d CardBus 1 3 software restoring 6 32 Standby mode 2 2 startup troubleshooting 6 19 status lights battery charge 1 5 hard drive 1 5 keyboard 1 2 1 6 location 1 2 main 1 2 1 5 meanings 1 5 wireless indicator 1 2 S Video out jack location 1 3 using 5 4 system recovery 6 28 T telephone line connection 1 9 1394 port connecting 5 6 location 1 3 toggling built in keypad 2 6 TouchPad 1 2 functions 2 5 tr...

Страница 108: ...eless network connection 4 8 U updating drivers 6 28 software 6 28 USB ports location 1 3 troubleshooting 6 19 using BIOS Setup Utility 6 23 V virus protection software 2 15 volume control 1 3 W wireless indicator light 1 2 network connection 4 7 on off button 1 2 troubleshooting 6 21 wireless network connection turning off 4 9 turning on 4 8 ...

Отзывы: