


5
GEA30580_Rev_11.15
“Two alternative curing methods are acceptable� Let
set for 1-1/2 hours minimum at room temperature
≥ 70°F or if coating is applied below 70°F, allow to
cure overnight in shop ambient temperatures (not
warehouse or outdoors)�”
Check for rotation
Complete blower build if not already assembled� Turn
over drive shaft by hand until the rotation is free� Do
not try to free up the blower by coupled or belted
drive, and do not try to spin the rotors with shop air�
Do not attempt to use any kind of solvent or cleaner
to partially remove coating, as this could ruin all the
coating�
Complete removal of coating
This is for complete removal (to bare metal) of coating
and may require some blower disassembly (depend-
ing on blower size and accessibility) for access to the
coated parts and any overspray� Apply removal fluid
liberally with a clean “soaked” rag� Vigorously rubbing
with the rag and scraping of the softened coating is
required to clean the surfaces down to bare metal�
The amount of effort required will vary depending upon
the solvent used� Protect uncoated surfaces from rust�
Because of the completely enclosed blower design,
location of the installation is generally not a critical
matter� A clean, dry and protected indoor location is
normally give satisfactory service� Important require-
ments are that the correct grade of lubrication oil be
provided for expected temperatures, for expected
temperatures, and that the blower be located so
that routine checking and servicing can be handled
conveniently after installation� The effect of the location
on driver and accessory equipment must be also be
considered�
Supervision of the installation by a Factory Service
Engineer is not usually required for these blowers�
Workers with experience in installing light-medium
weight machinery should be able to produce satisfac-
tory results� Handling of the equipment needs to be
accomplished with care, and in compliance with safe
practices� Blower mounting must be solid, without
strain or twist, and air piping mjust be clean, accurately
aligned and properly connected�
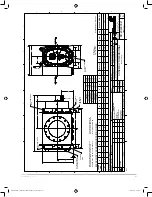
For handling the blower alone, use lifting lugs bolted
into the top of the headplates� Test them first for
tightness and fractures by tapping with a hammer� In
lifting, keep the direction of cable pull on these bolts as
nearly vertical as possible�
When blower is furnished mounted on a baseplate,
with or without a driver, use of lifting slings passing
under the base flange is required� Arrange these slings
so that no strains are placed on the blower casing,
mounting feet, or on any mounted accessory equip-
ment�
DO NOT use the lifting lugs in the top of the
headplates.
Before starting the installation, remove plugs, covers
or seals from blower inlet and discharge connections
and inspect the interior the interior completely for dirt or
foreign material� Anti-rust compound on the connection
flanges and drive shaft extension may also be removed
by this time with solvent� Then cover the flanges again
to keep out dirt until ready to connect the air piping�
The corrosion inhibitor used will vaporize and disappear
during operation�
Care, plus consideration of all possible problems, will
pay dividends when arranging the blower mounting�
This is especially true when the blower is a “bare” unit,
furnished without a baseplate� The convenient proce-
dure may be to mount such a unit directly on a floor or
small concrete pad but this generally produces the least
satisfactory results� It causes the most problems in
leveling and alignment�
Direct use of structural framing members is also not a
recommended mounting� If unavoidable, the members
must be rigidly reinforced when part of a building,
and spring type mountings should not be use� Noise
transmission can usually be reduced by use of a cork
insulating pad 1 to 2 inches (35 to 50 mm) thick� The
pad should be supported by a full steel plate attached
to the structure, with a rigid concrete slab on top of
the cork to carry the blower and driver�
For a blower without a base, it is recommended that
a well-anchored and carefully leveled steel or cast iron
mounting plate be provided at the installation point�
The plate should be at least 1 inch (925 mm) thick,
with its tip surface machined flat, and large enough
to provide leveling areas at one side and one end
after the blower is mounted� It should have properly
sized studs or tapped holes located to match the
blower foot drilling� As an alternative, smaller plates
at each end of the blower may be used� This is more
complicated, usually makes leveling more difficult and
can produce twist or strains in the blower� Use of a
high quality machinist’s level is important�
GEA30580 Roots 827 DVJ IOM Manual_rev.02.16.indd 5
15/02/2016 12:15:34


