background image

GB

3

PLEASE PHONE US TO REGISTER YOUR APPLIANCE AND ACTIVATE YOUR PARTS GUARANTEE ON 08448 24 24 24

Electrical connection

The electrical connection to the mains must be made
on the appliance.  The power voltage and frequency
are as indicated on the rating plate.

! THIS APPLIANCE MUST BE EARTHED.

THIS APPLIANCE MUST BE EARTHED.

THIS APPLIANCE MUST BE EARTHED.

THIS APPLIANCE MUST BE EARTHED.

THIS APPLIANCE MUST BE EARTHED.

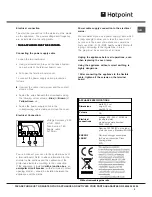
Connecting the power supply cable

To open the terminal board:

• Using a screwdriver, press on the tabs situated

on each side of the terminal board cover.

• Pull open the terminal board cover.

To connect the power supply cable, proceed as
follows:

• Unscrew the cable clamp screw and the contact

screws L-N-

.

• Fasten the wires beneath the screwheads using

the following colour scheme: 

Blue

(N)

Brown

(L)

Yellow-Green

• Fasten the power supply cable in the

corresponding cable clamp and close the cover.

Electrical Connection:

Voltage Frequency: 230
V-1+N  50Hz
Fuse Section: 16A
Supply cable:
3x1.5mm

2

You can connect your oven to the system means of
a terminal board. Refer to above information for the
minimal cable sections and the calibration of the
protective elements according to the connection.
If the appliance is installed 

with a junction box

, an

omnipolar circuit breaker

 - with a minimum contact

opening of 3mm - should be installed between the
appliance and the mains.

Power cable supply connection to the electrical
mains:

We recommend you use a power supply cable which
is long enough to allow you to take the oven out of
its recess in the event of maintenance operations
(only use HAR - H 05 - RRF quality cables fitted with
a plug conforming to the regulations in force.
The plug must be accessible at all times.

Unplug the appliance before all operations, even
when replacing the oven lamp.

Using the appliance without correct earthing is
highly dangerous.

! After connecting the appliance to the flexible
cable, tighten all the screws on the terminal
board.

4

2

N

L

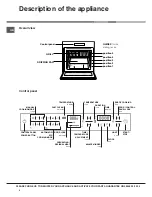
* Without removable guide rails

APPLIANCE SPECIFICATIONS

Dimensions

width 43.5 cm 
height 32 cm 
depth 41.5 cm

Volume

58 l

Electrical
connections

voltage: 230 - 240 V~ 50/60 Hz 
(see data plate) 
maximum power absorbed 
2800 - 3000 W 

ENERGY 
LAB EL*

Directive 2002/40/EC on the label 
of electric ovens. Standard EN 50304

Declared energy consumption 
for Forced convection Class – 
heating mode:
ECO.

Содержание SX 1038L PX S

Страница 1: ...ng cooking Practical cooking advice Cooking advice table Precautions and tips 11 General safety Disposal Respecting and conserving the environment Care and maintenance 12 14 Switching the appliance of...

Страница 2: ...be made of heat resistant material Cabinets with a veneer exterior must be assembled with glues which can withstand temperatures of up to 100 C To install the oven under the counter see diagram or in...

Страница 3: ...o above information for the minimal cable sections and the calibration of the protective elements according to the connection If the appliance is installed with a junction box an omnipolar circuit bre...

Страница 4: ...cks position 5 position 4 position 3 position 2 position 1 DURATION icon END OF COOKING icon DOOR LOCK indicator MANUAL COOKING MODE icons CLOCK icon MINUTE MINDER icon TIME display DOOR CONTROL PANEL...

Страница 5: ...h for 10 seconds To set the clock 1 Press the button 2 Adjust the hour figure using the and buttons 3 Once you have reached the correct hour value press the button 4 Repeat the above process to set th...

Страница 6: ...cooking the LEDs on the door light up for improved illumination of all cooking levels The button can be used to switch on the light at any time Residual heat indicators The appliance is fitted with a...

Страница 7: ...of the air throughout the oven This helps prevent food from burning on the surface and allows the heat to penetrate right into the food Always cook in this mode with the oven door closed see Practical...

Страница 8: ...re or until the dough has doubled in size Recipe for BREAD 1 Dripping pan holding 1000 g Max lower level 2 Dripping pans each holding 1000 g Max medium and lower levels Recipe for 1000 g of dough 600...

Страница 9: ...The and buttons will flash alternately to indicate that programming has taken place in the time before cooking starts the TIME display will show the duration and the cooking end time alternately 5 Onc...

Страница 10: ...no no no 40 65 90 8 12 ore 90 180 Pizza Pizza Focaccia bread 0 5 0 5 2 2 1 1 yes yes 220 200 15 20 20 25 Baking 0 5 1 0 7 0 7 0 6 0 7 0 7 0 8 0 5 0 5 2 or 3 2 or 3 2 or 3 2 and4 2 or 3 1 and3 1 and3 2...

Страница 11: ...o circumstances should you attempt to perform the repairs yourself Contact an authorised Service Centre see Assistance Do not rest objects on the open oven door Do not let children play with the appli...

Страница 12: ...ommend that detergents are not sprayed directly onto the control panel but that a sponge is used instead Never use steam cleaners or pressure cleaners on the appliance Cleaning the oven door The door...

Страница 13: ...anel on by pressing the D B C Left guide rail Right guide rail Direction of extraction button 2 Press the button the TIME display will show the default duration of 1 30 h normal cycle while he TEMPERA...

Страница 14: ...ff this indicates the oven temperature has dropped to an acceptable level You will notice some white dust deposits on the bottom and the sides of your oven remove these deposits with a damp sponge onc...

Страница 15: ...y Clock button is lit The appliance is in standby mode Press any button to exit standby mode An automatic mode has been selected Hot appears on the display and cooking does not start The temperature i...

Страница 16: ...d and functioning efficiently throughout its life UK 08448 225 225 Republic of Ireland 0818 313 413 www hotpointservice co uk Appliance Registration We want to give you additional benefits of Hotpoint...

Страница 17: ...ortation improper use neglect or interference or as a result of improper installation Replacement of any consumable item or accessory These included but not limited to plugs cables batteries light bul...

Страница 18: ...18 GB PLEASE PHONE US TO REGISTER YOUR APPLIANCE AND ACTIVATE YOUR PARTS GUARANTEE ON 08448 24 24 24...

Страница 19: ...GB 19 PLEASE PHONE US TO REGISTER YOUR APPLIANCE AND ACTIVATE YOUR PARTS GUARANTEE ON 08448 24 24 24...

Страница 20: ...20 GB PLEASE PHONE US TO REGISTER YOUR APPLIANCE AND ACTIVATE YOUR PARTS GUARANTEE ON 08448 24 24 24 09 2011 195095438 00 XEROX FABRIANO...

Отзывы: