background image

EN

7

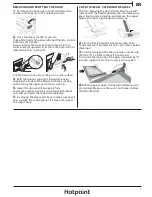
REMOVING AND REFITTING THE DOOR

1.

 To remove the door, open it fully and lower the 

catches until they are in the unlock position.

2.

 Close the door as much as you can. 

Take a firm hold of the door with both hands – do not 

hold it by the handle.

Simply remove the door by continuing to close it 

while pulling it upwards (a) at the same time until it is 

released from its seating (b).

~60°

a

b

~15°

Put the door to one side, resting it on a soft surface.

3.


Refit the door by moving it towards the oven, 

aligning the hooks of the hinges with their seating 

and securing the upper part onto its seating.

4.

 Lower the door and then open it fully.

Lower the catches into their original position: Make 

sure that you lower them down completely.

5.

 Try closing the door and check to make sure that it 

lines up with the control panel. If it does not, repeat 

the steps above.

CLICK TO CLEAN - CLEANING THE GLASS

1.

 After removing the door and resting it on a soft 

surface with the handle downwards, simultaneously 

press the two retaining clips and remove the upper 

edge of the door by pulling it towards you.

2.

 Lift and firmly hold the inner glass with both 

hands, remove it and place it on a soft surface before 

cleaning it.

3.

 To correctly reposition the inner glass, make sure 

that the “R” is visible in the left-hand corner.

First insert the long side of the glass indicated by “R” 

into the support seats, then lower it into position.

4.

 Refit the upper edge: A click will indicate correct 

positioning. Make sure the seal is not broken before 

refitting the door.

Содержание SA3330HIX

Страница 1: ...t is currently active 3 THERMOSTAT KNOB Turn to select the temperature you require 4 THERMOSTAT PREHEATING LED This will light up while the oven is preheating and will go out once the oven has reached...

Страница 2: ...hased Other accessories can be purchased separately from our After sales Service INSERTING THE WIRE SHELF AND OTHER ACCESSORIES Insert the wire shelf onto the level you require by holding it tilted sl...

Страница 3: ...t any time turn the selection knob and the thermostat knob to the position to switch the oven off DIAMOND CLEAN FUNCTION To use the Diamond Clean cleaning function pour 200 ml of drinking water onto t...

Страница 4: ...read loaf 80 g Yes 180 200 30 45 3 Sliced bread 500 g Yes 180 50 70 3 Bread Yes 180 200 30 80 4 2 Frozen pizza Yes 250 10 20 3 Yes 230 250 10 25 4 2 Savoury bakes vegetable pie quiche Yes 180 200 30 4...

Страница 5: ...mburgers 5 mins 250 15 30 5 4 Vegetable gratin 5 mins 250 5 15 4 Meat and potatoes Yes 190 200 45 100 4 1 Fish and vegetables Yes 180 30 50 4 2 Lasagne and meat Yes 200 50 100 4 1 Complete meal fruit...

Страница 6: ...e wire wool abrasive scourers or abrasive corrosive cleaning agents as these could damage the surfaces of the appliance LOWERING THE UPPER HEATING ELEMENT 1 Pull the heating element out a little and l...

Страница 7: ...ginal position Make sure that you lower them down completely 5 Try closing the door and check to make sure that it lines up with the control panel If it does not repeat the steps above CLICK TO CLEAN...

Страница 8: ...d the Use and Care Guide from our website docs hotpoint eu you can use this QR Code specifying the product s commercial code Alternatively contact our Client After sales Service CONTACTING OUR AFTER S...

Отзывы: