background image

24

GB

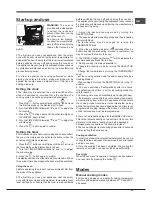
In the BARBECUE mode, the default power level value is 

indicated as a percentage (%) And may also be adjusted 

manually.


MULTILEVEL

 mode

All heating elements and the fan are activated. Since the 

heat remains constant throughout the oven, the air cooks 

and browns food in a uniform manner. A maximum of two 

racks may be used at the same time.


BARBECUE 

mode

The top heating element is activated. By turning the 

THERMOSTAT knob, the different power levels which may 

be set will appear on the DISPLAY; these range between 

5% and 100%. The high and direct temperature of the grill 

is recommended for food which requires a high surface 

temperature. Always cook in this mode with the oven door 

closed.


GRATIN 

mode

The top heating element is activated and the fan begins to 

operate. During part of the cycle the circular heating element 

is also activated. This combination of features increases the 

effectiveness of the unidirectional thermal radiation provided 

by the heating elements through forced circulation of the 

air throughout the oven. 

This helps prevent food from burning on the surface and 

allows the heat to penetrate right into the food. Always cook 

in this mode with the oven door closed.


LOW TEMPERATURE 

modes

This type of cooking can be used for proving, defrosting, 

preparing yoghurt, heating dishes at the required speed 

and slow cooking at low temperatures. The temperature 

options are: 40, 65, 90 °C.

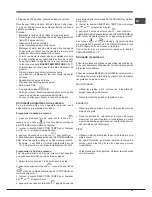
Spit roast (only available in certain models)

This accessory should only be used when cooking with 

the grill. Proceed as follows: thread the meat you wish to 

cook onto the rod positioned across the oven lengthwise, 

fixing it in place with the adjustable forks supplied. Position 

supports “

A

” and “

B

” in the relevant holes in dripping pan 

E

”, rest the groove on the rod in slot “

C

” and use the guide 

rail to place the rack in the lowest position in the oven; next 

position the rod in the rotisserie spit hole, sliding the groove 

forwards to slot “

D

” (see figures). Start the rotisserie using 

the SELECTOR knob set to cooking mod 

 or 

;

Automatic cooking modes

!

 The 

temperature are pre-set values

, guaranteeing a 

perfect result every time - automatically. These values 

cannot be adjusted and use the 

C.O.P.® (Programmed 

Optimal Cooking)

 system. The cooking cycle stops 

automatically and the oven indicates when the dish is 

cooked. You may start cooking whether the oven has 

been 

preheated

 or 

not

; we recommend that you follow the 

guidelines provided by the 

 icon when deciding on which 

shelf to place the tray.

!

 When the cooking stage has been reached, the oven 

buzzer sounds.

!

 Do not open the oven door as this will disrupt the cooking 

time and temperature.


GRILL 

mode

Use this function to cook beef, pork and lamb. Place the 

loaves inside the oven while it is still cold. The dish may 

also be placed in a preheated oven.

!

 The cooking duration may be changed by ±10 minutes.


PIZZA 

mode

Use this function to make pizza. Please see the following 

chapter for the recipe and further details.

!

 The cooking duration may be changed by ±5 minutes.


BREAD 

mode

Use this function to make bread. Please see the following 

chapter for the recipe and further details.


BAKING 

mode

This function is ideal for cooking desserts which are made 

using natural yeast, baking powder and desserts which 

contain no yeast. Place the dish in the oven while it is still 

cold. The dish may also be placed in a preheated oven.

!

 The cooking duration may be changed by ±10 minutes.


PIZZA 

mode

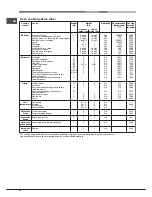
To obtain the best results, we recommend that you carefully 

observe the instructions below:

•  Follow the recipe.

•  The weight of the dough should be between 500 g and 

700 g.

•  Lightly grease the dripping pan.

Recipe for PIZZA:

1 dripping pan on a low shelf level, hot or cold oven

Recipe for 3 pizzas weighing approximately 550 g: 1000 g 

flour, 500 ml water, 20 g salt, 20 g sugar, 100 ml olive oil, 

20 g fresh yeast (or 2 sachets of powder yeast)

•  Leavening at room temperature: 1 hour.

•  Place inside hot or cold oven.
•  Start the 

 PIZZA cooking mode.

Содержание MH 99.1 /HA S

Страница 1: ...llation 21 Start up and use 23 Modes 23 Precautions and tips 27 Maintenance and care 27 Sommaire Mode d emploi 1 Avertissements 3 Assistance 7 Description de l appareil 9 Description de l appareil 10...

Страница 2: ...r tes 11 Installation 53 Inbetriebsetzung und Gebrauch 55 Programme 56 Vorsichtsma regeln und Hinweise 59 Reinigung und Pflege 60 Inhoud Gebruiksaanwijzing 2 Belangrijk 5 Service 8 Beschrijving van he...

Страница 3: ...do si inserisce la griglia assicurarsi che il fermo sia rivolto verso l alto e nella parte posteriore della cavit Warnings WARNING The appliance and its accessible parts become hot during use Care sho...

Страница 4: ...to es importante evitar tocar los elementos calentadores Mantengaalejadosalosni osmenoresde 8 a os si no son continuamente vigilados Elpresenteaparatopuedeserutilizadopor ni os mayores de 8 a os y por...

Страница 5: ...en ausreichend berwachtodersiewurdenindensicheren Gebrauch des Ger ts eingewiesen und haben eine ausreichende Wahrnehmung der mit dem Gebrauch des Ger ts verbundenen Gefahren Erlauben Sie Kindern nich...

Страница 6: ...lazen deur van de oven te reinigen aangezien deze het oppervlak zouden kunnen krassen en als gevolg het glas doen verbrijzelen Gebruik nooit huishoudapparaten met stoom of hoge druk voor het reinigen...

Страница 7: ...08 00 alle 18 30 il Sab dalle 08 00 alle 13 00 e di 5 58 centesimi di Euro al minuto iva inclusa dal Lun al Ven dalle 18 30 alle 08 00 il Sab dalle 13 00 alle 08 00 e i giorni festivi per chi chiama...

Страница 8: ...meros Nestes casos ser necess ria uma interven o da assist ncia t cnica Nunca recorra a t cnicos n o autorizados Comunique o tipo de avaria o modelo da m quina Mod o n mero de s rie S N Estas ltimas...

Страница 9: ...d ensemble 1 Tableau de bord 2 Vitre porte du four Descripci n del aparato Vista en conjunto 1 Panel de control 2 Cristal puerta forno Descri o do aparelho Vista de conjunto 1 Painel de comandos 2 Vi...

Страница 10: ...n 3 TIMER knob 4 SELECTOR knob 5 THERMOSTAT knob 6 LIGHT Button Display 7 AUTOMATIC ECO COOKING MODE icons 8 TEMPERATURE and TIME digits 9 CLOCK Icon 10END OF COOKING Icon 11DURATION Icon 12TIMER Icon...

Страница 11: ...dos TEMPOS 4 Selector PROGRAMAS 5 Selector do TERM STATO 6 Tecla LUZ do FORNO Display 7 cone de PROGRAMAS AUTOM TICOS 8 D gitos TEMPERATURA e TEMPOS 9 cone REL GIO 10 cone FIM DA COZEDURA 11 cone DUR...

Страница 12: ...PROGRAMMI 5 THERMOSTAATKNOP 6 Ovenverlichting Display 7 Symbolen AUTOMATISCHE PROGRAMMA S 8 Cijfers TEMPERATUREN en TIJDEN 9 Symbool KLOK 10Symbool EINDE BEREIDING 11Symbool DUUR 12Symbool TIMER 13Aan...

Страница 13: ...ra di 120 C In conformit alle norme di sicurezza una volta incassato l apparecchio non debbono essere possibili eventuali contatti con le pareti elettriche Tutte le parti che assicurano la protezione...

Страница 14: ...tra la presa e la spina dell apparecchio fare sostituire la presa con altra di tipo adatto da personale professionalmente qualificato Quest ultimo in particolare dovr anche accertare che la sezione d...

Страница 15: ...o si spegne l indicatore del preriscaldamento e si avverte un segnale acustico il preriscaldamento completo introdurre gli alimenti 4 Il DISPLAY visualizza l icona che consiglia il livello sul quale p...

Страница 16: ...dall icona Al raggiungimento della fase di cottura il forno emette un segnale acustico Non aprite la porta forno per evitare di falsare i tempi e le temperature di esecuzione delle cotture Programma C...

Страница 17: ...solo dopo aver impostato una durata di cottura 1 Seguire la procedura da 1 a 3 descritta per la durata 2 poi premere il tasto finch non lampeggiano l icona e i due digit numerici sul DISPLAY 3 ruotare...

Страница 18: ...1 1 e 3 1 e 3 1 e 3 1 e 3 3 3 3 3 2 o 3 3 3 3 3 2 2 2 2 2 2 2 2 2 2 2 2 2 2 Peso Kg Alimenti Pizza su 2 ripiani Crostate su 2 ripiani torte su 2 ripiani Pan di spagna su 2 ripiani su leccarda Pollo ar...

Страница 19: ...ssere messo in funzione per mezzo di un temporizzatore esterno oppure di un sistema di comando a distanza separato Smaltimento Smaltimento del materiale di imballaggio attenersi alle norme locali cos...

Страница 20: ...he la sede D sia agganciata perfettamente al bordo della feritoia muovere leggermente la porta avanti ed indietro Tenere la porta completamente aperta sganciare le 2 levette B verso il basso quindi ch...

Страница 21: ...neered wood units glues must be resistant to a temperature of 120 C In accordance with safety standards once the appliance has been mounted there must be no possible contact with electrical parts Any...

Страница 22: ...cket and appliance plug are not compatible have the socket replaced with a suitable model by a qualified technician The latter in particular will also have to ensure that the cross section of the sock...

Страница 23: ...he room is well ventilated before switching the oven off and opening the oven door The appliance may emit a slightly unpleasant odour caused by protective substances used during the manufacturing proc...

Страница 24: ...in the rotisserie spit hole sliding the groove forwards to slot D see figures Start the rotisserie using the SELECTOR knob set to cooking mod or Automatic cooking modes The temperature are pre set val...

Страница 25: ...he duration 3 Press the button again to confirm 4 When the set time has elapsed the text END appears on the DISPLAY the oven will stop cooking and a buzzer sounds For example it is 9 00 a m and a time...

Страница 26: ...e rails 1 and 3 1 and 3 1 and 3 1 and 3 1 1 1 1 and 3 1 and 3 1 and 3 1 and 3 3 3 3 3 2 or 3 3 3 3 3 2 2 2 2 2 2 2 2 2 2 2 2 2 2 Weight Kg Foods Pizza on 2 racks Pies on two racks cakes on 2 racks Spo...

Страница 27: ...structions relating to the operation of the appliance Do not let children play with the appliance The appliance is not intended to be operated by means of an external timer or separate remote control...

Страница 28: ...d out by removing hooks A as shown in figure To replace the door With the door in an upright position insert the 2 hooks A into the vents Make sure that slot D is perfectly fastened to the edge of the...

Страница 29: ...ster une temp rature de 120 C Conform ment aux normes de s curit une fois l appareil encastr tout contact accidentel avec les composants lectriques doit tre impossible Toutes le parties assurant la pr...

Страница 30: ...essionnel du secteur En cas d incompatibilit entre la prise et la fiche de l appareil faites remplacer cette prise par une autre appropri e par un professionnel du secteur Ce dernier devra aussi v rif...

Страница 31: ...r se place en phase de pr chauffage l indicateur pr chauffage s allume Pour modifier la temp rature tourner le bouton THERMOSTAT 3 L extinction de l indicateur de pr chauffage et le d clenchement du s...

Страница 32: ...quement et le four signale que le plat est cuit L enfournement peut avoir lieu froid ou chaud pour savoir quel niveau enfourner le plat suivre les indications de niveau fournies par l ic ne Un bip sig...

Страница 33: ...Le programme s arr te automatiquement 10h15 Programmer la fin d une cuisson La programmation d une fin de cuisson n est possible qu apr s avoir s lectionn une dur e de cuisson 1 Suivre la proc dure d...

Страница 34: ...issantes 1 et 3 1 et 3 1 et 3 1 et 3 1 1 1 1 et 3 1 et 3 1 et 3 1 et 3 3 3 3 3 2 ou 3 3 3 3 3 2 2 2 2 2 2 2 2 2 2 2 2 2 2 Poids Kg Aliments Pizza sur 2 niveaux Tartes sur 2 niveaux g teaux sur 2 nivea...

Страница 35: ...rm es sur l utilisation de l appareil S assurer que les enfants ne jouent pas avec l appareil Le dispositif n est pas destin tre mis en uvre par une minuterie externe ou un syst me de t l commande s p...

Страница 36: ...u four Ouvrez compl tement la porte et soulevez les 2 leviers B comme illustr figure Fermez pr sent partiellement la porte et soulevez la en d gageant les crochets A comme illustr figure Pour remonter...

Страница 37: ...deber n ser de material resistente al calor En particular en el caso de muebles de madera revestida las colas deber n ser resistentes a la temperatura de 120 C De conformidad con las normas de segurid...

Страница 38: ...caso de incompatibilidad entre el toma de corriente y el enchufe del aparato llamar a personal t cnico para reemplazar el toma con otro adecuado El t cnico en particular deber tambi n comprobar que la...

Страница 39: ...ando el mando TERMOSTATO 3 Cuando se apaga el indicador de precalentamiento y se escucha una se al sonora el precalentamiento ha finalizado introduzca los alimentos 4 El DISPLAY visualiza el icono que...

Страница 40: ...resultado perfecto La cocci n se interrumpe autom ticamente y el horno avisa cuando la comida est lista La cocci n se puede realizar enhornando con el horno fr o o caliente para colocar la bandeja se...

Страница 41: ...grama una duraci n de 1 hora y 15 minutos El programa se detiene autom ticamente a las 10 15 horas Programar el final de una cocci n La programaci n del final de una cocci n es posible s lo despu s de...

Страница 42: ...2 2 2 2 2 2 2 2 2 2 2 2 2 2 Posici n de las bandejas Kg Alimentos Pizza en 2 niveles Tortas glaseadas en 2 niveles tortas en 2 niveles Bizcocho en 2 niveles sobre una grasera Pollo asado patatas Cord...

Страница 43: ...rato No est previsto que el aparato sea utilizado por personas incluidos los ni os con capacidades f sicas sensoriales o mentales disminuidas por personas inexpertas o que no tengan familiaridad con e...

Страница 44: ...extraer la puerta del horno Forzar la puerta hacia abajo y mantener ligeramente presionadas las dos palancas B de las dos bisagras simult neamente tal como se indica en la figura Con las dos palancas...

Страница 45: ...or Especialmente as colas dos m veis de madeira revestidos dever o ser resistentes a uma temperatura de 120 C Depois de o aparelho estar encastrado evitar contactos com as partes el ctricas conforme a...

Страница 46: ...um t cnico profissionalmente qualificado trocar a ficha por outra de tipo adequado Este t cnico dever tamb m especificamente certificar se que o di metro dos cabos da ficha seja id neo para a pot nci...

Страница 47: ...de se poss vel modificar a temperatura se rodar o selector do TERM STATO 3 Quando o indicador do pr aquecimento se desligar e se ouvir um sinal ac stico o pr aquecimento ter sido completado coloque os...

Страница 48: ...o predefinidas e n o podem ser modificadasatrav sdosistemaC O P CozeduraOptimal Programada que garante automaticamente um resultado perfeito A cozedura interrompe se automaticamente e o forno avisa q...

Страница 49: ...da uma dura o de cozedura de 1 hora e 15 minutos O programa p ra automaticamente s 10 15 Programar o fim de uma cozedura A programa o do fim da cozedura poss vel somente depois de ter definido uma dur...

Страница 50: ...1 1 e 3 1 e 3 1 e 3 1 e 3 3 3 3 3 2 ou 3 3 3 3 3 2 2 2 2 2 2 2 2 2 2 2 2 2 2 Posi o das prateleiras Alimentos Pizza em 2 prateleiras Tortas doces em duas prateleiras bolos em duas prateleiras P o de l...

Страница 51: ...que tenham recebido instru es preliminares sobre o uso do aparelho N o permita que as crian as brinquem com o aparelho O aparelho n o destinado a ser colocado em funcionamento por meio de um temporiza...

Страница 52: ...nte a porta agora ser poss vel levant la e tirar os ganchos A da maneira indicada na figura Para montar novamente a porta Com a porta na posi o vertical coloque os 2 ganchos A nos carris Certifique se...

Страница 53: ...ilen ausge schlossen sein Alle zur Sicherheit vorhandenen Teile m ssen so befestigt werden da sie ohne Zuhilfenahme eines Werkzeuges nicht entfernt werden k nnen Befestigung Stellen Sie das Ger t in d...

Страница 54: ...nstimmen sollten ist die Steckdose von einem Fachmann durch eine andere geeigneten Typs zu ersetzen Derselbe mu bei der Gelegenheit auch berpr fen da der Steckdosen Kabelquerschnitt der Leistungsaufna...

Страница 55: ...ach dessen Ablauf ein akustisches Signal ert nt Inbetriebsetzung des Backofens 1 W hlen Sie das gew nschte Garprogramm durch Drehen des Knopfes PROGRAMME aus 2 Der Backofen schaltet auf Vorheizen die...

Страница 56: ...h ngen Sie diese dann in die Halterungen ein Die Halterungen A und B in die L cher der Fettpfanne einf gen die Spie stange an ihrer Aussparung in den Sitz D einlegen den Grillrost in die unterste Ein...

Страница 57: ...swahl eines Garprogramms m glich Programmieren der Garzeit Dauer 1 Dr cken Sie mehrmals dieTaste bis auf dem DISPLAY das Symbol und die drei Digit Anzeigen blinken 2 Drehen Sie den Knopf ZEITEINSTELLU...

Страница 58: ...Spie mit Drehspie wo vorhanden Kalbs oder Rinderbraten Schweinebraten Lamm 1 5 1 1 5 1 5 1 1 1 2 2 2 2 2 2 2 2 2 2 Nein Nein Nein Nein Nein Nein Nein 210 200 210 210 210 210 210 55 60 30 35 70 80 60...

Страница 59: ...ackofent r ab Dieses Ger t ist kein Spielzeug f r Kinder Das Ger t ist nicht zur Verwendung durch Personen einschlie lich Kinder mit eingeschr nkten k rperlichen odergeistigenF higkeitenoderWahrnehmun...

Страница 60: ...enMaterialienoderscharfkantige metallische Schaber dadieseKratzeraufihrerOberfl chehinterlassenund das Zerbrechen des Glases zur Folge haben k nnen UmdenBackofenm helosgr ndlichreinigenzuk nnen kann d...

Страница 61: ...ineerd hout moet de lijm bestand zijn tegen 120 C Conform aan de electrische veiligheidsnormen mogen er als het apparaat eenmaal ge nstalleerd is geen mogelijkheden bestaan tot eventueel contact met d...

Страница 62: ...de stekker en het stopcontact niet passen dan moet de stekker vervangen worden met een passende stekker door eenbevoegdeelectricien Dezemoetvooralookcontroleren dat de doorsnede van de kabels van het...

Страница 63: ...programma door aan de knop PROGRAMMA S te draaien 2 De oven begint voor te verwarmen de aanwijzers van de voorverwarming gaan aan De temperatuur kan veranderd worden door te draaien aan de knop THERMO...

Страница 64: ...motor in werking door de keuzeknop op de positie grill of te zetten Automatische kookprogramma s De temperatuur en de duur van de bereiding zijn ingesteld en kunnen niet worden gewijzigd door het sys...

Страница 65: ...ur in te stellen 3 druk nogmaals op de toets om te bevestigen 4 als de ingestelde duur is verstreken verschijnt op het DISPLAY het woord END be indigt de oven de bereiding en klinkt een geluidssignaal...

Страница 66: ...100 100 100 100 15 20 10 15 8 10 10 15 15 20 15 20 15 20 10 12 3 5 70 80 70 80 Gratineren Gegrilde kip Inktvis Kip aan het spit indien draaispit aanwezig Eend aan het spit indien draaispit aanwezig G...

Страница 67: ...worden gebruikt door personen kinderen inbegrepen met een beperkt lichamelijk sensorieel of geestelijk vermogen of personen die niet de nodige ervaring of kennis hebben met het apparaat tenzij onder t...

Страница 68: ...hurende materialen of scherpe schrapertjes die het oppervlak zouden kunnen krassen waardoor als gevolg het glas zou kunnen barsten U kunt voor een grondige reiniging de ovendeur verwijderen Open de de...

Страница 69: ...69 KZ min 45 mm 200 2 90 2 120 4 447 mm 78 78 min 550 mm 52 472 mm 475 mm 860 mm 22 mm 895 mm 525 mm 469 mm 850 mm 3 1 5 2 H05RR F 2 3 L N N L...

Страница 70: ...70 KZ N L 3 50 220 240 50 2800 2002 40 EC EN 50304 60350 12 12 2006 2006 95 EEC 15 12 2004 2004 108 EEC 22 07 1993 93 68 EEC 2012 19 EC 59 5 32 9 39 4 78...

Страница 71: ...71 KZ 1 2 1 2 3 4 5 1 2 3 1 2 THERMOSTAT 3 4 5 THERMOSTAT 0 6 7 2 40 C 250 C BARBECUE...

Страница 72: ...72 KZ 40 65 90 C 10 10 10 500 700 1 550 3 1000 500 20 20 10 3 2 1...

Страница 73: ...73 KZ 5 1 1 1 5 1 100 2 100 1000 600 360 11 25 2 350 10 1 5 1 1 2 3 4 END 9 00 1 15 10 15 1 1 3 2 3 4 5 6 7 END 9 00 1 15 12 30 11 15 0 1 2 1 2 4 2 3 4...

Страница 74: ...0 100 100 100 100 100 100 100 100 210 200 210 210 210 210 210 20 25 30 35 20 25 65 75 45 50 30 35 35 40 20 25 10 20 20 25 20 30 15 20 10 15 8 10 10 15 15 20 15 20 15 20 10 12 3 5 70 80 70 80 50 60 30...

Страница 75: ...75 KZ 2012 19 10...

Страница 76: ...76 KZ 2 1 2 25 14 3 195101939 03 04 2013 XEROX FABRIANO...

Отзывы: